
On this page
Start here
Quick answer
Do not force a stuck double-hung sash or pull a spiral balance rod freehand. First distinguish track friction from a balance or pivot problem: debris or a dirty jamb liner can make a sash drag through its travel, while a sash that drops, rises, binds on one side, or will not stay tilted points to balance-shoe engagement or balance tension. Clean only the accessible track or liner using the window maker's care instructions and a dry lubricant such as paraffin when the instructions allow it. If the window has a spiral balance, adjust only with the correct tool, with the sash supported, both sides equally, and no more than two turns at a time as specified by the applicable manufacturer guide. Stop for a detached or uncontrolled spring, a damaged shoe or pivot, a heavy or high sash, broken glass, frame distortion, or any condition that requires removing a sash without safe support; identify the exact window model and arrange qualified window service.
Before you begin
Safety first
- This article supports ordinary-access inspection and manufacturer-approved cleaning or adjustment only. Do not force or pry the sash, grab or release a spring rod, adjust an unidentified balance, remove a loaded sash, or work at height without appropriate equipment and qualified help.
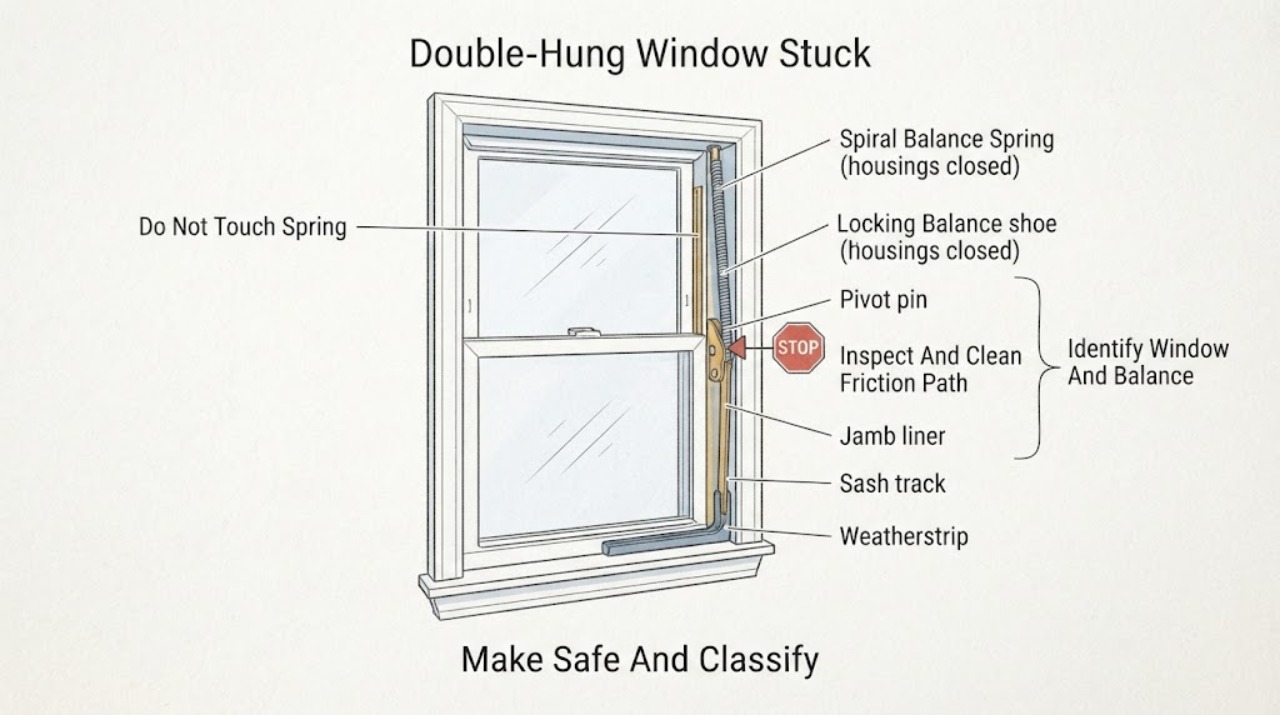
Work through in order
Diagnostic checks
Use only checks that match the exact appliance or system and its official guide.
-
Check 1
Clear the area, unlock the sash without forcing it, and support the sash with a second person or a stable support before testing a small movement. Record whether it is completely immobile, drags throughout travel, binds at one height or one side, drops when released, rises, or will not remain tilted.
Expected result: Note the sash position, direction of force needed, whether the upper and lower sashes behave differently, and any cracking, scraping, spring noise, loose hardware, or glass damage.
Next step: Continue only with ordinary-access inspection when the sash is supported and intact; otherwise leave it closed or supported and arrange window service.
Stop if: Do not pry the sash, put fingers beside a moving spring or shoe, lean out of a window, or work on a high/heavy sash without proper equipment and help.
Why this matters
Why: Uniform drag favors a liner, track, seal, paint, or installation-friction check. A drop or rise favors balance tension or shoe engagement; one-sided binding favors a pivot, shoe, liner, or frame-alignment check. A noise, loose spring, damaged glass, or uncontrolled movement makes this a stop-and-service condition.
-
Check 2
Identify the manufacturer and model from the frame, purchase records, or visible labels, then determine whether the sash tilts inward or is side-loaded. Use the matching manual to identify the balance system before removing a sash or touching a balance.
Expected result: Record tilt latches versus metal take-out clips, visible balance sleeves or rods, locking shoes, pivot pins, and any balance marking; record when the system or model cannot be identified without disassembly.
Next step: Use the exact manufacturer's repair guide for the identified system. If identity is uncertain, stop at the accessible inspection and provide photos and measurements to the manufacturer or a qualified window technician.
Stop if: Do not remove the sash just to investigate if it is heavy, above ground level, unsupported, or the balance is visibly under tension.
Why this matters
Why: A tilt sash with a visible spiral sleeve may use the procedure in its own guide, but a similar-looking sleeve can be a different balance type. A side-load, hybrid, constant-force, or block-and-tackle system requires its own instructions and is not proven to be a spiral balance by appearance alone.
-
Check 3
From safe interior access, inspect and clean the visible sill, both jamb liners or tracks, sash edges, weatherstrip, and latch area. Remove loose dust or debris without scraping the liner, bending a track, or forcing the sash; apply only the dry lubricant and amount permitted by the exact window care instructions.
Expected result: Look for grit, paint, compacted dirt, a screw or object in the path, a folded weatherstrip, damaged liner, or a sash edge that contacts the frame. After cleaning, test a short supported movement and note whether resistance is reduced evenly.
Next step: If the sash now moves evenly, retest its ability to hold position before considering any balance adjustment. If it still binds or a part is damaged, stop and arrange window service.
Stop if: Do not use oily spray as a substitute for the care instructions, sand the liner, cut weatherstrip, remove a track, or spray a balance assembly.
Why this matters
Why: A smooth improvement supports removable track friction. No improvement, a single-side rub, or a visible bend or frame distortion points to alignment, hardware, or structural service rather than more lubricant or more spring tension.
-
Check 4
For a tilt sash and only when the exact manufacturer procedure permits it, inspect whether both lower corners are seated and whether each pivot pin is engaged in its balance shoe. Press the lower sash corners down only as directed; do not rotate or release a shoe that is under load.
Expected result: Record whether both sides remain seated, one side pops out, the sash stays tilted unevenly, a pivot pin is bent or missing, or the balance shoe is damaged or out of position.
Next step: If the pins seat correctly, raise and lower the sash gently to confirm engagement. If one side will not seat or the sash remains uneven, stop and request model-specific repair or replacement service.
Stop if: Do not force a pivot into a shoe, remove the sash with one side engaged, or reach into a shoe while it can move.
Why this matters
Why: A pin not fully engaged can make the sash drop, bind, or fail to stay tilted even when the balance spring is intact. A damaged shoe, missing pin, or shoe that will not reset is not a tension adjustment problem.
-
Check 5
With the sash supported and the balance system confirmed as a spiral balance by the manufacturer's guide, make a controlled observation of the sash's support without disconnecting the rod: after a small safe opening, note whether the sash drops, rises, or holds its position.
Expected result: Classify the result as drops under its own weight, pushes upward, holds but drags, or cannot be tested safely; compare the left and right sides for unequal support.
Next step: Only a confirmed spiral system with a matching manufacturer procedure may proceed to a small, equal adjustment. Otherwise preserve the current position and arrange service.
Stop if: Stop for a bent or loose rod, missing locking shoe, spring that will not hold a tool, sudden movement, or any need to release the sash to perform the test.
Why this matters
Why: Dropping can indicate insufficient balance tension or a failing balance; rising can indicate excessive tension. A sash that holds but drags points back to friction or alignment. Unequal sides suggest different tension or a damaged component and should not be corrected by a one-sided guess.
-
Check 6
Only after the exact manual confirms a spiral-balance adjustment, use the specified spiral adjustment tool while gripping the rod securely. Add or reduce tension in the documented direction, one small equal increment on both sides, and never exceed two full turns at a time; keep the sash supported throughout.
Expected result: After each equal increment, reconnect or reseat the balance as the guide requires and test whether the sash holds without rising, dropping, or binding; note any asymmetry or uncontrolled rod movement.
Next step: Stop after the smallest effective documented adjustment and move to a gentle full-travel retest. If the problem remains after the permitted adjustment, replace or repair only after model-specific diagnosis by the manufacturer or qualified technician.
Stop if: Never grab and release the rod, over-tension it, adjust only one side, substitute pliers when the guide requires a tool, or continue after the two-turn limit or any sudden spring movement.
Why this matters
Why: A stable, even improvement supports a tension issue. No improvement, worsening friction, an uneven response, or a rod that will not remain engaged indicates a wrong balance type, failed spring, damaged shoe, or separate track/alignment problem.
-
Check 7
After cleaning or a permitted balance/pivot correction, raise and lower the sash slowly through its safe travel, then check the tilt function and latch without slamming or leaning outside the frame.
Expected result: Confirm that motion is smooth on both sides, the sash holds at a partial opening, both corners stay engaged when tilted, the latch aligns without pressure, and there is no scrape, gap, spring noise, or repeat drop.
Next step: Leave the window in the safe closed position if the retest fails and provide the exact symptoms, model, photos, and adjustment count to a qualified window technician.
Stop if: Stop immediately for glass movement, frame damage, a sash that can fall, exposed or detached spring parts, or a latch that cannot secure the window.
Why this matters
Why: A smooth, self-supporting, correctly latching sash supports a successful low-risk correction. A repeat drop or rise, renewed one-sided drag, poor latch alignment, or a new gap means the underlying balance, shoe, liner, or frame issue remains unresolved.
-
Check 8
Decide whether the issue is within ordinary care or needs professional service, and document the window identity, tilt or side-load type, symptom pattern, track condition, pivot/shoe result, balance type, and any turns made.
Expected result: Escalation is indicated by a damaged or unknown balance, an unseated shoe or pivot that will not reset, a distorted frame, heavy/high access, broken glass, repeated failure after the permitted adjustment, or a sash that cannot be safely supported.
Next step: Keep the sash closed and secured when possible, do not continue experimenting, and arrange manufacturer or qualified window service. Ask for diagnosis before ordering a balance or shoe.
Stop if: Do not leave a window with a loose sash, bypass a latch, remove a safety device, or operate it after a spring, shoe, frame, or glass failure.
Why this matters
Why: These results require model-specific parts, load handling, alignment, or spring work; generic tension changes can create a fall or damage hazard. A clear service record helps the technician avoid repeating unsafe tests.
Use your observations
Decision map
Find the observation that best matches what you see, then follow the next safe action.
-
PATH 01Safety boundary
What you see
The sash drags evenly and moves noticeably better after permitted cleaning of the jamb liners or tracks.
Do this next
Retest full travel, holding position, tilt engagement, and latch alignment. Keep the care method in the window record.
Why this path and its safety boundary
Why it matters: Accessible friction was a contributor; additional spring tension is not established as necessary.
Safety stop: Stop if drag returns quickly, the track is damaged, or the sash hits the frame.
-
PATH 02Safety boundary
What you see
The confirmed spiral-balance sash drops instead of holding after the pivot pins are seated.
Do this next
Follow the exact manufacturer adjustment procedure with the sash supported, adding only an equal, documented increment on both sides and no more than two turns at a time.
Why this path and its safety boundary
Why it matters: Insufficient tension or a failing balance is possible; a dirty track alone does not explain the support symptom.
Safety stop: Stop for a damaged shoe, uncontrolled rod, unknown balance type, or a result that remains unsafe; request service.
-
PATH 03Safety boundary
What you see
The confirmed spiral-balance sash pushes upward or will not remain at a partial opening.
Do this next
Use only the exact guide's equal, small reduction procedure, then retest with support; if the guide does not cover it, stop.
Why this path and its safety boundary
Why it matters: Excessive tension or a mismatched balance may be present; adding more tension can worsen the hazard.
Safety stop: Do not release the rod, reduce only one side, or continue when the sash moves suddenly.
-
PATH 04Safety boundary
What you see
One side will not stay tilted, the sash drops after tilting, or a pivot pin is not seated in the balance shoe.
Do this next
Use the model-specific removal and reinstallation guide only if the sash can be safely supported; otherwise arrange service.
Why this path and its safety boundary
Why it matters: The immediate issue is engagement or a damaged pivot/shoe, not a generic spring-tension setting.
Safety stop: Do not force the pin, rotate a loaded shoe, or remove the sash with one side still engaged.
-
PATH 05Safety boundary
What you see
The sash binds on one side, hits the frame, or remains hard to operate after the track is clean.
Do this next
Stop balance adjustments, photograph the contact area, and arrange a window professional to assess installation and components.
Why this path and its safety boundary
Why it matters: Alignment, frame distortion, a bent liner, weatherstrip displacement, or hardware damage is more likely than equal balance tension.
Safety stop: Do not sand, bend, shim, or force the sash to create clearance.
-
PATH 06Safety boundary
What you see
The balance is detached, the rod cannot be controlled, the shoe is broken, the glass is damaged, or the sash is heavy, high, or unsupported.
Do this next
Stop, secure the area and sash as safely as possible without reaching into the mechanism, and contact the manufacturer or qualified window service.
Why this path and its safety boundary
Why it matters: Spring energy, sash load, fall risk, or glass damage makes continued DIY adjustment unsafe.
Safety stop: Do not operate, leave unsecured, bypass the latch, or attempt a generic balance replacement.
Helpful context
Understand the symptom
Why a double-hung sash can feel stuck
A double-hung window has two independently sliding sashes. The sash rides in side jamb liners or tracks while a balance system supports its weight. A sticky movement that is worse in the same part of the travel often starts with dirt, paint, swelling, a displaced weatherstrip, or a bent track. A sash that drops as soon as it is released, shoots upward, will not remain tilted, or drags on only one side shifts the diagnosis toward a spiral balance, locking shoe, pivot pin, or reinstallation problem. These symptoms can overlap, so test one change at a time and do not compensate for track friction by adding spring tension.
Clean friction before touching a spring
With the sash supported and the lock disengaged, remove only loose debris that is accessible from inside. Inspect both jamb liners, the sill, sash edges, weatherstrip, and visible balance-shoe area for grit, paint, a screw head, or a displaced seal. Use the manufacturer's care method; a thin dry lubricant may be suitable for some liners, but oily sprays can collect dust and are not a universal window treatment. If the frame is bowed, the sash hits the frame, or the track is damaged, cleaning will not correct the geometry and a window professional should assess it.
Adjustment is a model-specific, controlled repair
Spiral balances are under spring tension. A clockwise turn can add support when the sash drops and a counterclockwise turn can reduce support when it rises, but that direction and limit must be confirmed against the exact window guide. Use an adjustment tool or another manufacturer-approved method while maintaining a firm grip on the rod; never let it snap back into the tube. Adjust both sides by the same small amount, reinstall and test the sash, and stop if the result becomes uneven. For an unfamiliar hybrid, constant-force, block-and-tackle, or non-tilt system, do not apply spiral-balance instructions by appearance alone.
Only after diagnosis
Potential parts
- spiral balance assembly
Consider this category only when the exact window guide and diagnosis show a failed or irreparable spiral balance after pivot and track checks; a drop alone does not establish fit or failure.
Match the exact balance type, sleeve length, markings, locking shoe, pivot-pin arrangement, and sash load with the manufacturer or qualified technician before ordering. - balance shoe or pivot pin
Consider this category only when inspection confirms a damaged, missing, or non-engaging shoe or pivot is causing one-sided binding or a sash that will not stay tilted.
Confirm the window series, sash design, pin geometry, shoe type, and manufacturer fit information; do not substitute a visually similar part. - jamb liner or sash weatherstrip
Consider this category only when cleaning does not restore movement and inspection confirms a torn, displaced, or damaged liner or seal is contacting the sash.
Match the window model, liner profile, sash size, seal location, and installation method; do not cut or shim the existing part to create clearance.
When checks do not resolve it
Need a professional?
Safety scope: This article supports ordinary-access inspection and manufacturer-approved cleaning or adjustment only. Do not force or pry the sash, grab or release a spring rod, adjust an unidentified balance, remove a loaded sash, or work at height without appropriate equipment and qualified help.
Common questions
FAQ
How do I tell whether a stuck double-hung window has track friction or a balance problem?
Even drag through the travel, visible grit, paint, or a displaced seal points first to the liner or track. A sash that drops, rises, will not hold at a partial opening, or will not stay tilted points toward balance tension or pivot-shoe engagement. Clean and reseat only as the exact manufacturer guide allows before considering spring adjustment.
Can I force a stuck double-hung sash open?
No. Forcing can break the glass, bend the track, release a balance shoe, or let the sash fall. Support the sash, perform only a safe visual and accessible inspection, and arrange service for a completely immobile, heavy, high, damaged, or spring-related sash.
How is a spiral balance adjusted when a sash drops?
Only after the window guide confirms a spiral balance and gives the procedure: support the sash, use the specified adjustment tool, add a small equal amount of tension on both sides, and stay within the guide's limit. The JELD-WEN guide says not to exceed two full turns at a time. Stop for an uncontrolled rod, damaged shoe, or unknown system.
What if the sash rises instead of staying open?
Do not add more tension. Excessive tension or a mismatched balance is possible. If the exact manufacturer guide covers it, reduce tension equally in a small controlled increment and retest with support; otherwise leave the window secured and call for model-specific service.
Should I replace the spiral balance or balance shoe myself?
Treat both as conditional parts, not universal replacements. Identify the window series, sash size, balance type, sleeve and shoe geometry, and pivot arrangement first. Spring-loaded balances and loaded sashes can cause injury, so use a qualified technician when the part is under tension, the sash cannot be supported, or the diagnosis is uncertain.
Read the exact guide
Official sources
- Product Guide Vinyl Single and Double-Hung Windows (JPG006)JELD-WEN · JELD-WEN Premium and Builders Series and listed historical vinyl products; other windows require their own manufacturer's instructions.
- Resetting Balancers on A-Series and 400 Series Tilt-Wash Double-Hung WindowsAndersen Corporation · Andersen A-Series and 400 Series Tilt-Wash Double-Hung windows; use other manufacturers' guides for other products.
- Double-Hung Window & Sash Window Ideas | PellaPella Corporation · General Pella product education; it does not replace the care or repair guide for a particular model.
Community feedback
Share a repair observation
Share a plain-text repair observation. Accepted observations are published automatically; this page may take a moment to update.