
On this page
Start here
Quick answer
A sliding patio door that is hard to open usually needs the low-risk checks done in order: remove visible dirt from the sill and roller path, confirm the panel is sitting level, then make only the small roller-height adjustment described for the exact door. Andersen and Milgard both identify track debris and roller height as operation checks, while Andersen says an uneven reveal from top to bottom indicates that the panel needs adjustment. If the aluminum running rail is visibly worn or grooved, a stainless steel track cap can restore a compatible running surface, but it must match the original sill profile and roller clearance; it is not a universal overlay. Do not force a heavy glass panel, remove it alone, bend the sill, or install a cap over a crushed or structurally damaged track. Stop and arrange qualified door service if the panel is unstable, glass or frame is damaged, the rollers remain rough after cleaning and adjustment, or the cap fit cannot be verified.
Work through in order
Diagnostic checks
Use only checks that match the exact appliance or system and its official guide.
-
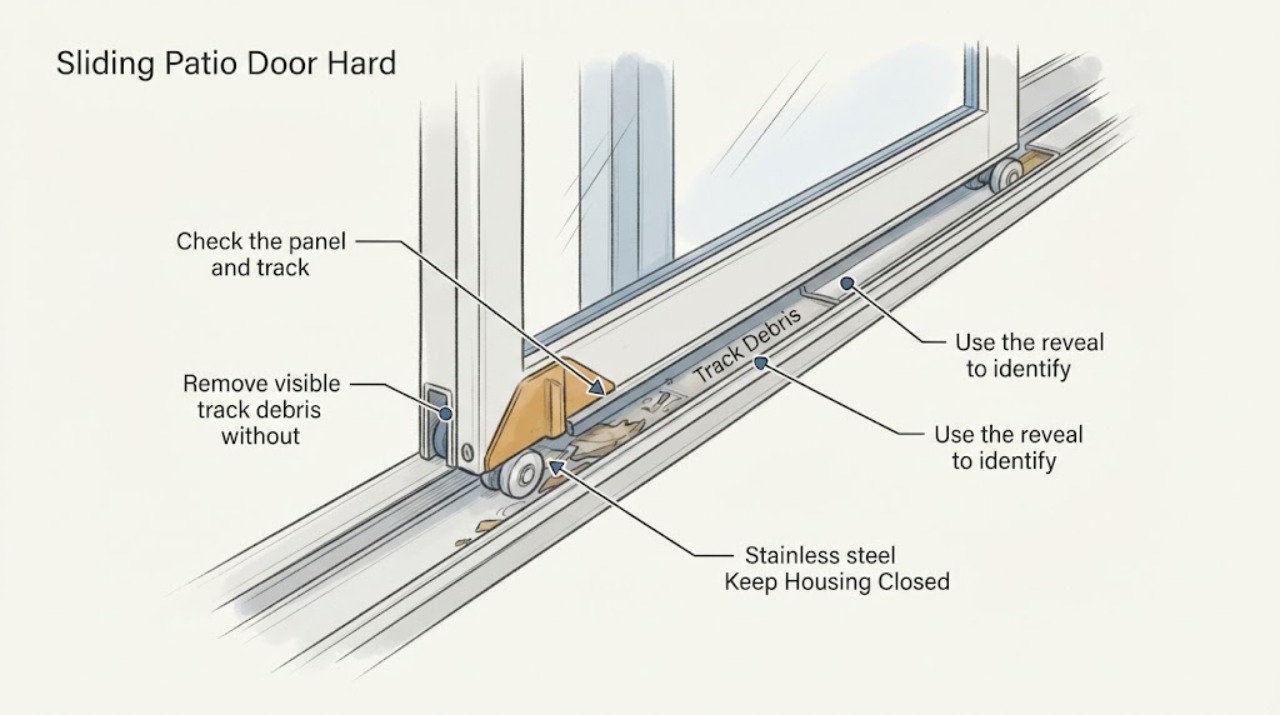
Check the panel and track before applying force
Keep children and pets away from the opening and move the panel only through its normal handle. With the door partly open, look along the lower sill, both roller paths, and the gap between the panel and side jamb. Use a flashlight without placing fingers under the panel or leaning on the glass.
Expected result: The track contains grit, hair, paint, or stones; the panel rubs at one end; the top-to-bottom gap is visibly uneven; the rail has a deep groove or sharp raised edge; or the panel rocks, drops, or appears unsafe.
Next step: If the panel is unstable or glass/frame hardware is damaged, stop using it and arrange qualified service. Otherwise photograph the track and reveal, then continue with a dry debris removal check.
Stop if: Stop immediately if the glass is cracked, the panel shifts out of the track, a roller is detached, or the door could fall or pinch someone.
Why this matters
Why: Loose debris is a cleaning issue, an uneven reveal suggests roller-height or alignment trouble, and a groove or raised edge is rail wear that may need a compatible cap or track repair. A rocking, dropping, cracked, or unstable panel is a stop condition because the panel or roller assembly may not be safely supported.
-
Remove visible track debris without changing the hardware
Close or secure the opening as practical, then vacuum the exposed sill and roller paths and wipe them with a soft, damp cloth. Clear the exterior weep openings only with a soft brush if they are visibly blocked. Do not scrape the rail with a blade, flood the sill, or use penetrating oil or an oily spray on the track.
Expected result: The debris lifts away and the rail is smooth; the door becomes easier to move; the door remains hard to move even though the path is clean; or a deep groove, dent, corrosion, or loose section remains visible.
Next step: If the path is clean but the panel is not level, continue to the reveal and roller-height check. If the rail is crushed, loose, or corroded through, stop before installing a cap and request an assessment of the sill.
Stop if: Stop if cleaning exposes a sharp metal edge, loose sill, water damage, or any condition that could cut a person or destabilize the panel.
Why this matters
Why: Improvement after cleaning supports debris as the main restriction. No improvement with a clean path shifts attention to panel height, rollers, frame movement, or rail damage. A damaged rail is not repaired by more lubricant.
-
Use the reveal to identify a height problem
Open the operating panel slightly and compare the narrow side-jamb gap from top to bottom. Check whether the panel edge is parallel to the frame and whether the door drags at the sill or head. Do not lift the panel by hand; identify the roller adjustment access holes only as shown in the exact door manual.
Expected result: The gap is even and the panel is level; one end is lower; the panel rubs the sill; or the panel is tight at the head while the roller path appears clear.
Next step: If the exact manual provides a roller adjustment, proceed with a small, hand-tool adjustment while supporting the panel as instructed. If there is no identified adjustment point or the frame appears bowed, stop and call a qualified door professional.
Stop if: Do not continue if the panel must be lifted, the adjustment screw is seized, the frame moves, or the glass is under visible stress.
Why this matters
Why: An even reveal makes roller height less likely to be the primary fault. A lower end or sill drag supports a small roller-height correction. Head contact, bowed jambs, or a frame that is out of square can require installation or structural service rather than a roller adjustment.
-
Adjust roller height only with the exact door instructions
With the panel supported as the manufacturer directs, turn only the identified roller adjustment screw by a small amount using the specified hand screwdriver. Adjust the low or rubbing end, then move the panel gently and recheck the reveal. Do not use a drill/driver, remove the panel, loosen frame fasteners, or adjust both sides blindly.
Expected result: The panel becomes level and slides smoothly; the panel improves in one direction but still rubs; the screw turns without changing height; or the adjustment makes the panel bind, lose its reveal, or miss the lock.
Next step: If the door is level and smooth, verify gentle closure and lock engagement once. If it remains rough or the lock no longer aligns, return the adjustment only as the manual permits and arrange qualified service; inspect the rail for a cap decision rather than forcing the panel.
Stop if: Stop if the panel shifts, the screw strips or seizes, the glass/frame flexes, or the door cannot close and secure normally.
Why this matters
Why: Improvement after a small correction supports roller height as the cause. No change can indicate a failed roller, seized adjuster, rail wear, or a frame issue. Binding or lost lock alignment means the adjustment is no longer safe to continue by trial and error.
-
Decide whether a stainless steel track cap is actually compatible
Only after the panel is safely supported and the rail is clean, compare the damaged rail's profile and usable clearance with the cap manufacturer's dimensions and the door maker's instructions. Confirm that the cap is intended to fit over or into that sill extrusion, will not cover weep paths or retainers, and leaves the rollers seated without binding. Do not order by length alone.
Expected result: The rail has a matching profile and clearance for a snap-on or slide-on cap; the cap is too tall or narrow; the rail is flattened, perforated, loose, or structurally corroded; or the cap would interfere with drainage, weather seals, or roller movement.
Next step: Use the exact cap installation instructions or have a qualified door professional install it, then recheck roller height and lock alignment. If fit or sill condition is uncertain, do not install the cap; obtain model-specific service.
Stop if: Stop if the cap requires forcing, drilling the sill without approved instructions, trimming near glass, blocking drainage, or removing the panel without trained help.
Why this matters
Why: A verified profile match may make a track cap a conditional repair for a worn running surface. A dimensional mismatch or structural sill damage means the cap could increase friction, derail the panel, trap water, or conceal a larger failure.
-
Make one gentle retest and set the service boundary
After cleaning or an approved adjustment/cap repair, slide the panel through one complete open-and-close cycle without slamming. Confirm that the panel stays level, rolls without grinding, clears the sill, and latches without force. Keep hands clear of the roller path and do not repeat a failing test.
Expected result: The panel moves smoothly and remains level; it still grinds or binds; it derails or drops; or it closes but the lock no longer aligns.
Next step: If any fault remains, stop using the door and arrange qualified window-and-door service. Give the technician the rail photographs, reveal result, adjustment direction, cap profile/fit information, and exact point where the retest failed.
Stop if: Stop immediately for derailment, panel instability, cracked glass, frame damage, grinding that worsens, or any need to force the handle or panel.
Why this matters
Why: A smooth cycle supports the corrected debris, height, or running-surface condition. Grinding, derailment, recurring binding, or lost lock alignment points to roller, sill, frame, or installation work beyond a safe surface check.
Use your observations
Decision map
Find the observation that best matches what you see, then follow the next safe action.
-
PATH 01Safety boundary
What you see
The panel is unstable, out of the track, cracked, or the frame/roller hardware is visibly damaged.
Do this next
Stop operating the door, keep people away from the opening, and arrange qualified window-and-door service. Do not remove or lift a heavy glass panel as a solo repair.
Why this path and its safety boundary
Safety stop: True
-
PATH 02Next step
What you see
The track is dirty and the door improves after vacuuming and wiping the roller path.
Do this next
Keep the track and weep openings clear with the manufacturer's approved cleaning method. Do not use penetrating oil on the track; monitor the reveal and operation.
-
PATH 03Next step
What you see
The path is clean but one end is low, the reveal is uneven, or the panel rubs the sill.
Do this next
Use the exact door manual to identify the roller access and make one small hand-tool height adjustment while supporting the panel as instructed. Stop if the screw is seized or the lock alignment changes.
-
PATH 04Next step
What you see
The rail is worn or grooved but remains a sound, matching sill extrusion.
Do this next
Treat a stainless steel track cap as a conditional measured repair. Verify profile, attachment style, clearance, drainage, and roller seating against the cap and door instructions before installation; use qualified service if removal or fitting is required.
-
PATH 05Safety boundary
What you see
The rail is crushed, loose, perforated, corroded through, or the door remains hard to slide after cleaning and a correct adjustment.
Do this next
Do not force a cap or keep adjusting the rollers. Stop using the door and arrange qualified service to assess the sill, roller assembly, frame, drainage, and installation alignment.
Why this path and its safety boundary
Safety stop: True
Helpful context
Understand the symptom
Separate debris, height, and rail damage
A door can feel heavy because grit is blocking the roller path, because one roller has dropped and the panel is rubbing, or because years of wear have cut a groove into the sill rail. These conditions can look alike from the handle. Start with the track and the panel reveal before ordering a roller or a track cap. A cap can provide a new running surface only when the original extrusion is still a suitable support and the replacement profile leaves the correct roller clearance.
Make the smallest model-specific adjustment
Roller screws and access holes differ by product. Manufacturer instructions commonly use a screwdriver through an access point near the bottom of the panel, but the direction and amount of adjustment must come from the exact door instructions. Support the panel's weight as directed, change one side slightly, and check that the panel stays level and the lock still engages. A heavy glass panel should not be removed or lifted as an improvised repair.
A track cap is a measured repair, not a lubricant
If cleaning and correct roller height do not overcome a visibly worn running rail, measure the existing sill profile and verify the cap's width, height, attachment style, length, and roller clearance against the door maker's instructions or a qualified technician's assessment. Do not use penetrating oil on the track to mask a damaged rail; oil can attract more grit and change the roller behavior. A crushed, loose, corroded-through, or water-damaged sill needs a professional repair decision rather than a cap forced over it.
Only after diagnosis
Potential parts
- sliding patio door roller assembly
Consider a roller assembly only if the clean track and documented height adjustment do not remove roughness, grinding, or a low panel and a qualified diagnosis identifies worn, seized, or damaged rollers.
Confirm the exact door make, model, panel configuration, wheel size, housing, and manufacturer fit information before ordering; do not remove the panel alone. - stainless steel sill track cap
Consider a track cap only when the original rail is worn but structurally sound and the cap profile, attachment method, height, width, length, drainage, and roller clearance are verified to match.
Track caps are profile-specific and are not universal; verify the exact sill extrusion and door instructions or use a qualified installer. - sill track or replacement rail section
A replacement sill or rail section may be needed when the original track is crushed, loose, perforated, or corroded through and cannot safely support a cap.
Sill geometry, drainage, frame construction, and panel loading are model-specific; obtain a professional assessment before ordering or removing the panel.
When checks do not resolve it
Need a professional?
Call a qualified window-and-door professional when a sliding patio door remains hard to open after the track is clean and the exact roller adjustment has been tried safely, or whenever the sill, panel, frame, glass, or lock alignment is damaged or uncertain.
Common questions
FAQ
Why is my sliding patio door suddenly hard to open?
Start with debris in the sill and roller path, then check whether the panel's top-to-bottom reveal is even. A low end or sill rub may need the exact door's roller-height adjustment; a clean path and correct height with continued grinding points toward a worn roller, damaged rail, frame movement, or installation issue.
Can I adjust the rollers myself?
Only if the exact door instructions identify the adjustment point and safe direction. Make a small hand-tool adjustment while supporting the panel as instructed, then check that the panel remains level and the lock still engages. Do not remove a heavy glass panel, use a drill/driver, or continue when the screw is seized or the frame is damaged.
Will a stainless steel track cap fix a worn sliding-door rail?
It can be a conditional repair when the original sill extrusion is sound and the cap's profile, attachment method, height, width, drainage, and roller clearance match. A cap is not universal and should not be forced over a crushed, loose, perforated, or corroded-through rail.
What should I use to lubricate the patio-door track?
Clean the track first and follow the exact door instructions. Avoid penetrating oil or oily track treatments that attract dirt; if lubrication is approved, use the specified dry lubricant on the specified component rather than flooding the sill.
When should I stop troubleshooting a hard-to-slide patio door?
Stop when the panel is unstable or derailed, glass or frame is damaged, the sill is crushed or corroded through, the adjustment screw is seized, a cap fit is uncertain, or the door still binds after the track is cleaned and the documented adjustment is tried. Arrange qualified window-and-door service.
Read the exact guide
Official sources
- Window & Door Care TipsMilgard · Manufacturer care guidance to vacuum sliding-door tracks and adjust rollers through the model-specific access point; it also covers keeping drainage openings clear.
- Gliding Patio Door Hardware Adjustment and Replacement GuideAndersen Windows and Doors · Manufacturer guidance that an uneven top-to-bottom panel gap indicates adjustment and that gliding patio door rollers can be adjusted for panel performance.
- Buy Encompass Vinyl Sliding Patio Doors OnlinePella · Product specifications showing a vent panel with adjustable rollers set on a stainless steel track cap; used only to illustrate that construction varies by model.
- Spring Cleaning: Windows & Patio DoorsAndersen Windows and Doors · Manufacturer maintenance checklist connecting difficult gliding operation with roller adjustment/cleaning and track cleaning, and recommending dry lubricant rather than an oily track treatment.
- Stainless Steel Sill Track Caps & CoversJohnson Brothers Roll Forming · Manufacturer information that sill covers fit a specific sill extrusion, may be snap-on or slide-on, and require profile/clearance selection; it also describes their use over worn running surfaces.
Community feedback
Share a repair observation
Share a plain-text repair observation. Accepted observations are published automatically; this page may take a moment to update.