
On this page
Start here
Quick answer
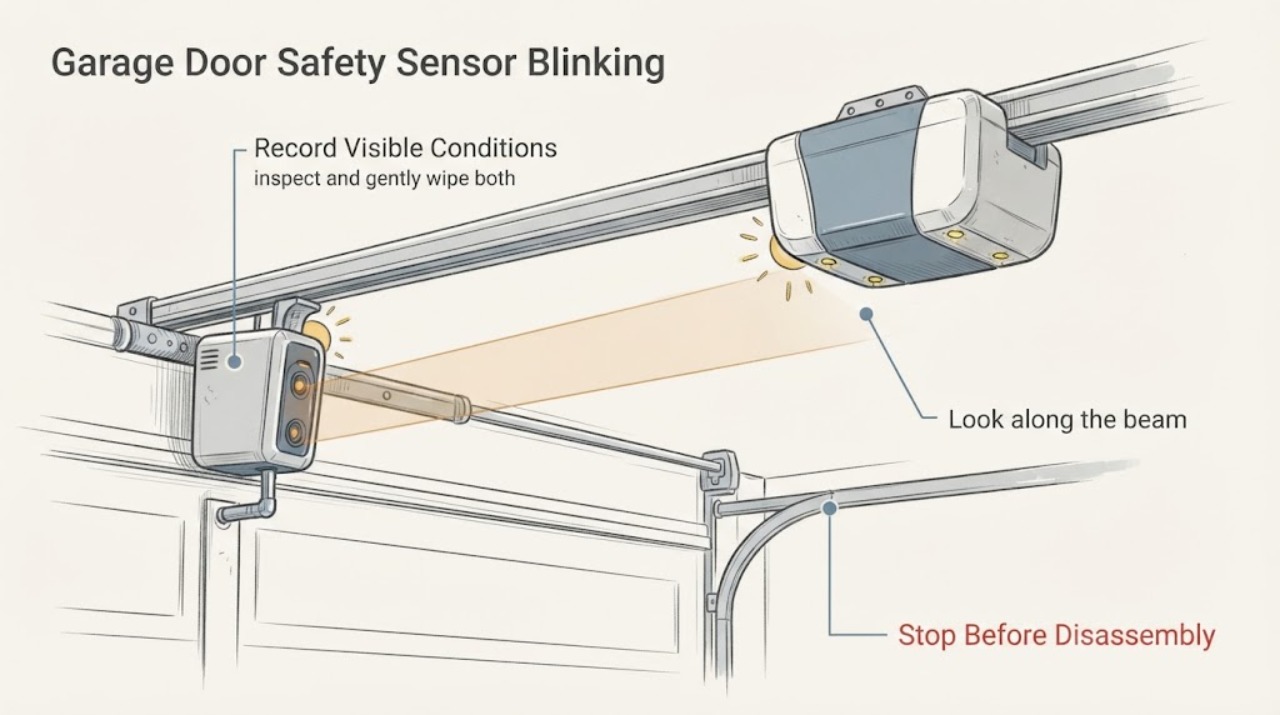
A blinking yellow, amber, or other safety-eye indicator usually means the opener is not receiving a clean, aligned photo-eye beam, but LED colors and blink patterns vary by manufacturer. Keep people, vehicles, and objects clear of the moving door, then check the lenses, the beam path, sensor alignment, mounting height, visible wiring, and direct sunlight. On Genie systems, sunlight can interfere with the receiver; LiftMaster documentation likewise says the receiving sensor should not face direct sunlight. The door should not be forced closed or the safety system bypassed. If both indicators do not become steady after safe alignment and cleaning, or the door fails its reversal test, stop and call a trained door-systems technician.
Work through in order
Diagnostic checks
Use only checks that match the exact appliance or system and its official guide.
-
Check 1
Record the exact indicator color and blink pattern on each photo eye and the opener, and compare it with the opener's own manual; note whether the door refuses to close, reverses, or only fails at certain times of day.
Expected result: A pattern that changes with sunlight suggests optical interference, while a constant pattern points more toward an obstruction, alignment, wiring, or sensor fault; a steady light on both eyes generally indicates the beam is being received on the documented system.
Next step: Continue with the physical beam-path check and keep the door from automatic closing until the protection system is confirmed operational.
Why this matters
Why: Color names and blink codes are system-specific, so the observed pattern must be interpreted against the correct opener documentation rather than treated as a universal yellow-code diagnosis.
-
Check 2
With the door stopped, inspect and gently wipe both photo-eye lenses; remove cobwebs, dust, leaves, stored items, or any object crossing the invisible beam between the eyes.
Expected result: The indicators become steady after a lens or obstruction is cleared, or they continue blinking with a visibly clear path.
Next step: Leave the beam path clear and continue to alignment. Do not cover either lens or test by placing a person, pet, or vehicle in the door path.
Why this matters
Why: Dirt and a broken beam can mimic misalignment; a clear path with persistent blinking shifts attention to mounts, wiring, sunlight, or a failed sensor.
-
Check 3
Look along the beam from one eye to the other and check that both lenses face each other at the same height, the brackets are firm, and the sensors are parallel rather than tilted by a bump or vibration.
Expected result: A loose bracket, visibly skewed lens, or indicators that turn steady when a sensor is held in line confirms alignment or mounting movement; steady indicators that never appear despite correct geometry point elsewhere.
Next step: If the model uses adjustable brackets, make a small alignment correction with the door stopped, tighten the mount, and recheck the indicators. If the mount will not hold or alignment cannot be achieved, call service.
Why this matters
Why: The beam must reach the receiving eye continuously; Genie and LiftMaster documentation describe steady indicators as the aligned state for their respective systems.
-
Check 4
Observe the receiving eye at the time the fault occurs and note whether direct sun reaches its lens; preserve a clear beam while moving the receiving eye to a shaded position or following the model's documented transmitter/receiver arrangement.
Expected result: The blinking appears only when the sun is low or shining through the opening, and the indicator steadies when the receiver is shaded or the documented sensor sides are exchanged.
Next step: Use a manufacturer-approved shade or repositioning method that does not block the lens or change the beam height beyond the manual's limits. If the problem remains in shade, continue with wiring and multi-door interference checks.
Why this matters
Why: Sunlight contains infrared energy that can interfere with the receiver, so a time-of-day fault can be optical rather than a new alignment error.
-
Check 5
Inspect only the visible sensor cable runs and terminal-area covers for a loose-looking connection, nick, crushed section, or cable shared with another door's sensor path; if multiple doors are side by side, compare their sensor positions for cross-talk or reflective surfaces.
Expected result: A damaged or loose-looking cable, multiple sensor sets facing the wrong way, or reflective flooring near the beam indicates a wiring or interference path; intact wiring and one correctly isolated set points back to the eyes or alignment.
Next step: Do not open the opener housing or alter wiring as a trial repair. Keep the door out of automatic operation and arrange a trained technician for cable, terminal, or multi-door interference work.
Why this matters
Why: Genie lists damaged wiring, cross-talk between adjacent doors, and reflective surfaces as causes of blinking or an incomplete beam.
-
Check 6
After the indicators are steady and the beam path is clear, perform the complete safety-reversal test specified by the opener manual with everyone clear of the door, then confirm that the door responds correctly to the documented obstruction test.
Expected result: The door reverses as required during the manufacturer's test, or it closes without reversing, stops unexpectedly, or the indicators begin blinking again.
Next step: Do not return the opener to automatic use after a failed test. Call a trained door-systems technician and report the light pattern, sunlight timing, alignment changes, and test result.
Why this matters
Why: Steady lights alone do not prove that the entire entrapment-protection system is safe; a failed reversal test requires trained service.
Use your observations
Decision map
Find the observation that best matches what you see, then follow the next safe action.
-
PATH 01Safety boundary
What you see
The lens is dirty or an object interrupts the beam.
Do this next
Clear the obstruction and clean the lens with the door stopped, then check whether the indicators become steady.
Why this path and its safety boundary
Safety stop: Continue with mount alignment and sunlight timing.
-
PATH 02Safety boundary
What you see
The receiving eye blinks only when direct sunlight reaches it.
Do this next
Use the manufacturer's documented shade or sensor-position method while preserving the beam and required mounting geometry; do not cover the lens.
Why this path and its safety boundary
Safety stop: Treat constant blinking as an obstruction, alignment, wiring, cross-talk, or sensor-fault path.
-
PATH 03Safety boundary
What you see
The sensors cannot be held aligned, a visible cable is damaged, or adjacent doors create cross-talk.
Do this next
Keep automatic closing disabled and arrange a trained technician for mounting, wiring, or multi-door interference diagnosis.
Why this path and its safety boundary
Safety stop: Continue to the manufacturer's safety-reversal test after the indicators are steady.
-
PATH 04Safety boundary
What you see
The indicators are steady but the safety-reversal test fails, or the door closes when the beam is obstructed.
Do this next
Stop using the opener and call a trained door-systems technician; do not bypass the sensors or rely on a manual override for normal use.
Why this path and its safety boundary
Safety stop: Return the opener to normal use only after the complete manufacturer test passes and the blinking does not recur.
Helpful context
Understand the symptom
The word ‘yellow’ is not universal: one system may call the light amber, while another uses a different color or blink count. Use the opener's own manual for the exact code. The useful first question is whether the light becomes steady when the two photo eyes have a clean, unobstructed line of sight, or whether it fails only when sunlight reaches one eye.
Safety eyes are entrapment protection, not an optional convenience. Do not tape over a lens, hold the door closed past the safety system, bypass the sensors, or keep operating a door that does not reverse correctly. Make adjustments only with the door stopped and people clear of the opening.
Only after diagnosis
Potential parts
- garage door safety photo-eye pair
Consider this only after the beam path, alignment, sunlight, visible wiring, and mount checks are correct and a technician identifies a defective sensor.
Confirm the exact opener model and the manufacturer's compatibility information before ordering a sensor pair. - photo-eye mounting bracket
Consider this only when a bracket is bent, loose, or unable to hold the two lenses in stable alignment.
Bracket geometry varies by opener and door track; confirm fit and safe installation with the model documentation or technician. - safety sensor wiring
Consider this only when a technician confirms a damaged or open sensor cable after the eyes and mounts are known to be sound.
Use the exact opener wiring requirements and qualified installation; do not substitute wiring based only on appearance.
When checks do not resolve it
Need a professional?
Stop and call a trained door-systems technician when the safety eyes cannot align, a cable or mount is damaged, the indicators remain blinking after cleaning and safe alignment, the fault persists in shade, the opener has multiple-door interference, or the safety-reversal test fails. Do not bypass the sensors or operate a door that closes without correct reversal protection.
Common questions
FAQ
What does a blinking yellow or amber garage door safety sensor mean?
Color and blink codes vary by opener. The common causes are a blocked or dirty beam, misalignment, wiring trouble, sunlight interference, or interference from another door. Use the exact opener manual to interpret the pattern.
Can sunlight make garage door photo eyes blink?
Yes. Direct sunlight can interfere with the receiving eye's infrared signal. Preserve a clear line of sight while using the manufacturer's approved shade or repositioning method to keep the receiver out of direct sun.
How do I align garage door safety eyes?
With the door stopped, clean the lenses, remove obstructions, and make the two eyes face each other at the same height with firm, parallel mounts. Adjust only as the opener manual directs, then run its complete safety-reversal test.
Should I bypass blinking safety sensors to close the garage door?
No. Safety eyes are entrapment protection. Do not bypass them or return the opener to normal use if the indicators remain abnormal or the reversal test fails; call a trained door-systems technician.
Read the exact guide
Official sources
- Genie Safe-T-Beam® Sunlight Interference SolutionsThe Genie Company · Genie safety-eye infrared beam, sunlight interference, receiver placement, and adjacent-door interference
- 114A5017LiftMaster · LiftMaster Protector System safety sensor alignment, sunlight placement, indicators, and reversal testing
- Safe-T-Beams® (Square Legacy Model) - Product Support InformationThe Genie Company · Genie Safe-T-Beam blinking indicators, alignment, obstructions, wiring, cross-talk, and sunlight troubleshooting
- Genie Safe-T-Beam System Self Diagnostic TroubleshootingThe Genie Company · Genie Safe-T-Beam blink patterns, alignment, obstruction, interference, and safe door operation
Community feedback
Share a repair observation
Share a plain-text repair observation. Accepted observations are published automatically; this page may take a moment to update.