
On this page
Start here
Quick answer
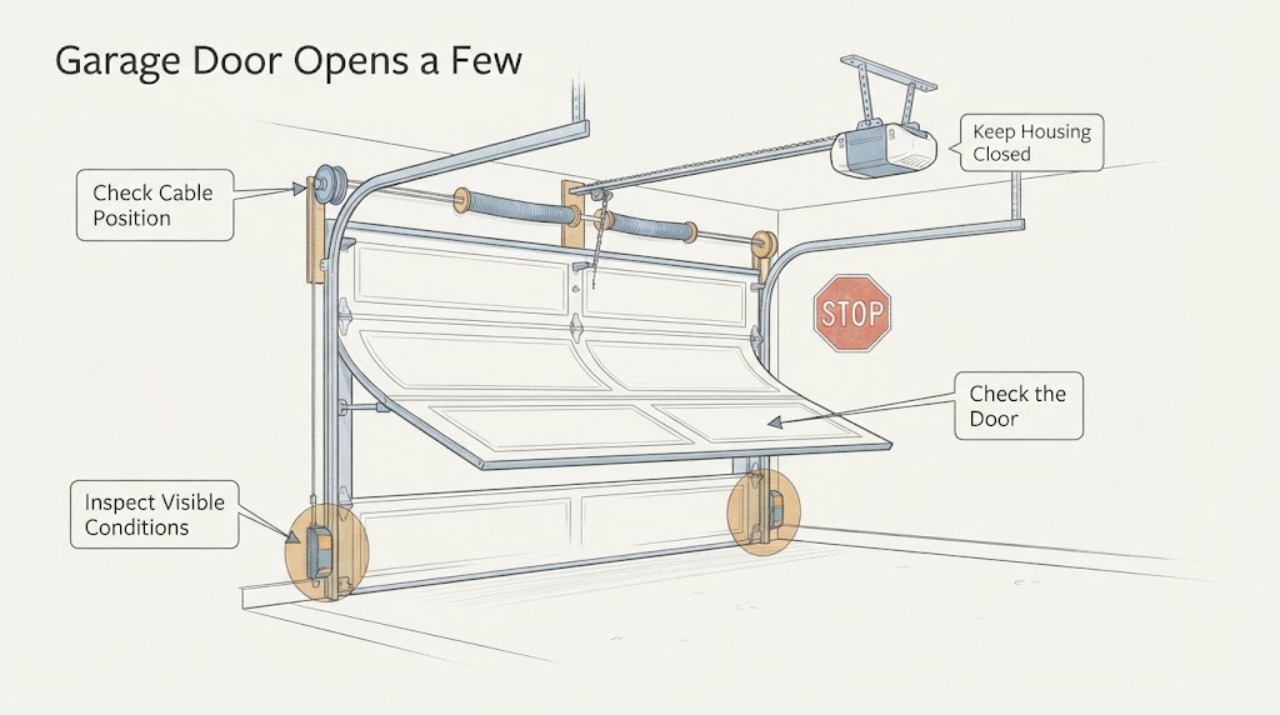
If a garage door rises only a few inches and then reverses, keep people, pets, and vehicles clear and stop repeated cycles. First observe whether the door itself binds, tilts, or shows damaged springs or cables, or whether the opener stops with a diagnostic light or code. Clean and align the external photo-eye lenses only as the exact opener manual permits, but remember that those sensors primarily govern closing and should not be bypassed. Travel and force settings are model-specific and must not be used to overpower a binding door or defeat safety reversal. A door that is heavy, crooked, damaged, or unsafe to move, or an opener that still reverses after safe external checks, needs a trained garage-door technician.
Work through in order
Diagnostic checks
Use only checks that match the exact appliance or system and its official guide.
-
Check 1
Keep everyone out of the opening and observe one existing cycle only from the side, without standing under the door. Note how far it rises, whether it reverses smoothly or stops hard, whether the door is level, and whether the opener lights flash or show a diagnostic pattern.
Expected result: The door rises a similar short distance each time, tilts or binds, makes a bang or scrape, the opener flashes a code, or the opener runs while the door does not move.
Next step: Write down the model, light pattern, travel distance, and sound. If the door is crooked, heavy, damaged, or the opener strains, stop operating it and request trained service before any further test.
Why this matters
Why: A repeatable short travel with a diagnostic indication can point to an opener travel or communication condition, while tilt, binding, impact, or a disconnected carriage points to door hardware or linkage. The observation does not identify a spring, cable, force, or travel adjustment by itself.
-
Check 2
With the door fully stopped and the opener controls left untouched, inspect the visible floor area and both sides of the opening for a stored object, ice, debris, a visibly bent track, a loose roller, a hanging cable, or a broken spring. Do not reach into the track or touch springs, cables, rollers, or brackets.
Expected result: A clear obstruction is present, the track or hardware is visibly damaged, a cable is slack or off its drum, a spring is broken, or nothing visible is wrong.
Next step: Remove only a loose object that is well away from the door and does not require entering its path. For damage, binding, or any uncertain hardware condition, keep the door closed if safe and call a trained garage-door technician.
Why this matters
Why: A simple object outside the travel path may be removed without touching the door. Damage, a slack cable, a broken spring, or a door that is not level is a high-force hardware condition and can make opener adjustments unsafe.
-
Check 3
Inspect the two photo-eye sensors from outside the door path. Check that each lens is clean, the sensors face one another, their brackets are not visibly bent, and no object, cobweb, or sunlight condition described by the exact manual interrupts the beam. Do not disconnect, bypass, relocate, or short the sensor wiring.
Expected result: An indicator is off or flickering, a lens is dirty, a bracket is out of line, an object blocks the beam, or both indicators are steady while the door still reverses during opening.
Next step: Clean only the accessible lens surface and remove a safe obstruction. If the indicators do not become normal, wiring is damaged, or the opening symptom remains, leave the opener off and request service.
Why this matters
Why: Misalignment or an interrupted beam commonly affects closing behavior. Steady indicators do not explain every opening reversal; if the door reverses while rising, continue with the door and opener branches rather than bypassing the safety system.
-
Check 4
Read the opener label and consult its exact manual for the recorded diagnostic pattern. Check only the documented external controls and travel display; do not change force or travel settings unless the manual explicitly allows that procedure for the exact model and the door has already been confirmed free of binding or damage.
Expected result: The manual identifies a short-travel or travel-module indication, a sensor indication, a binding or obstruction indication, or no matching pattern.
Next step: Follow only the matching manual procedure. If any adjustment is made, stop and perform every required safety reversal and non-contact sensor test; if the manual is unavailable, the code is unclear, or the door is unsafe, use trained service instead.
Why this matters
Why: Model-specific diagnostics can distinguish an opener control or travel condition from a door problem. Force and travel controls are safety controls, not a way to make a heavy or damaged door move.
-
Check 5
Only if the door is level, undamaged, not binding, and the exact manual authorizes testing, perform the manual's safety reversal check with the specified flat test object centered under the door. Keep clear of the moving door and stop if the test behaves unexpectedly.
Expected result: The door reverses promptly on the specified object, fails to reverse, closes onto it, or the non-contact sensor test prevents downward movement as required.
Next step: Remove the test object after the door is stopped. If either safety test fails, the door moves in an unsafe way, or the original opening reversal remains, leave the opener out of service and call a trained technician.
Why this matters
Why: A failed contact or non-contact safety test means the opener must not be used. A pass confirms only the tested safety function; it does not prove that an opening reversal, spring, cable, motor, or travel problem is resolved.
Use your observations
Decision map
Find the observation that best matches what you see, then follow the next safe action.
-
PATH 01Next step
What you see
The door is crooked, heavy, visibly damaged, has a broken spring, or has a loose or displaced cable.
Do this next
Do not operate, lift, release, balance, or adjust the door. Keep the opening clear and arrange trained garage-door service.
-
PATH 02Next step
What you see
A safe, loose object is in the travel path or the track area is visibly obstructed without hardware damage.
Do this next
Remove only the object from outside the door path, then make no more than one normal observation. If the door still reverses or strains, stop and request service.
-
PATH 03Next step
What you see
A sensor lens is dirty, an indicator is off or flickering, or the beam is visibly blocked.
Do this next
Clean the accessible lens and remove the safe obstruction without bypassing or disconnecting the sensors. If indicators remain abnormal, arrange service.
-
PATH 04Next step
What you see
Both sensor indicators are normal, but the door rises a few inches and reverses.
Do this next
Treat the symptom as an opening, door-balance, travel, force, or opener fault rather than a sensor bypass problem. Use the exact manual's diagnostic guidance or call a trained technician.
-
PATH 05Next step
What you see
The exact manual documents a travel or force adjustment and the door has passed a safe hardware check.
Do this next
Follow that model-specific sequence exactly and repeat every required safety reversal and non-contact sensor test. Do not increase force to overcome binding and do not operate if any safety test fails.
-
PATH 06Next step
What you see
The door closes when the safety beam is blocked, fails the contact reversal test, moves unpredictably, or anyone is at risk.
Do this next
Stop immediately and keep the opener out of service. Do not disable the sensors or keep testing; arrange trained door-system service, and use emergency help for an immediate physical hazard.
Helpful context
Understand the symptom
Separate an opening fault from a closing safety reversal
The photo-eye beam normally prevents or reverses a closing movement when it is blocked. A door that starts upward, travels a short distance, and then comes back down points first to door binding, balance or hardware trouble, a travel or force condition, or an opener diagnostic state. Do not assume that cleaning the sensors will fix an opening reversal, and do not defeat the sensors to make the opener run.
The door hardware is the safety boundary
Springs, cables, bottom brackets, rollers, hinges, and tracks can store or transmit substantial force. A broken spring, loose cable, bent track, leaning door, or door that is heavy by hand is not a homeowner adjustment. Do not pull the emergency release, lift the door, adjust spring tension, change cable routing, or stand under a partly raised door when any of those conditions is present.
Use the exact opener manual for adjustments
Travel limits, force settings, diagnostic flashes, and sensor indicators differ by opener family. Record the model and light pattern, then use the exact manual. If a manual permits a travel or force procedure, it must never be used to overcome a sticking door, and the safety reversal and non-contact sensor checks must pass afterward.
Safety boundary
Stop conditions
- Stop immediately for a broken spring, slack or displaced cable, leaning or falling door, bent track, crushed panel, severe binding, or a door that is too heavy to move normally.
- Do not stand under, catch, lift, release, or block a partly raised door, and do not touch springs, cables, bottom brackets, rollers, hinges, or high-force hardware.
- Never bypass, disconnect, short, or defeat the photo-eye sensors. Do not increase force to overpower a binding door or make an unsafe safety test pass.
- Stop if the door closes with the beam blocked, fails the specified contact reversal, moves unpredictably, makes a violent impact, or the opener repeatedly strains or reverses.
Only after diagnosis
Potential parts
- photo-eye safety sensor set
Consider this category only if the exact opener manual and a trained technician confirm a sensor fault after alignment and lens checks.
Sensor type, wiring, bracket, and opener family must match the exact model. Do not bypass the safety system or select a generic sensor from the symptom alone. - opener travel module
Consider this category only when the opener's model-specific diagnostic code supports a travel-module fault and the door hardware is confirmed safe.
Travel modules and programming procedures vary by opener. A technician should confirm the fault and complete the required safety tests.
When checks do not resolve it
Need a professional?
Request trained service for an opening reversal that remains after safe external checks, any door hardware concern, an unresolved diagnostic code, a failed sensor or contact-reverse test, or any unsafe movement.
Common questions
FAQ
Why does my garage door open a few inches and then reverse?
The opener may be detecting binding or an obstruction, or it may have a model-specific travel or force condition. Inspect only visible conditions from outside the path, record the diagnostic lights, and do not increase force to overpower a heavy or damaged door.
Are the safety sensors responsible when the door reverses while opening?
The photo-eye system primarily controls closing when its beam is interrupted. Clean and align the lenses as the exact manual permits, but steady sensor indicators do not rule out an opening, balance, track, travel, or opener fault. Never bypass the sensors.
Can I adjust the travel or force settings myself?
Only if the exact opener manual explicitly permits the procedure and the door is confirmed free of binding or damage. Every adjustment requires the specified contact and non-contact safety tests. If a test fails or the door hardware is uncertain, stop and call a trained technician.
Read the exact guide
Official sources
- 114A4565 Wall Mount Garage Door Opener Model 8500 Owner's ManualLiftMaster · LiftMaster travel and force adjustment, safety reversal, and photo-eye testing
- 8164W Wi-Fi Garage Door Opener Owner's ManualLiftMaster · LiftMaster short-travel reversal, binding, travel module, and sensor diagnostic guidance
- Garage Door Opener SafetyThe Genie Company · Garage door balance, spring safety, photo-eye operation, and contact-reversal testing
- Why does my Genie garage door opener reverse and open when I try closing it?The Genie Company · Genie obstruction and Safe-T-Beam lens checks
Community feedback
Share a repair observation
Share a plain-text repair observation. Accepted observations are published automatically; this page may take a moment to update.