
On this page
Start here
Quick answer
A leak at the small nut where a vanity sink pop-up drain's horizontal pivot rod enters the drain body usually points to the pivot gasket or pivot seat being damaged, misplaced, or no longer sealing; a leak from the flange, tailpiece, or P-trap is a different joint. Dry the area, place a container below it, and identify the exact leak without over-tightening or forcing the rod. If the pivot gasket and seat are accessible under the sink, use the exact drain manufacturer's diagram for their order and fit; Delta's guidance places its pivot seat next to the rod ball and its gasket beside the seat, but that arrangement is model-specific. Replace only an exact compatible seal or have a plumber rebuild the drain when the parts, model, or leak location are uncertain.
Before you begin
Safety first
- This article supports ordinary-access observation, protected short leak tests, and model-directed inspection only. A qualified plumber should handle concealed leaks, damaged or seized drain parts, flange removal, altered plumbing, and persistent leaks.
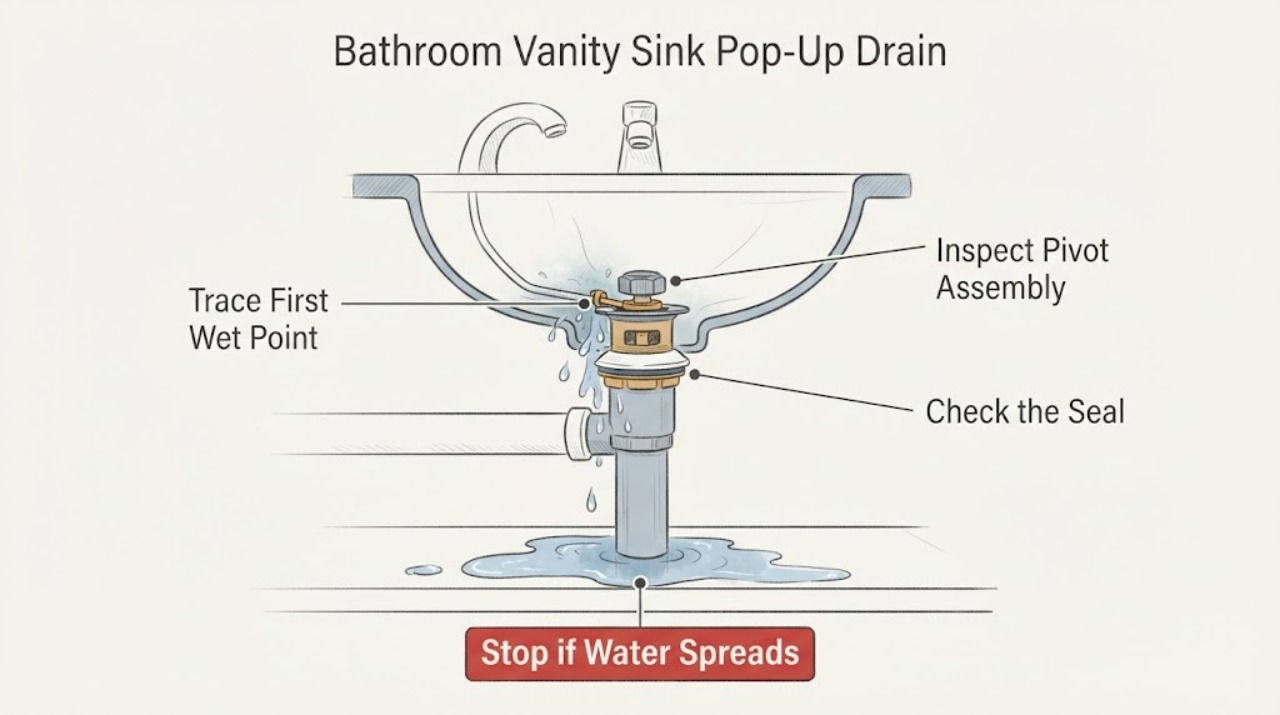
Work through in order
Diagnostic checks
Use only checks that match the exact appliance or system and its official guide.
-
Check 1
Empty the vanity cabinet, place a shallow container and towel below the drain, dry the visible drain assembly, then run only enough water to reproduce the leak while watching from a safe position under the sink.
Expected result: Record whether the first wet point is the pivot nut or rod entry, the flange under the sink bowl, the tailpiece or slip joint, the P-trap, or water draining through the closed stopper without appearing outside the assembly.
Next step: Photograph the first wet point and keep the drain in service only if the cabinet remains dry; proceed to the matching branch and stop using the sink if water can damage the vanity or wall.
Stop if: Stop if the leak is spraying, reaches electrical equipment, comes from concealed plumbing, or cannot be localized without removing the drain or opening the cabinet structure.
Why this matters
Why: Water beginning at the pivot entry supports a pivot gasket or seat check. A flange, tailpiece, or trap leak requires that joint's seal or connection diagnosis; water disappearing through the stopper is an internal sealing or linkage issue rather than proof of an external pivot leak.
-
Check 2
With the sink bowl empty and the area protected, inspect the pivot nut, rod, visible ball or seat area, stopper linkage, and nearby drain body from ordinary access; do not force the nut or rotate the drain body.
Expected result: Classify the pivot assembly as intact and dry, loose but undamaged, missing a gasket or seat, split or flattened, corroded, cross-threaded, or impossible to identify without disassembly.
Next step: Use the exact drain model's parts diagram to confirm the gasket and seat arrangement; if the model or assembly cannot be confirmed, preserve the parts and request plumbing or manufacturer guidance.
Stop if: Do not pry the drain body, force a stuck pivot nut, cut a gasket, sand corrosion into a sealing surface, or substitute a random rubber washer.
Why this matters
Why: A loose or displaced assembly can explain a pivot leak or poor stopper action, while a flattened, cracked, corroded, or missing sealing part requires an exact replacement or professional rebuild. An unknown layout is not permission to stack generic washers.
-
Check 3
If the exact drain instructions permit ordinary under-sink service, compare the pivot gasket and pivot seat with the manufacturer's diagram before loosening the pivot nut; keep the rod ball, seat, gasket, nut, and any clips together in their original orientation.
Expected result: Determine whether the gasket is present and elastic, the seat supports the rod ball, the sealing surfaces are clean and undamaged, and the observed order matches the exact assembly instructions; do not infer fit from appearance alone.
Next step: Reassemble only as the exact instructions show, hand-start the nut without cross-threading, and stop for a model mismatch, damaged threads, a missing seat, or any need to force the parts.
Stop if: Do not tighten until the leak stops by force, use thread tape or sealant on a pivot nut unless the manufacturer specifically calls for it, or operate the drain with a loose or damaged seal.
Why this matters
Why: A correctly matched but damaged seal can cause a pivot leak; a reversed, missing, or wrong-sized seat or gasket can leak or prevent the stopper from moving. Delta's seat-next-to-ball and gasket-next-to-seat arrangement applies to its referenced assembly, not every vanity drain.
-
Check 4
After an approved gasket or seat reassembly, wipe the pivot area dry, operate the stopper gently through open and closed positions, and add a small amount of water to the sink bowl while watching the pivot entry and every nearby connection.
Expected result: Record whether the pivot stays dry while the stopper moves, whether water appears immediately at the pivot nut, whether the stopper holds water, and whether a different joint becomes the first wet point.
Next step: If the pivot remains wet or the stopper binds, stop using the sink and arrange qualified plumbing service with the model, photographs, parts layout, and test result.
Stop if: Do not continue testing a leaking cabinet, rotate the flange or drain body, over-tighten plastic parts, or use the sink when water reaches the vanity structure.
Why this matters
Why: A dry pivot with normal stopper movement supports a successful seal repair. Immediate pivot wetness indicates a wrong, damaged, or mis-seated seal or damaged drain body; a new flange or tailpiece leak points to a separate joint, not a reason to tighten the pivot further.
-
Check 5
If the pivot area stays dry, test the stopper and flange as separate paths: close the stopper, add a small amount of water, and inspect whether water drains through the stopper or appears around the flange under the sink bowl; do not rotate the drain body.
Expected result: Classify the result as stopper seal or linkage failure, flange-to-sink leak, tailpiece or P-trap leak, or no leak during the short test.
Next step: Follow the exact drain instructions for the identified joint or call a plumber when the flange must be removed, the drain body is damaged, or the leak persists after an approved repair.
Stop if: Do not cover an external leak with caulk, rotate a sealed flange, dismantle a concealed trap, or continue using the sink when the cabinet or wall is being damaged.
Why this matters
Why: A stopper that will not hold water can involve its seal, lift rod, or pivot linkage. A flange leak concerns the flange seal and drain-body position; Delta says flange rotation can break its seal. A tailpiece or trap leak is a separate plumbing connection.
Use your observations
Decision map
Find the observation that best matches what you see, then follow the next safe action.
-
PATH 01Safety boundary
What you see
The first wet point is the pivot rod entry and the gasket or seat is cracked, flattened, missing, or out of position.
Do this next
Use the exact model instructions to restore the correct gasket and seat arrangement, then perform a short dry-and-water test.
Why this path and its safety boundary
Why it matters: The pivot seal is a plausible cause, but the replacement must match the exact drain assembly and rod-ball geometry.
Safety stop: Stop for unknown parts, damaged threads, a cracked drain body, or a leak that remains after approved reassembly; arrange qualified plumbing service.
-
PATH 02Safety boundary
What you see
The pivot entry still leaks after the exact gasket and seat are correctly installed and the nut is only properly seated.
Do this next
Keep the sink out of service and have a plumber or the drain manufacturer identify the compatible repair or complete assembly.
Why this path and its safety boundary
Why it matters: The seal may be the wrong part, the rod or seat may be worn or corroded, the drain body may be damaged, or the leak may have been mislocalized.
Safety stop: Do not add generic washers, thread tape, sealant, or more torque as a substitute for diagnosis.
-
PATH 03Safety boundary
What you see
The pivot stays dry but water first appears between the flange and the underside of the vanity sink.
Do this next
Follow the exact drain manufacturer's flange-sealing procedure or request plumbing service; preserve the drain body's orientation while assessing it.
Why this path and its safety boundary
Why it matters: This is a flange-to-sink sealing or drain-body-position problem, not a pivot gasket diagnosis.
Safety stop: Do not rotate the flange or pop-up body after sealing, cover the leak with exterior caulk, or use the sink when water is reaching the cabinet.
-
PATH 04Safety boundary
What you see
The pivot and flange remain dry but water begins at the tailpiece, slip joint, or P-trap.
Do this next
Stop the test, protect the cabinet, and arrange qualified plumbing service when the joint is damaged, concealed, cross-threaded, or still leaks after the exact instructions are followed.
Why this path and its safety boundary
Why it matters: The leak is downstream of the pivot gasket and needs the correct washer, joint, alignment, or plumbing diagnosis.
Safety stop: Do not tighten every joint indiscriminately, force plastic threads, or continue using a leaking drain over wood or drywall.
-
PATH 05Safety boundary
What you see
Water drains through the closed stopper but no water appears at the pivot entry or outside the drain assembly.
Do this next
Inspect the linkage and stopper seal only as the exact drain instructions permit, or request a plumber when the stopper is corroded, damaged, or non-removable.
Why this path and its safety boundary
Why it matters: The stopper seal, lift rod adjustment, pivot connection, or stopper position may be preventing a seal; this is not automatically a leaking pivot gasket.
Safety stop: Do not rotate the flange, force the stopper, or replace a pivot gasket without evidence that the pivot entry is the leak source.
Helpful context
Understand the symptom
Confirm the leak is at the pivot rod before touching the gasket
The pivot rod passes through the back of the pop-up drain body and operates the stopper. Water at that entry point is not the same problem as water at the flange under the sink bowl, the tailpiece connection, or the P-trap. Moen describes the pivot rod and waste plug as linked parts and notes that a broken or corroded part can affect stopper operation. Dry the cabinet area and trace the first wet point rather than tightening every nut.
The pivot gasket and seat are assembly-specific
A pivot rod commonly uses a sealing gasket and a seat around the rod ball, but their shape, order, and serviceability vary by drain assembly. Delta's published guidance for one plastic pop-up places the plastic pivot seat next to the ball and the rubber gasket beside it; this is an example, not a universal layout. Keep the parts together, photograph their original position, and use the exact manufacturer's installation information before removing or replacing them.
A stopper that does not hold water may have a different cause
If water drains through the closed stopper without wetting the pivot nut, inspect the stopper's seal and linkage rather than assuming the pivot gasket leaks. Delta also separates a flange seal from the pivot assembly and cautions that rotating the flange after sealing can break the seal. If the source is not the pivot entry point, follow that joint's instructions or arrange plumbing service instead of substituting a pivot gasket.
Safety boundary
Stop conditions
- Stop and protect the vanity when water reaches the cabinet, wall, flooring, electrical equipment, or concealed plumbing.
- Do not force a pivot nut, drain body, flange, plastic thread, stopper, or corroded rod; do not over-tighten to suppress a leak.
- Do not stack generic washers, cut or stretch a gasket, use thread tape or sealant on the pivot nut without exact manufacturer instructions, or substitute a part based only on appearance.
- Do not rotate the flange or pop-up drain body after sealing, and do not cover an active leak with exterior caulk.
- Arrange qualified plumbing service for an unknown assembly, damaged drain body or threads, concealed leak, persistent leak after approved reassembly, or any repair requiring wall or cabinet alteration.
Only after diagnosis
Potential parts
- pop-up drain pivot rod gasket and pivot seat
Consider this category only when the first wet point is the pivot rod entry and the exact drain instructions or technician confirm that the gasket or seat is damaged, missing, or incorrectly positioned.
Confirm the exact drain assembly, rod-ball size, seat shape, gasket material, and manufacturer's fit information before ordering; a visually similar seal may leak or prevent stopper movement. - pop-up drain stopper seal or O-ring
Consider this category only when water drains through the closed stopper without leaking at the pivot entry and the exact drain instructions identify a worn stopper seal.
Confirm the exact stopper and drain design and follow the manufacturer's replacement instructions; do not substitute this part for a confirmed pivot-entry seal. - pop-up drain flange sealing assembly
Consider this category only when the pivot remains dry and water first appears between the flange and the sink after the exact drain design is confirmed.
Confirm the sink material, drain design, sealant requirements, and manufacturer's instructions; do not rotate or reseal the flange by guesswork.
When checks do not resolve it
Need a professional?
Arrange qualified plumbing service when the leak cannot be localized to the pivot entry, the pivot gasket or seat is missing or model-unknown, the rod or drain body is corroded or damaged, the pivot still leaks after exact reassembly, the flange or trap leaks, or water is damaging the vanity or wall. Keep the sink out of service until the leaking joint is repaired and tested.
Safety scope: This article supports ordinary-access observation, protected short leak tests, and model-directed inspection only. A qualified plumber should handle concealed leaks, damaged or seized drain parts, flange removal, altered plumbing, and persistent leaks.
Common questions
FAQ
Where should the pivot rod gasket go on a vanity sink pop-up drain?
Do not assume every drain uses the same order. Use the exact drain manufacturer's diagram and keep the pivot seat, rod ball, gasket, and nut together. In Delta's referenced plastic assembly, the pivot seat sits next to the rod ball and the gasket sits beside the seat; that example does not establish fit for an unidentified drain.
How do I know whether the leak is the pivot gasket or the drain flange?
Dry the assembly and make a short, protected water test while watching the first wet point. Water at the horizontal rod entry supports a pivot gasket or seat check; water between the flange and sink is a separate flange-seal path. Do not rotate the flange while diagnosing it.
Can I use any rubber washer as a pivot rod gasket?
No. A gasket that looks similar can have the wrong thickness, material, or fit and can leak or bind the stopper. Confirm the exact drain assembly and manufacturer instructions, or have a plumber identify the compatible seal.
Why does the stopper leak even though the pivot nut stays dry?
The stopper seal, lift-rod linkage, pivot connection, flange seal, or drain-body position may be involved. Moen and Delta distinguish these parts and leak paths. Trace the first wet point and follow the exact drain instructions instead of replacing the pivot gasket without evidence.
When should a plumber repair a leaking pop-up drain?
Arrange plumbing service for an unknown or damaged assembly, corroded or seized parts, a concealed leak, water damage, a leak from the flange or trap, or a pivot that still leaks after the exact gasket and seat are correctly reassembled. Keep the sink out of service until it is repaired and tested.
Read the exact guide
Official sources
- Installation Guide Single-Control Lavatory FaucetKohler Co. · Kohler's installation guide illustrates one lavatory pop-up design; it supports the need to follow the exact model arrangement rather than assuming universal gasket placement.
- Drain Assembly- Plastic Pop-Up - Less Lift Rod - Bathroom in Brushed NickelDelta Faucet · Delta's product-specific Q&A is an example of one plastic pop-up assembly and must not be generalized to an unidentified vanity drain.
- Bathroom Faucet Drain: Immediately Leaking WaterMoen Solutions · Moen's bathroom faucet drain guidance is used for general pop-up drain mechanism distinctions; part numbers and arrangements vary by model.
- Why doesn't my pop-up sink stopper stop the water from draining?Delta Faucet · Delta guidance for pop-up sink stopper and flange behavior; exact sink and drain instructions control a particular installation.
Community feedback
Share a repair observation
Share a plain-text repair observation. Accepted observations are published automatically; this page may take a moment to update.