
On this page
Start here
Quick answer
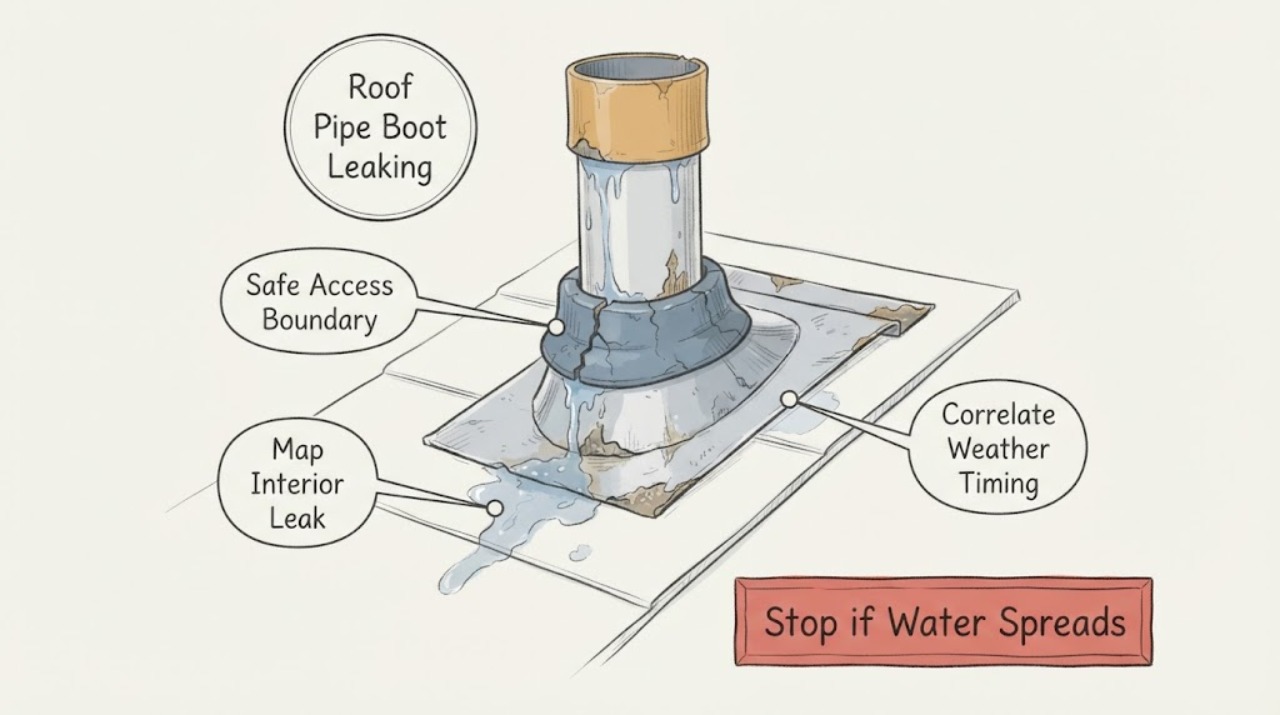
A cracked rubber collar on a plumbing vent pipe boot is a likely leak path, but water at the ceiling is not proof that the collar is the only failed layer. From the ground or another stable, dry location, document the pipe location, leak timing, and visible collar, flange, shingle, and interior ceiling clues. Do not climb onto the roof, walk on wet shingles, pull shingles, cut the boot, or smear sealant over the crack as a permanent repair. Arrange a qualified roofer to determine whether the boot/flashing needs replacement, whether surrounding shingles or deck are affected, and whether a compatible metal boot or other manufacturer-approved assembly is appropriate.
Before you begin
Safety first
- This article covers safe observation and service handoff only. A qualified roofer determines access controls, flashing removal, collar or boot replacement, shingle and underlayment work, deck inspection, and any compatible product selection.
Work through in order
Diagnostic checks
Use only checks that match the exact appliance or system and its official guide.
-
Check 1
Before inspecting the suspected pipe boot, decide whether the observation can be made entirely from the ground, a normal interior room, or another stable dry position; do not climb a ladder to the roof or step onto the roof.
Expected result: The pipe location and ceiling or attic clue are visible from a safe position, or the only useful view would require roof access, wet-weather access, or reaching near an edge.
Next step: Stay at the safe boundary, take photos from there, and tell the roofer that the roof-side collar could not be safely accessed.
Stop if: Stop for rain, snow, wind, wet or steep shingles, damaged decking, a ladder/edge exposure, or any need to lean, crawl, or reach onto the roof.
Why this matters
Why: A safe view is enough for documentation and triage. If roof access is required, the repair belongs with a roofer using an appropriate site-specific fall-protection setup; OSHA identifies roof work as a fall-exposure activity.
-
Check 2
From inside, map the ceiling or attic-side evidence below the vent line without opening drywall, walking on attic joists, moving insulation, or touching wet electrical equipment.
Expected result: Record a fresh drip, damp ring, stained or sagging drywall, wet insulation, mold-like discoloration, or no current moisture; note whether the mark is directly below the pipe or offset from it.
Next step: Photograph the area, record dimensions and the last rain or thaw, and keep clear of sagging or unstable material while arranging roofing assessment.
Stop if: Stop for water near wiring or fixtures, a bulging ceiling, falling material, suspected mold disturbance, or any need to enter an unsafe attic space.
Why this matters
Why: A fresh or expanding mark raises the urgency of water control, while an offset or old mark means water may have traveled along framing and does not rule out a roof-penetration leak. No current moisture does not rule out an intermittent rain leak.
-
Check 3
Compare the leak timing with ordinary rain, wind-driven rain, snow melt, and plumbing use from a safe location; do not spray the roof, run a hose, or create a load or water test.
Expected result: The leak starts during rain, after rain stops, during thaw, only with wind from one direction, or without a repeatable trigger; record the time delay and any change in the ceiling mark.
Next step: Send the timeline and photos to the roofer and mention any plumbing vent or interior plumbing event that coincided with the moisture.
Stop if: Do not enter the roof area to reproduce the leak and stop if water reaches electrical equipment or structural material appears compromised.
Why this matters
Why: Weather-linked timing supports investigation of the roof penetration and surrounding drainage, but timing alone cannot distinguish a cracked collar from a failed flange, shingle, fastener, or concealed deck condition. A leak unrelated to rain needs broader plumbing and roof assessment.
-
Check 4
From the ground or a safe distant view, photograph the vent pipe and classify only what is visible: collar cracking, a split or shrunken seal, lifted or missing flashing, exposed fasteners, displaced shingles, or damage around the pipe.
Expected result: The collar is visibly cracked while the flange looks flat; the flange is lifted or corroded; shingles or fasteners are disturbed; several layers look damaged; or the assembly cannot be seen clearly.
Next step: Give the photos and the exact pipe location to a roofer and ask for an assembly-level inspection, including the surrounding shingle courses and deck if water damage is suspected.
Stop if: Do not pull shingles, remove fasteners, cut the rubber, pry the flashing, or apply a permanent patch from an unsafe position.
Why this matters
Why: A visible collar crack supports a boot or collar evaluation, but a flat-looking flange does not clear hidden underlayment or deck damage. GAF installation material shows that the flashing, shingle overlap, fastening, and sealant details work as one assembly, so replacing only a visible rubber strip may leave the leak path in place.
-
Check 5
Decide whether the proposed temporary response is only water collection and interior protection, rather than a roof-side patch or sealant experiment.
Expected result: The plan keeps people clear and limits interior drips from a safe location, or it requires roof access, caulk over the collar, tape, cutting, lifting shingles, or a cover that could trap water.
Next step: Use only a safe interior container or protective measure that does not touch electricity or unstable material, then schedule prompt roofing service; do not treat the temporary measure as a repair.
Stop if: Stop the proposed work if it involves climbing, wet surfaces, live electrical equipment, roof cement on rubber/plastic, or any attempt to seal a hidden leak without diagnosis.
Why this matters
Why: Safe interior containment can reduce immediate mess, but it does not repair a cracked collar. GAF cautions that inappropriate sealant can degrade rubber or plastic and can trap water under the boot, so an improvised roof patch can obscure the defect or worsen the assembly.
-
Check 6
Prepare a service handoff with the pipe location, roof material and approximate age if known, safe-view photos, leak timing, interior damage, and any prior patch or replacement history.
Expected result: The roofer can identify the pipe from the photos and notes, or the location, roof slope, pipe size/material, or extent of water damage remains uncertain.
Next step: Request a qualified roofer to assess the collar, flange, shingles, underlayment, and deck as applicable, then choose a compatible replacement or repair system and confirm the work's water-shedding details.
Stop if: Do not order a part based only on pipe appearance, do not perform the roof repair yourself, and escalate urgently for active interior flooding, electrical contact, a sagging ceiling, or worsening structural damage.
Why this matters
Why: A complete handoff helps the roofer plan an assembly-level inspection. Uncertain size, slope, pipe material, or surrounding damage is a reason to inspect before ordering a replacement cover; product compatibility cannot be inferred from appearance or the word Perma-Boot alone.
Use your observations
Decision map
Find the observation that best matches what you see, then follow the next safe action.
-
PATH 01Safety boundary
What you see
Water is actively entering, reaching electrical equipment, or the ceiling is sagging or shedding material.
Do this next
Keep people out of the affected area, use only safe interior isolation from a dry position, and request urgent roofing and water-damage assessment.
Why this path and its safety boundary
Safety stop: Do not touch wet electrical equipment, puncture a bulging ceiling, enter unsafe attic space, or climb to the roof.
-
PATH 02Next step
What you see
A cracked or shrunken rubber collar is visible from a safe distance and the leak follows rain or thaw.
Do this next
Request prompt roofer inspection of the full pipe-boot/flashing assembly and surrounding shingles; the collar finding supports the diagnosis but does not select the replacement part.
-
PATH 03Next step
What you see
The flange is lifted, corroded, fasteners are exposed, or shingles around the pipe are displaced or damaged.
Do this next
Ask the roofer to assess the assembly and water-shedding layers together. Do not replace only the rubber collar or cover a damaged flange.
-
PATH 04Next step
What you see
The leak is intermittent, the visible collar cannot be confirmed, or the interior stain is offset from the pipe.
Do this next
Provide the timing log and photos and request broader roof and plumbing-source diagnosis rather than assuming the pipe boot is the sole source.
Helpful context
Understand the symptom
Why the rubber collar matters
The collar or seal around a plumbing vent pipe is one part of a roof penetration assembly. GAF describes damaged collars or flashing around vent pipes as common leak locations and shows pipe-boot flashing as the layer that protects the roof-to-pipe junction. A crack can let water past the pipe, but the leak may also involve the flange, shingle courses, fasteners, or roof deck below. The visible ceiling stain alone cannot identify which layer failed.
Perma-Boot or a replacement boot is a repair decision, not a diagnosis
A replacement boot or a metal external-cover product can be considered only after the pipe size, material, roof slope, flashing condition, and surrounding shingles are checked. GAF's metal Pivot product, for example, lists specific pipe types, opening sizes, roof slopes, and pipe heights; those limits are product-specific and are not proof that any named cover fits an existing roof. A roofer should select and install the assembly and inspect hidden water damage at the same time.
Control water while service is pending
Keep people away from any wet ceiling, dripping fixture, or fallen material. Use a container only from a safe interior position if it can be placed without contacting electrical equipment or unstable drywall, and document the leak instead of creating a roof patch. A temporary interior measure can limit mess; it does not restore the roof penetration or prove the leak source.
Safety boundary
Stop conditions
- Do not climb onto or walk on the roof to inspect or repair this leak; roof work requires an appropriate, site-specific fall-protection plan.
- Do not inspect wet or steep shingles, damaged decking, roof edges, or unsafe attic surfaces.
- Do not pull shingles, remove fasteners, cut a collar, pry flashing, apply roof cement to rubber/plastic, or use a hose test as a DIY diagnosis.
- Keep clear of wet electrical equipment, bulging ceilings, falling material, mold-like material, and active flooding; request urgent qualified help.
Only after diagnosis
Potential parts
- replacement plumbing vent pipe boot flashing
Consider only after the roofer confirms that the collar or flashing assembly is the failed layer and records the pipe material, opening size, roof slope, and surrounding roof condition.
Confirm the exact pipe type, inside or outside dimension, roof covering, slope range, installation details, and local requirements from the manufacturer's instructions; do not infer fit from a photo. - metal pipe boot flashing with protected collar
Consider only when a roofer confirms that a metal assembly is suitable for the existing pipe and roof and that it will address the complete penetration rather than cover hidden damage.
Product limits differ. Match pipe material, opening size, roof pitch, pipe height, and roof system instructions; the product name alone is not a compatibility claim.
When checks do not resolve it
Need a professional?
Request a qualified roofer promptly for a cracked collar with any leak, active or recurring water entry, a lifted or corroded flange, displaced shingles, uncertain leak location, or any roof-side access requirement. Request urgent response for active flooding, water near electricity, a sagging ceiling, falling material, or worsening structural damage.
Safety scope: This article covers safe observation and service handoff only. A qualified roofer determines access controls, flashing removal, collar or boot replacement, shingle and underlayment work, deck inspection, and any compatible product selection.
Have this ready
- Safe-view photos of the vent pipe and interior ceiling or attic-side evidence
- Pipe location, roof material, approximate roof age, and roof slope if safely known
- Rain, wind, thaw, or plumbing-use timing and any delay before moisture appeared
- Prior patch, collar, boot, or roof work and the date it was done
- Whether water reached electrical equipment, insulation, drywall, or other materials
Common questions
FAQ
Does a cracked rubber collar prove the pipe boot is the only leak source?
No. It is a strong clue, but the flange, shingles, fasteners, underlayment, pipe interface, or roof deck may also be involved. Have the roofer inspect the full penetration assembly and the interior water path.
Can I seal the crack with roof cement or caulk?
Do not use an improvised roof-side patch as the repair. GAF warns that inappropriate sealant can degrade rubber or plastic or trap water. Keep people safe, document the leak, and arrange qualified roofing service.
Is a Perma-Boot or metal cover automatically compatible?
No. Any replacement cover or boot must match the pipe material and dimensions, roof covering and slope, installation details, and the condition of the surrounding flashing and shingles. A roofer should verify those details before ordering or installing it.
Should I climb up to take a closer photo?
No. Use ground-level or safe interior documentation. Roof inspection and repair require appropriate fall protection and site-specific controls; do not walk on wet, steep, or damaged roofing.
When is a leaking pipe boot urgent?
Request urgent help for active flooding, water near electrical equipment, a sagging ceiling, falling material, worsening structural damage, or a leak that is spreading. Otherwise, schedule prompt roofing assessment because repeated wetting can damage concealed materials.
Read the exact guide
Official sources
- Master Flow™ Pivot™ Pipe Boot FlashingGAF · Supports conditional discussion of an all-metal replacement assembly and the need to confirm product-specific pipe dimensions and roof conditions before selection.
- How to Flash a Pipe on a Steep-Slope RoofGAF · Supports treating flashing, shingle overlap, rubber/plastic compatibility, and sealant use as an assembly concern rather than applying an improvised roof-cement patch.
- How to Spot and Prevent Roof Vent Pipe LeaksGAF · Supports the pipe penetration, collar/flashing leak-path explanation and the need to inspect the assembly rather than assume a ceiling stain identifies one failed part.
- Master Flow™ Pivot™ Pipe Boot Flashing — InstructionsGAF Master Flow · Supports the fact that a pipe-boot assembly has product-specific pipe, height, slope, flashing, fastening, and safety requirements; it is not a universal fit or DIY instruction for this roof.
- Fall Protection in Residential Construction - OSHA Guidance DocumentOccupational Safety and Health Administration · Supports the boundary against homeowner roof access and the need for trained, protected workers for roofing work; it does not prescribe a homeowner repair method.
Community feedback
Share a repair observation
Share a plain-text repair observation. Accepted observations are published automatically; this page may take a moment to update.