
On this page
Start here
Quick answer
A screen door that will not close is usually blocked by debris or a bent track, sitting out of the frame, riding on damaged or misadjusted rollers, or missing the latch, magnet, or receiver. First identify whether it is hinged, sliding, or retractable, then close it slowly and note whether the panel stops at the top, bottom, side, track, or latch. Clear only visible loose debris and inspect the panel, guides, rollers, magnets, and receiver using the exact manufacturer's instructions. Do not lift or push down on a retractable screen while operating it, force a panel into a track, bend a rail, cut mesh, drill new holes, or substitute hardware by appearance. If the screen is torn, the frame or track is crooked, the panel is heavy or falling, the door is a primary fall/security barrier, or a documented adjustment does not restore smooth closure, stop and arrange qualified door or window service.
Before you begin
Safety first
- This article supports design identification, safe observation, loose-debris clearing, and exact model-directed ordinary-access checks only. Do not force, bend, drill, cut, lift alone, change spring or cassette tension, or rely on a damaged insect screen for fall or security protection.
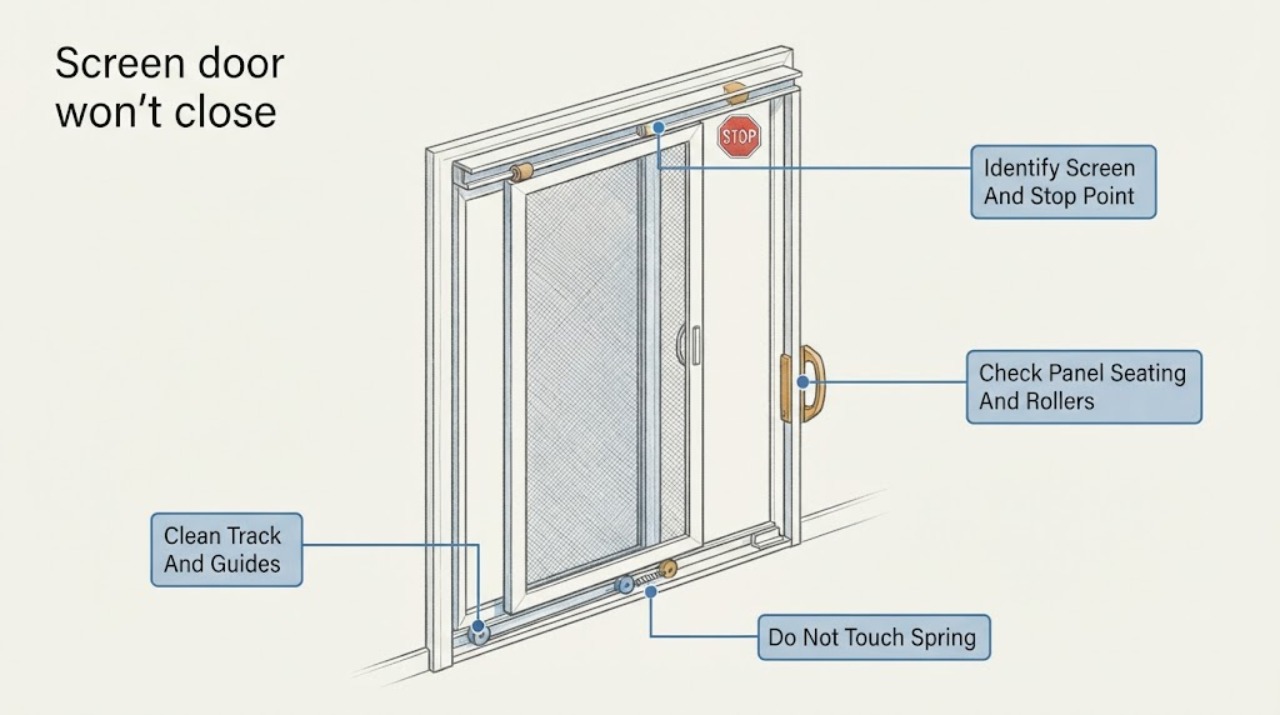
Work through in order
Diagnostic checks
Use only checks that match the exact appliance or system and its official guide.
-
Check 1
Stand clear of the opening and move the screen slowly through its normal travel without lifting, pushing down, or forcing the handle, pull bar, closer, latch, or magnet.
Expected result: Record whether the screen is hinged, gliding, or retractable; whether it stops at the top, bottom, side, track, mesh, magnet, latch, or receiver; and whether it scrapes, tilts, retracts unevenly, springs out, or has a torn mesh or damaged frame.
Next step: Photograph the first stop and identify the manufacturer, series, and door type before selecting a cleaning or adjustment procedure. Continue only with the exact model's ordinary-access guidance.
Stop if: Do not keep operating a screen that can fall, leave the track, expose a sharp frame or broken glass, or fail to protect an opening that people or pets could fall through.
Why this matters
Why: A stop in the track or at the frame suggests debris, panel seating, roller or guide alignment, or a crooked rail. A panel that reaches the frame but will not latch suggests magnet or receiver alignment. A falling, torn, or damaged screen is not a routine alignment issue.
-
Check 2
With the screen stopped and supported in its normal position, inspect the upper and lower track or guide for loose debris and remove only visible material using the manufacturer's permitted vacuum, soft cloth, or soft-bristle method.
Expected result: Record whether dirt or debris was present, whether the track is straight and undamaged, whether a guide is missing or crooked, and whether the panel moves smoothly afterward without rubbing or jumping.
Next step: Make one gentle closure check after cleaning. If the track is damaged, the panel remains stiff, or mesh is pulled from the track, stop and arrange manufacturer or qualified service.
Stop if: Do not pry the rail, scrape it with a sharp tool, drill it, bend it, pour liquid into a cassette, or use an oil-based cleaner that can attract more debris.
Why this matters
Why: Debris can obstruct a lower track or guide and prevent the screen from reaching its closed position. A track that remains crooked or damaged is an installation or component problem; cleaning cannot restore its geometry.
-
Check 3
For a gliding screen only, compare the panel's top and bottom engagement with the track and inspect visible rollers, springs, or guides for seating and damage; remove the panel only if the exact manufacturer procedure identifies a safe method and the panel can be handled without falling.
Expected result: Record whether the panel is tilted, a roller or spring is off its guide, the top or bottom edge binds, a roller is cracked or seized, or the screen is from a series whose roller design differs from the procedure being considered.
Next step: Re-seat or adjust only according to the exact product documentation; if a roller is damaged, the panel cannot be safely lifted, or the design is uncertain, request a technician and keep the panel secured.
Stop if: Do not lift a large panel alone, force the panel into a channel, raise or lower an adjustment screw by guesswork, or run the screen with a roller, spring, guide, or mesh edge visibly damaged.
Why this matters
Why: A panel that is not seated or a damaged roller can make the screen stick before it closes. Roller adjustment is series-specific; a procedure for one screen design can damage another, and a retractable or non-roller design needs its own guidance.
-
Check 4
With the screen moving freely and hands away from pinch points, inspect the closing magnet, pull bar, latch, strike, or receiver; operate the release or handle normally and compare the two mating parts without forcing them together.
Expected result: Record whether the magnet or latch is dirty, loose, missing, or above/below the receiver; whether the handle or release moves freely; and whether the screen reaches the frame but fails to seal or latch evenly.
Next step: Clean the mating surfaces only as instructed and use a documented receiver adjustment for the exact series. If the receiver, latch, magnet, or pull bar is damaged or the procedure requires drilling, cutting, or removing structural hardware, stop and request service.
Stop if: Do not force the latch, stretch the mesh to make contact, drill new holes, bend the receiver, glue on a magnet, or disable a closer or release feature.
Why this matters
Why: A clean, freely moving screen that stops at a misaligned receiver supports a hardware alignment issue. A stuck handle, broken latch, missing magnet, or receiver that has moved requires the exact manufacturer's procedure or replacement, not a bent rail or improvised magnet.
-
Check 5
After only the permitted cleaning or model-specific adjustment, make one attended, gentle open-and-close check while keeping the screen's path clear and preserving the primary door's normal security and fall-protection function.
Expected result: Record whether closure is smooth and even, whether the latch or magnet engages without a shove, and whether the screen returns to the track; note any continued binding, mesh tension, frame movement, sharp edge, or inability to secure the opening.
Next step: Stop repeated testing and provide the manufacturer, series, screen type, stop point, photos, and cleaning or adjustment result to qualified door/window service. Use a safe temporary opening control that does not load or damage the screen.
Stop if: Do not use a screen as a fall barrier, leave a retractable screen relied on to contain children or pets, or continue if the panel can fall, the track is damaged, or the opening cannot be secured normally.
Why this matters
Why: A smooth closure after clearing the path supports debris or seating as the cause. Continued binding, a crooked track, repeated derailment, damaged mesh, or a latch that still will not engage indicates a component, installation, or frame issue beyond safe generic troubleshooting.
Use your observations
Decision map
Find the observation that best matches what you see, then follow the next safe action.
-
PATH 01Safety boundary
What you see
The screen stops at the lower or upper guide and visible dirt or debris is present, with no crooked rail, torn mesh, or damaged frame.
Do this next
Remove loose debris using the exact care instructions, then make one gentle closure check.
Why this path and its safety boundary
Why it matters: A blocked track or guide is a plausible cause of the incomplete closure.
Safety stop: Do not scrape, pry, bend, drill, or pour liquid into the track or cassette; stop if the panel remains stiff or the guide is damaged.
-
PATH 02Safety boundary
What you see
A gliding screen is tilted, a roller or spring is off its guide, or the panel jumps, binds, or leaves the track.
Do this next
Use only the exact series procedure and safe handling method to re-seat or adjust it; arrange service for damaged rollers, springs, guides, or a panel that cannot be safely handled.
Why this path and its safety boundary
Why it matters: Panel seating or roller damage is more likely than a latch-only problem.
Safety stop: Do not lift a large panel alone, force it into the channel, or substitute a roller or spring by appearance.
-
PATH 03Safety boundary
What you see
The screen reaches the frame smoothly but the magnet, latch, or pull-bar hardware does not meet its receiver.
Do this next
Clean the mating surfaces and follow the documented receiver alignment for the exact product, or call service when hardware must be drilled, bent, or replaced.
Why this path and its safety boundary
Why it matters: The closing hardware or panel alignment is wrong even though the track may be clear.
Safety stop: Do not stretch the mesh, glue on a magnet, bend the receiver, force the latch, or drill new holes without exact instructions.
-
PATH 04Safety boundary
What you see
A retractable screen retracts unevenly, the mesh is out of the guide, the pull bar will not reach the latch, or the track appears crooked or damaged.
Do this next
Use the exact retractable-screen care procedure for a simple reset or cleaning only; contact the manufacturer or service provider for a damaged track, mesh, cassette, or tension mechanism.
Why this path and its safety boundary
Why it matters: Retractable cassette, guide, mesh, or track damage is possible; roller procedures for a gliding panel do not apply.
Safety stop: Do not lift or push down on the screen, apply inward/outward handle pressure, change factory-set tension, or use it as a barrier for people, pets, or objects.
-
PATH 05Safety boundary
What you see
The mesh or frame is torn, sharp, cracked, loose, falling, or unable to protect a doorway or opening normally.
Do this next
Keep people and pets away from the opening, use a safe temporary barrier or the primary door without loading the damaged screen, and arrange qualified service or exact replacement.
Why this path and its safety boundary
Why it matters: The screen is damaged or its safety function is compromised; ordinary cleaning or alignment is not enough.
Safety stop: Do not operate the damaged screen, remove a heavy panel alone, or rely on an insect screen as fall protection or security.
Helpful context
Understand the symptom
Identify the screen design before touching an adjustment
A hinged storm or screen door, a gliding insect-screen panel, and a retractable screen can all be described as a screen door but do not share the same hardware. A gliding panel uses tracks and rollers or springs; a retractable screen uses a cassette, guides, and a pull bar; a hinged unit may use a closer, magnets, or a latch rail. Start by identifying the design and the first point where closure stops. Andersen's guidance explicitly notes that roller directions vary by screen series and that some designs do not use rollers at all.
Clean and inspect the path before changing alignment
Dust, grit, insects, pet hair, or a small object in the lower guide can stop a screen before the magnet or latch meets its receiver. With the screen unloaded and supported by its normal track, vacuum or wipe visible debris according to the manufacturer's care instructions. Check for a crooked or damaged track, a mesh edge pulled out, a guide out of place, or a magnet that is dirty or no longer aligned. A damaged rail or frame is a service decision, not an invitation to bend it back.
Treat a stuck screen as a fall and damage risk
Do not pull a screen upward, push it down, or apply inward or outward force to make it latch. A panel that is out of its track, a retractable mesh that is snagged, or a heavy frame with a failed roller can drop or tear. Retractable insect screens are intended for insect control and are not designed to retain people, pets, or objects. If closure cannot be restored through the documented ordinary-access check, protect the opening and arrange service.
Safety boundary
Stop conditions
- Do not lift, push down, or apply inward/outward pressure to a retractable screen or force a gliding panel into its track.
- Do not bend, drill, cut, scrape, pry, glue, or permanently reshape a track, frame, mesh, guide, magnet, latch, or receiver to make the screen close.
- Do not change factory-set tension, remove a large screen panel alone, or handle a spring, roller, closer, or cassette without the exact instructions and safe support.
- Do not operate a screen with torn mesh, a crooked or damaged track, a loose or falling frame, sharp edges, or a latch that cannot secure it normally.
- Do not rely on a retractable insect screen to retain people, children, pets, or objects or to prevent someone from falling through an opening; arrange qualified service for a compromised opening.
Only after diagnosis
Potential parts
- model-specific screen roller, spring guide, or glide
Consider this category only when the exact screen series and inspection or technician diagnosis identify a damaged or worn roller, spring guide, or glide.
Confirm the exact series, vintage, panel position, roller or spring design, and safe removal method; official guidance notes that designs differ and a roller procedure may not apply. - model-specific latch, magnet, strike, or receiver
Consider this category only when the panel travels freely but the closing hardware is missing, damaged, or unadjustable under the exact product procedure.
Confirm the exact screen type, handing, receiver geometry, magnet or latch arrangement, and pre-existing mounting points; do not drill or substitute by appearance. - model-specific track, guide, mesh, or cassette component
Consider this category only when the track, guide, mesh, cassette, or frame is visibly damaged or a qualified technician confirms it cannot be restored by cleaning or documented adjustment.
Confirm the exact product family, dimensions, travel direction, tension or cassette design, and safe installation procedure; a damaged screen may need professional handling and cannot serve as a fall barrier.
When checks do not resolve it
Need a professional?
Arrange qualified door or window service when cleaning does not restore smooth closure, the track or frame is crooked or damaged, a gliding panel repeatedly leaves its track, rollers or springs are damaged, the retractable mesh or cassette is snagged, the latch or magnet remains misaligned, the screen is torn or falling, or any adjustment requires drilling, bending, cutting, lifting, spring work, or model-specific disassembly. Provide the manufacturer, series, screen type, first stop point, photos, and cleaning or adjustment result.
Safety scope: This article supports design identification, safe observation, loose-debris clearing, and exact model-directed ordinary-access checks only. Do not force, bend, drill, cut, lift alone, change spring or cassette tension, or rely on a damaged insect screen for fall or security protection.
Common questions
FAQ
Why does my screen door stop before it closes?
Identify the first stop: lower or upper track, side frame, mesh, magnet, latch, or receiver. Track debris, panel seating, rollers, and latch alignment are different branches. Clear only loose debris and follow the exact screen model's instructions; do not force or bend the frame.
How do I fix a sliding screen door that is hard to close?
Inspect and gently clean the upper and lower tracks first. If the panel is tilted, a roller is damaged, or it leaves the track, use only the exact series procedure or call service. Do not lift a large panel alone or adjust a roller by guessing which design it uses.
What if the screen reaches the frame but will not latch?
Check that the panel travels smoothly, then inspect the latch, magnet, pull bar, strike, or receiver for dirt, looseness, or offset. Clean or adjust only as the exact manufacturer guide allows; do not stretch mesh, glue on a magnet, or drill new holes.
Can I push down on a retractable screen to make it close?
No. Andersen's retractable-screen guidance says not to lift or push down while operating it and not to apply inward or outward pressure to the handle. If the mesh or track is snagged, stop and use the model-specific care procedure or arrange service.
Is a screen door safe if it will not close?
A damaged or unlatched screen should not be relied on for security or fall protection. Keep people and pets away from a compromised opening, use the primary door or a safe temporary barrier without loading the screen, and arrange qualified service when the frame, mesh, track, or latch is damaged.
Read the exact guide
Official sources
- Replacing the Latch Receiver and Screen Guides on 100 Series Gliding Patio DoorsAndersen Corporation · Official instructions for an identified Andersen 100 Series screen assembly; other screen doors may use different latch or receiver hardware.
- Adjust or Replace Rollers on Andersen Gliding Patio Door Insect ScreensAndersen Corporation · Official Andersen guidance for specified gliding patio-door insect-screen series; it expressly excludes some designs and cannot be generalized to every screen door.
- Insect Screen Installation and Adjustment on 100 Series Gliding Patio DoorAndersen Corporation · Official guidance for Andersen 100 Series gliding patio-door insect screens only; it does not establish fit or procedure for other screen designs.
- Clean and Maintain Andersen Retractable Screens on Gliding Patio DoorsAndersen Corporation · Official Andersen guidance for its retractable patio-door screens; other retractable or hinged screen designs require their own instructions.
Community feedback
Share a repair observation
Share a plain-text repair observation. Accepted observations are published automatically; this page may take a moment to update.