
On this page
Start here
Quick answer
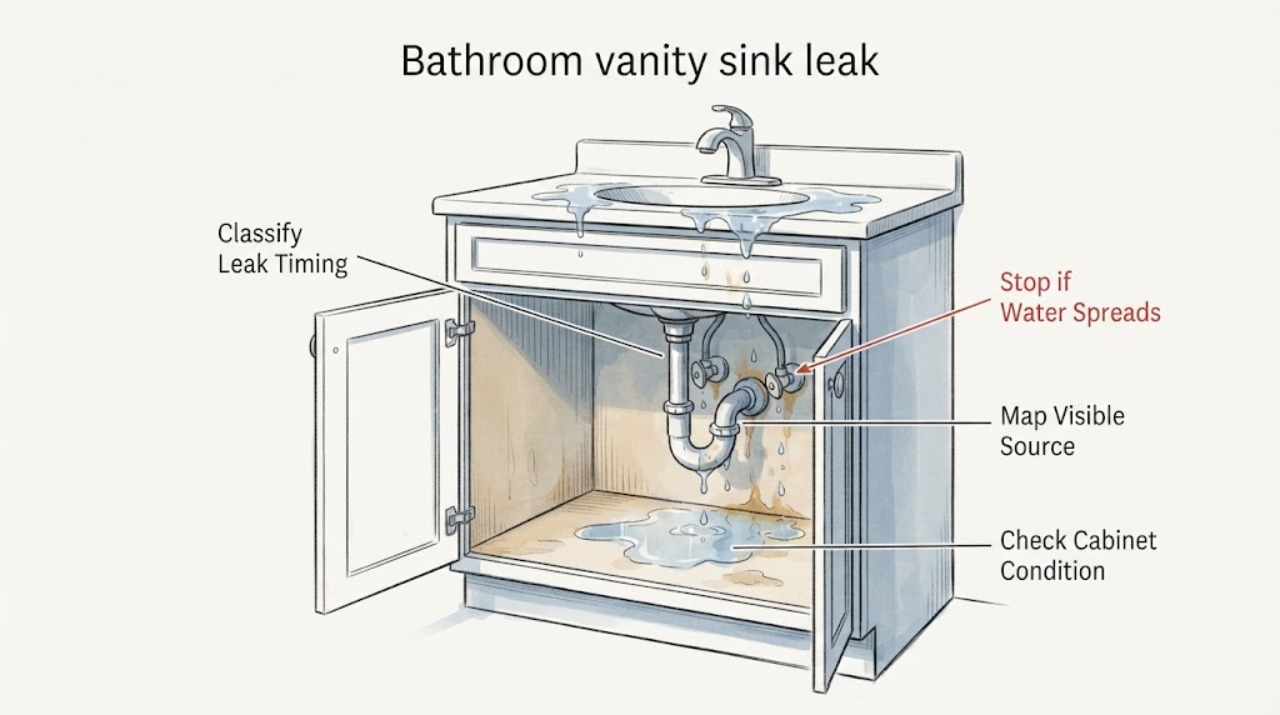
Treat a vanity sink leak as a source-identification and water-control problem first. From a dry, safe position, note whether water appears only while the faucet runs, only while the basin drains, or while everything is idle. Map the first visible wet point—faucet base or rim, supply connection or shutoff, drain flange or trap, cabinet floor, or an unseen area—without taking fittings apart. If flow is active, the source is hidden, the shutoff is inaccessible or leaking, the cabinet is swelling, or water is near electricity, stop using the sink and arrange qualified plumbing help; do not cut pipes, open walls, force valves, or perform a prolonged leak test.
Work through in order
Diagnostic checks
Use only checks that match the exact appliance or system and its official guide.
-
Check 1
From a dry, stable position, look at the already-visible area and, only if there is no uncontrolled flow or electrical hazard, make one brief normal faucet-use observation; do not touch fittings or keep repeating the test.
Expected result: Record whether moisture appears with the faucet on, only after the basin drains, or while the faucet is off and no water is being used.
Next step: Use the matching branch below, stop using the sink if water is active, and isolate an accessible fixture shutoff only when it is dry and operates normally without force.
Stop if: Stop immediately for uncontrolled flow, a hidden source, a seized or leaking shutoff, wet electrical equipment, standing water, or any need to extend the test.
Why this matters
Why: Faucet-on timing favors the faucet base, rim, or visible supply connection; drain timing favors the basin outlet, flange, or drain path; continuous moisture with no use raises the urgency for a supply, shutoff, or concealed source.
-
Check 2
With the water off, visually map the first wet point from the cabinet opening or sink edge without removing trim, hoses, the trap, the drain flange, or the faucet.
Expected result: Classify the visible location as faucet base/rim/basin, supply line or shutoff, drain flange/tailpiece/trap, cabinet floor or wall, or not visible.
Next step: Photograph the location and fitting layout for a plumber, then follow the faucet-use, drain-use, continuous, or hidden-source branch rather than ordering a generic part.
Stop if: Do not loosen, pry, cut, seal over, or force any fitting; stop if reaching the source would put a hand or tool into standing water or near electricity.
Why this matters
Why: A wet point above the cabinet floor can distinguish a faucet or drain assembly from water that has simply traveled along a surface; an unseen origin means the route cannot be safely diagnosed by observation alone.
-
Check 3
From outside the cabinet and without disturbing deposits or damaged material, inspect the accessible cabinet floor, sides, back, and stored contents for visible water damage.
Expected result: Note a dry cabinet, a stain or swollen edge, standing water, a persistent odor, or mold-like growth, and note whether any electrical device or outlet is nearby.
Next step: Remove only loose items that are reachable from a dry position, document the extent, and arrange plumbing and appropriate water-damage help when the cabinet or adjacent services are affected.
Stop if: Do not touch mold-like growth, wet electrical equipment, contaminated water, or unstable/swollen cabinet material; stop and seek professional help.
Why this matters
Why: Swelling, standing water, or a persistent odor suggests exposure beyond a single wipe-down; mold-like growth or water near electricity changes this from a simple source check to a professional safety issue.
-
Check 4
Visually identify the cold and hot fixture shutoffs under the vanity and note their condition without turning a valve that is corroded, wet, seized, or difficult to reach.
Expected result: Record whether a shutoff is visible, dry, and normally accessible; absent or inaccessible; or itself damp, corroded, or leaking.
Next step: If active water continues and the shutoff is not safely usable, stop using the fixture and call a qualified plumber with the valve condition and leak timing; do not move on to concealed plumbing.
Stop if: Stop before applying force, using tools, reaching through water, or contacting any wet electrical component.
Why this matters
Why: A dry, normally accessible shutoff may let the water supply be isolated when needed; an absent, inaccessible, or leaking shutoff means the user cannot safely rely on it to control the leak.
-
Check 5
Decide whether the source is visible, inactive when the fixture is unused, and safely isolated without disassembly or force.
Expected result: Answer yes only when all three conditions are true; answer no when the source is continuous, hidden, spreading into the cabinet, near electricity, or not safely controllable.
Next step: For no, stop using the vanity and use the service-call checklist. For yes, provide the timing, first wet point, photos, faucet identification, and shutoff condition to a qualified professional before any part is selected.
Stop if: Do not proceed to disassembly, pipe cutting, wall opening, forceful valve operation, or a long water test.
Why this matters
Why: Yes supports a documented, model-specific assessment of the visible faucet or drain component; no means the priority is water control and professional diagnosis, not a guessed repair kit.
Use your observations
Decision map
Find the observation that best matches what you see, then follow the next safe action.
-
PATH 01Safety boundary
What you see
Water appears only when the faucet runs and the first wet point is at the faucet base, rim, basin edge, or visible supply connection.
Do this next
Stop normal use, document the exact point and faucet model if visible, and have a qualified professional assess the faucet or connection; do not tighten or remove an unknown fitting under the sink.
Why this path and its safety boundary
Why it matters: The source is more consistent with the faucet, rim, basin, or supply side than with a drain-only leak.
Safety stop: Escalate immediately for spray, continuous flow, cabinet swelling, wet electricity, or an inaccessible shutoff.
-
PATH 02Safety boundary
What you see
Water appears when the basin drains, with the visible wet point at the drain flange, tailpiece, trap, or cabinet surface below it.
Do this next
Stop filling and draining the basin, photograph the drain layout, and have the drain assembly assessed for the correct flange, seal, or connection; do not remove the flange or cut pipe as a diagnostic step.
Why this path and its safety boundary
Why it matters: The timing and location favor the drain assembly or its connections, but the exact fitting still needs to be identified.
Safety stop: Stop if the drain source is not visible, the cabinet is saturated, or reaching it requires contact with standing water or electrical equipment.
-
PATH 03Safety boundary
What you see
Moisture continues with the faucet off, or no first wet point can be seen from a dry position.
Do this next
Stop using the vanity, isolate only a safely accessible fixture supply if it operates normally, and contact a qualified plumber for the supply, shutoff, or concealed route.
Why this path and its safety boundary
Why it matters: A supply, shutoff, or concealed route may be involved, so repeating faucet or drain tests will not make the situation safer.
Safety stop: Treat active flow, a leaking or seized shutoff, water in a wall or floor, or water near electricity as urgent; do not open the wall or cabinet structure.
-
PATH 04Safety boundary
What you see
The cabinet is swollen, standing water is present, mold-like growth is visible, or stored contents/electrical equipment were exposed.
Do this next
Keep people away from unsafe water, move only reachable dry items, document the condition, and arrange qualified plumbing plus appropriate water-damage or electrical evaluation as applicable.
Why this path and its safety boundary
Why it matters: The leak has created a material, indoor-environment, or electrical concern beyond identifying a replacement fitting.
Safety stop: Do not touch wet electrical parts, disturb mold-like growth, or use the cabinet if its floor or sides appear unstable.
Helpful context
Understand the symptom
Start with timing, not a replacement part
A leak that begins as soon as the faucet is opened points the investigation toward the faucet, its visible connections, or the basin/rim area. A leak that appears after water leaves the basin points toward the drain path. Water that returns with the faucet off is a different urgency: a supply, shutoff, or concealed leak may be involved. The same damp cabinet floor can be downstream from any of these sources, so timing and the first wet location matter more than the puddle alone.
Protect the cabinet while you observe
Move stored items away from the damp area only if they can be reached from a dry, stable position. Blot accessible standing water and leave the cabinet open for ordinary air circulation when that is safe, but do not disturb mold-like growth, wet electrical components, or swollen material. Do not keep running the faucet to reproduce a leak; one short, controlled observation is enough to choose the next branch.
Why the exact fitting still matters
Manufacturers separate faucet leak parts from drain components and advise identifying the product before selecting parts. Delta's opened guidance describes water escaping around a pop-up drain flange as a drain-assembly issue, which is different from a faucet supply leak. Treat any part suggestion as conditional until the model, fitting type, and visible source have been confirmed.
Safety boundary
Stop conditions
- Stop using the vanity and seek urgent help for uncontrolled flow, standing or contaminated water, wet electrical components, a seized or leaking shutoff, visible mold-like growth, unstable cabinet material, or a source behind a wall or floor.
- Do not cut pipe, open walls, force a valve, remove an unknown fitting, or perform prolonged leak testing.
- Do not disturb mold-like growth, touch wet electrical equipment, or use a swollen cabinet if its structure appears unstable.
Only after diagnosis
Potential parts
- sink-drain repair kit
Consider only after a professional confirms that the leak is in the visible drain assembly and identifies its flange, stopper, overflow, and connection configuration.
Match the exact sink and drain configuration; a generic kit is not proof that the leak is in the drain or that it fits. - leak alarm
An alarm can be a monitoring aid after the water source is addressed, especially where the cabinet is hard to observe; it does not stop or repair a leak.
Confirm that the alarm is intended for a dry accessible cabinet location and keep it away from standing water and energized equipment. - silicone caulk
Consider only when a qualified assessment identifies a nonstructural, visible rim or flange seal as the source; do not use caulk to hide an active supply, drain, or concealed leak.
Confirm the sink material and manufacturer's sealant guidance before selection; do not assume one sealant suits every basin or surface.
When checks do not resolve it
Need a professional?
Call a qualified plumber for any active or recurring leak, an unclear or concealed source, a leaking or inaccessible shutoff, a supply or drain connection, cabinet swelling, or any situation requiring disassembly. Add water-damage or electrical professionals when those hazards are present.
Have this ready
- The faucet and sink brand/model if known
- Whether water appears during faucet use, basin draining, or while idle
- The first visible wet point and photos from a dry position
- Cabinet damage and whether any electrical equipment was exposed
- Shutoff accessibility and any recent installation or plumbing work
Common questions
FAQ
How can I tell whether the bathroom vanity leak is from the faucet or the drain?
Use one brief, safe timing observation: faucet-on timing points toward the faucet, rim, or supply side; drain-only timing points toward the basin outlet or drain path; moisture while idle raises concern for a supply, shutoff, or concealed route. The first visible wet point is more useful than the puddle on the cabinet floor.
Should I keep running the sink to find the leak?
No. A single normal-use observation is enough when the area is dry and safe. Stop if water is active, the source is hidden, the cabinet is swelling, or electricity could be wet, and arrange professional assessment.
Is a sink drain repair kit automatically the right part?
No. A drain kit is conditional on confirming that the drain assembly is the source and matching the sink's configuration. Faucet, supply, shutoff, and concealed leaks require a different assessment.
What should I do if the vanity cabinet is swollen?
Stop using the sink, document the visible damage, and move only reachable items from a dry position. Do not disturb mold-like growth or touch wet electrical equipment; arrange plumbing and appropriate water-damage help.
Read the exact guide
Official sources
- Find Parts and Identify Your Product | Delta FaucetDelta Faucet · Supports identifying the faucet/model and treating faucet leak parts as issue- and model-dependent; it is not a diagnosis of an unknown vanity leak.
- Why doesn't my pop-up sink stopper stop the water from draining? | Delta FaucetDelta Faucet · Useful for distinguishing a drain-flange or pop-up drain leak from a faucet or supply leak; it does not establish a model-independent repair instruction.
Community feedback
Share a repair observation
Share a plain-text repair observation. Accepted observations are published automatically; this page may take a moment to update.