
On this page
Start here
Quick answer
An Electrolux refrigerator ice maker can appear not to work when it is turned off, the water supply is closed or kinked, the filter is restricted or not seated, the freezer is not cold enough, the bin or signal arm is not positioned correctly, or the refrigerator has not yet had time to stabilize after installation or a power interruption. First identify whether your model uses a display control or a wire signal arm, confirm the unit has power and water, check the filter and visible tubing, and allow the model-specific cooling/ice-making time. A newly installed refrigerator may have two or three empty cycles and may need up to 24 hours before producing ice. If the freezer is not cooling, an error returns, water leaks toward electrical parts, you smell burning, see damaged wiring, or the ice maker still does not produce after the safe checks, leave it off and arrange authorized service. Do not remove covers, probe the inlet valve, bypass a sensor or door switch, or test energized wiring.
Before you begin
Safety first
- The user may check power from a dry position, confirm the visible water valve and tubing, use the exact model's ice-maker control, inspect and reseat the bin, and change a model-approved filter as directed. Internal valves, ice-maker mechanisms, sensors, controls, wiring, cooling systems, live testing, and forced-cycle procedures are for qualified personnel.
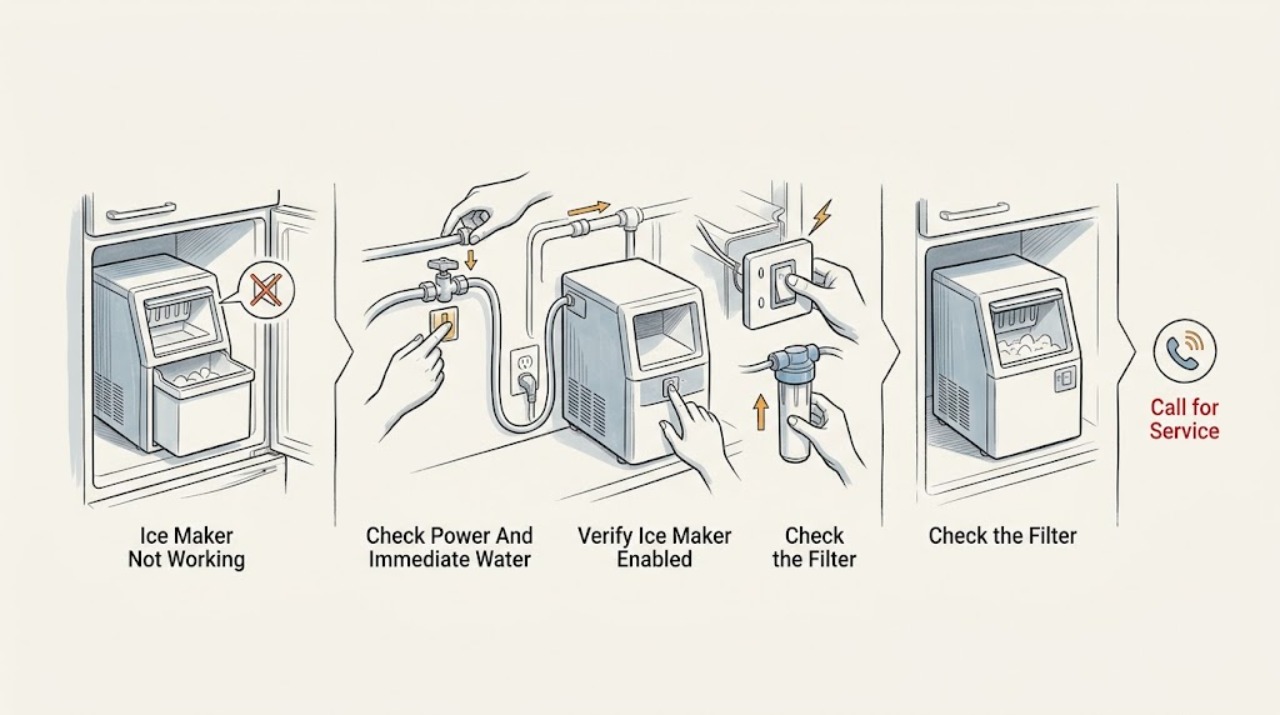
Work through in order
Diagnostic checks
Use only checks that match the exact appliance or system and its official guide.
-
Check 1
From a dry position, confirm that the refrigerator has interior light or display power and that the plug is secure. Look only at accessible areas for a wet floor, water near the receptacle or cord, burning odor, scorching, sparking, or a hot/damaged plug. If there is a water leak near electricity or an electrical hazard, stop and isolate power only from a safe dry location; close the household water valve if the leak is from the supply line.
Expected result: The refrigerator is completely unpowered; it has normal power with no hazard; or there is water near electrics, burning odor, smoke, heat damage, or sparking.
Next step: If there is no hazard, verify the outlet with a suitable appliance and check the refrigerator breaker once; restore power only if safe. If a breaker trips again or any water/electrical hazard is present, leave the refrigerator off and arrange qualified appliance/electrical service.
Stop if: Do not repeatedly reset a tripping breaker, touch wet electrical parts, pull a built-in unit out, use an extension cord, or reconnect a smoking, sparking, or heat-damaged refrigerator.
Why this matters
Why: A dead refrigerator cannot make ice, while water/electrical damage is a stop-use event rather than an ice-maker adjustment. Electrolux directs users to check power and the outlet, but an appliance with unsafe electrical symptoms needs service.
-
Check 2
Using the exact user manual, identify the ice-maker control for this refrigerator. Confirm the display setting is ON, or that the wire signal arm is fully down in the ON position where that design is used. Check that the ice bin or container is present, fully seated under the maker, and not visibly full or packed with old clumped ice. Do not force an arm, remove a fixed ice-maker cover, or use a sharp tool.
Expected result: The maker is OFF, the wire arm is raised or not latched, the bin is missing/misaligned/full, or the maker is enabled and the bin is correctly seated.
Next step: Correct only the visible setting or bin position described in the manual, then allow the refrigerator's normal cycle time. If it is already enabled and correctly seated, continue to the water check rather than repeatedly toggling it.
Stop if: Do not bypass a full-bin signal, force the ice-maker arm, remove internal covers, or reach into a moving or energized mechanism.
Why this matters
Why: An OFF state, a raised signal arm, a full container, or an incorrectly seated bin can stop or mask production. The exact controls differ by Electrolux refrigerator design, so a setting from another model is not proof for yours.
-
Check 3
With the refrigerator in place, inspect the accessible household shutoff valve and the visible supply tubing for a closed valve, a kink where the cabinet meets the wall, or a leak. If the refrigerator has a water dispenser, observe whether water flow is absent or much slower than usual. Check that the water filter is the model-specified type, fully seated and not visibly cracked or frozen; replace it only according to the manual when it is restricted or at the stated service interval.
Expected result: The valve is closed, the line is kinked or leaking, water is absent/slow, the filter is loose or restricted, or the accessible water path appears normal.
Next step: Open the household valve only if there is no leak and the installation permits it, gently correct a visible tubing bend without pulling the appliance, and reseat or replace the filter as the manual directs. Purge/prime a new line or filter using the model instructions, then allow a full ice-making period.
Stop if: Do not disconnect pressurized tubing, probe the inlet valve, force a filter, operate with a leaking connection, or continue if water reaches electrical parts.
Why this matters
Why: The ice maker needs water. Electrolux lists an unopened or kinked line and a poorly seated or clogged filter as no-ice causes; slow or absent dispenser flow supports a water-path restriction, but does not identify which internal component is at fault.
-
Check 4
Check whether the freezer is actually freezing and whether the refrigerator was recently installed, unplugged, or affected by a power outage. Use the displayed setting or a thermometer without dismantling the appliance; keep doors closed and allow the model's stabilization time. Do not assume the ice maker can produce while the freezer is warm, even if the ice-maker button is ON.
Expected result: The freezer is warm or not cooling, the unit was just installed or power was interrupted, or the freezer is cold and stable but no ice is produced.
Next step: For a recent installation or outage, restore the model-specified settings and wait the documented stabilization period. If the freezer remains warm, address the refrigerator cooling problem first; if it is cold and stable with no ice after the period, record the symptom and escalate.
Stop if: Do not remove evaporator covers, chip frost with a sharp object, add unapproved heat, or adjust sealed-system or electrical components.
Why this matters
Why: Electrolux says insufficient freezer temperature can prevent ice production and that a newly installed unit may require up to 24 hours, with air in new plumbing causing initial empty cycles. A cold stable freezer with continued no production makes a water, control, sensor, or ice-maker fault more likely.
-
Check 5
If the maker is enabled, the bin is correctly placed, the water path is available, and the freezer is cold after the model-specific waiting period, record the model code/PNC, serial number, exact display message or alarm, installation or outage date, dispenser-flow result, filter history, and whether any water or electrical symptom occurred. Keep the refrigerator operating only when it is otherwise safe and cooling normally; otherwise leave it off and contact an Electrolux-authorized technician.
Expected result: No ice persists after the safe checks, an error/alarm returns, the freezer is not cooling, or there is a leak, burning odor, repeated trip, or other electrical symptom.
Next step: Arrange authorized service and provide the recorded observations. Protect perishable food if the freezer temperature is unsafe. Do not order an internal part from the symptom alone or run a forced harvest/fill test unless a qualified technician directs it for the exact model.
Stop if: Do not open the rear or ice-maker housing, test live voltage, bridge a door/temperature switch, bypass a sensor, or reconnect a leaking or electrically damaged appliance to reproduce the fault.
Why this matters
Why: Persistent no-ice with normal external conditions may involve an inlet valve, ice-maker assembly, temperature sensor, door/control signal, wiring, or electronic control, but the symptom cannot identify a part safely. Repeated codes or broader cooling failure increase the need for service.
Use your observations
Decision map
Find the observation that best matches what you see, then follow the next safe action.
-
PATH 01Safety boundary
What you see
The refrigerator was installed, reconnected, or affected by a power outage within the last day, and the freezer has not yet stabilized.
Do this next
Confirm the water connection and maker ON state, then allow the exact model's documented stabilization period; Electrolux installation guidance allows up to 24 hours for production to begin.
Why this path and its safety boundary
Why it matters: Air in new plumbing and recovery to temperature can produce empty cycles or delayed ice without proving an ice-maker failure.
Safety stop: Stop and call service for a leak, no cooling, electrical hazard, or a repeated fault after safe power restoration.
-
PATH 02Safety boundary
What you see
The display says ice OFF, a model with a wire arm has the arm raised, or the bin is absent, full, or not seated.
Do this next
Set ON or lower the arm and seat the bin only as the exact manual shows, then wait for a normal cycle.
Why this path and its safety boundary
Why it matters: The ice maker may be intentionally inhibited or its level/bin signal may not be satisfied; this is more likely than an internal part failure.
Safety stop: Do not force the arm, bypass the full-bin signal, or remove covers.
-
PATH 03Safety boundary
What you see
The household valve is closed, the line is kinked, water flow is absent or slow, or the filter is loose, frozen, cracked, or overdue under the model instructions.
Do this next
Correct the visible valve/tubing issue and reseat or replace the filter per the manual; prime a new line/filter and allow a complete cycle.
Why this path and its safety boundary
Why it matters: Restricted water delivery is more likely than a failed ice-maker mechanism, but the external checks cannot distinguish a hidden valve or internal fault.
Safety stop: Stop for any leak or water near electricity; do not disconnect pressurized tubing or probe internal valves.
-
PATH 04Safety boundary
What you see
The freezer is warmer than it should be, the refrigerator is not cooling, frost/airflow symptoms are present, or the unit has not recovered after installation or outage.
Do this next
Follow the model-specific cooling guidance and contact service if the freezer does not reach normal operation or an error returns. Keep the ice maker off if water is unavailable.
Why this path and its safety boundary
Why it matters: Ice making depends on adequate freezing; a refrigerator cooling problem takes priority over replacing an ice-maker part.
Safety stop: Do not remove cooling-system covers, defrost with an open flame or improvised heater, or work on the sealed system.
-
PATH 05Safety boundary
What you see
The maker is ON, the bin and water path are normal, the freezer is cold and stable, but no ice is produced; or a code, leak, burning smell, repeated trip, or broader malfunction is present.
Do this next
Leave the appliance off when a safety sign or cooling failure exists; otherwise arrange Electrolux-authorized service and provide the model/PNC, code, timing, and checks already completed.
Why this path and its safety boundary
Why it matters: An internal valve, ice-maker, sensor, control, wiring, or cooling fault is possible, and no safe external observation can identify the failed part.
Safety stop: Do not perform live tests, forced harvest/fill procedures, bypasses, or internal part replacement.
Helpful context
Understand the symptom
First separate no ice from no dispensing
This page is about the ice maker not making cubes. A dispenser may also fail because the bin is empty, a door is open, the display is locked, or ice is frozen around the auger; that is a different symptom. Look in the bin or tray before concluding that the ice maker has stopped. Electrolux also warns that not every top-freezer refrigerator includes an ice maker, and some models use a display button while others use a wire signal arm. Follow the controls and layout in the exact model manual.
The usual safe causes are state, water, and temperature
A no-ice report is most useful when paired with three observations: whether the maker is enabled, whether water can reach the refrigerator, and whether the freezer is cold enough to complete a cycle. A newly installed unit can have empty cycles while air leaves the water line, and Electrolux says production may take about 24 hours after the refrigerator has cooled. A closed household valve, kinked line behind the cabinet, filter restriction, or warm freezer can prevent filling even when the ice-maker controls look normal.
When the checks stop being a DIY problem
Do not infer a failed inlet valve, motor, sensor, heater, or control from no ice alone. If the freezer itself is not cooling, an error or alarm returns, the unit leaks, or a power or electrical symptom appears, protect food and keep the appliance off as appropriate while arranging service. Internal access, live measurements, forced cycling, and bypassing a door or temperature control can create shock, water, or equipment hazards and belong to a qualified technician.
Safety boundary
Stop conditions
- Stop immediately for water near a receptacle, cord, or control; smoke, burning odor, sparking, scorching, a hot/damaged plug, or a breaker that trips again.
- Do not keep using the refrigerator if it is not cooling or a repeated error/alarm indicates a broader appliance fault; protect perishable food and arrange service.
- Do not disconnect pressurized water tubing, open the rear or ice-maker housing, or work on a sealed cooling system.
- Do not perform live-voltage tests, forced harvest/fill tests, sensor or door-switch bypasses, or internal part replacement.
- Use only the exact model manual for the maker control, bin, filter, temperature, and reset behavior; do not assume another Electrolux model is identical.
When checks do not resolve it
Need a professional?
Contact Electrolux or an authorized appliance technician when the ice maker remains enabled but produces no ice after the model-specific stabilization period and the visible water, filter, bin, and freezer checks are normal; when the freezer is not cooling; when an error or alarm returns; or whenever there is a leak near electrical parts, burning odor, smoke, sparking, heat damage, or repeated breaker trips. Have the model code/PNC, serial number, exact code, installation/outage date, filter history, water-flow observation, and freezer-temperature observation ready.
Safety scope: The user may check power from a dry position, confirm the visible water valve and tubing, use the exact model's ice-maker control, inspect and reseat the bin, and change a model-approved filter as directed. Internal valves, ice-maker mechanisms, sensors, controls, wiring, cooling systems, live testing, and forced-cycle procedures are for qualified personnel.
Common questions
FAQ
How long should an Electrolux refrigerator take to make ice after installation?
Air in new plumbing can cause two or three empty cycles. Electrolux says the refrigerator should cool for several hours and can produce ice within about 24 hours; exact production timing depends on the model and conditions. If the freezer is not cold or no ice appears after the model-specific period, continue with the water checks and service boundary.
How do I turn on an Electrolux ice maker?
Use the exact model manual. Some Electrolux models use an ice-maker ON/OFF control on the display; top-freezer designs with a wire signal arm generally use the arm in the down/ON position. Not every top-freezer refrigerator includes an ice maker.
Can a water filter stop an Electrolux ice maker?
Yes. Electrolux lists a filter that is not seated correctly or is restricted as a possible no-ice cause. Slow or absent water flow supports checking the filter and supply, but replace or reseat it only as the exact model manual directs.
Why is my Electrolux ice maker on but not making ice?
Check whether the freezer is cold enough, the household water valve is open, the supply line is kinked, and the filter is seated and flowing. If these conditions are normal and the model-specific waiting period has passed, an internal valve, ice-maker, sensor, control, or cooling issue is possible and needs professional diagnosis.
When should I stop using the refrigerator and call service?
Stop for water near electrical parts, smoke, burning odor, sparking, a hot or damaged plug, repeated breaker trips, a persistent leak, a freezer that is not cooling, or a recurring error. Do not open the ice-maker housing or perform live tests; give the technician the model/PNC, code, water-flow result, and freezer-temperature observations.
Read the exact guide
Official sources
- My refrigerator was just installed and the ice maker is not working, how do I fix it?Electrolux · Electrolux refrigerators, French-door refrigerators, side-by-side refrigerators, and top-freezer refrigerators covered by the support article.
- ICE + WATER TROUBLESHOOTING - Electrolux refrigerator manualElectrolux Australia · The refrigerator family covered by this manual; details such as production amount and controls are not universal across Electrolux models.
- 11. TROUBLESHOOTING - Electrolux refrigerator user manualElectrolux Australia · The exact manual model shown in the PDF; used for the manufacturer-documented categories, not as a universal code or part map for every Electrolux model.
- Temperature in the fridge-freezer is too high, too warm, not cooling or not coldElectrolux UK · Electrolux fridge-freezer and refrigerator models covered by the UK support guidance; controls and temperatures may vary by model and climate class.
- Electrolux fridge-freezer shows an error code - what does it mean?Electrolux UK · Electrolux fridge-freezer error displays; the meaning of each code remains model-specific.
- Refrigerators - No WaterElectrolux · Electrolux refrigerators with a water connection/dispenser; exact filter and purge instructions remain model-specific.
- Refrigerators - How do I use my ice maker in my Top-Freezer refrigerator?Electrolux · Top-freezer Electrolux models that are equipped with an ice maker; the page says not all top-freezer models have one.
- My fridge freezer is not workingElectrolux UK · Electrolux fridge freezers, freezers, and chest freezers covered by the support page; use the model manual for controls.
- Refrigerator No PowerElectrolux · All refrigerators covered by the support article; electrical repairs are not user DIY work.
Community feedback
Share a repair observation
Share a plain-text repair observation. Accepted observations are published automatically; this page may take a moment to update.