
On this page
Start here
Quick answer
If a Hotpoint dryer will not turn on, start with the low-risk checks: confirm the plug is fully seated, the door closes tightly, the intended cycle and temperature are selected, and the START control is pressed fully. Check the household breaker or fuse from the normal panel position; an electric dryer can appear completely dead when its dedicated circuit is partly tripped. Some newer models may display a personality setting that must match electric or gas operation. Do not remove the rear terminal-block cover, touch wiring, bypass the door switch, or repeatedly reset a breaker. Stop for a hot or damaged cord, a scorched switch, smoke, sparking, or a burning smell, and arrange qualified appliance or electrical service when the dryer remains unresponsive.
Before you begin
Safety first
- This article supports external start-input, circuit, display, door, and cord observations only. Do not open the cabinet, touch live wiring, bypass the door interlock, or reconnect the terminal block.
Work through in order
Diagnostic checks
Use only checks that match the exact appliance or system and its official guide.
-
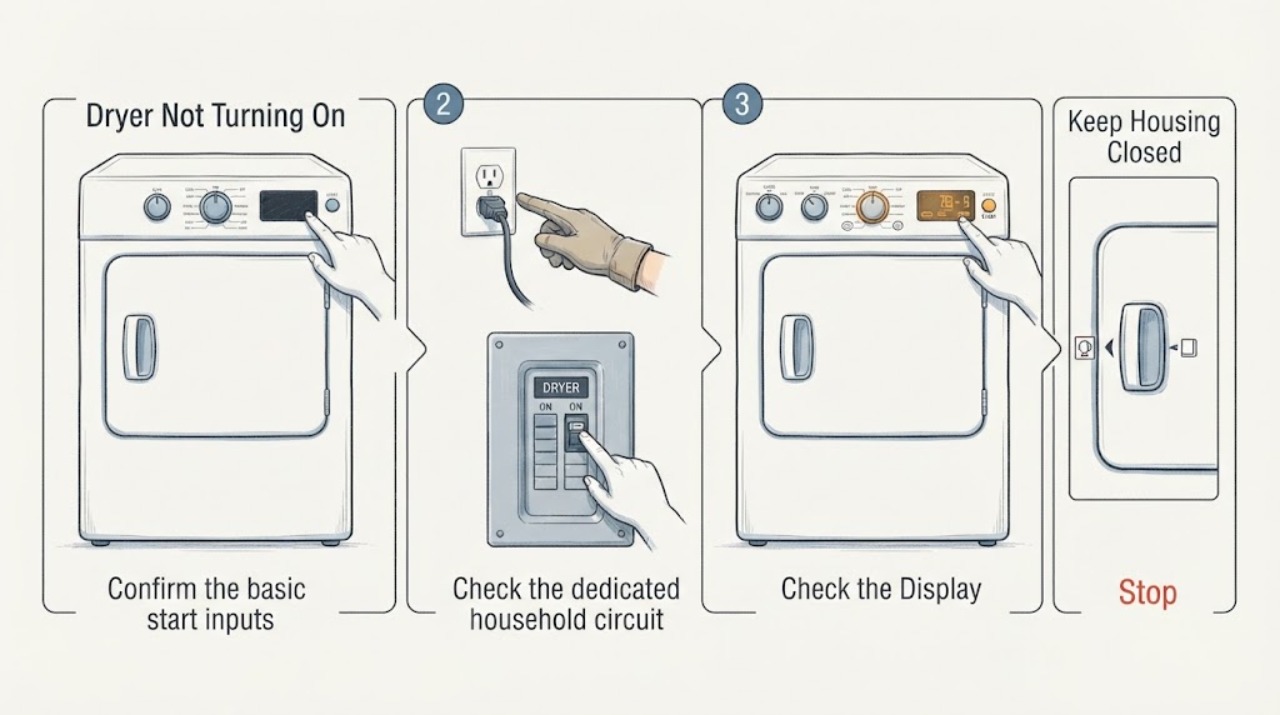
Confirm the basic start inputs
With the drum empty and the dryer stopped, push the plug fully into the wall outlet, close the door firmly, select the intended fabric, temperature, and drying time, and press START fully once.
Expected result: The display or motor responds, the door does not latch tightly, START is accepted only intermittently, or the dryer remains completely silent and dark.
Next step: Continue to the breaker or fuse check when the dryer remains unresponsive; stop if the plug, outlet, cord, or door area is hot, scorched, damaged, or arcing.
Stop if: Do not force the door, hold the door switch closed, use a tool to press START, or operate the dryer with a damaged cord or outlet.
Why this matters
Why: A loose plug, open door, incomplete cycle selection, or incomplete START input can prevent a normal start. A silent, dark dryer after these checks moves the decision toward household power or an appliance fault.
-
Check the dedicated household circuit
With the dryer controls off, inspect the household breaker or fuse panel from its normal accessible position and identify the circuit that supplies the dryer; reset a breaker only once by moving it fully off and then on, as the panel and model instructions allow.
Expected result: A breaker was partly tripped or a fuse is open, the dryer returns to life after one permitted reset, or the breaker trips again and the dryer stays dead.
Next step: If power returns and the panel, plug, and cord are normal, perform one supervised start; leave the dryer off and arrange electrical or appliance service for a repeat trip or persistent no power.
Stop if: Do not replace a fuse with a different type, repeatedly reset the breaker, remove panel covers, or touch conductors.
Why this matters
Why: A partly tripped circuit can make the dryer appear dead. A repeat trip indicates an electrical fault or overload and is not resolved by repeated resets; the appliance and circuit need qualified diagnosis.
-
Check for a model-specific display setting
If the display shows a single digit or another setup prompt instead of a normal cycle, consult the exact Hotpoint manual and check whether the model uses a personality or configuration setting; do not change wiring or open the console.
Expected result: The display shows a configuration prompt and the dryer does not start or tumble, or the display is normal but the START command still does nothing.
Next step: Follow only the exact manual's configuration procedure; if the setting is absent, unclear, or does not restore operation, stop changing settings and arrange service.
Stop if: Do not guess a configuration, bypass a control lock or interlock, or continue if the display is erratic, hot, or accompanied by smoke or sparking.
Why this matters
Why: Some newer GE-family dryers use a model-specific personality selection that can prevent operation when it is not set correctly. A normal display with no response points toward door sensing, controls, power delivery, or service.
-
Inspect the visible door and switch area
Open the dryer door and inspect the visible latch and door-switch area from outside for a pushed-in, cracked, scorched, or displaced switch, lint or clothing preventing closure, or a door that sits out of alignment; remove only loose lint or clothing with the dryer off.
Expected result: The door closes squarely and the visible switch is intact, or the switch is pushed in, scorched, loose-looking, or the door cannot engage it reliably.
Next step: If the door and switch look normal, continue to the controlled retest; if damaged or unreliable, leave the dryer off and arrange qualified appliance service.
Stop if: Do not hold the switch closed, tape it, bend the latch, remove the front panel, or reach into moving or energized parts.
Why this matters
Why: The dryer may not start when the door interlock is not engaged. A scorched or displaced switch is a fault and may also indicate heat or wiring damage; it should not be bypassed.
-
Check the plug and cord without opening the dryer
From outside the appliance, inspect the plug, receptacle, visible cord, and accessible rear cover for looseness, melting, fraying, scorching, or a burning odor without removing the terminal-block cover or pulling the dryer away from the wall.
Expected result: The external connection appears intact, or there is visible heat damage, a loose connection, exposed conductor, odor, smoke, or a hot receptacle.
Next step: Use the dryer only if the exterior is normal and the prior checks support a safe test; isolate power from a safe accessible control and arrange qualified electrical or appliance service for any damage.
Stop if: Do not remove covers, reconnect conductors, use an extension cord, touch exposed wire, or operate a hot, loose, melted, or scorched connection.
Why this matters
Why: A damaged power connection can stop the dryer and create shock or fire risk. An intact exterior does not prove that internal wiring, controls, or motor parts are sound.
-
Perform one controlled retest and escalate
After the plug, door, circuit, display setting, and exterior hazard checks are normal, place a small suitable load in the drum, close the door, select a normal cycle, and press START once while staying nearby.
Expected result: The drum starts normally, the display responds but the drum does not move, the dryer starts and stops immediately, or it remains silent and unresponsive.
Next step: Stop testing and provide the model, display behavior, door-switch observation, circuit result, and any damage to qualified service when the dryer remains unresponsive or stops abnormally.
Stop if: Do not repeat start cycles, bypass the door interlock, open the cabinet, or continue after a burning odor, smoke, sparking, unusual noise, or heat damage.
Why this matters
Why: A normal start supports a corrected input or supply condition. A continuing no-start symptom can involve the door switch, motor, timer, control, wiring, or another internal part that cannot be safely isolated from outside.
Use your observations
Decision map
Find the observation that best matches what you see, then follow the next safe action.
-
PATH 01Safety boundary
What you see
The plug was loose, the door was not closing tightly, the cycle or temperature was not selected, or START was not pressed fully.
Do this next
Correct the external input and perform one supervised start with no damage or hazard present.
Why this path and its safety boundary
Why it matters: A basic start input explains the no-start symptom without proving an internal failure.
Safety stop: Stop if the dryer remains dead or if the door, plug, outlet, or switch is damaged.
-
PATH 02Safety boundary
What you see
The dryer circuit was partly tripped or a fuse was open, and one permitted reset restores the display or start response.
Do this next
Observe one normal start only if the connection is cool and intact, then arrange service if the trip returns or the dryer remains unreliable.
Why this path and its safety boundary
Why it matters: Household power delivery interrupted operation; a repeat trip is an unresolved electrical fault.
Safety stop: Do not repeatedly reset, change fuse type, or touch the panel or conductors.
-
PATH 03Safety boundary
What you see
A newer model shows a configuration or personality prompt and will not start or tumble.
Do this next
Use the exact owner instructions for that display and stop changing settings when the prompt is unclear or the fault remains.
Why this path and its safety boundary
Why it matters: The dryer may need the exact model's setup selection before normal operation; the setting varies by fuel type and model.
Safety stop: Do not guess settings, alter wiring, or bypass an interlock.
-
PATH 04Safety boundary
What you see
The door does not engage reliably, or the visible switch is pushed in, scorched, cracked, loose-looking, or displaced.
Do this next
Leave the dryer off and arrange qualified appliance service for switch, latch, door alignment, or wiring diagnosis.
Why this path and its safety boundary
Why it matters: The safety interlock may be preventing a start and may have associated heat or wiring damage.
Safety stop: Do not tape, hold, bend, or bypass the door switch or latch.
-
PATH 05Safety boundary
What you see
The plug, door, cycle, START input, circuit, display setting, and visible connection are normal, but the dryer still does not turn on or stops immediately.
Do this next
Leave the dryer out of service and provide the complete observation record to an appliance technician.
Why this path and its safety boundary
Why it matters: An internal control, motor, timer, wiring, interlock, or other appliance fault remains possible and requires qualified diagnosis.
Safety stop: Do not open the cabinet, test live parts, bypass safety devices, or replace internal parts by guesswork.
Helpful context
Understand the symptom
Identify what not turning on means
A dryer that is completely dark is different from one whose display works but will not start, and both differ from a dryer that starts then stops. The first checks are therefore external: power connection, door closure, cycle and START input, breaker or fuse, and any model-specific display setting. Do not assume the motor, timer, control board, or door switch is defective until those observations are recorded.
Keep electrical covers and interlocks closed
Hotpoint support identifies the rear power cord and terminal block as possible fault points on electric models, but checking or reconnecting those conductors is not an ordinary user adjustment. A door switch is also an operating interlock, not something to hold closed with a tool. Leave the dryer out of service for visible damage, heat, smoke, or a repeated breaker trip and arrange qualified help.
Safety boundary
Stop conditions
- Stop immediately for smoke, a burning smell, sparking, a hot or melted plug or receptacle, exposed wiring, a scorched door switch, or a breaker that trips again.
- Do not remove the terminal-block or cabinet covers, touch conductors, test live voltage, reconnect internal wiring, or use an extension cord.
- Do not tape, hold, bend, or bypass the door switch or latch; the interlock is part of the dryer's safe operating sequence.
- Do not repeatedly reset a breaker or replace a fuse with a different type; arrange qualified electrical or appliance service for a repeat trip.
- Leave the dryer out of service when external checks do not restore operation, the display remains abnormal, or the drum starts and stops unexpectedly.
Only after diagnosis
Potential parts
- dryer door switch or latch assembly
Consider this category only if qualified diagnosis confirms that the door interlock or latch is not registering closure or is damaged.
Confirm the exact Hotpoint model and switch or latch design before ordering; do not bypass the interlock or select a part by appearance alone. - dryer power cord or terminal connection
Consider this category only if an electrical professional confirms a damaged cord or connection and verifies the correct model-specific installation.
Confirm the exact model, fuel type, receptacle, grounding arrangement, and installation instructions; do not reconnect a hot or damaged connection yourself. - dryer control or timer assembly
Consider this category only if qualified diagnosis rules out the supply and door interlock and identifies a control or timer failure.
Confirm the exact model, control revision, and manufacturer's fit information before ordering; do not replace an internal control by guesswork.
When checks do not resolve it
Need a professional?
Arrange qualified appliance service when a Hotpoint dryer remains unresponsive after the plug, door, cycle, START, circuit, display-setting, and visible connection checks, or when it starts and stops immediately. Use qualified electrical help for a recurring breaker trip, hot receptacle, damaged cord, or scorched connection. Treat smoke, sparking, burning odor, exposed wiring, and a damaged door switch as stop-use conditions.
Safety scope: This article supports external start-input, circuit, display, door, and cord observations only. Do not open the cabinet, touch live wiring, bypass the door interlock, or reconnect the terminal block.
Common questions
FAQ
Why is my Hotpoint dryer not turning on at all?
Check the plug, door closure, cycle and temperature, START control, household breaker or fuse, and any model-specific display configuration. If the dryer is still dark or unresponsive, leave it off for qualified diagnosis rather than opening the cabinet.
Can a partly tripped breaker stop a Hotpoint dryer from turning on?
Yes. Official support identifies the dryer circuit as an early check and notes that a breaker can appear on while being partly tripped. With controls off, one permitted full off-and-on reset may be observed; a repeat trip needs qualified electrical or appliance service.
Could the Hotpoint dryer door switch prevent it from starting?
Yes. A door that does not close tightly or a switch that is pushed in, scorched, or displaced can prevent operation. Do not tape or hold the switch closed; arrange service for a damaged latch, switch, or wiring.
What does a single digit or setup prompt on a Hotpoint dryer mean?
Some newer GE-family models may require a model-specific personality selection before they start or tumble. Follow the exact Hotpoint manual for that display; do not guess the setting or change wiring.
When should I stop using a Hotpoint dryer and call service?
Stop for smoke, sparking, burning odor, a hot or melted plug or receptacle, exposed wiring, a scorched door switch, or a breaker that trips again. Arrange qualified service whenever safe external checks do not restore operation or the dryer starts and stops abnormally.
Read the exact guide
Official sources
- Dryer - Will Not Run or StartGE Appliances · Official GE Appliances support article used for the GE-family dryer start sequence; exact Hotpoint model instructions control.
- Dryer - Things To Check For A Venting IssueGE Appliances · Official dryer venting guidance used for safe operation and escalation; it does not diagnose a no-start control fault.
- Dryer - Electrical Requirements and Breaker SizeGE Appliances · Official support article covering GE and Hotpoint gas and electric dryers; do not infer a specific model's wiring from general requirements.
- Electric Dryer - Has No PowerGE Appliances · Official GE Appliances support article for electric dryers; exact Hotpoint electrical installation controls the appliance.
Community feedback
Share a repair observation
Share a plain-text repair observation. Accepted observations are published automatically; this page may take a moment to update.