
On this page
Start here
Quick answer
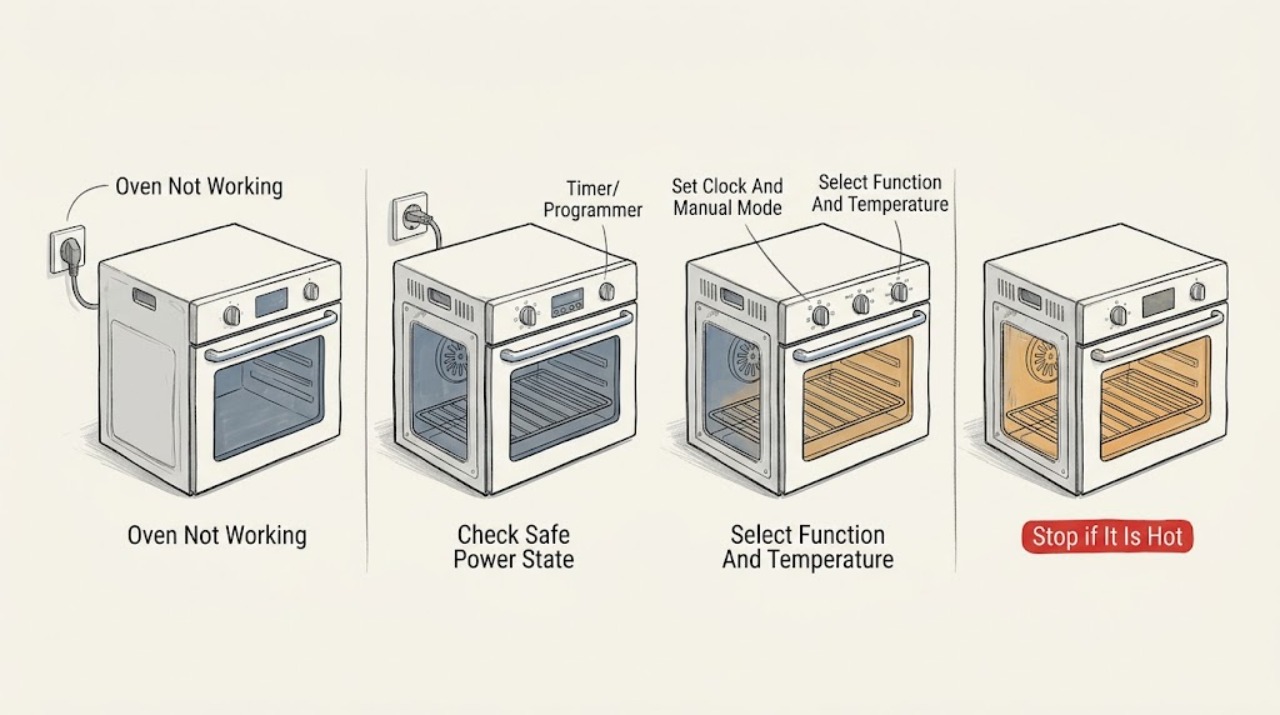
When a Belling oven is not working, first check the safe, visible causes: the cooker or oven isolation switch is on, the timer has a valid time, the programmer is in manual mode rather than Auto, and both a cooking function and temperature are selected where the model requires them. Belling says a flashing timer display can prevent the oven from functioning and that multi-functional ovens need both function and temperature selections. If the display remains blank, the breaker trips again, there is smoke, a burning smell, exposed wiring, or the oven still will not operate after the model-specific checks, stop and arrange qualified service rather than removing panels.
Work through in order
Diagnostic checks
Use only checks that match the exact appliance or system and its official guide.
-
Check 1
Turn the oven controls off and check the accessible wall switch or cooker isolation switch. Look at the display, interior light, and any other cavity controls without touching wiring or removing covers. If the circuit breaker or fuse has operated, reset it only once if there is no smell, heat, smoke, visible damage, or wetness.
Expected result: The display and light are blank, the switch is off, the breaker trips again, or the controls have power but the oven does not start.
Next step: If the breaker trips again, the display stays blank with a confirmed supply, or there is smoke, burning odor, heat, exposed wiring, or visible damage, leave the oven off and arrange qualified appliance or electrical service. Otherwise continue to the timer check.
Why this matters
Why: A switched-off supply can make the oven appear faulty. A repeated trip or visible electrical symptom indicates a fault or unsafe load, not a reason to keep resetting the circuit.
-
Check 2
If the timer display is flashing or the oven has just experienced a power interruption, use the exact model manual to set the time of day. Check whether the display shows manual mode, often written as Man, and select that mode only using the documented controls.
Expected result: The clock becomes steady and the manual indicator appears, or the display remains locked, blank, or in Auto/automatic mode.
Next step: Use the matching manual to exit Auto or unlock the programmer if it documents that control. If the timer cannot be set, controls do not respond, or the display returns to an abnormal state, stop and request service rather than forcing the keys.
Why this matters
Why: Belling says some ovens will not function until the clock is set and some require manual mode. Auto mode or an active lock can prevent a normal manual start even when the oven has power.
-
Check 3
For a multi-functional Belling oven, select a valid cooking function with the function selector and set a temperature with the temperature control. Use the cavity and control names shown in the exact manual; do not assume a light, defrost, or cooling setting is a heating function.
Expected result: The oven indicator or heating behavior begins, the fan or light operates but there is no heat, or nothing changes after both selections are valid.
Next step: Allow one normal preheat observation only if there is no hazardous symptom. If the oven stays cold, trips power, smells of burning, or behaves erratically, turn it off and arrange qualified service; do not access the element or wiring.
Why this matters
Why: Belling states that both function and temperature are needed on some multi-functional ovens. A fan or light alone does not prove the heating circuit is working; no response after valid selections points toward a control, supply, or internal fault.
-
Check 4
If the appliance has more than one oven or a separate grill, confirm that the intended cavity and its control are selected. Check the manual for whether the timer controls only one cavity and whether a delayed or automatic cooking program is active.
Expected result: Another cavity or function works, the intended cavity is in Auto/delayed mode, or no cavity responds despite a valid clock, manual mode, function, and temperature.
Next step: Return the intended cavity and timer to the model's documented manual setting and make one supervised test. If only one cavity remains inoperative, record that distinction for service; do not swap wires, knobs, or internal parts.
Why this matters
Why: A range cooker can have independent controls and timer behavior; one working cavity does not prove the other cavity's heater or selector is healthy. A delayed/automatic program can also make a normal manual start appear inoperative.
-
Check 5
With a valid manual setup and no safety warning, observe one short preheat attempt using the model's normal controls. Watch only the external thermostat/heating indicator and listen for normal fan cycling; do not touch the cavity, element, door glass, or rear panel while hot.
Expected result: The indicator behaves as the manual describes and the cavity warms, the indicator never responds and the cavity stays cold, or heat is intermittent/abnormally intense.
Next step: Stop the test for smoke, burning odor, scorching, unusual heat, or electrical noise. For persistent cold or abnormal heat with correct controls, arrange qualified service and do not remove panels or test the heating circuit yourself.
Why this matters
Why: On the Belling guide opened for research, the thermostat indicator remains on until the selected temperature is reached, but indicator behavior is model-dependent. Cold, intermittent, or excessive heat after correct setup suggests a heating, thermostat, sensor, selector, or control fault.
-
Check 6
Find the exact Belling model number and record the cavity, function, timer state, display state, power behavior, and result of the control checks. Compare the model with Belling's user-guide search before requesting technical help.
Expected result: The manual identifies a model-specific correction and the oven then works, or the oven remains inoperative after all visible documented checks.
Next step: Stop use and arrange qualified service for persistent failure, repeated breaker operation, heating faults, control faults, unusual heat, smoke, or damaged wiring. Provide the model and the complete sequence of observations.
Why this matters
Why: A model-specific correction can resolve a timer or selection issue. Continued failure after a valid supply, clock, manual mode, function, and temperature setup is evidence for service diagnosis rather than more user disassembly.
Use your observations
Decision map
Find the observation that best matches what you see, then follow the next safe action.
-
PATH 01Next step
What you see
Breaker trips again, display remains blank with confirmed supply, smoke, burning smell, scorching, exposed wiring, or unusual heat
Do this next
Stop using the oven and keep clear. Do not reset repeatedly, open panels, or test live wiring; arrange qualified appliance or electrical service.
-
PATH 02Next step
What you see
Timer display is flashing, clock is unset, or the programmer is in Auto mode
Do this next
Use the exact model manual to set the time and return the programmer to documented manual mode. Make one supervised test; escalate if the setting will not hold.
-
PATH 03Next step
What you see
A multi-functional oven has power but no function and temperature are selected together
Do this next
Select both controls as the Belling FAQ describes, then observe one normal preheat. If the cavity stays cold or behaves abnormally, stop and request service.
-
PATH 04Next step
What you see
One cavity or function works while another does not
Do this next
Record the affected cavity and control positions, verify the correct manual-mode/timer state, and request service if the affected cavity remains inoperative.
-
PATH 05Next step
What you see
Power, clock, manual mode, function, and temperature are correct but the oven remains cold or overheats
Do this next
Treat the heating, thermostat, sensor, selector, or control system as a professional diagnosis. Do not remove panels or replace an element yourself.
Helpful context
Understand the symptom
Do the visible control checks before assuming a failed element
A Belling oven that appears dead may be waiting for the clock, manual mode, a cooking function, or a temperature selection. Those controls differ by model, and a range cooker can have separate controls for different cavities. Start with the model-specific manual and the safe checks below. If power is present but the oven remains cold after a valid manual-mode setup, the heating or control system needs service diagnosis.
A flashing clock is meaningful
Belling's FAQ explains that a flashing timer display may mean the time of day needs to be set before the oven functions. Some models also show manual mode as Man, while others use different timer controls. Do not copy a button sequence from a different Belling timer; identify the model and use its instructions.
Know when to stop
A repeated breaker trip, smoke, burning odor, scorching, exposed wiring, or an oven that heats unpredictably is not a timer problem. Turn the oven off using the normal safe control, keep clear of hot or electrical areas, and arrange qualified appliance or electrical service. Do not remove the rear cover or test live wiring.
When checks do not resolve it
Need a professional?
Call qualified service when the oven remains inoperative after the correct wall supply, clock, manual-mode, function, and temperature checks., Arrange service for a persistent blank display, repeated breaker operation, a failed cavity-specific control, no heat after a valid setup, intermittent or excessive heat, or a control that will not hold its setting., Arrange urgent appliance or electrical inspection for smoke, sparks, burning smell, scorching, exposed wiring, damaged supply parts, or unusual heat.
Read the exact guide
Official sources
- Product Manuals & Technical Specifications | BellingBelling · Belling user-guide and documentation lookup by model number
- Built-in Ovens FAQsBelling · Belling built-in oven electrical isolation and model-manual safety context
- USER GUIDEBelling · Opened Belling 90cm E user-guide model family: timer/manual mode, function and temperature controls, indicator behavior, and safety limits
- Range Cooker FAQsBelling · Belling range-cooker main-oven power, timer, manual mode, and function/temperature selection
Community feedback
Share a repair observation
Share a plain-text repair observation. Accepted observations are published automatically; this page may take a moment to update.