
On this page
Start here
Quick answer
First confirm that the Crosley refrigerator actually has the dispenser type you are trying to use: some models have through-the-door ice and water, some have an internal water dispenser, and some have no dispenser. Identify whether water, cubed ice, crushed ice, or all functions fail, then check the dispenser lock or ice-maker-off setting, fully closed doors, household water valve, and any accessible water filter for correct seating or blockage. A recently installed or filter-changed water system may need the exact manual's priming/flush procedure; air in the line can cause drips or no flow. For ice, check for an empty or clumped bin and a correctly seated bin/auger, using only the model's instructions and never a sharp tool. If both ice and water stop together, suspect a shared lock, supply, filter, or valve path; if only ice fails, suspect ice production or the bin; if only water fails, suspect the water path or dispenser control. Persistent no-dispense, leaks, damaged wiring, or a fault requiring the inlet valve, solenoid, auger motor, ice maker, or door harness requires Crosley or qualified appliance service.
Before you begin
Safety first
- The user may identify the model, use documented lock and dispenser controls, check door closure and the household valve, inspect an accessible nonpressurized line, seat or replace the exact manual's filter, perform its priming/flush procedure, and clean/reseat an accessible ice bin. Water valves, solenoids, door tubing, auger motors, ice makers, sensors, controls, wiring, and pressurized or internal plumbing are for qualified service personnel.
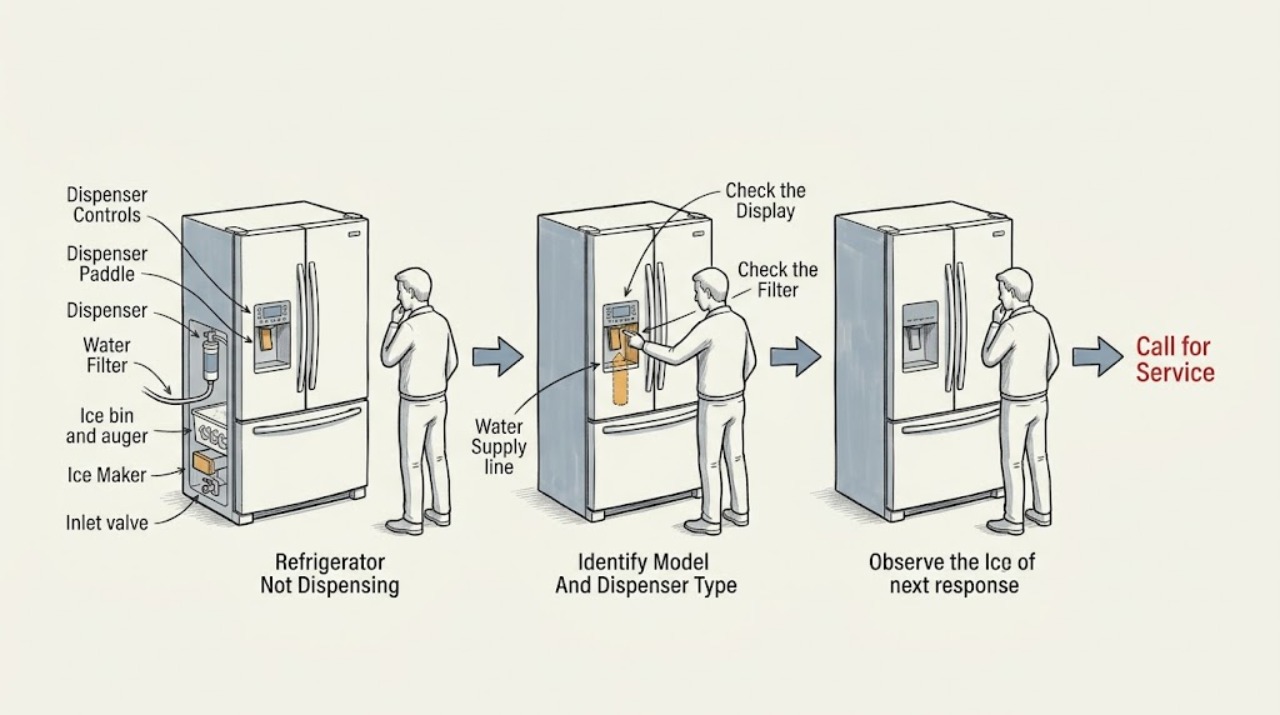
Work through in order
Diagnostic checks
Use only checks that match the exact appliance or system and its official guide.
-
Check 1
Read the complete Crosley model number and confirm whether the refrigerator has a through-the-door ice/water dispenser, an internal water dispenser, a factory or optional ice maker, and a filter. Record which selection fails: water, cubed ice, crushed ice, or all dispenser functions.
Expected result: The model has the requested dispenser and its control/paddle, or the model lacks that function or uses a different architecture.
Next step: Use the exact model's use-and-care guide. If the function is present, continue with the water/ice and lock checks; if it is not present, do not retrofit or disassemble the refrigerator.
Stop if: Do not apply an external-dispenser procedure to an internal or optional-dispenser model, and do not remove panels to search for a missing dispenser component.
Why this matters
Why: Crosley product families differ in dispenser location, ice-maker equipment, filter type, and controls. A missing function or different architecture is not evidence of a failed dispenser.
-
Check 2
With the refrigerator operating normally, check whether the dispenser lock or control lock is active, whether the ice-maker-off setting is enabled, whether every refrigerator door is fully closed, and whether the correct water/ice selection is lit. Press the paddle only as the exact manual directs.
Expected result: Unlocking the dispenser, enabling the ice maker, closing a door, or selecting the correct mode restores a function; or the control remains locked/nonresponsive with the doors closed.
Next step: Keep the corrected setting and test the failed function briefly. If the lock cannot be changed, a door will not close, or controls remain nonresponsive, stop and arrange service.
Stop if: Do not bypass a door switch, hold an interlock closed, repeatedly press a stuck paddle, or remove the control panel.
Why this matters
Why: A lock, ice-maker-off state, wrong mode, or door-open interlock can stop dispensing without a water-line or motor failure. A nonresponsive control after the documented action suggests a control, switch, or door-wiring issue.
-
Check 3
If water does not dispense, check that the household refrigerator water valve is open and the accessible supply line is not kinked or crushed. If the model has a water filter, verify that it is the exact type, fully seated/locked, and not overdue or visibly obstructed, following the model manual. Shut off the water supply before removing a filter.
Expected result: The valve was closed, the line is kinked, the filter is loose/clogged, or all accessible supply and filter conditions are correct but water still does not flow.
Next step: Correct only an obvious valve, kink, or filter-seating issue and perform the exact model's priming/flush procedure. If the problem returns or the filter housing leaks, close the supply and call service.
Stop if: Do not disconnect a pressurized line, force a stuck filter, substitute a filter by appearance, or open the door or rear water system to test a valve.
Why this matters
Why: Crosley manuals identify a closed household valve, restricted line, and filter seating or clogging as water-dispenser causes. A correct external setup with no water shifts suspicion toward the reservoir, paddle, inlet valve, solenoid, door tubing, or control.
-
Check 4
If the refrigerator is newly installed or the filter was just changed, use the exact manual's priming and flushing method rather than holding the paddle continuously. For the CFEH272 guide, water is dispensed in controlled intervals to remove air and impurities; for the CFDNH2218AS guide, the water system is flushed after filter replacement and the filter area is checked for leaks.
Expected result: Water begins after priming, initially sputters or drips and then clears, or no water appears and a leak is visible around the filter or line.
Next step: Stop when the exact manual's flush is complete and check the filter/connection area dry. If flow does not return or a leak appears, shut off the supply, discontinue use, and arrange service.
Stop if: Do not exceed the model's documented flush method, leave the paddle held continuously, operate with a leaking filter, or remove plumbing while pressurized.
Why this matters
Why: Air after installation or filter work can delay flow and cause temporary dripping. A leak at the filter or line, or no flow after the model procedure, is not corrected by repeated dispensing.
-
Check 5
If water works but ice does not, confirm that ice is present, the ice maker is enabled, and the bin is fully seated. With the ice maker switched off and the bin removed only as the manual shows, look for melted-and-refrozen clumps or cubes lodged between the maker and bin. Let stuck ice loosen with warm water, dry the bin completely, and realign the auger without using a sharp tool.
Expected result: The bin is empty, ice is clumped or jammed, the auger is misaligned, the ice maker is off, or the bin and ice path are clear but the dispenser still does not operate.
Next step: Correct only the accessible bin/ice condition allowed by the manual and allow the ice maker to produce ice if it was newly installed. If the auger does not turn normally or no ice is produced, stop and call service.
Stop if: Do not use an ice pick, knife, screwdriver, hair dryer, or forceful tool; do not reach into the auger or remove the ice maker, motor, or wiring.
Why this matters
Why: Crosley manuals identify no ice, clumping, a jam, incorrect bin/auger seating, and an ice-maker-off state as separate causes. A clear, correctly seated ice path with no dispensing points toward the motor, solenoid, wiring, or control.
-
Check 6
If the ice paddle was held for an extended period or the dispenser motor stopped hot, release the paddle and allow the exact model's documented overload-reset time. The CRSE263 guide describes about three minutes for its motor overload protector; do not assume that interval applies to every Crosley refrigerator.
Expected result: The ice dispenser recovers after the model-specific cool-down, or water/ice still fails, the motor makes abnormal noise, the refrigerator leaks, or the control/door wiring is damaged.
Next step: Use the dispenser normally if it recovers. Otherwise keep the affected dispenser out of service, close the water valve for a leak, and contact Crosley or qualified appliance service with the model and symptom pattern.
Stop if: Do not repeatedly stall the paddle, run the auger by hand, bypass a door/ice-maker sensor, or test a motor, valve, solenoid, or door harness live.
Why this matters
Why: A temporary motor overload can explain an ice-only interruption on applicable models. Persistent failure after a documented reset, a water leak, or abnormal noise points toward a service fault rather than a recoverable overload.
Use your observations
Decision map
Find the observation that best matches what you see, then follow the next safe action.
-
PATH 01Safety boundary
What you see
A model with a fitted ice-and-water dispenser produces neither water nor ice, while the refrigerator has power.
Do this next
Confirm architecture, lock, closed doors, water valve, filter seating, and line condition. If both functions remain unavailable, close the water supply if needed and request service.
Why this path and its safety boundary
Why it matters: A shared dispenser lock, closed household water valve, filter restriction, supply line, door interlock, or inlet-valve path is more likely than two independent dispenser failures.
Safety stop: Do not open the rear water system, bypass an interlock, or order both an ice maker and a water valve from the symptom alone.
-
PATH 02Safety boundary
What you see
Ice dispenses normally but water does not, or water sputters/drips after filter replacement or installation.
Do this next
Check the household valve, accessible line, filter seating, and exact model priming/flush procedure. Stop for a filter-area leak or persistent no-flow and call service.
Why this path and its safety boundary
Why it matters: The water filter may be unseated or restricted, the line may contain air or be kinked, or the water paddle, reservoir, inlet valve, solenoid, or door tubing may be at fault.
Safety stop: Do not disconnect a pressurized line, force the filter, or continue dispensing from a leaking housing.
-
PATH 03Safety boundary
What you see
Water dispenses but cubed or crushed ice does not, and the model has an ice maker and dispenser.
Do this next
Check the ice-maker setting and accessible bin/auger condition exactly as the manual shows. Allow a documented motor cool-down if applicable; call service for no ice production or persistent no-dispense.
Why this path and its safety boundary
Why it matters: An empty/off ice maker, clumped ice, a jam, incorrect bin/auger seating, or an ice-dispenser motor/control fault is more likely than a whole-refrigerator water-supply failure.
Safety stop: Do not use a sharp tool, force a jam, rotate the auger improperly, or remove the ice maker or motor.
-
PATH 04Safety boundary
What you see
The dispenser is silent or inactive, a lock indicator is on, or a refrigerator door is not fully closed or does not latch squarely.
Do this next
Unlock only with the exact control sequence and close the doors normally. If the lock, latch, or control will not respond, arrange service.
Why this path and its safety boundary
Why it matters: A model-specific dispenser lock, ice-maker-off setting, or door interlock is more likely than a failed water line or auger.
Safety stop: Do not tape a door switch, force the latch, or remove the control panel.
-
PATH 05Safety boundary
What you see
The filter housing, door, or rear line leaks; the dispenser remains dead after external checks; the motor/valve makes abnormal noise; or wiring, tubing, or controls are damaged.
Do this next
Close the water supply, isolate power only from a safe dry location if water is near electrical parts, leave the refrigerator/dispenser out of service as appropriate, and contact Crosley or qualified appliance service.
Why this path and its safety boundary
Why it matters: A pressurized water-line, inlet valve, solenoid, auger motor, ice maker, door harness, or control fault is more likely and cannot be safely identified by continued dispensing.
Safety stop: Do not remove panels, probe wiring, bypass a sensor, test live valves or motors, or keep using a leaking dispenser.
Helpful context
Understand the symptom
Start with the dispenser architecture
Crosley sells refrigerator families with different arrangements: an external ice-and-water paddle, an internal water dispenser, a factory or optional ice maker, or no dispenser at all. A no-flow complaint can therefore be a feature mismatch as well as a fault. Read the model label and the matching use-and-care guide before looking for a filter, lock button, ice bin, or water paddle. A procedure for an external through-the-door dispenser should not be applied to an internal reservoir or an optional ice-maker model.
Use water and ice as two separate tests
Press the exact model's water selection and dispenser paddle briefly, then test ice only if the ice maker and bin are fitted and enabled. If both water and ice fail, a shared lock, closed supply, filter restriction, or valve path is more likely. If water works but ice does not, focus on ice production, bin clumping, auger alignment, or the ice-maker setting. If ice works but water does not, focus on the water filter, line, reservoir, paddle, or water-valve path. These patterns narrow the next safe check; they do not identify an internal part for replacement.
Filter and ice-bin work must stay model-specific
A filter may need to click or lock into its housing, and a new filter or recently installed refrigerator may need a model-specific flush to remove air and impurities. Crosley manuals also warn that an ice bin can jam when cubes melt and refreeze, and that an auger must align with the drive mechanism for the bin to dispense. Remove and clean only accessible parts the manual names; never use an ice pick or other sharp tool and never reach into a moving auger.
Safety boundary
Stop conditions
- Stop using the dispenser and close the household water valve for a persistent leak, a leaking filter housing/line, damaged tubing, or water near the plug, outlet, controls, or wiring; isolate power only from a safe, dry location.
- Do not bypass door, dispenser, ice-maker, or temperature protections; do not hold an interlock closed or force a door, paddle, filter, bin, or auger.
- Do not remove refrigerator panels, disconnect pressurized plumbing, test a valve/solenoid/motor live, or work on the door harness, control board, sealed refrigeration system, or internal water reservoir.
- Do not use an ice pick, knife, screwdriver, hair dryer, or other sharp/forceful tool to clear ice; use only the exact model's safe thaw and cleaning instruction.
- Do not assume a lock, filter type, flush volume, motor reset time, dispenser pressure, or ice-maker sequence from another Crosley model; confirm the complete model first.
Only after diagnosis
Potential parts
- Crosley refrigerator water filter
Consider a filter only when the exact model uses one and the cartridge is clogged, overdue, unseated, or confirmed incompatible; no-flow can instead be a lock, valve, line, paddle, or control fault.
Match the complete model and filter housing; confirm the manual's seating, replacement, and flush instructions. - Crosley refrigerator ice bin or auger assembly
Consider this category only when the exact model's bin, auger, or drive is damaged or fails a qualified diagnosis; an empty or clumped bin may only need the documented cleaning/reseating procedure.
Match the exact model, bin geometry, and auger drive; do not force or manually rotate the auger. - Crosley refrigerator inlet valve, dispenser paddle, solenoid, or door water tube
These are service-diagnosis categories for persistent water or ice failures after lock, supply, filter, and bin checks, not parts to order from the symptom alone.
Do not order or install without exact model diagnosis and qualified service; water-line work is pressurized and may be near electrical parts.
When checks do not resolve it
Need a professional?
Arrange Crosley or qualified appliance service when water or ice remains unavailable after the exact model's lock, door, supply, filter, priming, and accessible bin checks; when a filter housing, door tube, or rear line leaks; when the ice maker or dispenser motor is abnormal; or when a sensor, valve, solenoid, wiring, control, or internal water component is suspected. Treat water near electrical parts as an immediate stop-use condition.
Safety scope: The user may identify the model, use documented lock and dispenser controls, check door closure and the household valve, inspect an accessible nonpressurized line, seat or replace the exact manual's filter, perform its priming/flush procedure, and clean/reseat an accessible ice bin. Water valves, solenoids, door tubing, auger motors, ice makers, sensors, controls, wiring, and pressurized or internal plumbing are for qualified service personnel.
Common questions
FAQ
Why does my Crosley refrigerator dispense neither water nor ice?
First verify that the model has an ice-and-water dispenser, then check the dispenser lock, fully closed doors, household water valve, water filter seating, and supply line. If both functions still fail, a shared water path, valve, control, or door-wiring fault is more likely and needs service.
Why does my Crosley refrigerator dispense water but not ice?
Check whether the ice maker is enabled, whether ice is present, and whether the bin is clumped, jammed, or incorrectly seated on the auger drive. Follow the model manual for safe removal and thawing. If water works but no ice is produced or the auger remains inoperative, arrange service.
Why did my Crosley water dispenser stop after I changed the filter?
The filter may not be fully seated, the line may contain air, or the model may require a controlled flush after replacement. Shut off the water supply before reseating the exact filter, follow the model's priming procedure, and inspect for leaks. Persistent no-flow or a leaking housing requires service.
How do I clear a Crosley ice dispenser jam?
Use only the exact model's procedure. Crosley guides describe removing the accessible ice bin, allowing stuck ice to loosen with warm water, cleaning and drying the bin, and reseating the auger/bin correctly. Never use an ice pick or sharp tool, force the auger, or remove the ice-maker motor yourself.
Read the exact guide
Official sources
- User's Operation Manual — CFDNH2218ASCrosley Home Products · Crosley CFDNH2218AS French-door bottom-mount model family; the manual contains model-specific controls, filter, flush, and water-system behavior.
- Customer Service — Crosley Home ProductsCrosley Home Products · Crosley major-appliance support guidance; contact route varies by appliance, product, and region.
- Automatic Ice & Water Dispenser — CFEH272Crosley · Crosley CFEH272 model family; the listed pressure range, timing, controls, and bin mechanics are not universal to every Crosley refrigerator.
- XNE25JGKW/B/S Crosley Bottom Mount RefrigeratorCrosley Home Products · Crosley XNE25JGKW/B/S product family; internal dispenser controls and ice-maker behavior differ from through-door models.
- CFDNH2218AS Crosley French Door Bottom Mount Counter-depth RefrigeratorCrosley Home Products · Crosley CFDNH2218AS product page; product architecture and documents vary by model.
- Use & Care Manual — CRSE263Crosley · Crosley CRSE263 side-by-side model family; lock controls, filter, ice bin, and motor behavior vary on other models.
Community feedback
Share a repair observation
Share a plain-text repair observation. Accepted observations are published automatically; this page may take a moment to update.