
On this page
Start here
Quick answer
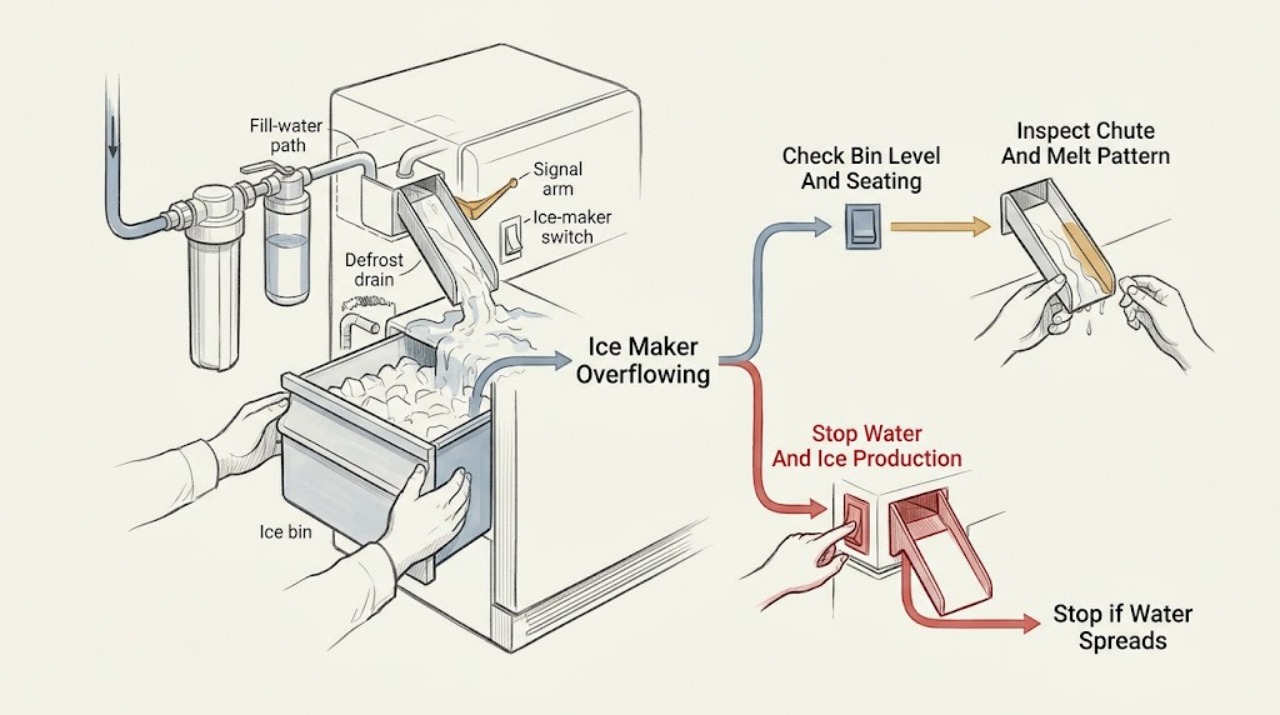
An Electrolux ice maker can appear to overflow because the bin is overfilled, the bin or chute is mispositioned, cubes are bridging or jammed, or meltwater is being mistaken for fresh fill water. First protect the floor and any nearby electrical parts, turn the ice maker OFF using the exact model's control or lift the wire signal arm only where the model uses one, and close the household water shutoff if water is still entering. Check whether the water is coming from the fill area, a filter or supply connection, the ice chute, or defrost meltwater. Electrolux says applicable models stop automatically when the ice container is full and that a top-freezer wire arm stops production in its raised OFF position, but controls and construction vary by model. A correctly seated, dry bin and unobstructed chute can be checked without opening panels. Continuous filling after OFF, water on the floor, a cracked filter, a stuck or misaligned bin, or repeat overflow points to an inlet valve, ice-maker module, sensor, wiring, drain, or installation fault that needs qualified service. Do not bypass the ice-level control, disconnect a pressurized line, probe wiring, or use a sharp tool to break ice.
Before you begin
Safety first
- The user may switch the ice maker OFF using the exact manual, close the household water shutoff, inspect a dry accessible bin, chute, filter, and visible connection, and remove only loose ice with the manual's safe method. Water valves, internal lines, ice-maker modules, sensors, wiring, drain access, panels, and energized testing belong to qualified service.
Work through in order
Diagnostic checks
Use only checks that match the exact appliance or system and its official guide.
-
Check 1
From a dry, stable position, note whether water is actively flowing, whether the spill is near the ice maker, filter, rear water connection, chute, or freezer floor, and whether smoke, burning odor, arcing, or water is near electrical parts. Turn the ice maker OFF using the exact model control; if the model has a wire signal arm, raise it until it locks without force. If water continues entering while OFF, close the household water shutoff. Do not open panels or reach into the mechanism.
Expected result: The flow stops when the ice maker is correctly switched off; water continues while OFF; the ice maker has no accessible OFF control; or a safety hazard is present.
Next step: If flow continues while OFF, keep the water supply closed, isolate power only from a safe dry location, leave the refrigerator unused as needed to prevent damage, and arrange qualified service. For a stopped flow with no hazard, continue with the dry external checks.
Stop if: Stop immediately for heavy leakage, water near energized parts, smoke, burning odor, arcing, a hot plug, or repeated breaker operation. Do not bypass the level control or disconnect a pressurized hose.
Why this matters
Why: Stopping with the correct OFF control makes overproduction, a bin-level or control-state issue more likely. Continued filling while OFF points to the inlet path or valve and creates flooding risk. A hazard takes priority over diagnosis.
-
Check 2
With production OFF and the floor dry, compare the ice level with the bin's normal fill area and check whether the bin is fully pushed into its guides, level, and free of ice packed behind or above it. Follow the exact manual before removing the bin. Wear hand protection, support the bin, and replace it only when completely dry and correctly aligned.
Expected result: The bin is overfilled, tipped, not seated, wet underneath, packed at the rear, or normal in level and position.
Next step: Remove excess ice and correct only the documented bin position. If the bin cannot seat, is cracked, or the overflow returns with a normal dry bin, leave production OFF and arrange service.
Stop if: Do not force the bin, rotate an auger against resistance, remove an ice-maker module, or use a sharp instrument to break frozen ice.
Why this matters
Why: A high or mispositioned bin can spill or prevent an applicable ice-level arm or sensor from seeing a full condition. A normal, dry, correctly seated bin makes persistent overfill more likely to be a control, fill, or sensor fault.
-
Check 3
Inspect the visible ice chute, flap, and area below the dispenser for a cube bridge, frost, or ice stuck between the maker and bin. Observe whether the spill is cold meltwater from clumped ice or fresh water arriving at the fill point. Clear only loose ice that the manual permits and allow a jammed bin or chute to thaw naturally or with the manual's safe method; keep all parts dry before use.
Expected result: Ice is bridging the chute, the flap cannot close, frost surrounds the chute, the bin is clumped, or fresh water appears at the fill area despite production being OFF.
Next step: Remove only the visible obstruction without sharp tools and reseat the dry bin. If the flap will not close, the chute refreezes, or fresh water returns while OFF, keep the supply closed and arrange service.
Stop if: Do not chip ice with a knife or ice pick, pour uncontrolled hot water into the dispenser, or access the chute motor, heater, or wiring.
Why this matters
Why: Electrolux associates ice or frost at a chute with meltwater and poor sealing, while fresh water with production OFF is not explained by a dispenser jam and makes an inlet or control fault more likely.
-
Check 4
If the model has a user-accessible water filter, note whether it was recently changed and inspect the filter housing and visible water line for droplets, a crack, or an incomplete seat. Use only the model's filter instructions; do not pull the refrigerator out, remove a rear cover, or loosen a line under pressure. Keep a towel away from electrical connectors and do not reconnect power while wet.
Expected result: The filter is not fully locked, visibly cracked, or wet around its housing; a visible supply connection is wet; or the filter and accessible connections are dry.
Next step: If the exact manual permits reseating the filter, turn the ice maker OFF, reseat it and check for leaks with the water supply handled safely. Replace a visibly damaged filter only with an exact-model-compatible part. If leakage persists or a line is damaged, shut off water and arrange service.
Stop if: Do not disconnect a pressurized water line, remove rear covers, operate the dispenser while water is near electricity, or treat a brand-level filter fit as universal.
Why this matters
Why: A filter or connection leak can be mistaken for an ice-maker overflow and can feed water into the cabinet or floor. Dry visible connections make a hidden valve, internal line, ice-maker fill cup, or drain fault more likely.
-
Check 5
Record the exact model, ice-maker type, display messages, freezer temperature indication, bin level, and where the water reappears after the appliance is dry and the ice maker remains OFF. Look only at accessible vents and the freezer floor for heavy frost or a recurring puddle. Compare any code or control sequence with the exact owner's manual; do not generalize a reset or error meaning.
Expected result: Water returns from the freezer floor with frost; the chute or door area refreezes; the bin overfills even when correctly seated; the ice maker fills with no request; or a model-specific alarm persists.
Next step: Keep ice production OFF and arrange qualified service for a recurring puddle, inaccessible drain, continuing fill, failed level detection, persistent alarm, or repeated overflow. Provide the technician with photos of the spill location and the exact model and control state.
Stop if: Do not remove freezer panels, heat a sealed compartment with a torch or high-temperature device, test a valve or sensor live, or bypass an ice-level or overflow protection system.
Why this matters
Why: A frost-and-floor pattern makes defrost drainage or airflow more likely, while repeated overfill or fill-without-request makes the ice-maker module, level sensor, inlet valve, wiring, or control more likely. A persistent alarm is model-dependent and may require service.
Use your observations
Decision map
Find the observation that best matches what you see, then follow the next safe action.
-
PATH 01Safety boundary
What you see
Water stops after the correct ice-maker OFF action, and the bin was overfilled, tipped, damp, or not fully seated.
Do this next
Remove excess ice, clear only loose visible obstruction, dry and correctly seat the bin, then use the exact model's manual before re-enabling production. If the overflow returns with a normal fill level, call for service.
Why this path and its safety boundary
Why it matters: A bin-level, seating, or ice-bridge condition is more likely than a continuously open fill valve.
Safety stop: Do not force the bin, hold the signal arm down, or restart production while water remains near electrical parts.
-
PATH 02Safety boundary
What you see
Fresh water continues entering or the level rises even though the ice maker is OFF by the exact model control and the water supply is still open.
Do this next
Close the household water shutoff, isolate power only from a safe dry location, do not use the ice maker or dispenser, and arrange qualified service.
Why this path and its safety boundary
Why it matters: An inlet valve, control, or water-level fault is more likely than melted ice or a full bin; flooding risk is present.
Safety stop: Do not remove the inlet valve, disconnect a hose, probe wiring, or reconnect water to see whether the leak returns.
-
PATH 03Safety boundary
What you see
The bin contains clumped ice, the chute has frost or a stuck cube, and water appears only after ice has softened rather than as a fresh fill stream.
Do this next
With production OFF, clear only accessible loose ice using the manual's safe method, dry the bin, check that the door and chute close normally, and arrange service if refreezing or leakage recurs.
Why this path and its safety boundary
Why it matters: A jammed bin, chute flap, warm-air leak, or door-seal/airflow condition is more likely than active overfilling.
Safety stop: Never use an ice pick or knife and do not dismantle the chute, auger, heater, or door liner.
-
PATH 04Safety boundary
What you see
Droplets or a crack are visible around a recently changed filter or an accessible water connection, while the ice bin and chute are normal.
Do this next
Keep the ice maker OFF, close the water supply if the leak continues, and follow only the exact model's filter procedure. Use qualified service for a damaged line, housing, or inaccessible connection.
Why this path and its safety boundary
Why it matters: A filter seating or supply connection problem is more likely than an ice-maker harvest problem.
Safety stop: Do not loosen pressurized fittings, operate the dispenser while wet, or install a filter without verifying model fit.
-
PATH 05Safety boundary
What you see
Overflow recurs with a dry, correctly seated bin and unobstructed visible chute, or the maker fills without a request, shows a persistent model-specific alarm, or creates a recurring freezer-floor puddle.
Do this next
Leave ice production OFF and arrange qualified appliance service with the exact model, water-entry pattern, control state, photos, and any alarm or code.
Why this path and its safety boundary
Why it matters: An internal ice-maker module, level sensor, inlet valve, wiring, control, defrost drain, or sealed airflow issue is more likely; the symptom alone does not identify a compatible part.
Safety stop: Do not remove panels, bypass level or overflow protection, perform live tests, or repeatedly cycle the water supply.
Helpful context
Understand the symptom
Identify what is actually overflowing
Remove loose ice from the floor with care and note whether the water is fresh and flowing while the ice maker is off, whether it is melting from a packed bin or chute, or whether it is clear meltwater collecting below the freezer. Fresh water at the fill area or a rising level while OFF is a supply-control problem. A wet, clumped bin or ice beneath the chute can instead be meltwater or an ice bridge. A freezer-floor puddle with frost points toward a drain or airflow issue. Do not run another harvest or fill cycle just to reproduce the spill.
Use only the exact model's OFF control
Some Electrolux refrigerators use a display Ice Maker button; some top-freezer designs use a wire signal arm. Use the owner's manual or a clearly labeled control for the exact model. If a wire arm is present, it should move freely and lock in the raised OFF position without force. Do not hold a sensor down, tape an arm, or reach into a moving mechanism.
Water connections and filter areas need a dry inspection
If the refrigerator has a water filter, a recent filter change is relevant: an incorrectly seated or cracked filter can leak. Inspect only surfaces and connections that are accessible without removing panels. A wet hose, valve connection, or filter housing can put water near electrical components; close the water supply and isolate power only from a safe, dry location before arranging service.
Bin, auger, chute, and drain are different paths
A bin that is not fully seated can leave ice in the wrong place or prevent the level control from working. Ice jammed at the chute can melt and run down the door; a defrost drain blockage can send meltwater toward the freezer floor. Only remove an accessible bin as described by the manual, keep it dry before replacement, and never use an ice pick or sharp tool. Internal drain, valve, ice-maker, or sensor work is not a user repair.
Safety boundary
Stop conditions
- Close the household water supply and leave the ice maker unused if fresh water continues entering while the ice maker is OFF or if the appliance is flooding.
- Isolate power only from a safe, dry location for water near electrical parts; stop for smoke, burning odor, arcing, a hot plug, damaged wiring, or repeated breaker operation.
- Do not bypass the wire arm, level sensor, overflow protection, door switch, or electronic control, and do not tape a control in the ON or OFF position.
- Do not disconnect a pressurized line, remove rear or freezer panels, access the valve or ice-maker module, probe wiring, or perform live tests.
- Never use a knife, ice pick, or other sharp tool to break ice; do not force the bin, auger, chute, or signal arm.
Only after diagnosis
Potential parts
- ice-maker assembly or level-sensing mechanism
Consider only when the exact model is identified and qualified diagnosis confirms repeated overfill or failed ice-level detection after the bin, chute, and OFF-control checks.
Ice-maker assemblies and sensing arrangements vary by refrigerator model; verify manufacturer fit information and do not bypass the level control. - water inlet valve
Consider only when qualified diagnosis confirms fresh water enters while the ice maker is OFF or the valve does not close after the model's external checks.
Match the exact model and documented water and electrical specifications; valve replacement and pressurized-line work are service tasks. - water filter or filter housing
Consider only when the exact model's filter procedure and inspection show a cracked filter, failed seal, or housing leak rather than an ice-maker overflow.
Confirm exact model fit and installation instructions; never substitute a filter by appearance or operate a leaking housing. - defrost drain or drain component
Consider only when qualified diagnosis confirms a recurring freezer-floor puddle with frost or a blocked/inaccessible defrost-drain path.
Drain access and components are model-specific; do not remove freezer panels or force heat into the cabinet.
When checks do not resolve it
Need a professional?
Arrange qualified service when overflow returns after a dry, correctly seated bin and visible chute check, water enters while the ice maker is OFF, the filter housing or a supply line leaks, the freezer floor repeatedly puddles, the chute or bin will not align, or an exact-model alarm persists. Close the household water supply for active filling or heavy leakage and isolate power only from a safe, dry location. Stop immediately for water near electrical parts, smoke, burning odor, arcing, a hot plug, damaged wiring, or repeated breaker operation.
Safety scope: The user may switch the ice maker OFF using the exact manual, close the household water shutoff, inspect a dry accessible bin, chute, filter, and visible connection, and remove only loose ice with the manual's safe method. Water valves, internal lines, ice-maker modules, sensors, wiring, drain access, panels, and energized testing belong to qualified service.
Common questions
FAQ
Why is my Electrolux ice maker overflowing only after the ice bin looks full?
A full or mispositioned bin, an ice bridge, or a chute obstruction can stop the level control from seeing the intended condition or redirect melting ice. Turn production OFF with the exact model control, check the dry bin and visible chute without forcing anything, and call for service if the overflow returns with a normal bin position.
What should I do if water keeps filling the Electrolux ice maker while it is turned off?
Close the household water shutoff, isolate power only from a safe dry location, and do not use the ice maker or dispenser. Continued filling while OFF is not a normal full-bin or meltwater condition and needs qualified diagnosis of the inlet and control path.
Can I remove the ice bin to stop the overflow?
Only if the exact manual permits it and the ice maker is OFF. Support the bin, use gloves, avoid rotating the auger, and replace it completely dry and correctly aligned. Do not use an ice pick or sharp tool; internal jams and damaged mechanisms need service.
Could a water filter cause an Electrolux ice-maker overflow?
A recently changed, cracked, or incompletely seated filter can leak and make a spill look like an ice-maker problem on applicable models. Follow the exact filter instructions, keep the ice maker OFF while inspecting, and close the water supply and arrange service if the housing or connection remains wet.
When is an overflowing Electrolux ice maker unsafe to troubleshoot?
Stop for heavy leakage, water near electrical parts, smoke, burning odor, arcing, a hot plug, damaged wiring, or repeated breaker operation. Do not remove panels, disconnect pressurized water lines, bypass the ice-level control, or perform live tests.
Read the exact guide
Official sources
- How to change the water filter in my fridge freezer? (located inside)Electrolux UK · Supports turning the ice maker off during filter service, exact filter seating, checking for leaks, and format-specific limitations.
- Delivery and Installation Guide - RefrigeratorElectrolux · Supports the existence of a local shutoff for refrigerators with ice makers and water dispensers; it is not a repair instruction for internal water lines.
- What do the alarms or error messages mean on my French-Door refrigerator?Electrolux · Supports model-dependent alarm interpretation and service escalation; it does not provide a universal ice-maker overflow code.
- Refrigerators - How do I use my ice maker in my Top-Freezer refrigerator?Electrolux · Supports wire-arm OFF position, full-bin automatic stop, bin placement, water connection, and model-specific scope for applicable top-freezer designs.
- Water Leaking from Fridge or Fridge Freezer – Causes & SolutionsElectrolux UK · Supports distinguishing drain, frost, airflow, water-connection, and heavy-leak patterns; not a substitute for an exact ice-maker manual.
- Ice bin removal or replacementElectrolux UK · Supports safe accessible bin handling, drying, auger alignment, and prohibition on sharp tools; exact bin construction remains model-dependent.
- Refrigerators / Freezer - Frost Build UpElectrolux · Supports door-gasket, ice-chute flap, temperature, and airflow observations that can lead to frost or meltwater; it does not identify a specific ice-maker fault.
- Refrigerator Error Code DI SP or DISP - Ice JamElectrolux · Supports ice jam, melted-and-refrozen ice, and exact-model reset caution; it is not evidence that every Electrolux model uses this code.
- My refrigerator was just installed and the ice maker is not working, how do I fix it?Electrolux · Supports model-format differences, display ON state, water priming, bin filling from the rear, and turning the maker OFF when there is no water supply.
Community feedback
Share a repair observation
Share a plain-text repair observation. Accepted observations are published automatically; this page may take a moment to update.