
On this page
Start here
Quick answer
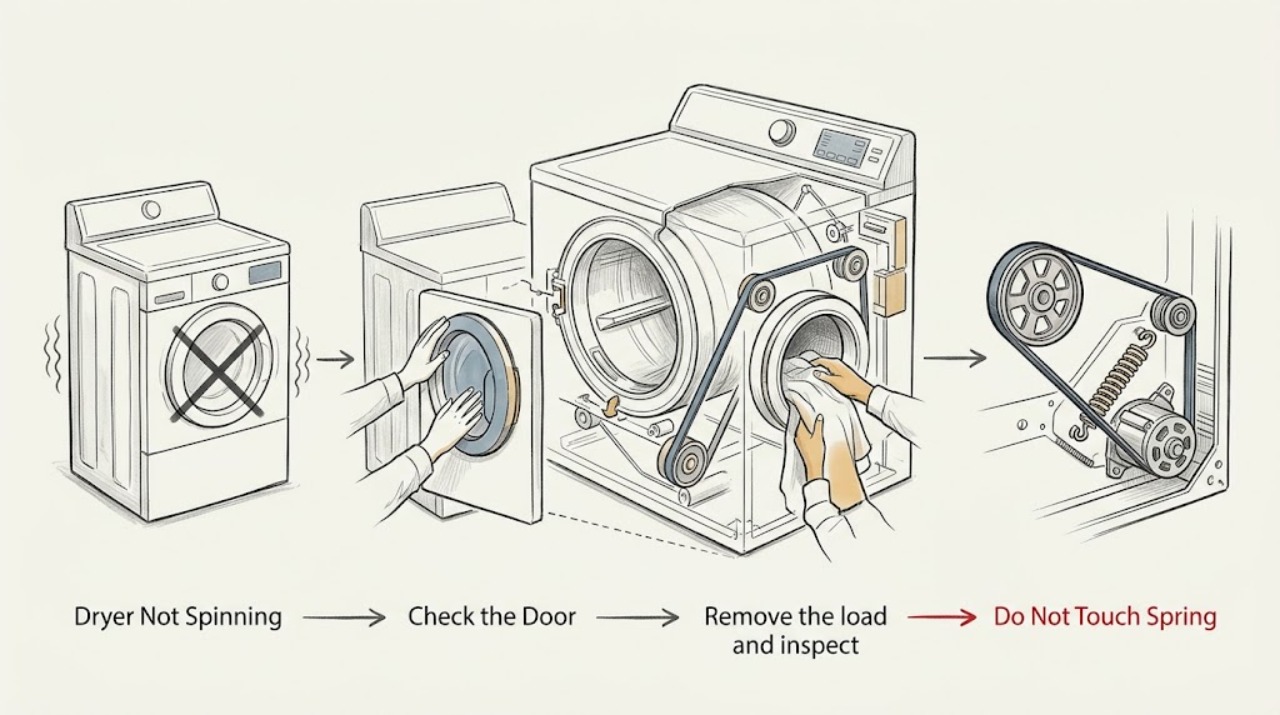
Stop the Hoover dryer and disconnect it before inspecting the drum or moving the appliance. Remove the load and check for a trapped garment or hard object, confirm the door closes fully, and use the exact model manual to check the program, load limits, and user-accessible filters. A drum that is empty but will not turn, turns only briefly, feels loose, or is accompanied by squeaking, grinding, creaking, repeated clicking, or a burning smell generally needs qualified diagnosis of the drive, drum supports, motor, door switch, or controls. Hoover's noise guidance associates squeaking with possible bearing wear, creaking with tension pulleys, and drum-related grinding with imbalance. Do not remove panels, reach around the belt or motor, bypass a door switch, or keep restarting a dryer that has stopped turning.
Work through in order
Diagnostic checks
Use only checks that match the exact appliance or system and its official guide.
-
Classify what the drum does and when
From a safe position, note whether the dryer has power, whether the display responds, whether the drum moves at startup, whether it stops after a few seconds, and whether the motor hums or clicks. Record the selected program, load size, and any warning light or message. Do not keep starting cycles to reproduce a severe symptom.
Expected result: No response suggests power, door, control, or program conditions. A motor sound without drum movement suggests a drive or drum-support branch, while a drum that starts then stops may reflect a load, safety, or internal fault. A violent scrape, burning smell, or repeated electrical trip is not a normal no-spin symptom.
Next step: Continue with the door, load, and accessible-object checks only when there is no safety warning. If the drum is loose, jammed, or the motor only hums or clicks, keep the dryer disconnected and arrange service.
Why this matters
Why: The timing of the failed movement separates an external start condition from a mechanical drive problem and sets the safety boundary for further checks.
-
Confirm the door and program conditions
With the dryer off, check that the door closes firmly and that no garment or debris is trapped in the door opening. Confirm the exact model's start procedure, child-lock or pause status, and selected program in the manual. Do not bypass the door switch or press repeatedly on a damaged latch.
Expected result: A door that does not latch or a program that is paused can prevent the motor from being energized. If the display is active, the door latches, and the cycle begins but the drum does not move, the issue is less likely to be a simple start condition.
Next step: Correct only an accessible obstruction or documented control selection. If the latch, switch, or controls are damaged or the drum still does not turn, stop and arrange qualified service.
Why this matters
Why: The door interlock and control state are prerequisites for a safe start, but a successful latch does not prove the motor or drive system is healthy.
-
Remove the load and inspect for a trapped object
Disconnect the dryer and remove all laundry. Check pockets, zippers, hooks, coins, and the door seal for an object caught between the drum and cabinet. If the manual permits, rotate the empty drum gently by hand and stop if it binds, scrapes, wobbles, or feels unusually loose. Do not insert a tool or force the drum.
Expected result: A trapped object can stop or obstruct the drum and may leave a rattle, knock, or scrape. If an empty drum still will not rotate smoothly by hand, a mechanical support, roller, bearing, or internal obstruction is more likely than a load issue.
Next step: Remove only a clearly accessible object and perform no more than one supervised confirmation. If the empty drum binds, scrapes, or remains stationary under power, keep the dryer disconnected and call service.
Why this matters
Why: An empty, freely moving drum points away from a seized drum, but it does not prove that a belt, motor, switch, or control can drive it under power.
-
Check load size and program suitability
Use the model manual to confirm the load is within the dryer's capacity and that large items are not packed so tightly that the drum cannot move. Remove an obviously overloaded load and do not test with a single heavy item that could place uneven force on the drum. Check that a sensor cycle is appropriate for the load.
Expected result: Hoover's drying guidance says excessive loading can hinder airflow and put too much weight on the drum, while mixed or trapped items can prevent effective operation. If the drum turns empty but stalls with a heavy load, load or drive capacity is part of the branch; if it fails empty, a component issue is more likely.
Next step: Try one suitable, balanced load only after the drum turns freely and no safety symptom exists. If the dryer stalls again or does not turn empty, stop using it and arrange qualified diagnosis.
Why this matters
Why: A load-related stall can be corrected without assuming a failed motor, but repeated stalls can stress the drive and should not be used as a routine workaround.
-
Use noise and drum movement to narrow the drive branch
Do not remove panels. Record whether there is a squeak that follows drum rotation, a deep rumble, metal-on-metal grinding, a creak, a repeated click, or only a motor hum. Note whether the drum jumps, leans, or feels loose, and whether drying performance changed before it stopped turning.
Expected result: Hoover associates squeaking with possible bearing wear, deep rumbling with a fan possibility, grinding with drum alignment or footing, and creaking with tension pulleys; it notes a pulley problem may accompany a substantial performance drop or eventual failure to work.
Next step: Provide the sound, timing, and drum behavior to a qualified technician. Do not tighten, lubricate, replace, or bypass an internal drive or safety part based only on the noise.
Why this matters
Why: The sound is a diagnostic clue, not a confirmed part identification. The belt, bearings, rollers, pulley, motor, fan, door switch, and control require model-specific access and testing.
-
Check accessible filters and ventilation without opening the drive
With the dryer disconnected, clean the door lint filter and any model-approved condenser filter, and check accessible ventilation areas for fluff. For a vented model, inspect the hose for a kink or blockage without moving a stacked or heavy machine alone. Do not remove a panel that exposes the motor, belt, heater, or fan.
Expected result: Hoover says filter or vent restrictions can reduce drying performance and contribute to unusual operation. Cleaning can help when a maintenance restriction is present, but a clean airflow path does not explain a drum that is mechanically locked or a motor that cannot drive it.
Next step: Refit completely dry filters and perform one supervised test only if the drum is free and no safety symptom exists. If the drum still will not spin, stop and arrange qualified service.
Why this matters
Why: Maintenance checks rule out an external contributor while preserving the boundary around the non-spinning drive system.
-
Find the exact model guide and prepare service evidence
Locate the product code on the Hoover dryer and use Hoover's model-specific Advice Centre or manual page. Keep the code, program, load, start-and-stop timing, sound recording, hand-rotation result, filter and vent condition, and any warning or breaker event ready for support.
Expected result: Hoover's support pages are organized around product code and model-specific troubleshooting, manuals, and maintenance. Different dryer types and models can have different user-accessible filters, controls, and drive arrangements.
Next step: Follow only the exact model's user-accessible instructions. If they do not restore drum movement, use Hoover support or a qualified appliance technician rather than continuing to run the machine.
Why this matters
Why: Model identity prevents a belt, door, reset, or filter procedure from another Hoover dryer being applied incorrectly.
-
Run one supervised confirmation after a safe correction
Only after correcting a documented door, load, object, filter, or ventilation condition, run one short supervised test with a suitable load. Stay nearby and observe drum movement, motor sound, heat, airflow, and odor. Stop immediately if the drum stalls, wobbles, scrapes, the motor only hums or clicks, heat rises sharply, smoke or burning smell appears, or the breaker trips.
Expected result: Normal drum movement after the correction supports an external condition. A drum that remains stationary, stops again, or produces a new mechanical or electrical symptom indicates an unresolved drive, motor, switch, or control fault.
Next step: Disconnect the dryer and arrange qualified service when the test fails. Do not open panels, bypass the door switch, or continue testing a stalled drum.
Why this matters
Why: One controlled test confirms whether the safe correction changed the symptom; repeated attempts can worsen a failing drive or overheat the motor.
Use your observations
Decision map
Find the observation that best matches what you see, then follow the next safe action.
-
PATH 01Next step
What you see
The drum turns empty and the dryer works after removing a trapped object or correcting a clearly unsuitable load.
Do this next
Use only model-approved load sizes and check pockets before each cycle. Stop if the drum stalls again or the noise returns.
-
PATH 02Next step
What you see
The display is active but the door does not latch, the cycle is paused, or a control or lock condition prevents starting.
Do this next
Follow the exact model's door and program instructions. Do not bypass the door switch; arrange service for a damaged latch or persistent start failure.
-
PATH 03Next step
What you see
The drum binds, scrapes, wobbles, feels loose, or will not turn empty, with or without a squeak, grind, or creak.
Do this next
Keep the dryer disconnected and arrange qualified diagnosis of the drum supports, bearings, rollers, belt, pulley, motor, or internal obstruction. Do not remove panels.
-
PATH 04Next step
What you see
The motor hums or clicks but the drum does not move, or it starts then stops repeatedly.
Do this next
Stop repeated restarts and obtain qualified service for the drive, motor, control, or safety circuit. Record the timing and sound for the technician.
-
PATH 05Next step
What you see
Smoke, burning smell, sparks, a hot or damaged cord or outlet, exposed wiring, severe scraping, or repeated breaker operation is present.
Do this next
Stop immediately, disconnect only if safe, keep clear, and seek qualified help from a safe location. Do not restart or disassemble the dryer.
Helpful context
Understand the symptom
A non-spinning drum has several distinct branches
A dryer that never starts may have no power, an unlatched door, a selected pause or program condition, or an internal control issue. A dryer that starts and then stops can be reacting to an overloaded or unsuitable load, a safety condition, or a drive fault. A drum that turns by hand but not under power is different from a drum that binds, grinds, or feels loose. Record which behavior you see before assuming a belt or motor has failed.
Do not turn a drive problem into a safety problem
Use the normal control to stop the cycle, disconnect the dryer as the model instructions require, and wait for hot parts to cool. Do not remove the top or rear panel, reach into the drive system, bypass a door switch, insert tools through drum holes, or apply lubricant inside the cabinet. Smoke, a burning smell, sparks, a hot or damaged cord or outlet, exposed wiring, severe scraping, or a loose drum is an immediate stop-use condition.
Only after diagnosis
Potential parts
- drive belt or tension pulley
Consider this only when qualified inspection confirms a broken, slipping, or worn drive component after the drum and load checks.
Belts and pulleys vary by model and require safe cabinet access; do not open the drive enclosure by guesswork. - drum bearing, roller, or support
Consider this only when a technician confirms binding, wobble, squeaking, or drum-support wear.
Support parts are model-specific; a replacement should not be selected from the noise alone. - motor or motor-start component
Consider this only after qualified testing finds that the motor or its start circuit cannot drive a mechanically free drum.
Motor and electrical parts require model-matched testing and safe isolation; do not probe live circuits. - door switch or electronic control
Consider this only when the door latch and program are correct but qualified testing finds that the interlock or control is not enabling the motor.
Safety switches and controls must never be bypassed and are model-specific.
When checks do not resolve it
Need a professional?
Arrange qualified Hoover dryer service when the drum will not turn empty, stalls repeatedly, binds, wobbles, or produces persistent squeaking, grinding, creaking, humming, or clicking after accessible load and door checks. Stop immediately for smoke, burning smell, sparks, a hot or damaged cord or outlet, exposed wiring, severe scraping, a loose drum, or repeated breaker operation. Do not remove panels, bypass a door switch, or keep restarting a stalled dryer.
Common questions
FAQ
Why does my Hoover dryer turn on but not spin?
Check the door latch and program, remove the load and any trapped object, and confirm the drum turns freely when disconnected if the manual permits. If it still will not turn empty, the drive, motor, switch, or control needs qualified diagnosis.
Can an overloaded Hoover dryer stop the drum from turning?
An excessive or unsuitable load can place too much weight on the drum and prevent effective operation. Remove the load and try one model-approved load only if the empty drum moves freely and no safety symptom is present.
What does a squeak or creak mean when the Hoover drum will not spin?
Hoover associates squeaking with possible bearing wear and creaking with tension pulleys, but those are possibilities rather than confirmed diagnoses. Disconnect the dryer and arrange service when the sound persists or movement is affected.
Should I replace the belt if my Hoover dryer is not spinning?
Do not choose a belt based only on the symptom. A door switch, motor, bearing, roller, pulley, control, obstruction, or drum support can produce similar behavior. A technician should confirm the fault and exact model before a part is selected.
When should I stop using a Hoover dryer that will not spin?
Stop for a binding or loose drum, severe scraping, burning smell, smoke, sparks, a hot or damaged cord or outlet, exposed wiring, repeated clicking or breaker operation, or repeated stalls. Do not bypass the door switch or open panels.
Read the exact guide
Official sources
- Contact Hoover Customer Support, Warranty & OrdersHoover UK · Technical support, after-sales service, and model-specific manual routing
- Search and download instruction manualsHoover UK · Finding model-specific user instructions by model or product code
- Are your clothes still wet after a drying cycle?Hoover UK · Load size, load balance, lint screen, airflow, and vent checks that can affect drum operation and drying performance
- Why is my tumble dryer making noises?Hoover UK · Safe unplugging and noise-pattern clues involving bearings, fan, drum balance, and tension pulleys
- Tumble Dryer TroubleshootingHoover Advice Centre · Model-specific troubleshooting, product-code lookup, manuals, power, door, filters, and maintenance routing
- How To Clean Your Tumble DryerHoover UK · Door-seal and drum checks, pockets, filters, condenser, ventilation, and stop-for-persistent-problem guidance
Community feedback
Share a repair observation
Share a plain-text repair observation. Accepted observations are published automatically; this page may take a moment to update.