
On this page
Start here
Quick answer
If your Hoover washing machine will not start, stop first for a leak near the plug or controls, standing water you cannot safely avoid, burning smell, smoke, sparks, overheating, or a breaker that trips again. With no hazard, check that the washer has power, the door closes and locks, a real programme is selected, Start has been pressed, and Child Lock, Delay Start, Pause, or Demo mode is not preventing the cycle. Hoover also says a washer may not begin without a water supply, and a drain or residual-water condition can prevent the next programme. Record any exact error code or light pattern. After the safe external checks, use only the reset procedure in the exact Hoover manual once; if the fault returns, the door remains unlocked, water will not enter or drain, or the machine fills while idle, keep it unused and arrange qualified service.
Before you begin
Safety first
- Do not use the Hoover washer with a leak near electrical parts, standing water that cannot be safely isolated, burning smell, smoke, sparks, overheating, repeated protective trips, a damaged hose or plug, a failed door interlock, or an idle-fill symptom until qualified service has assessed it.
Work through in order
Diagnostic checks
Use only checks that match the exact appliance or system and its official guide.
-
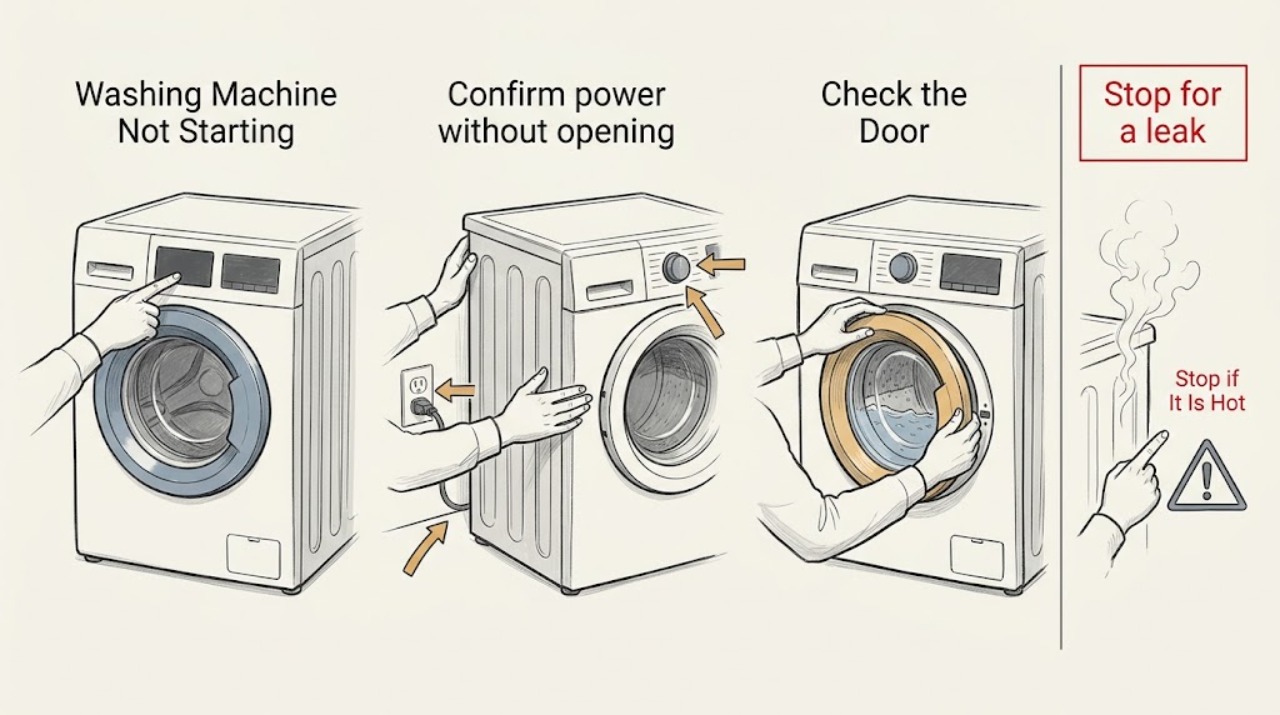
Stop for a leak or electrical danger
Stop immediately if water is leaking onto the floor or toward the plug and controls, the floor is flooded, you smell burning, see smoke or sparks, the cabinet is overheating, or a breaker or residual-current device trips again. From a dry, safe position close the water tap only if it is already reachable without stepping into water, then keep away and arrange qualified help; do not touch wet electrical parts or keep resetting protection.
Expected result: The washer, floor, plug area, and controls are dry and intact with no burning or electrical warning, or one of those warning signs is present.
Next step: Continue only in the dry, safe state. For any warning sign, leave the washer unused and use qualified plumbing, appliance, or emergency electrical service as appropriate.
Why this matters
Why: A start failure is secondary when water can reach electricity or when an electrical fault is active. Further attempts can increase shock, flood, or fire risk.
-
Confirm power without opening the washer
Check that the washer is switched on and that its plug, socket, and accessible breaker are in a normal, dry, undamaged state. If the socket is safely accessible, use a known working low-power appliance to distinguish a supply issue; do not use a wet socket, open the cabinet, or repeatedly reset a breaker.
Expected result: The display is blank, the socket has no power, a breaker is tripped, or the washer display and nearby supply appear normal.
Next step: If household power is absent, use an electrician or address the safe supply issue. If power is normal, continue with the door, controls, and programme checks; do not open the washer to trace internal power.
Why this matters
Why: A blank display or failed socket points to household power, a fuse, or the appliance supply rather than a programme or water issue. Hoover manuals list no power, a disconnected plug, and electrical supply failure among causes of a machine that does not operate.
-
Check the door and safety lock
Open the door, remove any clothing caught in the opening, and close it firmly without slamming. Select the programme again and press Start or Pause as the exact Hoover instructions show. Do not force the door, hold it open during a start attempt, or bypass the interlock.
Expected result: The door does not latch, a door-lock indicator does not appear, the washer reports a door error, or the door locks and the programme proceeds.
Next step: If the door closes and locks, continue to the control and water checks. If it will not lock or the error returns, keep the washer off and arrange service rather than bypassing the safety lock.
Why this matters
Why: Hoover says the door must close correctly before a cycle can begin, and its manuals list an open or improperly closed door as a cause of failure to operate. A persistent missing lock indication points to the latch or interlock path, not simply the Start button.
-
Clear Child Lock, Delay Start, Pause, or Demo mode
Look for a padlock, key, delay, pause, or demo indication. With no hazard, use the exact Hoover manual or Advice Centre instructions for that panel: Hoover notes that Child Lock may be activated by holding a padlock button or by pressing two marked buttons, while delay and demo controls vary by model. Do not guess combinations or hold controls while the machine is wet.
Expected result: The lock or delay indicator clears and buttons respond, the control panel remains locked, the display shows a delay, or the panel appears to be in a demonstration mode.
Next step: Use the model-specific cancellation procedure once and then select and start the programme normally. If controls remain locked or the cycle still does not start, stop and arrange service rather than bypassing the control state.
Why this matters
Why: Child Lock can make buttons appear faulty, and Delay Start can make a healthy washer wait before running. Demo mode can also leave a washer apparently unresponsive; the combination is model-specific.
-
Read the exact code or light pattern
Record every displayed letter and number, or count the repeating flashes with the pause between groups, before switching the washer off. Compare the result with the exact Hoover manual or official Advice Centre page; do not infer a code from a single light or apply another model's code table.
Expected result: An E2 or equivalent fill indication appears, an E3 or drainage indication appears, an E15 or another code appears, or there is no code.
Next step: Follow the appropriate external water, drain, or door branch for the exact code. For an unrelated or recurring code, keep the washer unused and provide the exact display to Hoover or qualified service.
Why this matters
Why: Hoover associates E2 with failure to load water and E3 with drainage problems on relevant models. E15 has its own model-specific reset guidance, while other codes can indicate a door, sensor, communication, or control fault.
-
Confirm water supply before blaming the controls
From a dry position, confirm the cold-water tap is open and not visibly broken, and look for a crushed or kinked fill hose if the washer was moved or installed recently. If water flow is uncertain, close the tap and isolate mains power before any hose examination; do not force a seized valve or leave a disconnected hose pressurized.
Expected result: The tap is closed or has weak flow, the fill hose is kinked or trapped, the supply and hose look normal, or the washer starts but waits for water.
Next step: Restore only a safe, obvious tap or hose condition with the machine isolated, then retry the documented programme once. Call a plumber for no or weak household flow and arrange appliance service if the washer still will not start.
Why this matters
Why: Hoover says a washer may not start a programme without a water supply and that a crushed or kinked pipe can stop flow. A normal supply shifts attention to the door, programme, inlet path, or control system.
-
Check residual water and drain conditions
If water remains in the drum or the washer hums and stops, compare the drain hose route with the exact Hoover manual and check only the accessible external hose for a bend or obvious blockage. Do not reach into dirty standing water or remove a pump filter while water can spill onto electrical parts; use the model procedure and safe isolation first.
Expected result: The drum contains residual water, a drain fault is shown, the hose is kinked or routed incorrectly, or the drain route appears normal and the drum is empty.
Next step: Follow the exact manual's safe drain and filter procedure only when conditions allow. If water cannot be removed safely, the pump is noisy, or the drain fault returns, arrange qualified appliance or plumbing service.
Why this matters
Why: A washer may refuse a new cycle when the previous cycle did not drain. Hoover manuals distinguish a drainage fault from a fill fault and identify blocked or incorrectly routed drainage as a cause; water left in the drum can also keep the door locked.
-
Use one model-supported reset, then escalate
After the washer is dry, the door and connections are intact, and no hazard is present, use only the reset procedure specified by the exact Hoover manual or official code page. For some E15 models Hoover describes disconnecting the machine for several minutes before trying again; do not apply that timing to every code and do not repeat resets to conceal a fault.
Expected result: The washer starts normally after the documented reset, the same code returns, it remains silent or locked, it fills while switched off, or a breaker trips again.
Next step: Keep the washer unused for a recurring or idle-fill fault and arrange Hoover or qualified appliance service. Provide the model, code, door state, programme settings, power, supply, drain, and leak observations.
Why this matters
Why: A one-time recovery can clear a transient control state. Recurrence points toward the door interlock, water inlet, pump, level sensing, wiring, or control system; water entering while idle points to an inlet valve that may not be closing.
Use your observations
Decision map
Find the observation that best matches what you see, then follow the next safe action.
-
PATH 01Safety boundary
What you see
A leak reaches the plug or controls, standing water is unsafe, or burning smell, smoke, sparks, overheating, or a repeated breaker trip occurs
Do this next
From a dry position close the water tap if safely reachable, keep away from wet electrical areas, and arrange qualified plumbing, appliance, or electrical service.
Why this path and its safety boundary
Safety stop: Do not touch wet electrical parts, restart the washer, or keep resetting the protective device.
-
PATH 02Safety boundary
What you see
The display is blank or the socket has no power
Do this next
Check only the safe accessible supply, plug, and breaker state; use an electrician if household power is absent or the breaker will not stay on.
Why this path and its safety boundary
Safety stop: Do not open the cabinet or keep resetting a tripped breaker.
-
PATH 03Safety boundary
What you see
The door does not latch or the door-lock indication never appears
Do this next
Remove clothing from the opening and close the door normally once; arrange service if the interlock still does not report locked.
Why this path and its safety boundary
Safety stop: Do not force, tape, or bypass the door lock.
-
PATH 04Safety boundary
What you see
Child Lock, Delay Start, Pause, or Demo mode is shown
Do this next
Use the exact Hoover manual or Advice Centre procedure for that control panel to cancel the state, then select and start the intended programme.
Why this path and its safety boundary
Safety stop: Do not guess button combinations or continue if controls remain unresponsive.
-
PATH 05Safety boundary
What you see
E2 or an equivalent fill indication is shown, or the washer waits for water
Do this next
Check the cold-water tap, household flow, fill-hose routing, and model-supported inlet path, with mains power isolated before hose examination.
Why this path and its safety boundary
Safety stop: If supply and routing are normal but the code returns, keep the washer unused and arrange service; do not open the inlet system.
-
PATH 06Safety boundary
What you see
Water remains in the drum or an E3 or drainage indication appears
Do this next
Follow the exact Hoover manual's safe external drain and filter checks, and verify the drain hose is not kinked or incorrectly routed.
Why this path and its safety boundary
Safety stop: Do not reach into dirty water or remove a filter where water can contact electricity; arrange service if drainage remains blocked.
-
PATH 07Safety boundary
What you see
Another code or repeating light pattern appears
Do this next
Record the exact pattern and model, consult the matching Hoover manual, and use only that code's documented action.
Why this path and its safety boundary
Safety stop: If the code returns after the documented reset or its meaning is uncertain, stop and arrange Hoover or qualified service.
-
PATH 08Safety boundary
What you see
The machine fills while switched off or still will not start after safe external checks and one documented reset
Do this next
Close the water tap when the washer is not supervised and arrange qualified appliance service for the valve, interlock, sensing, pump, wiring, or control path.
Why this path and its safety boundary
Safety stop: Do not leave an idle-filling washer connected to an open supply or open the cabinet to test it.
Helpful context
Understand the symptom
First identify what “will not start” means
A blank machine, an unresponsive control panel, a door that will not lock, and a programme that starts but never takes water are different symptoms. Hoover's published guidance covers each separately. Record whether the display is on, whether the door-lock indication appears, whether the pump runs, whether water enters, and whether an error code or repeating light pattern is shown before changing settings.
Use the exact Hoover instructions
Hoover manuals and Advice Centre pages are model-specific. Use the label on the washer and Hoover's manual search to confirm the Child Lock combination, delay cancellation, error-code meanings, door behavior, and reset procedure. A button combination or code from another Hoover series may not apply to yours.
Keep water and electricity apart
Before looking behind the machine, close the water tap and disconnect mains power as Hoover directs. Do not reach into standing water, handle a wet plug or socket, keep resetting a protective device, or run the washer after a burning smell, smoke, spark, overheating, or a leak has reached the controls. Use qualified plumbing, electrical, or appliance help when the safe boundary is unclear.
Only after diagnosis
Potential parts
- door interlock or latch
Only relevant when the door is correctly closed but the lock indication never appears and qualified diagnosis confirms an interlock or latch fault.
Confirm the complete Hoover model or product code; never bypass the interlock or open the cabinet for a self-test. - water inlet valve or inlet filter
Only relevant when tap flow, hose routing, door state, and the model-supported filter check are normal and service confirms the inlet path is faulty.
Confirm model-specific fitment and use qualified installation; isolate water and mains power before any approved external inspection. - drain pump or drain hose
Only relevant when residual water or a recurring drainage indication remains after safe external hose and manual-supported checks and a technician confirms the blocked or failed component.
Confirm the full model and water-handling configuration; do not dismantle a water-filled or energized appliance.
When checks do not resolve it
Need a professional?
Provide the Hoover model or product code, exact code or light pattern, whether the display works, door-lock state, programme and Start observations, Child Lock or delay state, power result, tap and hose condition, residual-water or drain result, and whether water enters while idle.
Safety scope: Do not use the Hoover washer with a leak near electrical parts, standing water that cannot be safely isolated, burning smell, smoke, sparks, overheating, repeated protective trips, a damaged hose or plug, a failed door interlock, or an idle-fill symptom until qualified service has assessed it.
Common questions
FAQ
Why is my Hoover washing machine not starting?
Check the safe basics in order: power, door closure and lock, programme and Start, Child Lock or delay, water supply, and residual water or drainage. Record any code and use only the exact model's reset once. A recurring fault, failed lock, leak, or electrical warning needs qualified service.
Can Child Lock stop a Hoover washer from starting?
Yes. Hoover says Child Lock can make the panel appear unresponsive and prevent a programme from starting. Use the padlock symbol or the exact two-button combination shown for your model; do not guess the combination or bypass the lock.
Why does my Hoover washer turn on but not begin the cycle?
The door may not have locked, a programme or Start command may not have been accepted, a delay or pause may be active, or the water supply may be off. Hoover also lists fill and drain conditions that can stop progress, so compare the exact code or light pattern with the model manual.
What does E2 mean on a Hoover washing machine that will not start?
On relevant Hoover models, E2 or E02 indicates that the machine cannot load water. Check the tap, household flow, and a crushed or kinked fill hose, then follow the exact model's filter and drain-routing instructions. If the code returns, arrange service.
Can a drain problem prevent a Hoover washer from starting?
Yes. Residual water or a drainage fault from the previous cycle can keep the door locked or prevent a new cycle. Check only the safe external hose route and model-supported filter procedure; do not reach into dirty water or dismantle a water-filled machine.
What should I do if my Hoover washer fills while it is off?
Close the water tap when the washer is not supervised and arrange service. Hoover describes contamination at the inlet valve as one possible cause and recommends an engineer if the symptom persists. Do not leave an idle-filling washer connected to an open supply.
When should I stop troubleshooting a Hoover washer that will not start?
Stop for leaks near electricity, wet controls, burning smell, smoke, sparks, overheating, a repeated protective trip, a damaged hose or plug, a failed door lock, or a recurring code after one model-supported reset. Keep the machine unused and use qualified plumbing, electrical, or appliance service.
Read the exact guide
Official sources
- Cycle won't start - Hoover Advice CentreHoover Advice Centre · Hoover washing-machine cycle-start, Child Lock, door, water, and delay-related guidance
- Error message E02 - Hoover Advice CentreHoover Advice Centre · Hoover washing-machine E2 or E02 water-fill fault, low pressure, tap, and fill-hose guidance
- Is the water turned on?Hoover Advice Centre · Hoover washing-machine programme start dependency on the water tap and fill-hose routing
- Search and download of instruction manuals – Hoover UKHoover Home · Hoover model and product-code manual lookup for model-specific controls and troubleshooting
- The buttons are not working or the program will not start- Hoover Advice centreHoover Advice Centre · Hoover washing-machine Child Lock, unresponsive buttons, and Demo mode guidance
- 11-Troubleshooting ENHoover · Hoover washing-machine operating, Child Lock, water-fill, drain routing, error, reset, and service troubleshooting
- Unplug the appliance for a few minutesHoover Advice Centre · Hoover E15 washing-machine reset and service escalation guidance
- Is it filling up when not in use?Hoover Advice Centre · Hoover washing-machine clean water entering while idle, inlet-valve filter, leak check, and engineer-service guidance
- Check that the water supply is turned onHoover Advice Centre · Hoover washing-machine water tap, seized or broken valve, safe flow check, and mains isolation guidance
- Hoover Washing machine DXOA 412AHFN Instruction ManualHoover · Hoover washing-machine power, programme, door, pause, delay, E2 fill, E3 drain, and service troubleshooting
Community feedback
Share a repair observation
Share a plain-text repair observation. Accepted observations are published automatically; this page may take a moment to update.