
On this page
Start here
Quick answer
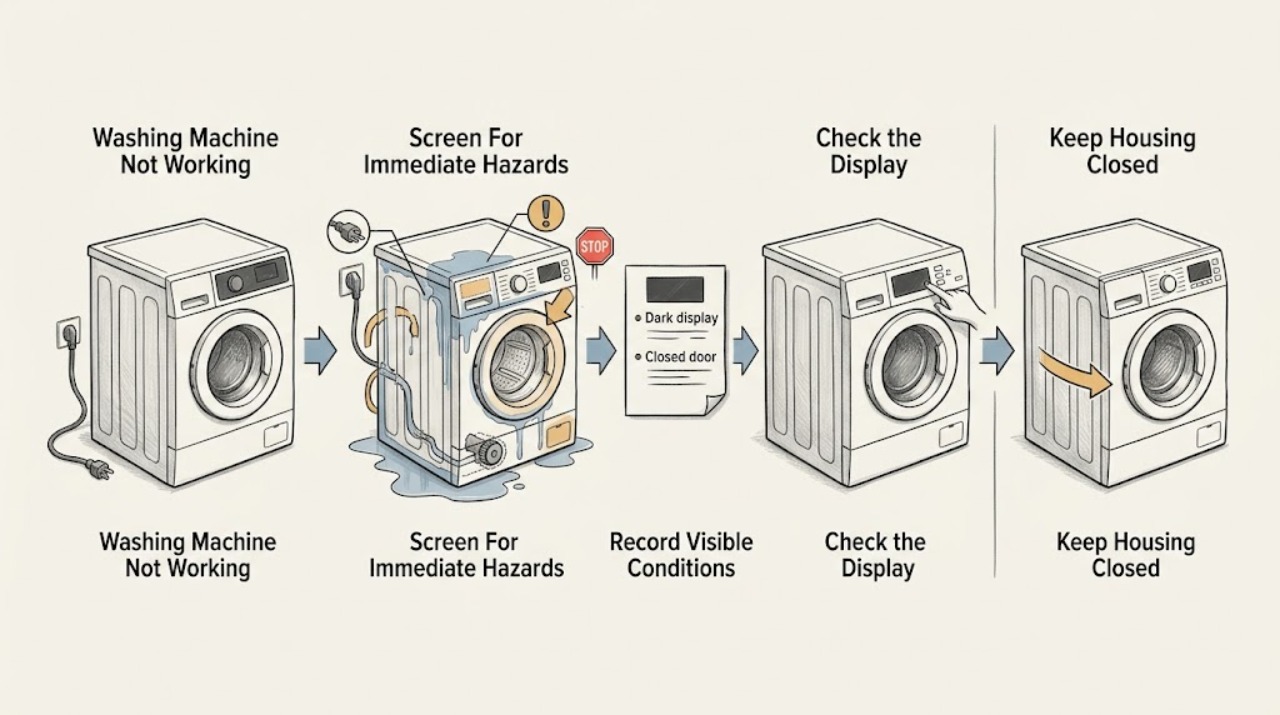
A Maytag washing machine that is not working should first be classified as no power, no start, no fill, no drain, no wash or spin, leaking, or displaying a code. Record whether it is a top-load or front-load model, the exact cycle and stage, the display or flashing lights, lid or door-lock state, remaining water, and whether the basket is moving. Then use the matching external checks: power and Control Lock, a closed lid or door, both water supplies and kink-free hoses, drain routing, a balanced load and correct cycle, and only model-permitted filter or screen care. A low-water sensing cycle, a pause, or an out-of-balance correction may be normal on some models. Stop for a leak near electricity, unexpectedly hot water, smoke, burning smell, sparking, severe walking or impact, or a repeated breaker trip; a persistent fault after one documented reset needs qualified appliance, plumbing, or electrical service.
Before you begin
Safety first
- This article covers ordinary controls, visible plumbing and installation checks, load correction, and model-permitted external maintenance only. Do not touch wet electrical equipment, bypass safety interlocks, open the cabinet, perform live tests, or dismantle the pump, motor, valve, sensor, or control.
Work through in order
Diagnostic checks
Use only checks that match the exact appliance or system and its official guide.
-
Check 1
Before operating the washer, check for a leak or standing water near the plug or outlet, unexpectedly hot water, smoke, burning smell, electrical odor, visible sparking, damaged cord, severe cabinet movement, or a breaker that has tripped again.
Expected result: Classify the washer as safe for ordinary external checks, or record the exact water, heat, mechanical, or electrical warning.
Next step: If safe, continue with the symptom record. If water is near electrical parts, stop the washer, close water valves from a dry position if safe, and isolate power only without touching wet equipment. Arrange qualified appliance, plumbing, or electrical service.
Stop if: Do not touch a wet plug or outlet, reach into standing water, run the washer, or repeatedly reset a tripping breaker.
Why this matters
Why: A safety warning is a stop branch, not evidence that a longer cycle or reset will fix the machine.
-
Check 2
Record top-load or front-load design, selected cycle and options, stage where operation stops, display or flashing lights, remaining water, lid or door-lock state, and whether the motor, pump, or basket moved.
Expected result: Classify the symptom as no LEDs, powered but no start, no fill, fill then drain, no drain, no wash or agitation, no spin, leak, unusual walking or impact, or a specific code.
Next step: Photograph the display and model label, preserve the code exactly, and follow the corresponding branch without substituting a code definition from another Maytag washer.
Stop if: Do not enter a service diagnostic mode, open panels, or clear a code before recording it unless the manual explicitly requires that step.
Why this matters
Why: The symptom class determines which external check is relevant. An exact code and platform matter; Maytag warns that code lists may not include every model.
-
Check 3
If the washer has no display or does not respond, check from a dry position that its cord is fully seated in a grounded outlet, that no extension cord is used, and that the household breaker or GFCI has not tripped; check whether Control Lock is indicated.
Expected result: Record a dead or unavailable outlet, a tripped protection device, a restored display, a Control Lock indicator, or normal power with no response.
Next step: Restore only an obviously tripped device once from a dry safe position and unlock Control Lock using the model instructions. If power does not remain available, call a qualified electrician; if the washer remains unresponsive, arrange appliance service.
Stop if: Do not use an extension cord, change fuse ratings, open the washer console, touch wet electrical equipment, or reset a breaker repeatedly.
Why this matters
Why: No power or Control Lock can make every wash function appear broken. A protection device that trips again or a powered console that stays dead points beyond a simple outlet check.
-
Check 4
Confirm the intended cycle and options, cancel an unintended delay or pause, press or hold Start exactly as the model requires, and close the top lid or front door fully so its latch can engage.
Expected result: Record a successful start, a Control Lock or delay indicator, an open or misaligned lid or door, a lid or door that clicks but does not lock, or no response after the documented Start sequence.
Next step: Remove only visible lint, clothing, detergent buildup, or objects from the latch area with the washer off, then follow the exact model instructions. Arrange service for a damaged or persistent lock signal.
Stop if: Do not bypass, tape, magnetize, pry, or hold a lid or door switch closed, and do not reach into a moving basket.
Why this matters
Why: Maytag models differ: some can fill before a top-load lid locks, while others will not start or fill until the lid is latched; a front-load door can remain locked when water, heat, tumbling, or spinning is present.
-
Check 5
For a no-fill or slow-fill symptom, confirm both household hot and cold valves are open, both hoses are connected to the intended supplies, and visible hose sections are not kinked, crushed, or leaking.
Expected result: Record a closed valve, weak household flow, one missing or reversed supply, a kinked or damaged hose, or normal supplies with no water entering.
Next step: Open only an obviously closed valve if safe and correct only an accessible hose connection according to the model instructions. Arrange plumbing service for weak flow or a leaking supply; continue to the permitted screen branch when the supply is normal.
Stop if: Do not force a seized valve, disconnect a pressurized hose, or continue near a spray, hot-water, or uncontrolled leak.
Why this matters
Why: Maytag guidance commonly requires both supplies to be available for correct operation; a household flow problem is upstream of the washer. A normal supply with no fill points toward screens, the inlet valve, control, pressure sensing, or lid signal.
-
Check 6
Only when the exact model instructions permit it, turn off both water supplies, isolate washer power, contain residual water, and inspect the accessible inlet screens and hose ends for mineral or debris restriction without removing a fixed screen.
Expected result: Record a kinked or restricted hose, a visibly blocked screen, a damaged connection, or a clear inlet path.
Next step: Clean or replace only as the model instructions allow and restore the hoses without leaks. If the path is clear or the screen cannot be safely accessed, arrange appliance service instead of opening the cabinet.
Stop if: Do not remove a fixed screen, use sharp tools or chemicals, handle a bulging hose, spill water toward electrical equipment, or perform live tests.
Why this matters
Why: A restriction before the inlet valve can stop or slow filling. A clear permitted path with no fill shifts the diagnosis toward the valve, pressure sensor, control, wiring, or lid system.
-
Check 7
For standing water, a pump that runs continuously, a drain or spin failure, or water that enters and immediately disappears, inspect the visible drain hose for kinks, clogs, incorrect height, excessive insertion, sealing, or siphoning; check the drainpipe or utility sink from safe access.
Expected result: Record water that remains, a hose that is kinked or too low or deep, a blocked drain, a pump-out routine, or correct visible routing with continued no-drain behavior.
Next step: Correct only visible hose routing allowed by the installation instructions. Clean an accessible pump filter only when the model manual permits it and water and power are safely isolated; request plumbing or appliance service for hidden blockages or persistent no-drain.
Stop if: Do not reach into standing water, open a filter with hot or pressurized water, use chemicals in the drain, seal the drain hose, or open internal panels.
Why this matters
Why: Drain installation can cause siphoning, backflow, or slow drainage and can make a fill, spin, or completion problem look like a total failure. A correct visible path with standing water points toward the pump, filter if model-equipped, control, or internal blockage.
-
Check 8
For a washer that agitates poorly, does not spin, walks, bangs, or leaves clothes wet, pause only as the model permits, redistribute or reduce an overloaded or tightly packed load, verify the cycle and spin setting, and check that the cabinet is level and stable from outside.
Expected result: Record a balanced load and quiet stable cabinet, an unbalanced or single bulky item, excessive suds, a gentle or low-spin selection, or the same failure with a reasonable load.
Next step: Use the correct cycle and detergent amount, redistribute the load, and make only a safe leveling adjustment allowed by the manual. Arrange service for repeated walking, impact, motor or drive symptoms, or failure with a balanced load.
Stop if: Stop for violent movement, cabinet or floor damage, a leaking hose, smoke, burning smell, or a basket that strikes the cabinet; do not hold the lid or door switch closed.
Why this matters
Why: Maytag identifies load balance, level, cycle and spin selection, excess suds, and drain performance as causes of poor spin or a cycle that stops. A stable washer with the same failure needs service rather than a heavier test load.
-
Check 9
For a leak, inspect only from outside and with the washer stopped for the visible fill and drain connections, door seal or lid area, dispenser area, hose washers, and excessive suds; note when the water appears: fill, wash, drain, spin, or after the cycle.
Expected result: Record a loose or leaking hose connection, torn or obstructed door seal, overflow or suds, water from underneath, or no visible source.
Next step: Close water valves and isolate power from a dry safe position when a leak is active. Wipe only a visible seal or remove an external obstruction as the model instructions allow; arrange qualified appliance or plumbing service for an internal or recurring leak.
Stop if: Do not run a leak test, tighten a hidden connection, touch wet electrical equipment, use excessive detergent, or open the cabinet.
Why this matters
Why: The timing and location separate an accessible connection or seal issue from an internal leak, drain problem, oversudsing, or a tub or pump fault. A leak underneath or near electrical parts is not an ordinary adjustment.
-
Check 10
If an exact code or flashing pattern is present, photograph it, identify the washer platform and model, follow that model's official resolution, and perform no more than the documented single control reset when there is no leak or electrical hazard.
Expected result: Record whether the code clears, whether the same code returns, whether the washer resumes, and whether the code corresponds to fill, drain, lid or door, balance, motor, temperature, or a general system fault in the model guide.
Next step: Provide the exact code, model, cycle stage, water state, lid or door state, and prior observations to qualified service. Do not clear the evidence by repeated resets.
Stop if: Do not apply a code from another washer, enter unapproved diagnostics, bypass a sensor, or repeatedly reset the control.
Why this matters
Why: Maytag code lists are model-specific. A code can point to a branch but does not prove a replaceable part, and a returning code after the documented step is service evidence.
Use your observations
Decision map
Find the observation that best matches what you see, then follow the next safe action.
-
PATH 01Safety boundary
What you see
No LEDs or display are present, the outlet or protection device is unavailable, or the washer remains dead after a safe one-time power check.
Do this next
Use a qualified electrician for a recurring breaker or outlet problem and qualified appliance service for a powered washer that remains dead. Do not open the console.
Why this path and its safety boundary
Why it matters: The problem is at the supply, outlet, cord, or washer power/control path rather than a fill, drain, or load setting.
Safety stop: Stop for wet electrical equipment, a hot or damaged cord, smoke, burning smell, sparking, or a breaker that trips again.
-
PATH 02Safety boundary
What you see
The console has power but Control Lock, a delay or pause, an unaccepted Start command, or an unresponsive control prevents the cycle from beginning.
Do this next
Use the exact model instructions to unlock, cancel the delay, close the lid or door, and start once. Arrange service if the control or lock remains unresponsive.
Why this path and its safety boundary
Why it matters: The washer may be waiting for a permitted control state rather than having failed mechanically.
Safety stop: Do not bypass the lock, hold a switch closed, or repeatedly cycle power.
-
PATH 03Safety boundary
What you see
The washer starts but no or little water enters, both supply valves or hoses are not normal, or a fill alert is shown.
Do this next
Check both supplies, visible hose routing, permitted screens, lid state, and drain installation. Arrange plumbing or appliance service when those checks do not restore fill.
Why this path and its safety boundary
Why it matters: The immediate possibilities are household supply, hose or screen restriction, lid state, drain siphoning, or a model-specific fill-control condition.
Safety stop: Stop for a hot-water or hose leak, water near electricity, a bulging hose, or any need to open the washer.
-
PATH 04Safety boundary
What you see
A top-load high-efficiency washer shows sensing or fill activity, moves briefly, adds water in stages, and matches the selected cycle's expected level.
Do this next
Allow the documented sensing period and cycle to continue. Do not add water manually or change the water-level system.
Why this path and its safety boundary
Why it matters: The low visible level or pause may be normal operation rather than a no-fill fault.
Safety stop: Stop for a dry tub after sensing, an error code, an overflow, leak, or water near electrical equipment.
-
PATH 05Safety boundary
What you see
Water remains after wash, the pump runs without emptying, the washer fills and drains at once, or a drain code is shown.
Do this next
Check visible drain routing and accessible filters only as the model manual allows, then arrange plumbing or appliance service for persistent standing water or no-drain.
Why this path and its safety boundary
Why it matters: A kink, clog, incorrect hose installation, siphoning, suds, or a model-specific pump or control issue can block completion and spin.
Safety stop: Do not handle hot or standing water, run a chemical drain test, or open internal pump access without model-approved safe isolation.
-
PATH 06Safety boundary
What you see
The washer fills but does not agitate, spin, or complete, and the load is overloaded, unbalanced, excessively sudsy, or set to a gentle or low-spin cycle.
Do this next
Redistribute or reduce the load, use the correct cycle and detergent amount, check stable leveling, and perform one normal observation only if no safety condition exists.
Why this path and its safety boundary
Why it matters: The control may be protecting the washer or following a cycle choice; the load and drain result must be separated from a motor or drive fault.
Safety stop: Stop for violent walking, banging, a leak, smoke, burning smell, or a repeat failure with a balanced load.
-
PATH 07Safety boundary
What you see
Water appears during fill, wash, drain, spin, or after the cycle from a hose, seal, dispenser, underneath the cabinet, or an unknown location.
Do this next
Stop, close water valves, and isolate power safely. Arrange qualified appliance or plumbing service for any recurring, underneath, or hidden leak.
Why this path and its safety boundary
Why it matters: The timing and location may indicate a connection, door seal, drain, oversudsing, pump, tub, or internal leak; water near power is an immediate hazard.
Safety stop: Do not run another cycle, touch wet electrical equipment, or open the cabinet to locate the source.
-
PATH 08Safety boundary
What you see
A code or flashing pattern remains after the exact model's documented supply, lid, drain, load, or one-time reset step.
Do this next
Keep the code record and arrange qualified Maytag appliance service with the model and stage information.
Why this path and its safety boundary
Why it matters: The code is unresolved and can represent a platform-specific sensor, motor, pump, control, or installation condition; it is not a universal part number.
Safety stop: Do not use a different model's code table, enter unapproved diagnostics, or repeatedly clear the code.
-
PATH 09Safety boundary
What you see
Smoke, burning smell, visible arc or spark, a hot cord, repeated breaker trip, unexpectedly hot water, severe walking or impact, or water near electricity occurs.
Do this next
Stop use, keep people away, isolate power or water only from a safe dry position, and arrange qualified appliance, electrical, or plumbing service.
Why this path and its safety boundary
Why it matters: The priority is fire, electrical, burn, flood, or mechanical safety, not restoring the wash cycle.
Safety stop: Do not run, reset, test, move, or open the washer after a safety event.
-
PATH 10Safety boundary
What you see
Power, control, lid or door, supplies, drain, load, and visible leak checks are normal, but the washer still will not operate or stops at the same stage.
Do this next
Keep the washer out of service if the symptom is severe or recurring and arrange qualified appliance diagnosis with the complete record.
Why this path and its safety boundary
Why it matters: An internal valve, pump, motor, drive, sensor, wiring, or control issue is possible, but the broad symptom does not identify one part.
Safety stop: Do not order a part, open panels, or use a service diagnostic sequence from a generic symptom alone.
Helpful context
Understand the symptom
Define what not working means on this load
A washer can be completely dead, powered but waiting for Start, filling slowly, draining continuously, stopping before spin, leaving clothes wet, leaking, or showing a code. Those are different decision paths. Note the stage and behavior before pressing buttons repeatedly: no LEDs, an unresponsive console, a locked lid or door, a tub with standing water, a fill or drain sound, an out-of-balance pause, and the exact code or flashing pattern.
Separate normal sensing from a stopped machine
Maytag high-efficiency top-load models can sense a load, use short slow movements, pause, and add water in stages. Some cycles intentionally use a low level, while a delicate or low-spin selection can leave more water in clothing. A sensing or balancing pause is not the same as no power. Compare the behavior with the cycle guide and owner's manual before adding water, changing a control, or calling a fill problem.
Use the shortest safe branch first
Check power and Control Lock, then the lid or door, water supplies, hoses, drain path, load balance, and exact code. This sequence keeps a supply or installation problem separate from an internal valve, pump, motor, sensor, or control fault. Inspect a pump filter or inlet screen only when the exact model instructions allow it, with water off, power isolated, and residual water contained.
A safety symptom ends ordinary troubleshooting
Water, heat, and electricity can overlap in a laundry fault. Stop for a leak that reaches the plug or outlet, unexpectedly hot water, smoke, burning or electrical odor, visible sparking, a hot cord, a breaker that trips again, or a washer that walks or bangs violently. Do not keep resetting or run a larger test load to reproduce the symptom; document it for qualified service.
Safety boundary
Stop conditions
- Stop for a leak or standing water near a plug, outlet, control, or other electrical equipment; do not touch wet electrical equipment.
- Stop for unexpectedly hot water, smoke, burning or electrical smell, visible sparking, a hot or damaged cord, or a breaker that trips again.
- Stop for severe walking, banging, cabinet impact, a damaged floor or hose, or a basket that strikes the cabinet; do not run a larger test load.
- Do not bypass, tape, magnetize, or hold a lid or door lock closed, and do not open the cabinet or perform live electrical or water-valve tests.
- Turn off water, isolate power, and contain residual water before any model-permitted hose, inlet-screen, or pump-filter inspection; do not disturb a fixed screen.
- Stop after the model-specific power, control, lid or door, supply, drain, load, and one-time reset checks fail or an exact code returns; arrange qualified service rather than guessing a part.
Only after diagnosis
Potential parts
- washer water inlet valve
Consider this category only after both supplies, hoses, permitted screens, lid or door state, and cycle settings are normal and qualified testing points to the inlet valve.
Confirm the exact Maytag model and valve configuration; do not infer valve failure from a broad no-operation symptom. - washer drain pump or accessible filter
Consider this category only when standing water or a no-drain symptom remains after visible drain routing and any model-permitted filter care and qualified diagnosis supports pump service.
Not every model has the same filter access or pump design; confirm the model and isolate water and power before service. - washer lid or door-lock assembly
Consider this category only when the exact model cannot receive a valid lid or door-lock signal after visible obstruction and control checks.
Confirm the exact washer platform and lock design; never bypass the safety interlock. - washer drive or motor component
Consider this category only when a balanced load, correct cycle, drain path, and model-specific testing confirm a drive or motor fault.
Verify the exact model and technician diagnosis before selecting an internal component; the symptom alone is not a fitment claim. - washer control or water-level sensing component
Consider this category only when a persistent code or incorrect fill or cycle behavior remains after external supply, drain, lid, and reset checks and qualified testing supports it.
Confirm the exact model and diagnostic evidence; do not treat a generic code or no-operation symptom as proof of a control part.
When checks do not resolve it
Need a professional?
Arrange qualified Maytag appliance service when the washer remains dead or unresponsive, will not start after the correct control and lid or door checks, will not fill after both supplies and permitted hose or screen checks, will not drain or spin after visible drain and load checks, leaks from underneath or repeatedly, or returns an exact model code. Use plumbing service for weak household supply, seized valves, blocked standpipes, or persistent siphoning, and qualified electrical service for an outlet, cord, wiring, smoke, sparking, or repeated breaker issue. Treat water near electricity, hot water, smoke, burning smell, severe impact, or a repeated trip as an immediate stop, not a routine retry.
Safety scope: This article covers ordinary controls, visible plumbing and installation checks, load correction, and model-permitted external maintenance only. Do not touch wet electrical equipment, bypass safety interlocks, open the cabinet, perform live tests, or dismantle the pump, motor, valve, sensor, or control.
Common questions
FAQ
What should I check first when my Maytag washer is not working?
First screen for leaks, hot water, smoke, burning smell, sparking, severe movement, or a repeated breaker trip. If safe, record whether the washer has power, the exact cycle and stage, the display or code, the lid or door state, and the water level. Then follow the matching power, start, fill, drain, load, leak, or code branch.
Why does my Maytag washer have power but not start?
Control Lock, a delay or pause, an unaccepted Start command, or an open or unlatched lid or door can prevent starting. Use the exact model instructions and never bypass the safety interlock. A persistent lock or unresponsive control needs service.
Can a Maytag high-efficiency washer look like it is not filling?
Yes. Sensing cycles can pause, move the load, and add water in stages, and some cycles intentionally use a low visible level. Compare the behavior with the exact cycle guide. A dry tub after sensing or a returning fill alert is a fault branch.
Why does my Maytag washer fill and then drain or stay empty?
A drain hose that is too low, inserted too far, sealed, kinked, or otherwise installed incorrectly can siphon water away. Check visible routing against the installation instructions. Persistent standing water or a pump that runs without emptying needs qualified service.
Why will my Maytag washer not drain or spin?
Check the visible drain hose, cycle and spin setting, door or lid, load balance, and detergent amount. An unbalanced or overloaded load, excess suds, incorrect drain routing, or a door or lid signal can stop completion. Do not handle hot or standing water or open the cabinet.
What do Maytag washer codes mean?
Code meanings depend on the exact washer platform and model. Record the code or flashing pattern before clearing it, then use that model's guide. Fill, drain, lid or door, balance, motor, and system codes follow different branches; a code that returns needs service rather than a guessed part.
What should I do if my Maytag washer is leaking?
Stop the washer, close water valves, and isolate power from a dry safe position if water is near electricity. Note when and where the leak appears. Do not run a leak test or open the cabinet; a recurring, underneath, or hidden leak needs qualified appliance or plumbing service.
When should I stop using my Maytag washing machine?
Stop for water near electrical equipment, unexpectedly hot water, smoke, burning or electrical odor, visible sparking, a hot or damaged cord, severe walking or impact, or a breaker that trips again. Also stop after the model-specific external checks and one-time reset fail; arrange qualified service.
Read the exact guide
Official sources
- Fill or Sensing Light OnMaytag · Maytag top-load washer guidance for models with a Fill or Sensing indicator.
- Water Levels by Cycle - WasherMaytag · Maytag top-load washer water-level guidance; cycles and options vary by model.
- Front Load Washer Door Will Not OpenMaytag · Maytag front-load washer door safety guidance; exact timing and controls vary by model.
- Error Codes in Top Load HE WashersMaytag · Maytag top-load HE washer error-code guide; exact code meanings and controls vary by model.
- Lid Locking on a Top Load High Efficiency WasherMaytag · Maytag top-load high-efficiency washer guidance; exact lid and fill behavior varies by model.
- Error Codes in Front Load WashersMaytag · Maytag front-load washer error-code guide; not every code appears on every model.
- Not Starting - WasherMaytag · Maytag top-load washer operation guidance; Start and lid behavior varies by model.
- No Power - WasherMaytag · Maytag top-load washer Product Help; exact electrical installation and controls vary by model.
- Checking the Fill Hoses if the Washer is not FillingMaytag · Maytag washer Product Help; exact hose and screen access varies by model.
- How To Repair A Washing Machine: 7 Possible Problems and SolutionsMaytag · Maytag consumer troubleshooting overview; exact model manuals and professional service control repairs.
- LF - Error CodeMaytag · Maytag top-load washer error-code guidance; codes and behavior are model-specific.
- Washer Not Draining or Spinning? Troubleshooting GuideMaytag · Maytag washer Product Help for drain and spin symptoms; model-specific access and settings apply.
- Not Filling or Filling Slowly - Front Load WasherMaytag · Maytag front-load washer Product Help; use the exact model manual before hose or screen access.
Community feedback
Share a repair observation
Share a plain-text repair observation. Accepted observations are published automatically; this page may take a moment to update.