
On this page
Start here
Quick answer
A Roper dryer that will not start usually falls into one of four paths: no power, a door or Start-control condition, a locked or invalid cycle, or a protective stop related to heat and airflow. First stop if there is a burning smell, smoke, sparks, melting, abnormal heat, gas odor or a breaker that trips again. If the appliance is safe, note whether the drum light or controls work, close the door firmly, remove clothing caught in the latch, select a valid Automatic or Timed cycle, and press or hold Start exactly as the model guide describes. If a Control Lock or delay indicator is present, use only the model-specific unlock or cancel sequence. With the dryer cool and disconnected, clean and correctly reinstall the lint screen and inspect the visible vent for a crush, kink or blockage. Restricted airflow can overheat the dryer and fabrics and can lead to a protective no-start or stop. Roper gas and electric models have different supply requirements, so confirm the fuel type and model before any service. Do not open panels, test live wiring, bypass a thermal device or keep retrying after a hazard. Persistent no-start, a thermal symptom or a returning fault needs qualified service.
Before you begin
Safety first
- Do not open panels, probe live wiring, bypass a thermal fuse or interlock, run the dryer with a loose or missing lint screen, move it to inspect hidden connections, or continue testing after smoke, sparks, abnormal heat or a gas odor.
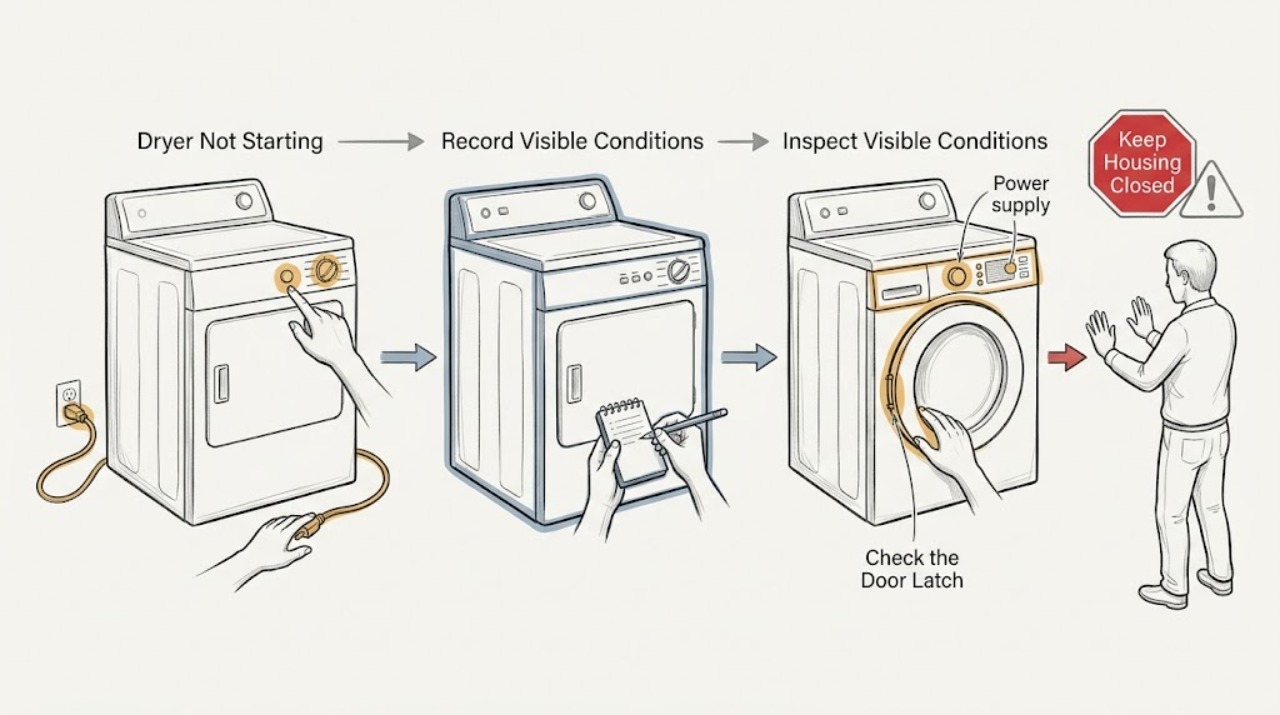
Work through in order
Diagnostic checks
Use only checks that match the exact appliance or system and its official guide.
-
Check 1
Before another start attempt, assess the room and dryer. Stop if there is smoke, a burning or gas odor, visible sparking, melting, abnormal heat, water near electrics or a breaker that trips again. If none is present, record the model, fuel type if known, whether the drum light or controls work, the selected cycle, any lock or fault indication and whether the dryer was hot during the previous attempt.
Expected result: A safety warning is present, the controls are dark, the controls are lit but unresponsive, or the dryer was hot or stopped during an earlier cycle.
Next step: For any hazard, keep the dryer off and get qualified help from a safe location. Otherwise continue with one external power and control check at a time; do not repeatedly start a hot or previously failed dryer.
Why this matters
Why: A hazard requires isolation and service. A dark control points to power; a lit but unresponsive control points to settings, lock, moisture or control behavior. A hot or interrupted cycle makes airflow and thermal protection relevant before restarting.
-
Check 2
Check accessible power without dismantling the dryer: confirm the plug is seated, check the household breaker or fuse specified for the model, and observe whether the display or drum light returns. If an electric model has a supply concern, do not open the terminal area; if a gas model has a control-power concern, do not assume gas alone can run the motor or controls.
Expected result: Power returns and stays on, the dryer remains dark, or the breaker or fuse opens again.
Next step: If the breaker or fuse opens again, leave the dryer off and arrange qualified electrical or appliance service. If power is stable, continue to the door, cycle and Start checks.
Why this matters
Why: A stable return of power can explain a no-start condition. A persistent dark control or repeated trip indicates an electrical supply, cord, control or internal fault that is not safe to locate by live testing.
-
Check 3
Check the start conditions for the exact Roper model. Close the door firmly until the latch engages, remove clothing caught at the opening, select an Automatic or Timed cycle that the guide says can start, and press or hold Start or Push to Start for the specified operation. If a Control Lock or delay indicator is present, use only the manual's unlock or cancel sequence.
Expected result: The door will not latch, the selected cycle is a non-starting option, the Start command is accepted, the lock or delay clears, or the controls still ignore the command.
Next step: Correct only the door obstruction, cycle selection or model-specific lock state. If the latch is damaged or the controls remain unresponsive after one correct sequence, stop and arrange service.
Why this matters
Why: A blocked latch, wrong cycle, insufficient Start press or enabled lock can prevent operation without a motor fault. A command that is accepted but produces no drum movement points beyond basic controls.
-
Check 4
With the dryer cool and disconnected from power, clean the accessible lint screen and reinstall it fully. Inspect the visible vent connection and outside exhaust hood, if present, for crushing, kinks, lint or debris. Keep the dryer area clear and do not move the unit, reach into the cabinet or use an improvised tool to clean a hidden path.
Expected result: The lint screen is blocked or damaged, the vent is crushed or obstructed, the exhaust has little air movement, or the accessible airflow path is clear.
Next step: Clean or professionally inspect the vent path as appropriate for the model. Do not run the dryer with a loose, damaged or missing lint screen. If the dryer had abnormal heat or still will not start, leave it off for service.
Why this matters
Why: Restricted airflow can keep heat and moisture in the dryer, lengthen drying and contribute to a protective stop or fire risk. A clear external path does not rule out an internal fan, heater or thermal fault.
-
Check 5
If the dryer is cool, has stable power, a latched door, a valid cycle, no lock and no hazard, perform at most one model-specific reset or start attempt. Observe whether the drum moves, whether the cycle stops immediately, and whether any fault or thermal symptom returns. Do not bypass a thermal fuse, open panels or test live components.
Expected result: The dryer starts and runs normally, starts then stops, remains silent, or immediately shows the same fault or heat symptom.
Next step: Stop using the dryer for recurrence, abnormal heat, odor, smoke, sparks or a fault code. Give the technician the model, power result, latch and Start observations, cycle, lint/vent condition, fuel type and prior heat symptoms.
Why this matters
Why: A single normal run after correcting a setting supports a control-state issue. Immediate stopping, recurring no-start or a return of heat points to a door switch, motor, thermal protection, airflow, wiring or control diagnosis.
Use your observations
Decision map
Find the observation that best matches what you see, then follow the next safe action.
-
PATH 01Next step
What you see
There is smoke, a burning or gas odor, visible sparking, melting, abnormal heat, water near electrics or a breaker that trips again.
Do this next
Stop the cycle, isolate power only if safe from a dry position, leave the area if necessary and obtain emergency or qualified appliance help. Do not restart the dryer.
Why this path and its safety boundary
Why it matters: This is a fire, gas or electrical safety event, not a Start-button problem.
-
PATH 02Next step
What you see
The display and drum light are dark, or accessible power cannot be restored without another breaker or fuse trip.
Do this next
Check only the accessible plug and household protection once. If the dryer stays dark or the protection opens again, arrange qualified electrical or appliance service.
Why this path and its safety boundary
Why it matters: The dryer may not have the supply needed for its controls and motor, or it may have an electrical fault.
-
PATH 03Next step
What you see
The display works, but a lock or delay indicator is active, the door is not latched, clothing blocks the latch, or the selected cycle is not a startable drying cycle.
Do this next
Clear the obstruction, latch the door, select a valid cycle and follow the exact model's one-time lock or delay sequence. Escalate if the latch or control still fails.
Why this path and its safety boundary
Why it matters: A normal operating condition is preventing the Start command from reaching the motor.
-
PATH 04Next step
What you see
The Start command is accepted but the drum does not move, or the dryer starts and stops quickly.
Do this next
Stop repeated attempts and arrange qualified diagnosis, especially if the dryer was hot or stopped with an odor.
Why this path and its safety boundary
Why it matters: The symptom is beyond basic selection and can involve a door switch, motor, thermal protection, wiring or control; it does not identify a part by itself.
-
PATH 05Next step
What you see
The lint screen or vent is blocked, crushed, kinked or has little exhaust movement, or the dryer was unusually warm before stopping.
Do this next
Clean the lint screen and have the full vent path inspected as appropriate for the model. Do not operate with a damaged or missing screen, and escalate if heat or no-start returns.
Why this path and its safety boundary
Why it matters: Restricted airflow can cause excessive heat and a protective stop and can create a fire risk.
-
PATH 06Next step
What you see
Power, door, cycle, lock and accessible airflow checks are normal but the dryer remains inoperative or a fault returns.
Do this next
Keep the dryer off and provide the technician with the exact model, fuel type, fault indication, power result, latch behavior, Start response and any heat or odor history.
Why this path and its safety boundary
Why it matters: An internal component or control fault is likely and requires model-specific service.
Helpful context
Understand the symptom
Begin with the stop decision
A silent dryer is not automatically a harmless control issue. Burning odor, smoke, sparks, melting, an unusually hot cabinet, a gas odor or a breaker that trips again ends user testing. Isolate power only from a dry, safe position and obtain qualified help. Do not move the dryer to inspect a hidden gas or electrical connection.
Let the visible symptom choose the path
A dark display or drum light suggests a supply or control-power issue. A lit control that ignores Start points toward a lock, damp panel, wrong cycle or failed control. A door that looks closed but is not latched prevents the motor from running. A dryer that started and stopped, ran unusually hot or had long dry times needs a lint and vent check before another cycle.
Keep gas and electric differences explicit
Roper makes both gas and electric dryers. Gas models need electrical control power as well as an open gas supply, while electric models have different circuit requirements. Use the model and serial label to find the correct Roper manual. The checks below remain external and conditional; they do not authorize gas, heater or live-circuit repair.
Safety boundary
Stop conditions
- Burning, electrical or gas odor, smoke, sparks or melting
- Abnormal cabinet or drum heat, scorched clothing or a repeated breaker or fuse trip
- Water near electrical parts or a damaged power connection
- A vent that is blocked or damaged and cannot be cleared safely
- Any need to open the cabinet, test live wiring or bypass a thermal or door safety component
Only after diagnosis
Potential parts
- door latch or door switch
Consider this only when the door cannot latch or a qualified diagnosis shows that the closed-door signal is not reaching the control.
Confirm the complete Roper model, fuel type and fit information before selecting a replacement. - thermal fuse or thermal limiter
Consider this only after the lint and vent path are clear and a qualified technician confirms an open thermal-protection component.
Thermal parts are safety-critical and model-specific; never bridge or substitute one without qualified diagnosis. - start switch or electronic control
Consider this only when power, door latch, cycle and lock checks pass but the Start command is not accepted or the motor is not commanded.
Confirm model-specific wiring and configuration through qualified service before replacement.
When checks do not resolve it
Need a professional?
Arrange qualified Roper or appliance service for smoke, burning odor, sparks, abnormal heat, gas odor, a repeated breaker or fuse trip, a damaged latch, persistent no-start after the external checks, a recurring thermal stop, a fault code or a blocked vent that cannot be safely cleared.
Safety scope: Do not open panels, probe live wiring, bypass a thermal fuse or interlock, run the dryer with a loose or missing lint screen, move it to inspect hidden connections, or continue testing after smoke, sparks, abnormal heat or a gas odor.
Common questions
FAQ
Why will my Roper dryer not start even though it has power?
Check that the door is fully latched, clothing is not caught in the latch, a valid drying cycle is selected, any model-specific lock is cleared and Start is pressed or held as the Roper guide requires. If the command is accepted but the drum stays still, arrange qualified service.
Does a Roper gas dryer need electricity to start?
Yes. Roper gas-dryer instructions still check the electrical outlet and household protection, as well as the gas supply. If the gas valve is open but the dryer will not operate, use the model information and arrange qualified service rather than adjusting the gas system.
Can a blocked vent stop a Roper dryer from starting?
Restricted airflow can make a dryer run hot, stop protectively or show long-dry symptoms, although a no-start condition can also involve the door, power, lock or control. Clean the lint screen and inspect accessible venting only when cool and disconnected; escalate if the path is blocked or heat returns.
When should I stop troubleshooting a Roper dryer?
Stop for smoke, burning or gas odor, sparks, melting, abnormal heat, scorched clothing, a repeated breaker or fuse trip, water near electrics or any need to open the cabinet or bypass a safety component. Keep it off and arrange qualified service.
Read the exact guide
Official sources
- Dryer Not Starting or No OperationWhirlpool Product Help · Representative manufacturer dryer no-start troubleshooting
- Owner SupportRoper Appliances · Roper owner support, model manuals and factory-authorized service
- Dryer Vent may be Blocked or RestrictedWhirlpool Product Help · Representative manufacturer dryer vent and fire-risk guidance
- Use and Care Guide – RED4516FWRoper Appliances · Roper electric dryer operation, no-run and lint/vent guidance
- Dryer Too HotWhirlpool Product Help · Representative manufacturer dryer heat, cycle and airflow guidance
- Installation Instructions – RGD4516FWRoper Appliances · Roper gas dryer installation, start and gas-supply checks
- Loc - Error Code - DryerWhirlpool Product Help · Representative manufacturer Control Lock behavior
Community feedback
Share a repair observation
Share a plain-text repair observation. Accepted observations are published automatically; this page may take a moment to update.