
On this page
Start here
Quick answer
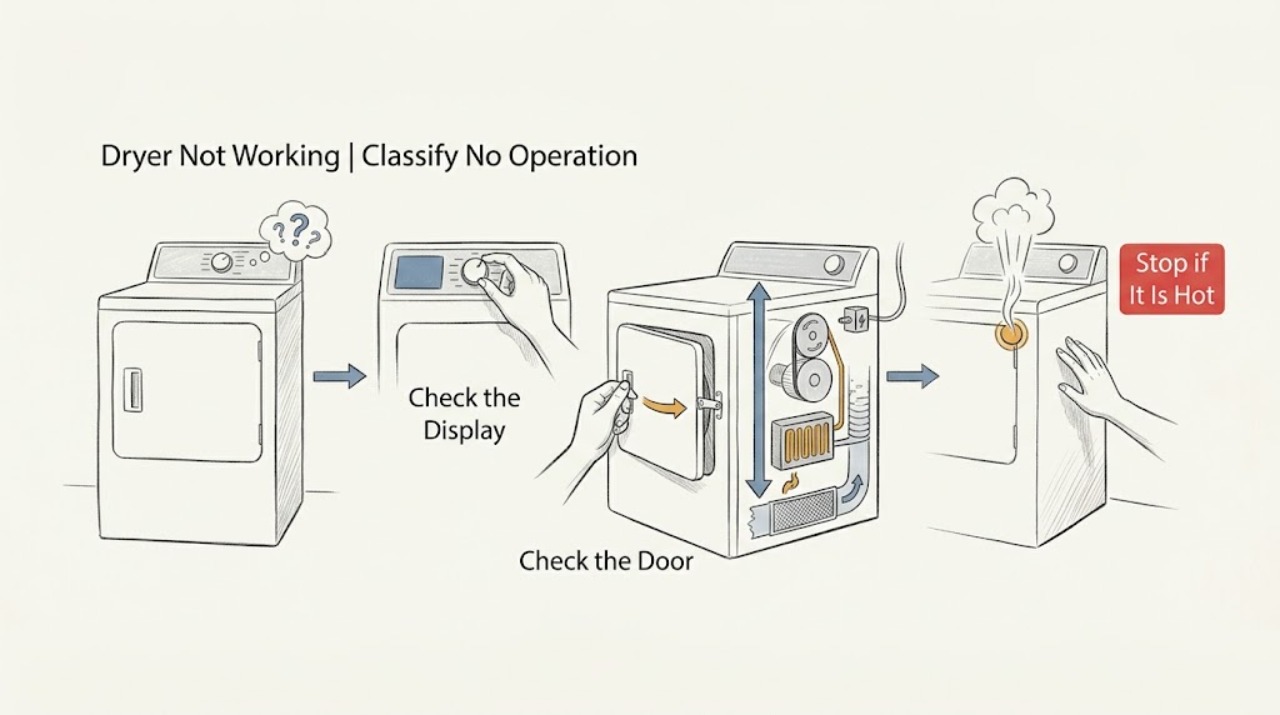
First define what not working means on the Roper dryer: no display or drum light, controls on but no start, drum not tumbling, no heat, or a cycle that stops early. Check the exact model guide for the control sequence, door latch, cycle, and gas or electric configuration. Make only cool, dry, external checks of the plug, supply, door, lint screen, and visible exhaust route. Do not open the cabinet, work on terminals, bypass a door switch, or keep running the dryer when there is a burning smell, smoke, flame, sparking, scorching, abnormal heat, a damaged lead, or a gas odor. A repeated failure after the correct cycle and safe supply checks needs qualified appliance service; an electrical trip or suspected wiring fault also needs a registered electrician.
Work through in order
Diagnostic checks
Use only checks that match the exact appliance or system and its official guide.
-
Check 1
Stop the dryer and identify the symptom without dismantling it: check whether the display or drum light has power, whether controls respond, whether the door latches, whether the drum turns, whether heat reaches the drum, and whether the cycle stops early. Record the complete model and whether the dryer is gas or electric.
Expected result: There is no power indication, the controls light but Start does nothing, the drum does not tumble, the drum tumbles without heat, or the cycle stops after starting.
Next step: Choose the matching branch below and use the exact Roper guide. Do not reconnect or run the unit if a hazard sign is present.
Stop if: Stop for smoke, flame, gas odor, burning smell, sparks, scorching, melting, abnormal heat, a circuit trip, or a damaged cord or plug.
Why this matters
Why: These symptoms activate different checks for supply and controls, door and cycle selection, drive, heating or gas supply, airflow, or a safety control. The model and fuel type change the safe interpretation.
-
Check 2
With the dryer cool and disconnected only from a dry safe position, inspect the plug, socket, and accessible supply lead for cuts, crushing, looseness, scorch marks, melted plastic, discoloration, or moisture. Then check that the cycle is valid for the model, the door is fully latched, any control lock is cleared by the manual, and Start is pressed in the model's required way.
Expected result: The supply path is damaged or hot, the socket or protective device is abnormal, the door or cycle setting is wrong, the control is locked, or all visible supply and controls appear normal.
Next step: Leave a damaged supply path disconnected and call a registered electrician or qualified appliance technician. If the path and settings are normal, continue with the dry, non-invasive lint and airflow checks.
Stop if: Stop for burn marks, arcing or crackling, melting, exposed conductors, a hot socket, a tripped breaker, or any need to open the terminal area or change wiring.
Why this matters
Why: A damaged or hot supply path can be a fire or shock hazard and must not be bypassed. A door, cycle, or control setting can prevent operation without proving a component failure; normal visual checks do not rule out an internal fault.
-
Check 3
With power off and the drum cool, inspect the visible door opening and latch for clothing or debris that prevents closure. Confirm the chosen cycle is an operating dry cycle rather than an end-of-cycle or no-heat option, and review whether the load is tightly packed or unable to tumble freely.
Expected result: The latch is obstructed, the door does not close securely, a no-operation or no-heat option was selected, the load is packed tightly, or the door, cycle, and load appear normal.
Next step: Remove only loose visible obstruction, select the correct model-approved cycle, and reduce the load if the guide calls for free tumbling. Do not bypass the latch or restart after a hazard symptom.
Stop if: Stop for a damaged latch, a door that will not close, a hot or distorted door area, smoke, burning smell, gas odor, sparks, or any request to bypass the door switch.
Why this matters
Why: A dryer will not run when its door safety is not engaged, and an unsuitable cycle can look like a failed dryer. A packed load can affect tumbling and drying performance but does not explain smoke, gas odor, or a hot electrical supply.
-
Check 4
When the dryer is cool and safely disconnected, clean and reseat the lint screen as directed by the Roper guide, clear clothing from the front of the dryer, and inspect only the accessible exhaust connection and outside hood for visible blockage. Do not open the cabinet or reach into the exhaust with tools.
Expected result: The screen is blocked or damaged, the exhaust route or hood is visibly obstructed, the dryer area is crowded, or the accessible airflow path looks clear.
Next step: Correct only a safe, visible external obstruction and reinstall the screen correctly. If airflow remains poor, the cabinet contains lint, or the dryer overheats, keep it off and arrange qualified vent or appliance service.
Stop if: Stop for smoke, burning odor, scorched lint, abnormal heat, a damaged or missing screen, flame, gas odor, sparks, or any need to remove cabinet panels.
Why this matters
Why: Restricted airflow can cause long or poor drying and can contribute to overheating. The Roper guide warns not to operate with a loose, damaged, blocked, or missing lint screen and assigns cabinet lint removal to a qualified servicer.
-
Check 5
Use the model label and guide to confirm whether the Roper dryer is gas or electric. For an electric model, record whether one or both household protective devices operated and do not inspect the 240-volt supply or terminal connections yourself. For a gas model, check only the model-approved external supply status; do not loosen a gas fitting, relight repeatedly, or work on the burner path.
Expected result: The model is electric or gas, a supply protection device is tripped, an electric dryer has no full operation, a gas dryer tumbles without heat, or the fuel and supply status are unclear.
Next step: For an electrical supply problem, keep the unit off and use a registered electrician. For a gas supply or ignition concern, stop and use qualified gas appliance service; provide the model and symptom rather than attempting gas work.
Stop if: Stop for gas odor, delayed ignition, unusual flame, smoke, electrical arcing, a repeated trip, a hot lead or socket, or any need to open gas or electrical compartments.
Why this matters
Why: Electric and gas dryers have different supply and heating paths. Whirlpool notes that an electric dryer can have separate protective devices for motor and heating, while a gas dryer may tumble without heat when its gas supply is unavailable. These clues do not authorize internal testing.
-
Check 6
Without forcing or opening the cabinet, note whether the drum turns freely when cool and empty, whether it stopped at a repeatable point, whether the load was heavy, and whether the dryer became hot or noisy before stopping. Record any display indication and whether the unit stops only on automatic sensing or also on timed cycles.
Expected result: The drum does not turn, a heavy load preceded the stop, only an automatic cycle stops, both automatic and timed cycles stop, or an abnormal sound or heat preceded the stop.
Next step: Use a smaller load and the exact guide only when no hazard exists and the unit is cool. For a stalled drum, repeated stop, or abnormal heat or noise, keep the dryer out of service and arrange qualified repair.
Stop if: Stop for a seized or scraping drum, impact noise, smoke, burning or gas odor, scorching, abnormal cabinet heat, sparks, or a repeated protective-device trip.
Why this matters
Why: Load and cycle selection can change normal stop behavior, while a no-tumble or repeatable stop in both cycle types points toward a drive, control, airflow, or safety fault. Abnormal heat, noise, odor, or smoke overrides ordinary troubleshooting.
-
Check 7
Only when the dryer is cool, dry, correctly connected, free of visible damage, and clear of hazard symptoms, decide whether one brief model-approved cycle check is appropriate while remaining nearby. Do not use a test cycle to investigate gas odor, electrical damage, repeated trips, abnormal heat, or a failure that requires cabinet access.
Expected result: The dryer operates normally, the original symptom returns at a repeatable stage, it stops again, or a new heat, odor, noise, spark, or trip appears.
Next step: Stop for any recurrence and arrange qualified appliance repair. Include the exact model, gas or electric type, cycle, load, timing, visible checks, and all safety symptoms in the handoff.
Stop if: Stop immediately for smoke, flame, gas or burning odor, sparks, abnormal heat, unusual noise, water, a damaged lead, or another trip.
Why this matters
Why: A normal brief check does not certify the appliance. A repeatable stage helps the technician separate controls, drive, heat, gas, airflow, and supply paths; any hazard means further operation is unsafe.
Use your observations
Decision map
Find the observation that best matches what you see, then follow the next safe action.
-
PATH 01Next step
What you see
There is smoke, flame, burning or gas odor, arcing, scorching, melting, a hot plug or socket, exposed wiring, or an immediate repeat trip.
Do this next
Arrange qualified service and follow the exact model guidance.
Why this path and its safety boundary
Why it matters: Do not restart the dryer or reset protection again. From a dry safe position isolate power if possible, keep clear, and arrange urgent qualified electrical, gas, or appliance help as appropriate.
-
PATH 02Next step
What you see
The display and drum light are off, or the dryer loses all indication before a cycle can start.
Do this next
Arrange qualified service and follow the exact model guidance.
Why this path and its safety boundary
Why it matters: Keep the unit safe and check only the visible connection and household protection without opening the panel. A persistent supply issue needs a registered electrician; do not use another outlet as a workaround.
-
PATH 03Next step
What you see
The controls have power but Start does nothing, the door does not latch, controls are locked, or the selected cycle is not a running dry cycle.
Do this next
Arrange qualified service and follow the exact model guidance.
Why this path and its safety boundary
Why it matters: Use the exact Roper guide to clear the control lock, select a valid cycle, press Start as specified, and confirm the latch is free of clothing. If the dryer still will not start, keep it off and request service rather than bypassing the door switch.
-
PATH 04Next step
What you see
The dryer starts but the drum does not turn, or it stops with a stalled drum or a movement-related noise.
Do this next
Arrange qualified service and follow the exact model guidance.
Why this path and its safety boundary
Why it matters: Do not force the drum or open the cabinet. Record the load and timing; a persistent no-tumble condition needs qualified diagnosis of drive, control, and safety systems.
-
PATH 05Next step
What you see
The drum turns but the load stays cold or the dryer stops heating, with no gas odor or electrical hazard.
Do this next
Arrange qualified service and follow the exact model guidance.
Why this path and its safety boundary
Why it matters: Confirm the cycle is not a no-heat setting and use the model guide to distinguish gas from electric supply. Do not open the heater, burner, terminal, or duct system; request qualified service if the external checks do not explain it.
-
PATH 06Next step
What you see
Drying is slow, the cycle stops early, the lint screen or exhaust path is restricted, or the cabinet becomes abnormally hot.
Do this next
Arrange qualified service and follow the exact model guidance.
Why this path and its safety boundary
Why it matters: Stop for abnormal heat or odor. When cool, clean and reseat the lint screen and inspect only the accessible exhaust route; cabinet lint and persistent restriction require qualified vent or appliance service.
-
PATH 07Next step
What you see
The dryer remains nonfunctional after the correct model-specific controls, supply, door, load, lint, and visible airflow checks, or the cause is unclear.
Do this next
Arrange qualified service and follow the exact model guidance.
Why this path and its safety boundary
Why it matters: Keep it out of service and provide the complete model, fuel type, cycle, symptom, timing, and any code or hazard sign to qualified repair. Do not guess at a motor, heater, gas valve, control, or thermal component.
Helpful context
Understand the symptom
Define the failure before touching the dryer
A dryer with no display has a different first path from one whose controls light but whose drum will not move. A drum that turns with no heat also differs from a unit that never starts, stops early, or becomes hot outside the drum. Record the model, whether it is gas or electric, the selected cycle, what the controls do, and the exact point at which the symptom appears.
Start with safety and the supply boundary
Stop using the dryer for smoke, a burning or gas odor, sparks, crackling, scorching, melting, a hot plug or socket, abnormal cabinet heat, a circuit trip, or a damaged lead. If there is no water or other hazard and the connection is accessible from a dry position, disconnect power. Never bypass a door switch, defeat a thermal safety, open an energized terminal area, or repeatedly reset a breaker. Gas work and live electrical diagnosis belong to qualified professionals.
Use the model guide for controls and airflow
Roper models differ in cycles, control locks, door latches, power arrangements, and gas or electric parts. The official Roper guide calls for the lint screen before each load, free tumbling rather than a tightly packed drum, and a clear dryer area. It also states that accumulated lint inside the cabinet should be removed by a qualified servicer.
A safe stopping rule
One careful external check is enough to separate a setting or visible airflow issue from a persistent fault. If the dryer still will not operate, trips protection, overheats, smells of gas or burning, or needs cabinet access, keep it out of service and provide the technician the model, cycle, symptom, timing, and any visible damage.
Safety boundary
Stop conditions
- Smoke, flame, gas odor, burning or melting odor, sparks, arcing or crackling, scorching, or abnormal heat.
- A tripped breaker or fuse that operates again, a hot or damaged plug, socket, cord, or terminal area, or a suspected household wiring fault.
- A blocked, missing, loose, or damaged lint screen, scorched lint, a cabinet that overheats, or an exhaust restriction that cannot be safely cleared externally.
- A door that will not latch, a stalled or scraping drum, severe impact noise, or a request to bypass a switch or thermal safety.
- Any need to open the cabinet, burner, heater, terminal, gas fitting, or live electrical area, or to move the dryer across a wet floor.
- The original failure returns after one safe external review or the cause remains uncertain.
Only after diagnosis
Potential parts
- dryer thermal or heating component
Consider this category only after the exact model and qualified diagnosis link a repeatable no-heat or overheating symptom to a failed thermal or heating component.
Confirm the complete model, gas or electric type, component rating, and safe replacement procedure before selecting a part. - dryer drive component
Consider this category only when the drum does not tumble or a qualified diagnosis identifies a drive fault; a no-start symptom alone does not prove a drive component.
Confirm the exact model and drive arrangement; do not infer fit from appearance or force a stalled drum. - dryer door latch or switch assembly
Consider this category only when the exact model guidance and inspection confirm that the door cannot engage its safety latch or switch.
Confirm the model, latch configuration, and safe access instructions; never bypass the door safety.
When checks do not resolve it
Need a professional?
The dryer has no power after a safe visible supply check, or the breaker, fuse, RCD, plug, socket, or lead is abnormal., Controls light but the dryer will not start, the door latch fails, the drum will not tumble, or a cycle stops repeatedly., The drum turns without heat, gas supply or ignition is uncertain, or an electric dryer has a heating or supply fault., The dryer overheats, dries slowly despite a clear external path, has cabinet lint, or presents smoke, odor, sparks, scorching, or abnormal noise., The repair would require internal electrical, gas, heater, motor, control, thermal, or duct access.
Common questions
FAQ
Why is my Roper dryer not working at all?
First separate no power from controls that light but do not start. Check the visible supply, door latch, selected cycle, control lock, and Start operation using the exact model guide. If the protection trips, the supply is hot or damaged, or the dryer still fails after safe checks, leave it disconnected and arrange qualified service.
What should I check if the Roper dryer drum will not turn?
With the dryer cool and off, record whether the door latches, the cycle is valid, and whether a tightly packed load or abnormal sound preceded the failure. Do not force the drum or open the cabinet. A persistent no-tumble symptom needs qualified drive and control diagnosis.
Why does my Roper dryer tumble but not heat?
Confirm the cycle is not a no-heat setting and identify whether the dryer is gas or electric from its model guide. Check only the safe external lint and exhaust path. Do not open the heater, burner, gas fitting, terminal, or live supply; persistent no-heat needs qualified diagnosis.
Can a blocked lint screen make a Roper dryer stop?
A blocked, missing, loose, or damaged lint screen and a restricted exhaust can reduce airflow, lengthen drying, and contribute to overheating. With the dryer cool and off, clean and reseat the screen as directed and inspect only the accessible external route. Cabinet lint removal belongs to a qualified servicer.
When should I stop using a Roper dryer and call for help?
Stop for smoke, flame, gas or burning odor, sparks, arcing, scorching, melting, abnormal heat, a hot or damaged plug or socket, a repeated trip, a stalled drum, or any repair requiring cabinet, gas, heater, terminal, or live electrical access. Keep the dryer out of service and provide the model and symptom details to qualified repair.
Read the exact guide
Official sources
- Use and Care Guide – RED4516FWWhirlpool · Roper dryer operation, cycle selection, temperature, load, lint screen, airflow, safety, and qualified cabinet cleaning guidance
- Plugs and fusesElectrical Safety First · Disconnected plug and cable inspection, fuses, overheating, melting, discoloration, arcing, and qualified repair guidance
- Dryer is Not Heating - Product Help | WhirlpoolWhirlpool · Model-dependent dryer heating, airflow, electric supply, dual protection, and gas supply distinctions
- Electrical Safety Advice for Washer Machines / Washing Machines SafetyElectrical Safety First · Large laundry appliance plug, socket, lead, extension, arcing, breaker, overheating, and qualified repair safety guidance
- Not Tumbling or Spinning - Dryer - Product Help | WhirlpoolWhirlpool · Dryer power, Start control, moisture at controls, door, and supply-cord checks relevant to no-tumble symptoms
- Dryer Not Starting or No Operation - Product Help | WhirlpoolWhirlpool · Model-dependent dryer no-start checks for power, Start control, door latch, cycle, control lock, and protective devices
Community feedback
Share a repair observation
Share a plain-text repair observation. Accepted observations are published automatically; this page may take a moment to update.