
On this page
Start here
Quick answer
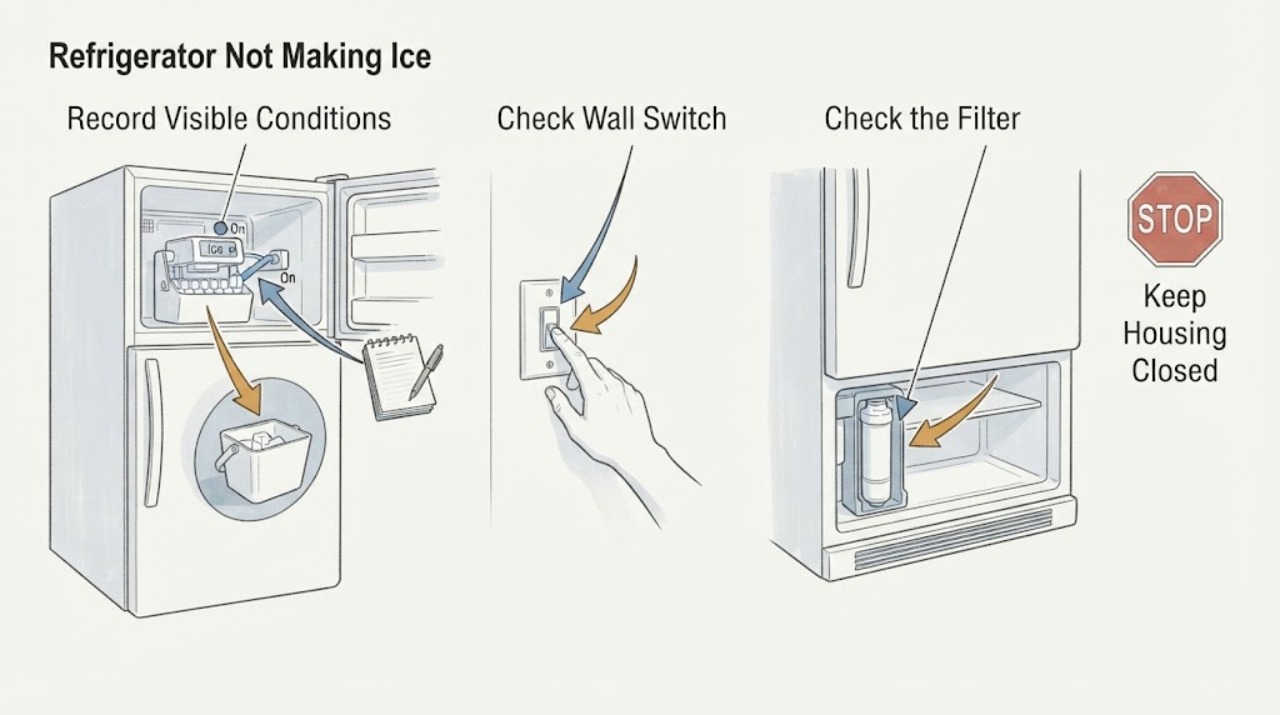
When a Viking refrigerator is not making ice, first identify whether the ice maker is switched off, recently installed, empty because water is not reaching it, or jammed. Check the model's ice-maker shutoff arm or switch, confirm the household water valve is open and the supply line is not kinked, and reseat or replace an overdue filter using the model manual. Allow the documented startup or refill time after installation or service. If the freezer is cold but the ice maker remains inactive after those checks, or there is a leak, damaged arm, frozen fill path, or no water flow, stop forcing the mechanism and arrange model-specific Viking service.
Work through in order
Diagnostic checks
Use only checks that match the exact appliance or system and its official guide.
-
Check 1
Record the refrigerator model and serial information, then identify the ice-maker symptom: no cubes at all, a small or intermittent harvest, an empty bin after a recent installation, or a dispenser that has ice but will not deliver it. Check whether the model uses a wire shutoff arm or another ice-maker switch.
Expected result: The ice maker is visibly switched off, the refrigerator is newly installed or was recently serviced, the bin contains cubes but dispensing fails, or there has never been a harvest.
Next step: Use the matching check below and keep the model information available for the exact Viking manual.
Stop if: Do not remove panels or bypass an ice-maker switch to force a cycle.
Why this matters
Why: These observations separate a disabled or startup condition from a water-fill or harvest problem; a full bin with a failed dispenser is not the same as the ice maker producing no ice.
-
Check 2
With the refrigerator operating normally, check the ice-maker shutoff arm or switch and put it in the model manual's on position. If the refrigerator was just connected or the ice maker was turned back on, allow the manual's stated startup and fill time before judging the result.
Expected result: The arm or switch was off and production resumes after the documented waiting period, or it was already on and no harvest occurs.
Next step: Do one supervised recheck after the manual's time window; do not repeatedly cycle the mechanism by hand.
Stop if: Stop if the arm is bent, loose, or cannot move as the manual describes.
Why this matters
Why: An off control or a first-fill delay can explain an empty bin. If the control is on and the waiting period passes without a harvest, check water delivery and filter seating next.
-
Check 3
Verify that the household water supply valve serving the refrigerator is open. Inspect the accessible supply line for a kink or compression where the refrigerator was pushed back, and confirm the filter is installed and locked according to the model manual. If water dispensing is slow or absent and the filter is due for replacement, use only the exact filter specified for that model.
Expected result: The valve was closed, the line is kinked, the filter was not seated, or water flow is weak; alternatively, supply and filter checks are normal.
Next step: Correct only the accessible valve, line position, or filter installation described by the manual, then allow the next fill cycle; arrange service if the supply restriction is inside the cabinet or plumbing.
Stop if: Do not disconnect a pressurized line, cut tubing, or substitute a filter by appearance.
Why this matters
Why: A closed valve, restricted line, misinstalled or clogged filter, or a restricted saddle valve can stop the ice maker from filling. Normal flow makes a basic supply blockage less likely and shifts attention to temperature, the fill path, or the ice-maker mechanism.
-
Check 4
Inspect the ice bin and the visible ejector or rake area with the ice maker off. Look for cubes bridged together or an obstruction that the manual identifies as removable, and use only the model-approved method to clear it. Never use a sharp tool against the mold, fill tube, or wiring.
Expected result: A loose cube blockage clears and the mechanism returns to its normal position, or the ejector is stuck, the fill path appears frozen, or a component is damaged.
Next step: After a safe clearance, allow one normal cycle. If the blockage returns or the mechanism will not reset, stop using the ice maker and book Viking service with the model and serial information.
Stop if: Do not chip ice with a knife, heat the assembly, or reach into a moving ice maker.
Why this matters
Why: A removable ice obstruction can prevent a harvest. A frozen fill path, damaged arm, abnormal mechanism position, or recurring jam requires internal diagnosis rather than force.
-
Check 5
Compare the ice symptom with freezer operation and water treatment: note whether the freezer is warm, whether water is available at the dispenser, and whether the refrigerator uses reverse-osmosis or softened water. Keep these observations for the service call instead of changing internal temperature or pressure settings without the model manual.
Expected result: The freezer is not maintaining its normal cold condition, water is unavailable everywhere, or a reverse-osmosis or softened-water setup is present; or cooling and water supply are normal while ice production alone fails.
Next step: Resolve an obvious whole-appliance cooling or water-supply issue through its own manual; otherwise request Viking service for the ice-maker circuit and provide the recorded observations.
Stop if: Stop using the ice maker if water leaks, wiring is exposed, or food safety is affected by a warm freezer.
Why this matters
Why: Poor freezer conditions or whole-refrigerator water loss can prevent ice production, while special water systems can affect filling. Normal cooling and supply with no ice points more strongly to the ice-maker, inlet, fill, or control path.
Use your observations
Decision map
Find the observation that best matches what you see, then follow the next safe action.
-
PATH 01Next step
What you see
The ice-maker control was off or the refrigerator has just been installed, and the manual's startup window has not elapsed.
Do this next
Put the control in the documented on position and wait the model manual's stated period before further diagnosis.
Why this path and its safety boundary
Why it matters: The symptom is consistent with a disabled or initial-fill condition rather than a failed part.
-
PATH 02Next step
What you see
The ice maker is on, the freezer is normally cold, but water is absent or weak at the dispenser, or the filter and supply line are restricted.
Do this next
Correct the accessible supply or filter condition exactly as the manual allows; use service for an internal valve or plumbing restriction.
Why this path and its safety boundary
Why it matters: A household valve, kinked line, filter, saddle valve, or other water-delivery restriction is more likely than an ice-maker harvest fault.
-
PATH 03Next step
What you see
Water dispensing and freezer cooling are normal, the ice-maker control is on, and no cubes are produced after the documented wait.
Do this next
Stop forcing cycles and arrange Viking model-specific service with the model, serial, and observations.
Why this path and its safety boundary
Why it matters: The remaining possibilities include the ice-maker mechanism, inlet valve, fill path, or control circuit; the supplied checks do not identify which internal component failed.
-
PATH 04Next step
What you see
There is a leak, a bent or loose shutoff arm, a frozen fill path, exposed wiring, or an obstruction that cannot be removed using the manual's method.
Do this next
Turn the ice maker off, close the accessible refrigerator water valve if needed to stop a leak, and contact an authorized Viking servicer.
Why this path and its safety boundary
Why it matters: The problem has crossed the safe user-maintenance boundary and may cause water damage or component damage.
Helpful context
Understand the symptom
Separate an empty ice bin from a stopped ice maker
A Viking refrigerator may have no ice because production is disabled, the unit has not completed its initial fill period, water supply is restricted, the filter is not seated, or the ejector area is obstructed. First note whether the ice maker has made any recent cubes, whether the dispenser still supplies water, and whether the freezer is maintaining its normal cold condition. Use the exact refrigerator manual for the control style and reset behavior; Viking's documentation archive lists different refrigerator families and their own use-and-care manuals.
Do not guess at a model-specific ice-maker part
Viking documentation covers multiple refrigerator configurations, including models with different dispensers and filters. Record the model and serial label before ordering anything. A filter may be a legitimate replacement only when the exact manual identifies it and the flow or filter-age symptoms support it; an ice-maker motor, inlet valve, control, or fill assembly needs model-specific diagnosis.
Only after diagnosis
Potential parts
Only when the exact Viking refrigerator manual identifies the filter and the observed flow or filter-age symptom supports replacement.
When checks do not resolve it
Need a professional?
Provide the Viking refrigerator model and serial information, the ice-maker control position, whether the freezer is cold, whether water dispenses, filter and valve observations, and how long the no-ice condition has lasted. A servicer should diagnose internal valves, fill components, the ice-maker motor, wiring, and controls.
Common questions
FAQ
How long should a Viking refrigerator take to make ice after installation?
Use the exact model manual's startup and refill timing. Viking troubleshooting material notes that a new connection can require a waiting period before the first harvest and that the bin may take additional time to fill; do not treat an empty bin immediately after installation as proof of a failed ice maker.
Should I replace the ice maker when there is no ice?
Not from the symptom alone. Confirm the control, documented wait, freezer condition, water valve, line, and filter first. If cooling and water supply are normal but the ice maker still does not harvest, Viking service should identify the failed component before a part is selected.
Read the exact guide
Official sources
- Viking Refrigerator Ice Maker TroubleshootingViking Range, LLC · Viking refrigerator ice-maker no-production checks, water supply, freezer startup, filter, ejector, and reverse-osmosis considerations
- Viking Range, LLC | Support and Docs | Refrigeration DocumentationViking Range, LLC · Viking refrigerator model-specific use-and-care and installation documentation
- Viking Refrigerator Use and Care ManualViking Range, LLC · Viking refrigerator ice-maker controls, water supply, filter, startup, and no-ice troubleshooting
Community feedback
Share a repair observation
Share a plain-text repair observation. Accepted observations are published automatically; this page may take a moment to update.