
On this page
Start here
Quick answer
Check the ice-maker status and bin first, then separate a water-supply problem from a freezer-temperature or ice-blockage problem. For a non-plumbed Beko refrigerator, fill the water tank; for a plumbed model, check the model-specific connections and any visible shutoff valve. Keep the freezer door closed as much as practical and look for heavy frost or a freezer that is not reaching the condition specified in its manual. Inspect only accessible ice-maker or dispenser openings for an ice blockage—do not chip ice, probe a tube, or remove covers unless the manual explicitly allows it. If the ice maker remains on, the water path is available, the freezer is cold, and no accessible blockage explains the empty tray, the ice maker or another control component needs model-specific service.
Before you begin
Safety first
- Do not bypass door or bin interlocks, force a harvest cycle, chip or heat hidden ice, puncture water or refrigerant tubing, or test energized wiring as a household check.
Work through in order
Diagnostic checks
Use only checks that match the exact appliance or system and its official guide.
-
Check 1
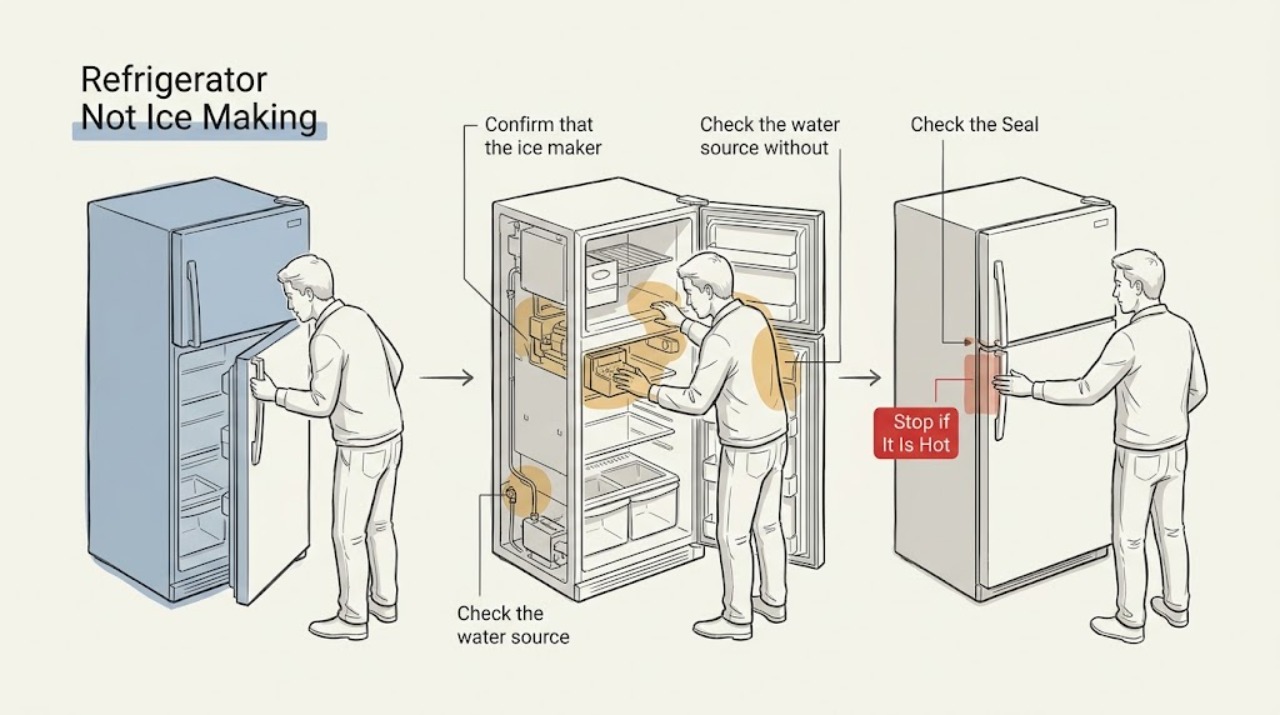
Confirm that the ice maker is enabled and that the ice bin, shutoff arm, or model-specific sensor is seated in its normal operating position using the exact Beko manual for the refrigerator.
Expected result: The display or physical control says ice is off, the bin is missing or not seated, the shutoff arm is raised, or the ice maker is enabled and the bin is correctly positioned.
Next step: Enable the ice maker and reseat the bin only as the manual describes. If the control will not stay enabled or the bin/sensor cannot seat because of damage or ice, stop and arrange model-specific service.
Stop if: Do not force the bin, arm, or sensor and do not bypass a door or bin interlock.
Why this matters
Why: An off setting, a missing bin, or a full-bin sensor position can intentionally stop production. If the maker is enabled and the bin is correctly installed, continue to the water and temperature checks rather than repeatedly toggling it.
-
Check 2
Check the water source without disconnecting a pressurized line: fill the internal tank on a non-plumbed model, or verify that the household supply and the refrigerator's visible shutoff connection are on for a plumbed model.
Expected result: The tank is empty, the supply tap or valve is closed, a visible connection is kinked or leaking, or water is available and the connection appears unobstructed.
Next step: Fill the tank or open the supply only when the model manual permits it, and straighten a visible hose kink without pulling on fittings. If a connection leaks, the supply cannot be restored, or the route is not user-accessible, stop and call service.
Stop if: Stop for any water leak behind the refrigerator or if moving a built-in unit is required to reach the connection.
Why this matters
Why: An empty tank or closed/restricted connection can starve the ice maker even while the refrigerator still cools or a dispenser appears normal. If water is available, the leading branch shifts toward freezer temperature, a fill blockage, or the ice-maker mechanism.
-
Check 3
Assess the freezer condition: keep the door closed, check whether the freezer is cold according to the model manual, and inspect for heavy frost or a door gasket that does not seal.
Expected result: The freezer feels warmer than its normal setting, frost covers the rear wall or air path, the door is left open frequently, or the freezer is cold with no unusual frost.
Next step: Close the door fully, remove an obvious item preventing the seal, and follow the model manual for any permitted defrost procedure. Do not scrape frost or remove an evaporator cover; use service if frost returns or the freezer cannot reach its normal condition.
Stop if: Do not use heat or sharp tools to melt or remove ice near the liner, wiring, or water tubing.
Why this matters
Why: Warm air, frequent door opening, a poor seal, or frost blocking circulation can slow or stop the ice-making cycle. A cold freezer with clear airflow makes the water route or ice-maker mechanism more likely.
-
Check 4
With the ice maker switched off before touching anything, inspect only the visible mold, fill opening, and dispenser connection for a loose ice obstruction or an overfilled, jammed bin.
Expected result: A visible chunk of ice blocks an opening, the bin or chute is jammed, the mold is dry and clear, or the suspected blockage is behind a cover or inside a tube.
Next step: Remove only loose ice that the manual identifies as user-removable, then restore the bin and enable the maker. If the blockage is frozen in a tube or behind a cover, stop and use the model manual or authorized service.
Stop if: Never chip at the liner, puncture a fill tube, or pry off an ice-maker cover to reach a hidden obstruction.
Why this matters
Why: A visible blockage can prevent water from entering or ice from leaving. A dry, clear mold with a confirmed water supply points away from a simple chute jam. A hidden blockage cannot be safely diagnosed by pushing an object into the path.
-
Check 5
After the user-accessible checks, observe one normal ice-making interval without opening the freezer repeatedly; note whether the tray receives water, freezes, and releases ice according to the model's normal operation.
Expected result: Water enters and ice is later released, water never reaches the mold despite an available supply, the mold freezes but does not harvest, or the refrigerator remains too warm.
Next step: If the cycle completes, monitor production after normal use. If it fails at a repeatable stage, record that stage, the model, and any display indication for authorized service instead of buying a part based only on the symptom.
Stop if: Stop if water leaks into the freezer, the ice maker binds, the refrigerator overheats, or an electrical smell or unusual noise appears.
Why this matters
Why: Water entering and ice releasing means the original problem was likely a setting, supply interruption, temperature disturbance, or temporary obstruction. No fill with a confirmed supply suggests a fill valve or hidden route issue; frozen ice that never releases suggests the ice-maker mechanism or its control; a warm freezer is a cooling or airflow issue first.
Use your observations
Decision map
Find the observation that best matches what you see, then follow the next safe action.
-
PATH 01Next step
What you see
The ice maker is off, the bin is not seated, or the model's shutoff sensor is held in the stop position.
Do this next
Correct the setting or seating exactly as the Beko manual shows. If it cannot be corrected without forcing parts or opening the assembly, use authorized service.
Why this path and its safety boundary
Why it matters: The appliance is being told not to make ice, so a water-valve or ice-maker replacement would be premature. A control that will not enable or a damaged sensor needs model-specific attention.
-
PATH 02Next step
What you see
The ice maker is enabled, but the tank is empty or a plumbed connection is closed, kinked, or leaking.
Do this next
Refill or restore the supply only at the user-accessible point allowed by the manual, then monitor. If the line remains restricted or wet, stop using the ice maker and arrange service.
Why this path and its safety boundary
Why it matters: Water starvation is more likely than a failed ice-maker mechanism. A persistent supply or leak requires plumbing or appliance service before further testing.
-
PATH 03Next step
What you see
The water path is available, but the freezer is warm, has heavy frost, or the door does not seal.
Do this next
Follow the exact manual for door-seal, temperature, and defrost checks. If the freezer cannot hold its normal condition, use qualified service before replacing the ice maker.
Why this path and its safety boundary
Why it matters: Ice production is secondary to the freezer's temperature and airflow. Persistent warmth or frost makes a cooling, defrost, fan, or door-seal fault more likely than a simple ice-maker part.
-
PATH 04Next step
What you see
The freezer is cold and the supply is available, but a visible ice blockage prevents filling or dispensing, or the tray never fills with no visible blockage.
Do this next
Clear only the permitted loose obstruction and monitor one normal cycle. If the failure repeats or access requires removing a cover, stop and provide the model and observed stage to authorized service.
Why this path and its safety boundary
Why it matters: A loose obstruction can explain no ice without proving a failed component. A repeatable no-fill or no-harvest condition after the basic checks makes a model-specific ice-maker, valve, sensor, or control fault more likely.
Helpful context
Understand the symptom
What the empty ice tray tells you
An empty tray does not identify one failed part. Ice production depends on the ice maker being enabled, a correctly seated bin or sensor where the model uses one, a water source, a sufficiently cold freezer, and an unobstructed fill or dispensing route. Beko's support guidance treats these as separate checks and warns that the water connections vary by model. This is why the first useful observation is whether there is no water in the mold, a frozen blockage, or ice that was made but cannot leave the dispenser.
Safety before inspecting the ice maker
Do not use a knife, screwdriver, wire, steam, or a hair dryer near the ice maker, liner, water, or electrical parts. Do not jumper a door switch or force a harvest cycle from an unknown service mode. If the freezer has a leak, exposed wiring, a burning smell, or an ice maker that is cracked or binding, keep the refrigerator off if safe and use qualified service.
Only after diagnosis
Potential parts
- ice-maker assembly
Consider this only when the maker is enabled, the freezer is at its normal condition, water is available, no permitted blockage is present, and the maker repeatedly fails at harvest or fill.
Confirm the exact Beko model and manufacturer fit information; ice-maker assemblies are not interchangeable merely because the connectors look similar. - ice-maker water inlet valve
Consider this only when the household or tank supply is confirmed, the visible route is clear, and a model-specific test indicates that water is not being delivered to the ice maker.
Verify the exact model, valve configuration, and manufacturer's compatibility information before ordering; do not replace it from an empty-tray symptom alone.
When checks do not resolve it
Need a professional?
Arrange service when the failure repeats at the same fill or harvest stage, the water route is hidden, the freezer cannot maintain its normal condition, or the ice-maker assembly or control would need removal.
Safety scope: Do not bypass door or bin interlocks, force a harvest cycle, chip or heat hidden ice, puncture water or refrigerant tubing, or test energized wiring as a household check.
Have this ready
- The exact Beko model and serial information
- Whether the ice maker is enabled and whether the bin or shutoff sensor is seated
- Whether the refrigerator is tank-fed or plumbed and whether water reaches the appliance
- The freezer condition, frost pattern, and door-seal observations
- Whether the mold is dry, frozen, filled with water, or unable to release ice
Common questions
FAQ
Why is my Beko refrigerator not making ice when the water dispenser works?
The dispenser and ice maker can have different paths or controls. Check that the ice maker is enabled, the bin or sensor is seated, and the ice maker's own tank or water connection is open and unobstructed. Beko says these connections vary by model, so use the exact manual before touching a line.
Can frequent freezer-door opening stop ice production?
It can slow production because warm air entering the freezer raises its air temperature. Close the door fully, check the gasket, and address heavy frost or a warm freezer according to the model manual. Do not use heat or sharp tools to remove hidden ice.
Should I replace the Beko ice maker first?
No. First confirm the setting, bin or sensor, water supply, freezer condition, and accessible blockages. If the failure repeats at fill or harvest with those checks correct, an ice-maker or valve fault becomes more plausible, but the exact model should guide the part and diagnosis.
Can I thaw a frozen ice-maker fill tube with a hair dryer?
Do not improvise with a hair dryer, steamer, knife, or wire near the liner, water, or electrical parts. If the blockage is not loose and visibly user-removable under the Beko manual, stop and use authorized service.
When does a no-ice problem need professional service?
Use service when water connections leak, the freezer stays warm or heavily frosted, the ice maker fails repeatedly after the accessible checks, or reaching the valve, wiring, cover, or cooling system requires disassembly. Stop immediately for burning odor, exposed wiring, hissing, or water at electrical parts.
Read the exact guide
Official sources
- Help Center ResultBeko · Beko refrigerator help-center guidance on model-specific manuals, freezer condition, frost, and ice-maker controls
- Why is my ice maker not making ice?r/Appliances community · Community case distinguishing an empty ice tray from a working water dispenser and later identifying a closed ice-maker water line
- How to fix an ice-maker that won't make any iceBeko · Beko refrigerator ice-maker troubleshooting: tank, water connections, freezer-door temperature effects, blockages, and service
Community feedback
Share a repair observation
Share a plain-text repair observation. Accepted observations are published automatically; this page may take a moment to update.