
On this page
Start here
Quick answer
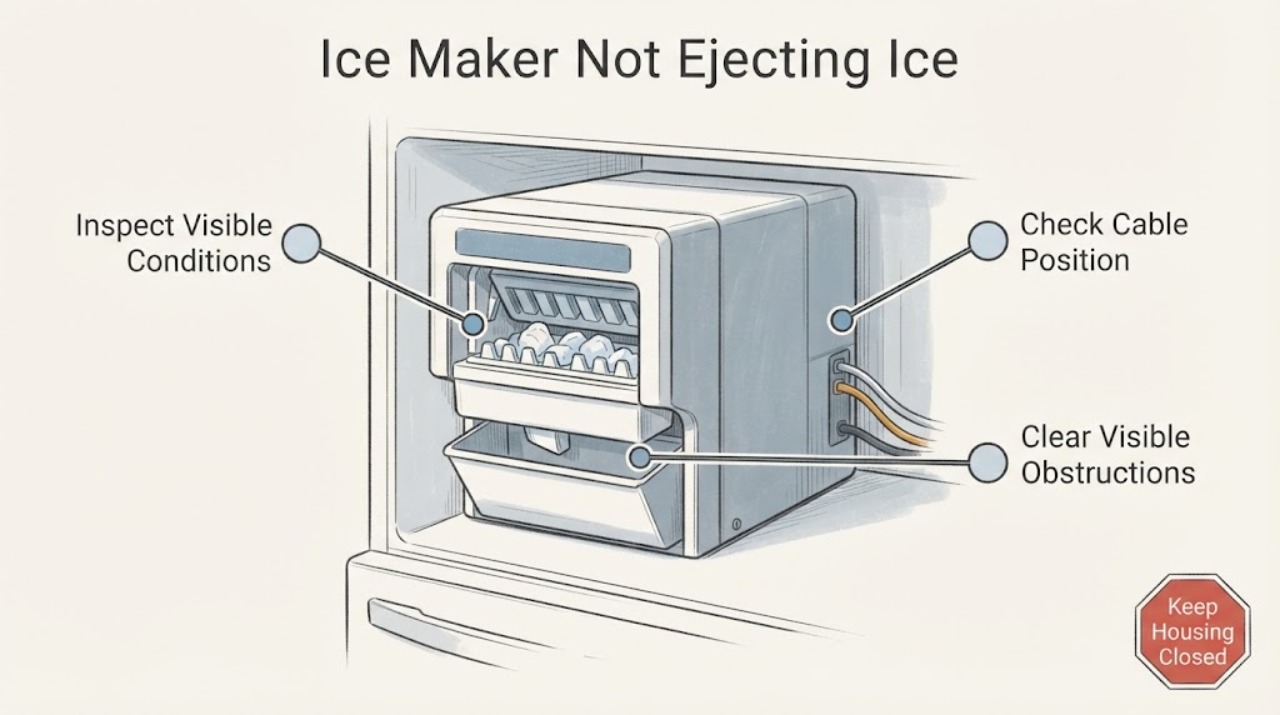
If a Whirlpool ice maker has frozen cubes in the mold but does not eject them, stop the cycle before reaching into the mechanism. First confirm that the ice maker is on and that the storage bin is seated as your model manual specifies. With the appliance otherwise off, inspect only the visible ejector area; if a loose cube is jammed, remove it with a plastic utensil, never a sharp or metal tool. If the mold is empty rather than full, check the water supply, kinked line, filter condition, and freezer temperature instead of treating it as an ejector failure. Repeated jams, no ejector movement after the visible obstruction is removed, damaged parts, or a need to open the ice-maker housing require model-specific qualified service; Whirlpool’s general guidance does not establish a DIY motor, gear, module, or wiring repair.
Work through in order
Diagnostic checks
Use only checks that match the exact appliance or system and its official guide.
-
Check 1
Look at the mold and ejector area without forcing any moving arm. Determine whether the mold contains solid cubes that are waiting to be pushed out, or is empty/only partly filled.
Expected result: Solid cubes are present in the mold, or the mold is empty/partly filled.
Next step: Use the full-mold path below only when cubes are actually present. If the mold is empty, continue with the water-supply and freezer-condition checks instead of prying at the ejector.
Why this matters
Why: A full mold points first to a harvest/ejector obstruction; an empty or partly filled mold does not establish an ejector fault and calls for water, temperature, or control checks.
-
Check 2
Confirm the ice maker is turned on and that any wire arm, switch, or storage-bin position is in the normal operating state for the exact Whirlpool model. Do not assume one Whirlpool design’s switch or reset location applies to another.
Expected result: The ice maker is off, the shutoff arm is raised, the bin is not seated, or the model-specific manual shows a different control; alternatively, the controls and bin appear normal.
Next step: Correct only the visible on/off or bin-position condition described by the exact owner manual. If the controls are already normal, continue without opening the ice-maker housing.
Why this matters
Why: An off control, raised shutoff arm, or incorrectly seated bin can prevent a harvest cycle without proving that the ejector mechanism has failed.
-
Check 3
With the appliance in a safe, non-cycling state, inspect the visible ejector arm for a loose cube or ice bridge. Remove only a loose obstruction with a plastic utensil; do not use a knife, screwdriver, heat source, or force the fingers through the ice.
Expected result: A loose cube or bridge is visibly blocking the ejector, or the arm/mold is clear but the ice remains stuck or a part looks cracked/bent.
Next step: If the obstruction comes away easily, close the compartment and observe a normal later cycle. If it does not come away easily, or damage is visible, stop and arrange model-specific service.
Why this matters
Why: A visible jam is a documented Whirlpool cause that may clear without a part diagnosis. A clear mechanism with persistent ice or visible damage is outside the safe external check and does not identify whether the motor, gear, mold, or control is at fault.
-
Check 4
If the mold is empty or the cubes are small/hollow, check the refrigerator’s visible water shutoff valve, the supply line for a kink, the filter’s installation/condition, and the freezer temperature using the exact model guidance. Do not disconnect or disassemble a water valve to test it.
Expected result: The supply valve is closed, the line is kinked, the filter is recently changed or restricted, or the freezer is outside the model’s specified range; alternatively, these external conditions are normal.
Next step: Restore only a visibly closed valve, kinked line, or incorrectly installed filter according to the owner manual, then allow the documented recovery period. If the mold still does not fill, request service rather than testing internal components.
Why this matters
Why: Restricted water or unsuitable temperature can prevent a normal fill and make the complaint look like an ejector failure. Normal external conditions do not prove an internal valve or control failure.
-
Check 5
After one safe visible check, record whether a later cycle produces ice, whether the same jam returns, whether the ejector never moves, and the complete model number from the appliance label.
Expected result: The jam clears and ice production resumes, or the symptom repeats/never cycles despite normal visible settings.
Next step: For recurrence or no movement, keep hands and tools out of the mechanism and provide the model, mold condition, water/temperature observations, and any visible damage to Whirlpool service.
Why this matters
Why: A one-time obstruction that clears supports a limited external fix. Recurrence or no movement after the obstruction is removed requires a model-specific diagnosis and does not justify naming a failed motor, gear, module, or wiring.
Use your observations
Decision map
Find the observation that best matches what you see, then follow the next safe action.
-
PATH 01Next step
What you see
The mold contains solid cubes and a loose cube or ice bridge is visibly blocking the ejector arm.
Do this next
Remove only the loose obstruction without force or sharp tools, then observe a later normal cycle. Escalate if the obstruction will not release or returns.
Why this path and its safety boundary
Why it matters: Whirlpool documents a jammed ejector arm as a possible cause and permits a plastic-utensil removal check.
-
PATH 02Next step
What you see
The mold is empty or partly filled, with a closed valve, kinked line, recently changed filter, or freezer condition that does not match the model guidance.
Do this next
Correct only the visible condition allowed by the owner manual and allow the stated recovery period; request service if filling remains abnormal.
Why this path and its safety boundary
Why it matters: The symptom is more consistent with a fill or operating-condition problem than a proven ejector failure.
-
PATH 03Next step
What you see
The ejector area is clear and the ice maker is on, but the arm never cycles, the jam recurs, or a mold/arm part is damaged.
Do this next
Stop DIY disassembly and arrange model-specific Whirlpool service with the full model number and the recorded mold, water, temperature, and jam observations.
Why this path and its safety boundary
Why it matters: The remaining fault is beyond the shared Whirlpool external guidance; the symptom alone cannot distinguish a motor, gear, module, wiring, or mold issue.
-
PATH 04Next step
What you see
The unit has a water leak, exposed damaged wiring, burning odor, sparking, or an unsafe need to reach into a powered mechanism.
Do this next
Stop, disconnect power and water only when safe and accessible, keep the appliance out of use, and obtain qualified service; do not continue cycling or open the housing.
Why this path and its safety boundary
Why it matters: This is a safety or service condition rather than a routine ejector check.
Helpful context
Understand the symptom
Not ejecting ice can mean two different things: frozen cubes are present but blocked at the ejector, or the mold never filled and the problem is upstream. Whirlpool’s support pages cover several ice-maker types, so the checks below stay at the shared external level and leave model-specific reset sequences to the owner manual.
Do not force the ejector fingers, chip at the mold with a knife, or remove the ice-maker housing for a DIY motor or wiring test. If an inspection finds damage, a recurring bridge, or no response after a visible obstruction is cleared, record the model and arrange service.
When checks do not resolve it
Need a professional?
Request model-specific Whirlpool service when a visible jam will not release easily, the jam returns, the mold or ejector is damaged, the ice maker never cycles after visible settings are normal, water or temperature checks do not restore filling, or any internal repair would be required. Stop immediately for a leak, exposed wiring, burning odor, sparking, or another electrical hazard.
Common questions
FAQ
Can I pry the ice out of the Whirlpool ejector with a screwdriver or knife?
No. Whirlpool’s guidance specifies a plastic utensil for a visible ejector-arm jam. Do not force the fingers or use sharp or metal tools; request service if the obstruction will not release easily.
How do I know this is an ejector problem rather than a fill problem?
A mold full of solid cubes points toward a harvest obstruction. An empty or partly filled mold points first toward the ice maker’s on/off state, water supply, filter, or freezer condition. The symptom alone cannot identify an internal part.
Can I replace the Whirlpool ice-maker motor or module as a DIY repair?
This article does not establish a motor or module diagnosis or compatibility because no model was supplied. Record the full model number and obtain model-specific service or fit information before considering any part.
Read the exact guide
Official sources
- How Does a Refrigerator Icemaker Work?Whirlpool · Whirlpool explanation of refrigerator ice-maker operation, used only to explain that ejector teeth push cubes from the mold; it does not diagnose an unspecified-model component failure.
- Ice Maker Not Working - Troubleshooting - Product Help | WhirlpoolWhirlpool · Whirlpool refrigerator ice-maker troubleshooting guidance for restricted water supply, freezer temperature, on/off state, and water-filter checks; exact controls vary by model.
- How to Troubleshoot the Freestanding Ice MakerWhirlpool · Whirlpool freestanding ice-maker troubleshooting guidance, used for the shared visible jam, on/off, water-supply, and model-manual boundaries; not asserted as a model-specific repair manual.
- Owner's ManualWhirlpool · Opened Whirlpool owner manual used only for general documented ice-maker checks: on/off state, water supply, kinked line, wait periods, and removing an ejector-arm jam with a plastic utensil. Exact model applicability must be confirmed from the appliance label before using model-specific controls.
- Ice Maker Troubleshooting: How to Fix an Ice MakerWhirlpool · Whirlpool refrigerator ice-maker troubleshooting overview, used for water-flow, temperature, frozen-inlet, and professional-service boundaries; not a model-specific parts guide.
Community feedback
Share a repair observation
Share a plain-text repair observation. Accepted observations are published automatically; this page may take a moment to update.