
On this page
Start here
Quick answer
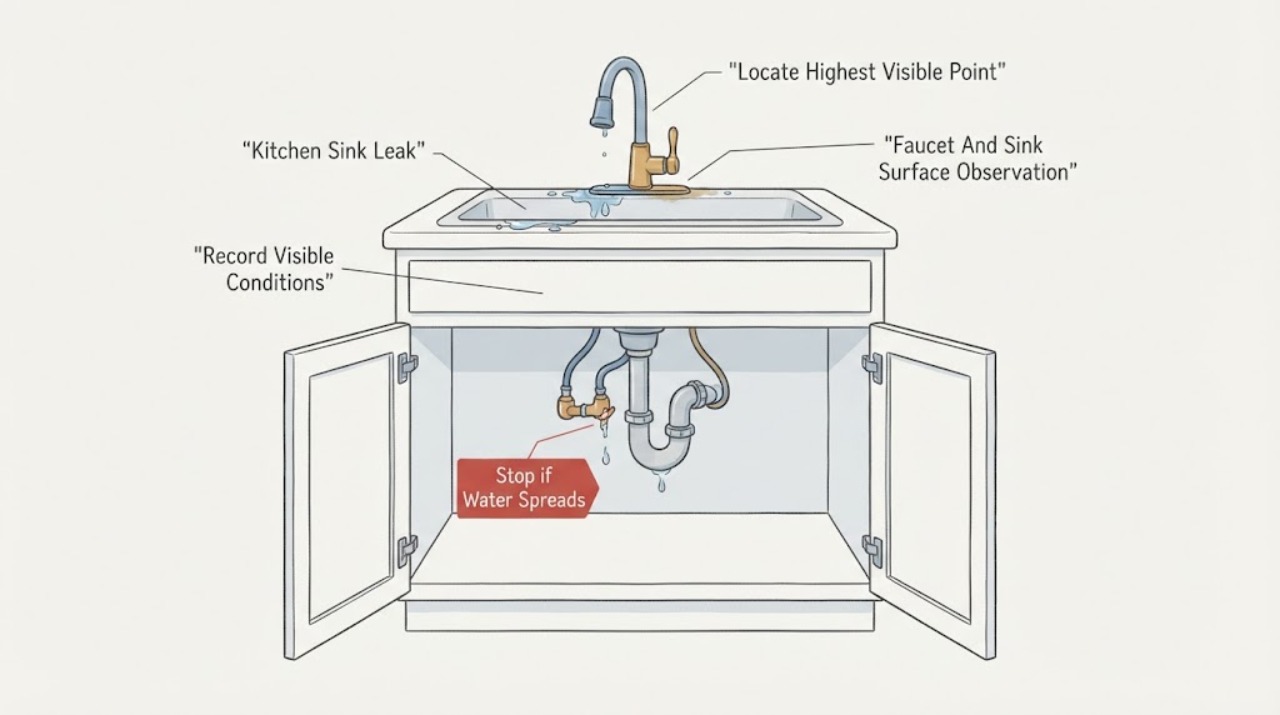
First determine when the leak appears: during faucet use, while the basin drains, when the disposal runs, or even when the sink is untouched. From a dry, safe position, look for the highest visible wet point and record whether water is at the faucet base, sink rim, drain or trap, supply connection, cabinet side, or floor. Do not put hands into standing water, touch wet electrical or disposal equipment, remove plumbing, cut a pipe, mix chemicals, or run the sink repeatedly to reproduce the leak. Stop using the sink and arrange prompt plumbing service for continuous flow, a damaged supply connection, water near electrical equipment, cabinet swelling, sewage odor, or a leak that cannot be localized safely.
Work through in order
Diagnostic checks
Use only checks that match the exact appliance or system and its official guide.
-
Check 1
From a dry, stable position, record whether the last visible leak appeared during faucet use, after the basin drained, while the disposal operated, after a sprayer or pull-down hose was used, or while the sink was untouched. Do not repeat the use cycle to test it.
Expected result: The leak is use-triggered, drain-triggered, disposal-triggered, intermittent, or continuous even when the sink is idle.
Next step: Stop using the sink if water is active or spreading, and give the trigger history to a plumber. Continue only with visual observations from a dry location.
Stop if: Stop immediately if the leak is continuous, water is near electrical equipment, or safely reaching the observation area would require stepping into water.
Why this matters
Why: Timing separates faucet and hose behavior from drain-side or supply-side behavior, but it does not prove which hidden connection has failed. A continuous leak is more urgent because water may continue without a new sink use.
-
Check 2
Look without touching for the highest visible wet point and note whether moisture is at the faucet base or handle area, sink rim, drain opening, disposer or drain connection, supply connection, cabinet side, or floor. Photograph the location and surrounding dry surfaces.
Expected result: Water is visible above the counter, below the sink basin, at a drain or supply area, along the cabinet wall, or only on the floor.
Next step: Keep the area unused and provide the photos and highest visible point to service. Do not remove a cabinet base or plumbing to chase the source.
Stop if: Stop if water is pooling, the cabinet floor is soft, the source is hidden, or any electrical or disposal equipment is wet.
Why this matters
Why: The visible location helps a professional choose between faucet, drain, supply, cabinet, and floor investigations. Water can travel along a surface, so the lowest wet mark is not necessarily the source.
-
Check 3
From above the counter, look for a visible wet ring at the faucet base, moisture under a handle, water at the sink rim, or water appearing only when the faucet is in a particular ordinary position already observed. Do not remove the handle, sprayer, cartridge, sink clips, or seal.
Expected result: Moisture is at the faucet base or handle, at the sink-to-counter rim, around a sprayer hose path, or absent from the upper sink surface.
Next step: Record the faucet brand or model only if it is already visible without disassembly, then request plumbing service for a model-specific assessment.
Stop if: Stop if water reaches a counter outlet, appliance, disposal control, or any electrical device, or if finding the model would require removing a part.
Why this matters
Why: A faucet-base or handle pattern can indicate a faucet seal or cartridge path; a rim pattern can involve the sink-to-counter interface; no upper moisture makes a concealed or under-sink path more relevant. Exact parts depend on the faucet and sink model.
-
Check 4
From the cabinet opening or doorway, look for staining, swollen board edges, softened shelving, peeling finish, mold-like spotting, musty odor, or water marks on stored items. Do not kneel in standing water, move a heavy appliance, pull out the disposal, remove panels, or perform cleanup on contaminated water.
Expected result: The cabinet is dry, has a localized old-looking mark, is actively wet or swollen, has odor or visible growth, or contains water near electrical equipment.
Next step: Keep people and pets away from the affected cabinet, stop using the sink, and request plumbing plus appropriate water-damage service. Do not demolish the cabinet or apply DIY mold treatment.
Stop if: Stop at once for standing water, sewage odor, visible contamination, softened flooring, or wet electrical equipment.
Why this matters
Why: Cabinet swelling or odor shows that the leak may have persisted or that materials were affected, even if the current source is not obvious. Water near electrical equipment or contaminated water raises the safety and service urgency.
-
Check 5
Record whether the leak started after a faucet, disposal, filter, hose, drain, or cabinet change; whether it followed a freeze, move, cleaning, or remodel; and whether the home's water supply has been interrupted. From a dry position, note any visibly damaged or corroded connection without tightening, cutting, or disassembling it.
Expected result: The leak followed a recent change, appears at a visibly damaged connection, recurs without a clear event, or has no known history.
Next step: Give the timeline, photos, fixture model if known, and whether the leak is ongoing to the plumber. Leave the sink unused until the service decision is made.
Stop if: Stop once the next step would require turning a hidden fitting, opening a wall or cabinet, cutting pipe, or touching water near electricity.
Why this matters
Why: Recent work and visible damage are useful clues for the professional, but neither confirms that a particular fitting or repair kit is compatible. A no-history leak still needs the same trigger and location evidence.
Use your observations
Decision map
Find the observation that best matches what you see, then follow the next safe action.
-
PATH 01Next step
What you see
The leak appears continuously while the sink is not being used
Do this next
Stop using the sink and arrange prompt plumbing service because a supply-side or concealed connection may continue to release water. Do not perform a prolonged test or disassemble the plumbing.
-
PATH 02Next step
What you see
The leak appears at the faucet base or under the handle during faucet use
Do this next
Treat it as a faucet or seal-path lead and provide the faucet model and timing to service. Do not remove the handle or cartridge as a homeowner observation.
-
PATH 03Next step
What you see
The leak appears after the basin drains or near the drain, trap, or disposer connection
Do this next
Stop using the basin and request a plumber to inspect the visible and concealed drain path. Do not remove the trap, run chemicals, cut a pipe, or reach into a disposal.
-
PATH 04Next step
What you see
The cabinet is swollen, actively wet, odorous, contaminated, or wet around electrical equipment
Do this next
Keep people and pets away, stop sink use, and arrange appropriate plumbing and water-damage service. Do not touch wet electrical equipment or attempt cabinet demolition or mold remediation.
-
PATH 05Next step
What you see
The source cannot be localized safely or water is spreading
Do this next
Stop the observation, leave the sink unused, and use prompt plumbing or emergency water service. Hidden access and supply isolation should be handled by a qualified professional.
Helpful context
Understand the symptom
Why the timing matters
A faucet leak that appears only while the handle is on is different from water that appears after the basin drains, and both differ from a continuous supply-side leak. Manufacturer troubleshooting separates leak location and faucet state because the likely component and the safe service path depend on those details. The observations below are for a plumber's handoff, not a concealed plumbing repair.
Keep the observation dry and limited
Do not reach into wet cabinet contents, touch a disposal, outlet, appliance cord, or other electrical equipment near water, or remove a trap, drain, supply line, faucet handle, cabinet panel, or countertop. Do not pour drain chemicals or run a prolonged leak test. If water is spreading, stop using the sink and use qualified plumbing or emergency water service.
Only after diagnosis
Potential parts
- sink-drain-repair-kit
Only consider a drain repair kit after a plumber identifies a localized drain-side failure and confirms that the kit matches the sink, drain, and disposal arrangement.
Confirm the sink/drain configuration, connection type, material, and manufacturer fit information before ordering; do not treat a kit as a solution for an unknown or concealed leak. - leak-alarm
A leak alarm may be useful after the active leak is controlled as a supplemental way to observe recurrence in the cabinet; it does not repair a leak or replace prompt service.
Confirm the device's placement, battery, audible or connected-alert behavior, and suitability for the cabinet environment without placing it in standing water or near unsafe electrical equipment. - silicone-caulk
Consider sealant only if a qualified professional identifies an accessible sink-rim sealing issue and approves a product compatible with the sink and counter; it is not a cure for a drain, faucet, supply, or concealed leak.
Confirm the sink material, countertop, existing sealant, cure requirements, and manufacturer's instructions before purchase; do not cover an active leak with caulk.
When checks do not resolve it
Need a professional?
Call a qualified plumber promptly for a continuous or spreading leak, a leak at a supply or drain connection, cabinet swelling, odor, a leak near a disposal or electrical equipment, or any source that cannot be safely localized. Use emergency water service when water is rapidly spreading or threatening the building.
Have this ready
- Provide the trigger (faucet, drain, disposal, or idle), highest visible wet point, photos, faucet or sink model if visible without disassembly, cabinet material condition, water or odor history, recent work, and whether water is still flowing.
Common questions
FAQ
How can I tell whether a kitchen sink leak is from the faucet or the drain?
Record whether it appears while the faucet is used, after the basin drains, or while the sink is idle, then compare the highest visible wet point from a dry position. Do not run repeated tests or remove plumbing; a plumber can confirm the source safely.
What should I do if there is water under the kitchen sink?
Stop using the sink, keep people and pets away from wet or swollen cabinet materials, and arrange plumbing service. Do not touch wet electrical or disposal equipment, reach into standing water, cut a pipe, or demolish the cabinet.
Can I seal a kitchen sink leak with silicone caulk?
Only after a professional confirms that the accessible sink-to-counter seal is the source and approves a compatible sealant. Caulk will not fix a faucet, drain, supply, concealed, or active leak and can hide evidence of the real problem.
Read the exact guide
Official sources
- How to Fix a Leaky Sink FaucetKOHLER · General faucet guidance; exact faucet instructions and professional service govern model-specific work.
- Troubleshooting: Faucet Leaking Below the DeckKohler · Specific Kohler faucet family flowchart used only to support location-based observation; it is not a universal repair procedure.
- Leaking Under the HandleKohler Assist · Kohler kitchen faucet support; other faucet designs may use different parts and procedures.
Community feedback
Share a repair observation
Share a plain-text repair observation. Accepted observations are published automatically; this page may take a moment to update.