
On this page
Start here
Quick answer
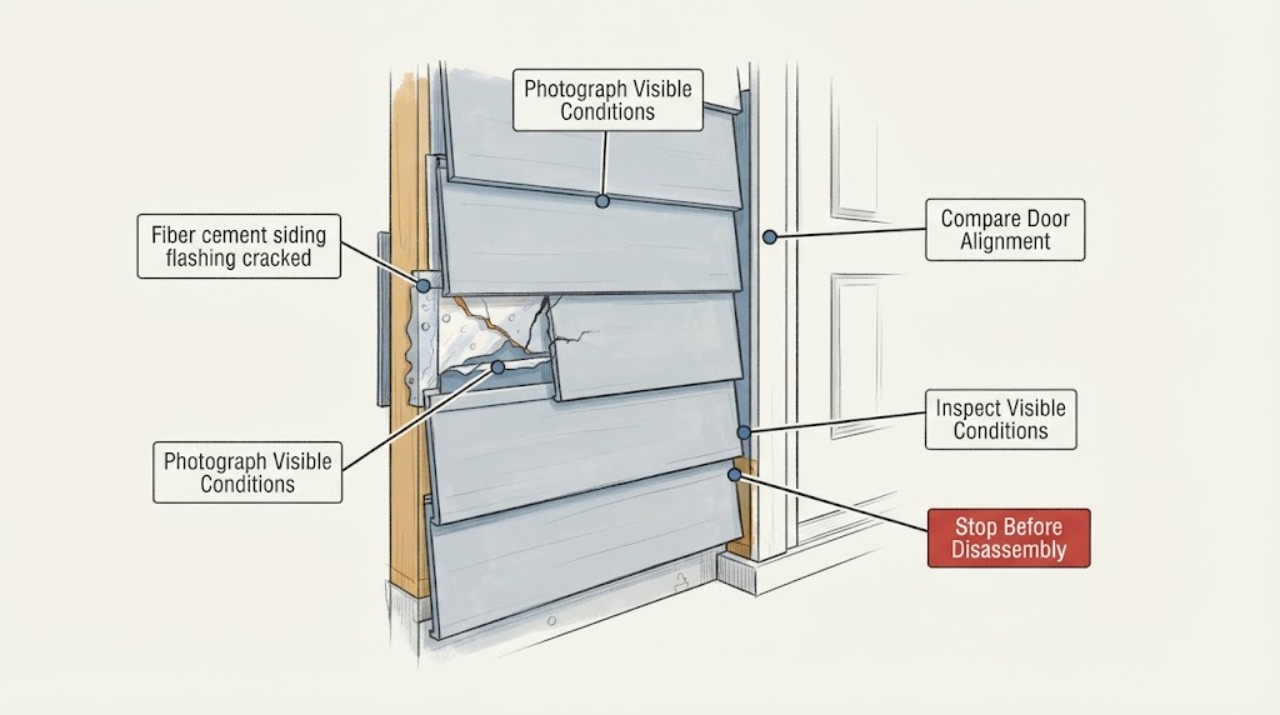
A crack in flashing behind or beside fiber cement siding is a water-management concern, not just a cosmetic gap. From the ground or a safe indoor position, document where the crack is, whether the siding or flashing appears displaced, whether water staining or dampness is visible, and whether the condition followed wind or heavy rain. Do not climb, pry siding, cut or sand fiber cement, or apply a sealant as a guess. Keep clear of loose or falling material and arrange a qualified siding or building-envelope professional when water enters, the flashing is displaced, or the surrounding wall shows rot, mold-like growth, or electrical risk.
Work through in order
Diagnostic checks
Use only checks that match the exact appliance or system and its official guide.
-
Check 1
From ground level, visually locate the cracked flashing in relation to windows, doors, corners, rooflines, decks, trim, or siding joints; photograph the full elevation and a close view without climbing or touching the wall.
Expected result: The crack is isolated in visible flashing with no apparent displacement, or it aligns with a loose-looking edge, open joint, bent piece, or adjacent siding crack.
Next step: Record the location and provide the photographs to a qualified siding or building-envelope professional for an assembly-level assessment.
Stop if: Stay away and keep people clear if flashing, trim, or siding appears loose, hanging, or capable of falling.
Why this matters
Why: Location changes the likely water path and the professional's inspection plan. A visible crack does not show whether the weather barrier or sheathing behind the cladding is also affected.
-
Check 2
From a safe indoor position, look at the wall, ceiling, floor, trim, and window or door perimeter nearest the exterior crack for staining, dampness, peeling finish, musty odor, or visible swelling; do not open the wall or touch wet material.
Expected result: No indoor symptom is visible, or staining, dampness, odor, or finish damage appears near the same opening or wall area.
Next step: Photograph the interior observation, note when it appears, and arrange professional service if moisture or staining is present.
Stop if: Stop near any wet electrical outlet, switch, fixture, or wiring; keep clear and request qualified electrical and water-intrusion assistance.
Why this matters
Why: The absence of an indoor sign does not rule out concealed intrusion. A matching interior pattern increases the urgency of tracing the exterior flashing and wall drainage path before more finish damage occurs.
-
Check 3
From the ground, compare the visible flashing and siding around the crack for a change in alignment, bowing, open-looking seams, missing pieces, or a gap that appears larger after weather; do not pry, reattach, or seal anything.
Expected result: The visible components remain aligned and intact, or one or more pieces look displaced, bowed, separated, or missing.
Next step: Keep the wall undisturbed, block access below loose material, and have a professional determine whether flashing, siding, trim, weather barrier, or sheathing needs attention.
Stop if: Do not approach beneath loose or falling material, and do not attempt a ladder inspection or temporary fastening.
Why this matters
Why: Displacement or missing material can interrupt the intended water path and expose edges to weather. It may also indicate movement or concealed damage that a surface seal would not correct.
-
Check 4
Note whether water staining, dampness, or the visible crack first appeared after wind, heavy rain, freeze-thaw weather, or another exterior event; use existing photographs or ordinary observations rather than creating a hose test.
Expected result: The condition repeats after particular weather or appears unrelated to weather and continues during dry conditions.
Next step: Give the professional the event timeline, weather relation, and any prior repair information so the inspection can follow the likely water path.
Stop if: Do not inspect during wind, lightning, heavy rain, or other conditions that make the wall or surrounding ground unsafe.
Why this matters
Why: Weather timing can help trace rain entry or movement, while a persistent dry-weather sign may indicate an older displacement, finish failure, or another source. Timing alone cannot prove the flashing is the only failed component.
-
Check 5
From a safe distance, look for rot-like softness, mold-like growth, darkened sheathing or trim, peeling paint, or an odor around the affected wall without scraping, probing, sampling, or disturbing the material.
Expected result: The surrounding finish appears intact, or deterioration, mold-like material, crumbling edges, or a persistent odor is visible or present.
Next step: Keep the area isolated and tell the siding or water-intrusion professional exactly what was observed; request appropriate environmental assessment if mold-like material is involved.
Stop if: Stop all DIY repair or cleanup for crumbling, visibly contaminated, or structurally questionable material and arrange professional assessment.
Why this matters
Why: These signs raise concern that moisture reached absorbent wall components. Appearance alone cannot establish the extent or identify a mold type, and disturbance can spread damage or exposure.
Use your observations
Decision map
Find the observation that best matches what you see, then follow the next safe action.
-
PATH 01Next step
What you see
The crack is isolated, aligned, dry-looking, and there is no loose material or indoor water symptom.
Do this next
Schedule a professional review before selecting exterior caulk or touch-up paint; the professional can determine whether the finish or the flashing detail needs work.
-
PATH 02Next step
What you see
Flashing, siding, or trim appears displaced, loose, missing, or capable of falling.
Do this next
Keep people away from the wall and arrange prompt qualified siding service. Do not climb, pry, fasten, or seal the assembly yourself.
-
PATH 03Next step
What you see
Interior staining, dampness, odor, or swelling matches the exterior crack.
Do this next
Treat the issue as possible wall moisture intrusion and request an assembly-level inspection of flashing, weather barrier, cladding, and interior damage.
-
PATH 04Next step
What you see
Rot-like deterioration, mold-like material, crumbling components, or persistent odor is visible or present.
Do this next
Do not disturb or clean the material. Isolate the area and arrange qualified siding, water-damage, and environmental assessment as appropriate.
-
PATH 05Next step
What you see
Water is near an outlet, switch, light, or other electrical equipment.
Do this next
Do not touch the wet electrical area. Keep clear and obtain qualified electrical and water-intrusion help, with urgent escalation for smoke, heat, sparks, or burning odor.
-
PATH 06Next step
What you see
The condition appeared during unsafe weather or the wall cannot be observed safely from the ground.
Do this next
Wait for safe conditions and use photographs or a professional inspection; do not use a ladder or approach the wall during wind, rain, or lightning.
Helpful context
Understand the symptom
Why cracked flashing needs an assembly view
Flashing works with the siding, weather-resistive barrier, trim, openings, and drainage path. A crack can be a surface finish issue, a displaced piece, or a symptom of movement or water reaching the wall behind the cladding. Manufacturer guidance describes flashing and weather-barrier products as part of water management, but the correct detail depends on the location and the installed system. A photograph and a safe observation are more useful than a guessed patch.
Keep the inspection at ground level
Use a stable viewpoint and photograph the wall, opening, trim, and nearby ground or interior finish. Do not use a ladder, touch loose siding, remove trim, or disturb a crack to see behind it. Tell the professional whether the issue is near a window, door, roofline, deck, corner, or siding joint and whether the wall has a history of leaks or repairs.
Only after diagnosis
Potential parts
- exterior-caulk
Consider only after a professional confirms that the visible condition is a compatible surface joint or finish issue and that the flashing and wall drainage path are intact.
Match the sealant to the installed siding, flashing, finish, exposure, and manufacturer guidance; caulk is not a substitute for displaced flashing or concealed moisture repair. - siding-touchup-paint
Consider only after the professional confirms the substrate is sound, dry, and repaired and that the remaining issue is a finish blemish.
Confirm the siding finish, color system, surface preparation limits, and manufacturer instructions before selecting touch-up paint; do not paint over active water damage or mold-like material.
When checks do not resolve it
Need a professional?
Call a qualified siding or building-envelope professional for a cracked or displaced flashing detail, recurring weather-related water, indoor staining, dampness, rot-like deterioration, mold-like material, loose or falling siding, or a crack whose extent cannot be viewed safely. Coordinate qualified electrical help when water is near electrical equipment.
Have this ready
- Provide exterior and interior photographs from safe positions, the flashing location, the crack and displacement pattern, weather and leak timing, nearby opening or trim details, prior repairs, and any odor, rot-like condition, mold-like appearance, or electrical proximity.
Common questions
FAQ
Does a crack in siding flashing always mean the wall is leaking?
No. It may be a finish issue, but displacement, weather-related recurrence, indoor staining, dampness, or deterioration raises concern for a water-management problem. Have the flashing and surrounding wall assessed together.
Can I seal the cracked flashing from a ladder?
Do not use a ladder or apply a guessed sealant. The correct repair depends on the flashing location, siding system, weather barrier, and concealed condition, and should be handled by a qualified professional.
What should I do if I see water inside near the crack?
Photograph it from a safe position, limit exposure to the affected area, and arrange prompt professional service. Keep clear of any nearby wet electrical equipment and do not open the wall.
Can touch-up paint fix cracked fiber cement siding flashing?
Paint is appropriate only after the flashing, cladding, and moisture condition are confirmed sound and repaired. It cannot restore displaced flashing or correct concealed water damage.
Read the exact guide
Official sources
- Hardie Trim-Over Method for Faster Siding InstallationJames Hardie · Professional installation context only; this article does not reproduce the installation procedure or recommend DIY alteration.
- Hardie Weather Barrier ProductsJames Hardie · Manufacturer context for moisture-management layers; it does not diagnose a cracked flashing detail in a particular wall.
- Re-side Process: Make Over Your Home ExteriorJames Hardie · Manufacturer project-planning context; it is not a homeowner instruction to remove siding or perform installation work.
Community feedback
Share a repair observation
Share a plain-text repair observation. Accepted observations are published automatically; this page may take a moment to update.