
On this page
Start here
Quick answer
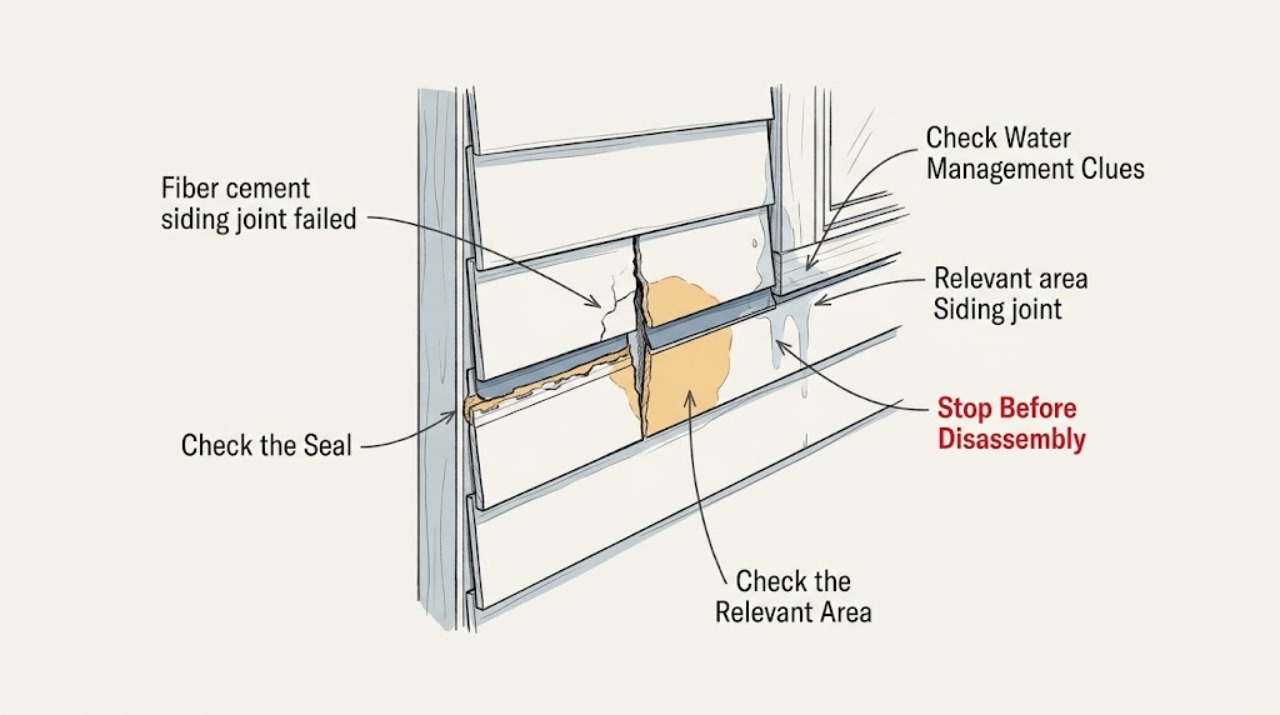
Do not assume a failed fiber-cement siding joint should simply be filled with caulk. First identify what kind of joint it is—such as a lap-siding butt joint, a trim or opening transition, or a panel/control joint—and inspect it from a safe ground-level position. Look for an open or displaced board, damaged coating, staining, soft trim, or signs that water is getting behind the cladding. Manufacturer details differ: for example, James Hardie describes flashing behind lap-siding butt joints as a water-management option, while sealant may apply at particular edges or penetrations. If the joint is high, the board is cracked or loose, the wall shows moisture damage, or the product instructions are unavailable, stop and have a siding professional assess the flashing, weather-resistive barrier, and repair method.
Before you begin
Safety first
- Do not climb, cut, sand, drill, remove siding, or generate fiber-cement dust as a homeowner diagnostic step.
Work through in order
Diagnostic checks
Use only checks that match the exact appliance or system and its official guide.
-
Check 1
From the ground, photograph and identify where the failure occurs: between two lap boards, at a corner or trim edge, around a window or door, or along a panel/control joint. Do not climb, remove siding, or cut fiber cement to investigate.
Expected result: The separation is a simple board-to-board butt joint; it is at trim, a corner, or an opening; it is a panel/control joint; or the exact joint type is not clear.
Next step: Use the identified product's installation and maintenance guidance for that joint type. If the joint cannot be classified from a safe position, arrange a professional inspection instead of guessing.
Stop if: Stop the inspection if access would require a ladder, roof travel, siding removal, or cutting.
Why this matters
Why: Different joint locations can use different flashing, trim, sealant, and movement details. A generic caulk repair can hide a missing water-management detail or seal a location that is intended to drain.
-
Check 2
Inspect the visible joint and nearby boards for an open gap, displaced ends, cracked or missing sealant, chipped coating, board swelling, fastener movement, or a dark line that appears after rain. Keep the inspection visual and ground-level.
Expected result: Only the surface sealant or finish looks worn; the board ends have moved or cracked; the siding is loose or damaged; or the area looks dry with no visible displacement.
Next step: Record the condition and whether it changes after wet weather. Keep the area protected from further disturbance and have a professional determine whether the joint needs re-seating, flashing work, board replacement, or a product-specific sealant.
Stop if: Stop and escalate if the board is loose, broken, visibly swollen, or likely to fall, or if moisture is entering the wall.
Why this matters
Why: A cosmetic sealant or finish issue is different from a displaced board or damaged cladding. Movement, cracking, looseness, or repeated wetting can indicate a joint, fastening, flashing, or substrate problem that caulk alone may not correct.
-
Check 3
Look from the ground for water-management clues around the failed joint, including staining below the joint, recurring dampness after rain, damaged trim, missing-looking flashing at an opening, or interior marks on the corresponding wall. Do not open the wall or pull the siding apart.
Expected result: There is no visible moisture pattern; staining recurs below the joint; moisture appears at a window, door, corner, or roof transition; or interior staining or soft material is present.
Next step: Photograph the pattern, note when it appears, and give those observations to a siding or exterior-envelope professional. Do not seal over a suspected drainage path before the water-management detail is understood.
Stop if: Stop DIY work and arrange professional assessment when water reaches the wall assembly, interior damage is present, or the source cannot be isolated visually.
Why this matters
Why: A recurring pattern below the joint or at a transition may point to drainage or flashing rather than a surface-only sealant failure. Interior staining or soft material raises the possibility of concealed damage and needs a broader inspection.
-
Check 4
Find the product name, profile, finish type, and regional installation guide from the original project records or a clearly identified manufacturer source; compare the failed joint location with that guidance before selecting caulk, flashing, touch-up coating, or replacement material.
Expected result: The product and joint detail are identified with current manufacturer guidance; only the product family is known; or neither the product nor detail can be confirmed.
Next step: Use only the matched instructions for a planned repair, or provide the professional with the product evidence and photos so they can choose a compatible, code-aware repair. Treat any exact gap, overlap, fastener, or sealant requirement as product- and region-specific.
Stop if: Stop material selection if the product, joint type, or water-management detail cannot be confirmed.
Why this matters
Why: Fiber-cement systems are not interchangeable. James Hardie's lap-siding guidance discusses durable flashing behind butt joints and separately discusses caulk and finish maintenance, but that does not establish a universal rule for every brand, profile, or joint. Unknown details should not be filled with a generic sealant by assumption.
Helpful context
Understand the symptom
Why a failed joint needs classification first
A visible opening can be caused by movement, impact, poor fit, failed finish, missing joint flashing, damaged trim, or water-management work behind the siding. The same-looking line can be intentional at one transition and defective at another. Treat the first inspection as documentation: capture the joint location, surrounding pattern, and response after rain without disturbing the cladding.
Caulk is conditional, not a universal fix
A manufacturer may specify sealant at some trim, opening, or edge conditions and a flashing or drainage detail at others. Do not bridge a gap simply because it is visible, and do not claim that every butt joint should be caulked or left uncaulked. The identified siding profile, the current installation guide, local requirements, and the condition behind the joint control the repair choice.
When to call a professional
Use a siding or exterior-envelope professional when the joint is above safe ground-level reach, a board is loose or cracked, water is reaching the wall, interior staining is present, the joint is at a window/door/roof transition, or the original product details cannot be confirmed. Do not cut, sand, drill, or remove fiber-cement siding as an experiment: dust controls and access planning are professional work.
Only after diagnosis
Potential parts
- exterior-caulk
Only where the identified siding and joint detail permits a compatible exterior sealant and the underlying water-management condition is sound.
Do not select by color or generic label alone; confirm manufacturer, finish, joint location, and local requirements. - siding-touchup-paint
For a small exposed finish or edge repair after the joint and water-management condition are corrected and the product finish is identified.
A finish coating cannot correct a displaced board, missing flashing, active leak, or concealed wall damage.
When checks do not resolve it
Need a professional?
The failed joint is above safe ground-level reach or would require ladder or roof access., The siding is cracked, loose, displaced, swollen, or at risk of falling., Water staining, recurring dampness, interior damage, or soft wall material is present., The joint is at a window, door, corner, roofline, or other transition, or the product detail is unknown.
Safety scope: Do not climb, cut, sand, drill, remove siding, or generate fiber-cement dust as a homeowner diagnostic step.
Have this ready
- Photos taken from a safe ground-level position
- Siding profile, product or brand information, finish type, and installation age if known
- The joint location and whether the appearance changes after rain
- Any interior staining or nearby trim, window, door, roof, or gutter observations
Common questions
FAQ
Should I caulk a failed fiber-cement siding joint?
Not automatically. Identify whether the line is a lap-siding butt joint, a trim or opening transition, or a panel/control joint, then match the product's current installation guidance. A visible joint may need flashing, fit, fastening, or substrate work rather than surface sealant.
What does staining below a siding joint mean?
Recurring staining after rain suggests that water may be moving through or around the joint or a nearby transition. Photograph the pattern and have a professional assess the flashing, drainage, cladding, and wall assembly instead of sealing over the visible line.
Can I cut out the failed section myself?
Do not cut, sand, drill, or remove fiber-cement siding as a diagnostic experiment. Cutting can create respirable dust and the joint may be connected to flashing or weather-barrier details that are not visible from the face. Use a qualified professional for access and material work.
What should I give a siding professional?
Provide safe ground-level photos, the siding profile and product details if known, the exact joint location, what changes after rain, and any staining or soft material inside. Ask the professional to explain whether the repair is sealant, flashing, board, fastening, trim, or wall-assembly work.
Read the exact guide
Official sources
- Silica, Crystalline - ConstructionOccupational Safety and Health Administration · Government safety guidance used to set a no-cutting/no-dust boundary for homeowner observation; it is not a siding installation method.
- Frequently Asked QuestionsJames Hardie · Manufacturer FAQ for James Hardie products, used for conditional finish and repair context.
- Tips for installing James Hardie Lap SidingJames Hardie · Manufacturer guidance for the identified James Hardie Plank lap-siding system; not a universal rule for every fiber-cement product or joint.
Community feedback
Share a repair observation
Share a plain-text repair observation. Accepted observations are published automatically; this page may take a moment to update.