
On this page
Start here
Quick answer
Do not refill or use the walk-in tub to prove a suspected seal leak. With the tub empty and dry, inspect the seal for cuts, flattening, gaps, hardening, or separation, then check whether the door sits evenly and fully against the frame without forcing the handle. Look for a dry or dried leak trail below the door and around the threshold, while keeping clear of standing water. A visibly worn seal, uneven seating, damaged frame, or any active leak needs a qualified walk-in-tub technician; do not disassemble the door, alter the latch, perform plumbing work, or apply caulk to the moving seal.
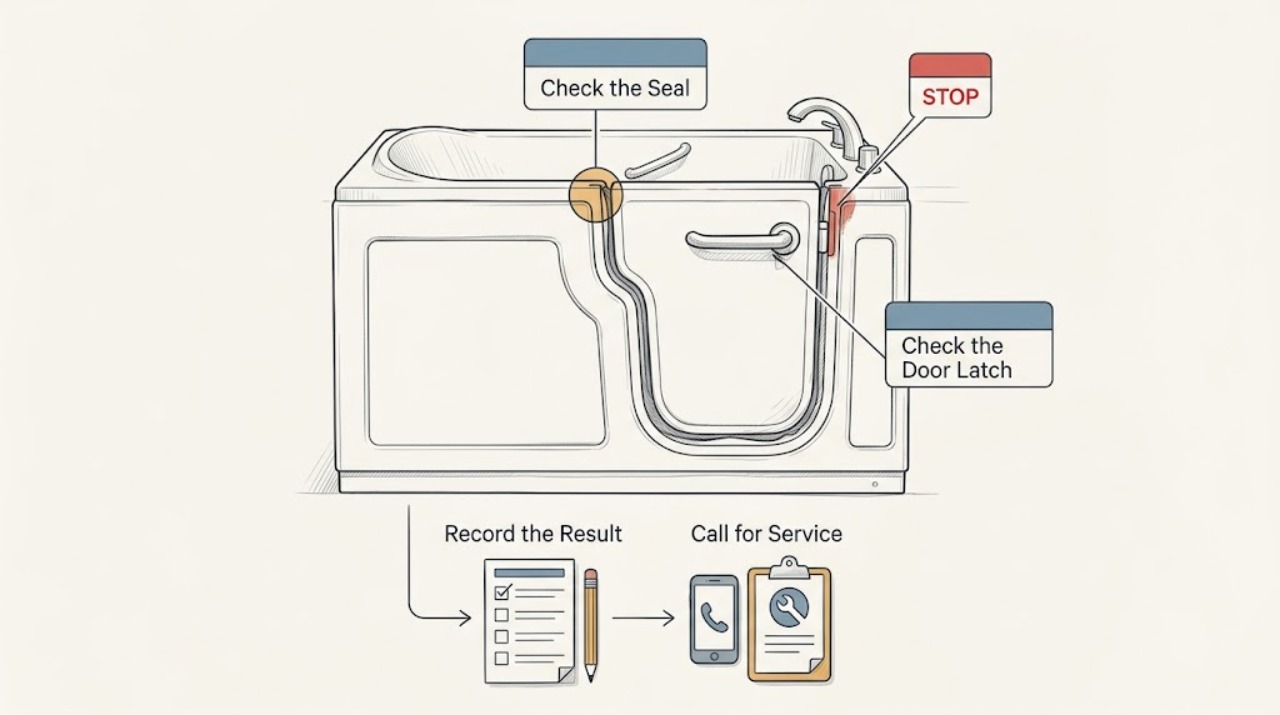
Work through in order
Diagnostic checks
Use only checks that match the exact appliance or system and its official guide.
-
Check 1
With the tub empty, dry, and not in use, use a flashlight to inspect the entire visible door seal and the frame from a comfortable standing position. Look without pulling the seal out of its channel or inserting tools.
Expected result: A continuous, flexible seal with no visible gaps is different from one that is cut, flattened, hardened, cracked, detached, swollen, or missing a section. Dirt or dried residue may be visible on the sealing surface without proving that the seal itself has failed.
Next step: Photograph the seal in place, including both ends and the door label or model information if it is safely visible, then check how the closed door sits.
Stop if: Stop if the seal is torn, loose enough to catch on the door, sharp, or visibly displaced, and do not operate the tub until a qualified technician assesses it.
Why this matters
Why: A clear change in the seal profile supports a seal-replacement assessment; a clean-looking seal means the door seating, frame, or the location of the leak trace still needs to be checked. Do not assume a generic seal will fit.
-
Check 2
Close the empty door only through its normal motion and observe the top, bottom, hinge side, and latch side from the front and side. Do not force the handle, change latch settings, or remove any door hardware.
Expected result: An even contact line and a door that sits square suggest the seal is being presented to the frame normally. A visible gap, tilted door, contact on only one corner, unusual handle resistance, or a door that springs back suggests a seating, frame, latch, or seal-shape problem.
Next step: Record which edge fails to meet the frame and whether the problem began after an impact or recent service. Continue to the leak-trace check without filling the tub.
Stop if: Stop if the door will not close, the latch will not engage normally, the handle binds, or the door shifts in its frame; do not use the tub or attempt latch adjustment.
Why this matters
Why: If the door does not seat evenly, replacing the seal alone may not address the leak. An uneven door should be evaluated by a technician because adjustment methods and safety interlocks differ across walk-in-tub designs.
-
Check 3
Inspect the floor, threshold, and cabinet or wall surfaces immediately below and beside the door for a dried water line, fresh dampness, discoloration, mineral residue, or a musty smell. Use a dry paper towel only on accessible floor surfaces; do not reach into standing water.
Expected result: A trace that starts at the lower door edge or follows the threshold is relevant to door sealing, while moisture that begins at a supply, drain, wall, or tub-side fitting may be a separate plumbing or installation leak. No visible trace does not prove the seal is safe.
Next step: Photograph the trace with the door closed and note when it was found, whether the tub had recently been cleaned, and whether the floor was already wet. Keep the tub out of service until the source is identified.
Stop if: Stop immediately for active dripping, standing water, soft flooring, water near electrical equipment, sewage or contaminated water, or a strong persistent musty odor.
Why this matters
Why: The leak path determines who should assess the problem. Door-edge evidence supports a walk-in-tub door/seal inspection; moisture from a fitting or wall requires a qualified plumbing or water-damage assessment before the tub is used.
-
Check 4
Read the model or manufacturer label from a safe, accessible location and compare the visible door mechanism with the matching owner guide or service contact. Do not use another model's seal profile, latch procedure, or test sequence as a substitute.
Expected result: A documented model and intact label give a technician a way to identify the correct seal and door system. An unknown model, missing label, or mechanism that does not match the guide means fit and safe operation cannot be inferred from appearance.
Next step: Give the technician the model information, seal photos, seating observations, and leak-trace location; mention any recent impact, cleaning, or service.
Stop if: Stop if identifying the label requires lifting panels, reaching behind plumbing, removing covers, or otherwise disassembling the tub.
Why this matters
Why: Use model information to request a professional seal assessment and compatible part confirmation. Do not order a seal solely because its shape looks similar, and do not apply silicone caulk to the moving door seal.
Use your observations
Decision map
Find the observation that best matches what you see, then follow the next safe action.
-
PATH 01Next step
What you see
The seal is visibly cut, flattened, hardened, detached, or missing material.
Do this next
Keep the tub empty and request a qualified walk-in-tub technician to identify and replace the correct seal. Provide close photos and model information; do not stretch, glue, or caulk the moving seal.
-
PATH 02Next step
What you see
The closed door sits unevenly, the handle or latch behaves differently, or the seal contacts only one part of the frame.
Do this next
Stop use and arrange professional door/frame/latch evaluation. Do not adjust the latch, remove the door, or test by adding water.
-
PATH 03Next step
What you see
Moisture is traced to a fitting, wall, floor, or active plumbing leak rather than the door edge.
Do this next
Keep the tub out of service and contact a qualified plumbing or water-damage professional as appropriate; have the door seal checked after the water source is controlled.
Helpful context
Understand the symptom
Separate seal wear from door seating
A leak at a walk-in tub door can come from a seal that has lost its shape, debris or damage at the sealing surface, a door that is not sitting evenly, or a frame or latch problem. The correct replacement profile is not universal, so the first useful evidence is the seal's condition, the door's closed position, and where water was seen outside the tub. Keep the tub empty during this inspection; a walk-in door is part of a water-retaining safety system, not a normal shower curtain.
Use manufacturer guidance only for the matching model
Manufacturer pages show that walk-in bath doors may rely on a handle or an inflatable seal system, and the service procedure differs by model. For example, KOHLER describes its walk-in bath handle as completing a watertight seal, while a separate KOHLER rising-wall-bath guide describes seals that inflate and deflate during an authorized operating sequence. Those details are useful for recognizing the mechanism, not permission to adjust or disassemble an unknown door.
Only after diagnosis
Potential parts
- tub-door-seal
Consider this category only after the seal is visibly worn or a qualified technician confirms the leak is at the door seal and identifies the correct profile.
Confirm the tub manufacturer, model, seal cross-section, door orientation, and installation method before ordering; similar-looking seals are not proof of fit. - silicone-caulk
This category is relevant only for a qualified professional's repair of a stationary, non-moving trim joint after the leak source is identified; it is not a remedy for a worn moving door seal.
Do not apply caulk to the door's moving seal, latch contact, or sealing channel. Confirm the exact stationary joint and manufacturer-approved material before any use.
When checks do not resolve it
Need a professional?
Call a qualified walk-in-tub technician when the seal is worn, the door does not seat evenly, the latch or handle behaves abnormally, the frame is damaged, or any leak trace appears below the door. Call a qualified plumber or water-damage professional first when moisture comes from a fitting, wall, floor, active leak, or contaminated water.
Have this ready
- Provide the tub manufacturer and model if safely visible, close photos of the seal and door contact line, the edge where the door sits unevenly, the leak-trace location, and when the problem was noticed. State that the tub has remained empty and that you did not disassemble the door or alter the latch.
Common questions
FAQ
Can I fill the walk-in tub to see whether the worn seal leaks?
No. Keep it empty until the door and seal are assessed by a qualified technician. A visible tear, uneven seating, abnormal latch behavior, or a leak trace is enough reason to avoid a water test.
Can I put silicone caulk over a worn walk-in-tub door seal?
No. The door seal moves and must meet the frame in the way the tub was designed. Caulk can hide the failure or interfere with the seal. A professional may specify an approved material only for a stationary trim joint after identifying the actual leak source.
Is every walk-in-tub door seal interchangeable?
No. Door systems can use different seal shapes and mechanisms, including model-specific designs. Use the manufacturer and model information, photos, and a professional fit assessment rather than ordering by appearance alone.
Read the exact guide
Official sources
- Elevance Rising Wall Bath - Proper OperationKOHLER Assist · This model-specific guide describes an inflatable door-seal system and its authorized fill/drain sequence; it is used here to show why mechanisms differ and why an unknown tub should not be tested or adjusted from generic instructions.
- Reveal by KOHLER FAQs: KOHLER Walk-In BathKOHLER · The walk-in bath section explains that the handle completes the watertight seal and directs owners with problems to authorized support; mechanism-specific details are not universal.
- KOHLER Walk-In Bath WarrantyKOHLER · The page lists the bath door seal as a covered component for the specified KOHLER Belay walk-in bath warranty; it is evidence that a seal is a model-specific component, not a universal fit claim.
Community feedback
Share a repair observation
Share a plain-text repair observation. Accepted observations are published automatically; this page may take a moment to update.