
On this page
Start here
Quick answer
A walk-in tub door that will not latch or does not seal should stay out of use until the cause is identified. With the tub empty and the floor dry, observe whether the latch stops before its normal position, whether the door gap is uneven, and whether the gasket is dirty, displaced, torn, or permanently deformed. A door that latches but still leaks points toward gasket contact, alignment, leveling, or another water path; a latch that will not engage can involve an obstruction, handle or latch adjustment, door position, frame movement, or a model-specific fault. Do not force the handle, open the door with water inside, loosen hinges or leveling legs, remove panels, or test a filled tub. Photograph the condition and have the manufacturer or a qualified walk-in-tub professional verify the repair.
Before you begin
Safety first
- The professional identifies whether the fault is in the latch, door alignment, frame or level, gasket contact, or another water path, then verifies any model-specific repair or replacement safely.
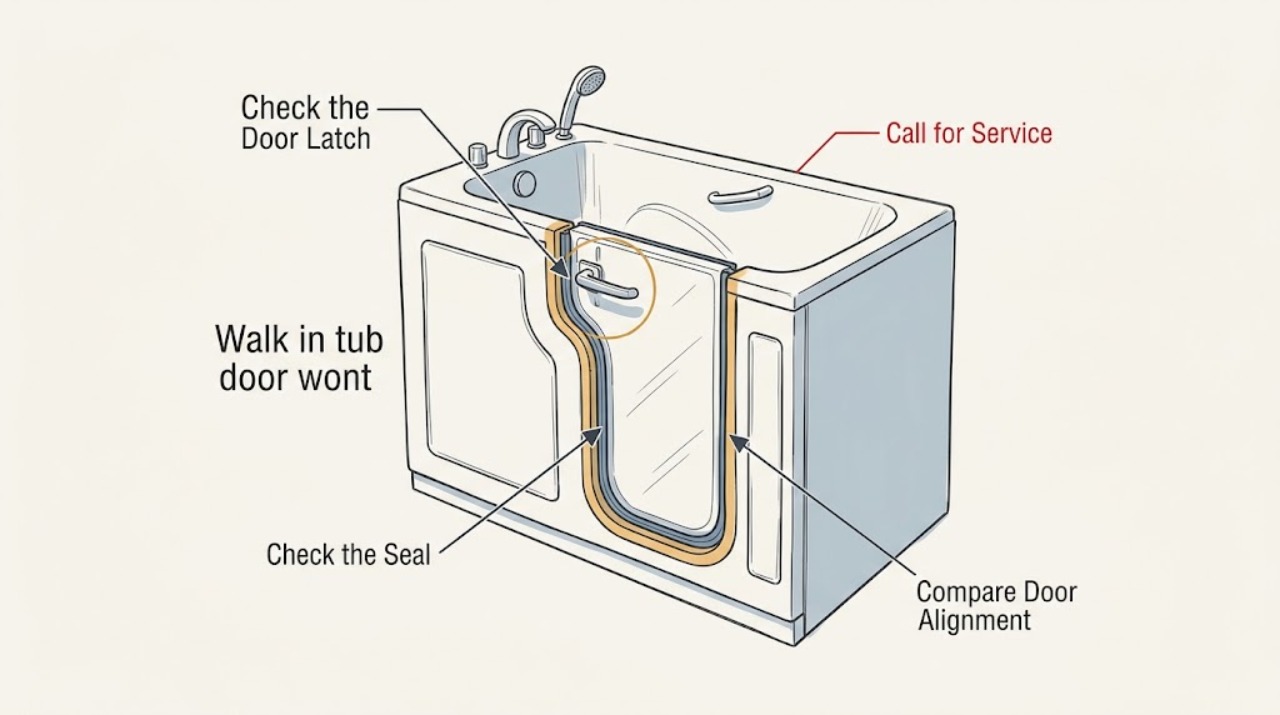
Work through in order
Diagnostic checks
Use only checks that match the exact appliance or system and its official guide.
-
Check 1
With the tub empty, the floor dry, and a stable handhold available, close the door only through its normal motion and observe the handle or latch travel. Do not force the handle, lean on the door, or stand in a wet tub.
Expected result: Record whether the latch reaches its normal locked position, stops early, springs back, feels unusually tight or loose, or closes while leaving one part of the door visibly proud.
Next step: Photograph the latch position and the door gap with the tub empty, then continue only with the safe visual checks below; do not repeat the motion if it binds or requires force.
Stop if: Stop if the handle binds, the door shifts unexpectedly, the frame moves, the floor is slippery, or the latch cannot be observed without unsafe access.
Why this matters
Why: A latch that stops early or does not engage makes an obstruction, latch mechanism, door position, or frame-alignment issue more likely than a worn gasket alone. A latch that engages normally but leaves an uneven gap keeps seal contact, alignment, or leveling in question.
-
Check 2
Visually inspect the full gasket and the mating jamb from the accessible side, with the door open and the tub empty. Look without pulling out the gasket, scraping it, applying lubricant, or using a sharp tool.
Expected result: Look for soap or mineral buildup, trapped debris, a folded or displaced section, a tear, a missing section, hardened material, permanent flattening, or a section that does not meet the jamb evenly. Note if the gasket and jamb appear clean and continuous.
Next step: Take close photographs and check the exact manufacturer instructions before any cleaning. If the manual permits a soft-cloth cleaning step, use only that documented method; otherwise leave the gasket undisturbed and request service.
Stop if: Stop if inspection requires removing the gasket, opening a cover, using chemicals, kneeling on a wet surface, or reaching into an inaccessible space.
Why this matters
Why: Debris or a small contact interruption can prevent sealing without proving that the gasket needs replacement. A torn, missing, permanently deformed, or displaced gasket makes a model-specific seal repair more likely. A clean, intact gasket shifts attention toward latch pressure, door alignment, frame movement, or tub level.
-
Check 3
From a safe standing position, compare the door-to-frame gap around the latch side, hinge side, top, and bottom while the empty door is in its normal closed position. Do not loosen hinges, alter the latch, or move the tub.
Expected result: Record whether the gap is even, whether one corner contacts before another, whether the door rubs, and whether the frame or shell appears twisted or shifted relative to the surrounding wall or floor.
Next step: Send the gap photographs to the installer, manufacturer, or qualified service professional and ask them to verify alignment before recommending a seal or latch part.
Stop if: Stop if checking alignment requires moving the tub, removing trim or panels, lifting the door, or entering a cramped or wet area.
Why this matters
Why: An uneven gap, rubbing edge, or shifted frame can prevent the latch from reaching its designed position and can leave the gasket compressed unevenly. An even gap with a damaged gasket makes seal wear more likely; an even gap with no visible damage does not rule out a hidden latch or frame fault.
-
Check 4
Review accessible installation records and the visible floor or tub surroundings for a recent move, settling, remodeling, water event, or prior door work. Do not adjust leveling legs or use a hidden access area as a homeowner test.
Expected result: Note whether the symptom began after installation or movement, whether the floor or tub appears out of level, whether all visible supports remain in place, and whether the problem is new or gradually worsening.
Next step: Provide the history and photos to a qualified walk-in-tub professional. Ask them to verify the level, frame, door alignment, and latch together rather than changing one item by guesswork.
Stop if: Stop if inspection requires lifting the tub, opening panels, moving flooring, entering a confined space, or handling plumbing or electrical equipment.
Why this matters
Why: A level or support condition can change door alignment and gasket compression, while a recent adjustment or water event can point to installation or frame movement. No visible change does not clear concealed leveling or support conditions.
-
Check 5
If leakage has been reported, observe the first visible water path only from a dry, stable position and record whether it starts at the door perimeter, below the tub, behind an apron, or around a faucet, hand shower, drain, pump, or plumbing connection. Do not fill the tub to reproduce the leak.
Expected result: Record whether the latch was fully engaged when the leak occurred, whether water appears before the door area is wet, and whether water remains after the tub is fully drained. Note any slippery floor or water near electrical components.
Next step: Keep the tub out of use, photograph the first water location, and provide the timing and latch position to service. Never open the door while water remains inside; follow the installed manufacturer's operating instructions.
Stop if: Stop immediately for active flooding, a slippery access path, water near electrical equipment, loss of door control, or any need to enter the tub while the cause is unresolved.
Why this matters
Why: Water beginning at the door perimeter with an incomplete latch or uneven seal supports a door closure or gasket assessment. Water beginning below or behind the tub makes another plumbing or installation path more likely. A safety hazard changes the priority from diagnosis to stopping use and getting qualified help.
Use your observations
Decision map
Find the observation that best matches what you see, then follow the next safe action.
-
PATH 01Safety boundary
What you see
The empty door does not reach its normal latch position, the handle binds or springs back, and the gasket is not visibly torn or missing.
Do this next
Keep the tub out of use and request a manufacturer or qualified professional inspection of the latch, door, frame, and gasket together. Do not force the handle or attempt a model-specific adjustment from memory.
Why this path and its safety boundary
Why it matters: An obstruction, latch mechanism, door position, or alignment issue is more likely than a worn seal alone. The visible symptom does not identify which concealed part needs work.
Safety stop: Do not loosen latch or hinge hardware, drill, pry, or bypass the door's closure mechanism.
-
PATH 02Safety boundary
What you see
The latch reaches its normal position, but the door gap is uneven or the gasket has a tear, missing section, permanent deformation, displacement, or a repeatable leak at one contact area.
Do this next
Stop bathing and arrange model-specific service. Provide close gasket photos, the door style, model information, and the exact leak location; do not glue, stretch, trim, or substitute a generic gasket.
Why this path and its safety boundary
Why it matters: Gasket wear or uneven seal compression is more likely, but alignment or frame movement can cause the same pattern and must be excluded before ordering a seal.
Safety stop: Do not fill the tub or rely on one successful latch cycle as proof that a damaged seal is safe.
-
PATH 03Safety boundary
What you see
The latch and gasket look intact, but one corner rubs, the gap changes around the perimeter, the frame appears shifted, or the symptom began after installation, movement, or a water event.
Do this next
Request a qualified walk-in-tub assessment of the floor, supports, frame, door, and latch. Keep the tub out of use until the door can close and seal as designed.
Why this path and its safety boundary
Why it matters: Door alignment, tub level, frame support, or installation conditions are more likely than simple seal wear. Changing the latch alone could conceal the underlying cause.
Safety stop: Do not adjust leveling legs, move the tub, remove trim, or alter the surrounding wall or floor.
-
PATH 04Safety boundary
What you see
Water begins below or behind the tub, around another fitting, or on an electrical component, or the floor is actively flooding, slippery, or unsafe for the bather.
Do this next
Stop use, keep people clear, and request prompt qualified plumbing or walk-in-tub service. Escalate immediately for water near live electrical equipment, uncontrolled movement, or an imminent fall or flooding hazard.
Why this path and its safety boundary
Why it matters: The reported latch symptom may not be the source of the water, and continued use could create property, electrical, or fall risk.
Safety stop: Do not open panels, touch wet electrical equipment, test with a hose, or continue bathing to reproduce the problem.
Helpful context
Understand the symptom
Latch and seal are related but not interchangeable diagnoses. A handle can feel closed while one edge of the gasket is not contacting the jamb, and a healthy gasket cannot seal if the door or frame is out of alignment. A leak can also come from the faucet, hand shower, drain, pump connection, or plumbing beneath the tub. The first decision is therefore whether the latch fails mechanically, the door closes but leaves an uneven seal, or the water starts somewhere other than the door.
Keep the checks observational and model-neutral. Some manufacturers instruct owners to keep the door open or unsealed between baths to reduce continuous gasket compression, but follow the installed tub's manual rather than applying another brand's adjustment or care procedure.
Safety boundary
Stop conditions
- Do not open the walk-in tub door while water remains inside; drain completely according to the installed manufacturer's instructions.
- Stop for active flooding, a slippery floor, water near electrical equipment, an unstable door or frame, loss of latch control, or unsafe entry or exit.
- Do not force the handle, adjust hinges or latch hardware, change leveling legs, move the tub, remove panels, pull out the gasket, or apply adhesive as an ordinary-user check.
- Do not order or install a generic latch or gasket until the exact model, door style, leak path, and compatible repair method are confirmed.
Only after diagnosis
Potential parts
- walk-in tub door latch assembly
Consider only if a qualified diagnosis confirms that the latch or closure mechanism is not reaching its designed position and identifies the correct model-specific assembly.
Latch geometry, handle travel, door swing, and adjustment differ by tub; physical resemblance is not proof of fit or safe operation. - walk-in tub door gasket or seal
Consider only after the leak is confirmed at the door contact area and the professional verifies that the gasket is torn, missing, displaced, or permanently deformed.
Seal profile, material, compression, and installation method must match the exact door and tub; do not use a generic replacement or adhesive by appearance alone.
When checks do not resolve it
Need a professional?
Arrange prompt service for a latch that will not engage, a door that does not seal, a torn or displaced gasket, an uneven door gap, frame or tub movement, repeated leakage, or any condition that affects safe entry or exit.
Safety scope: The professional identifies whether the fault is in the latch, door alignment, frame or level, gasket contact, or another water path, then verifies any model-specific repair or replacement safely.
Have this ready
- photos of the latch position, door gap, and full gasket
- the first location where water appears, if there is a leak
- whether the latch stops, binds, springs back, or fully engages
- brand, model, door style, installation context, and prior work if known
- any wet-floor, electrical, mobility, access, or active-flooding concern
Common questions
FAQ
Why will my walk-in tub door not latch?
Possible causes include an obstruction, latch or handle fault, door misalignment, frame or tub movement, an unlevel installation, or a gasket that is displaced and interfering with closure. Observe the empty door's latch travel and gap without forcing it, then have the exact model assessed.
Can a dirty gasket keep a walk-in tub door from sealing?
Yes. Debris or buildup where the gasket meets the jamb can interrupt contact. Follow the installed manufacturer's cleaning instruction if one is available, but do not scrape, pull, lubricate, glue, or trim the gasket as a generic fix.
Can I adjust the latch or hinges myself?
Do not adjust them unless the exact manufacturer procedure, model, and safe access are confirmed. A latch adjustment can hide a frame or level problem, and forcing the door can damage the seal or closure mechanism.
Can I open the walk-in tub door to test it while the tub is full?
No. Follow the installed manufacturer's operation rule and drain the tub completely before opening the door. Do not deliberately fill a tub with a questionable latch or seal to reproduce a leak.
When should I stop using a walk-in tub with a latch problem?
Stop use for an incomplete latch, repeatable leak, uneven or damaged seal, slippery floor, active flooding, water near electrical equipment, shifting door or frame, or any condition that affects safe entry or exit. Request qualified service before bathing again.
Read the exact guide
Official sources
- 1287866-5.inddKOHLER Walk-In Bath · Supports the safety boundary that the door is latched to secure the bath and should only be opened after the bath is completely drained.
- Bathing System Support & FAQsApollo Bath · Supports the caution that leaving a gasket continuously compressed can affect its service life and that model, serial, and part photographs should be verified before ordering a replacement.
- Self Install Walk In BathtubElla's Bubbles · Supports the model-specific relationship between level or frame alignment and door sealing, the requirement for smooth door closure, and maintenance considerations for a door gasket.
Community feedback
Share a repair observation
Share a plain-text repair observation. Accepted observations are published automatically; this page may take a moment to update.