
On this page
Start here
Quick answer
Do not assume every Bosch dishwasher has a separate rear foot that can be reached from behind. Bosch installation instructions for several platforms show the back being leveled through a center screw, while other parts pages list leveling legs that must be matched to the dishwasher's E-Nr. First record the exact model and photograph the damaged area without pulling a built-in dishwasher or opening panels. If the machine rocks, the foot is cracked or missing, the rear cannot be supported, the door or countertop clearance is wrong, or a hose, water, or electrical connection may be disturbed, leave it out of use and arrange qualified Bosch service or an experienced installer. Only make a model-documented adjustment on a stable, completely installed appliance; never substitute a generic foot or use the dishwasher while it is unstable.
Before you begin
Safety first
- Do not operate an unstable or incompletely installed dishwasher, lift or pull a built-in unit without isolating and supporting it, work on energized electrical connections, disconnect water or power by guesswork, or use a spacer or generic foot. Stop immediately for a leak, exposed wiring, water near electricity, a hot connection, or tip-over movement.
Work through in order
Diagnostic checks
Use only checks that match the exact appliance or system and its official guide.
-
Check 1
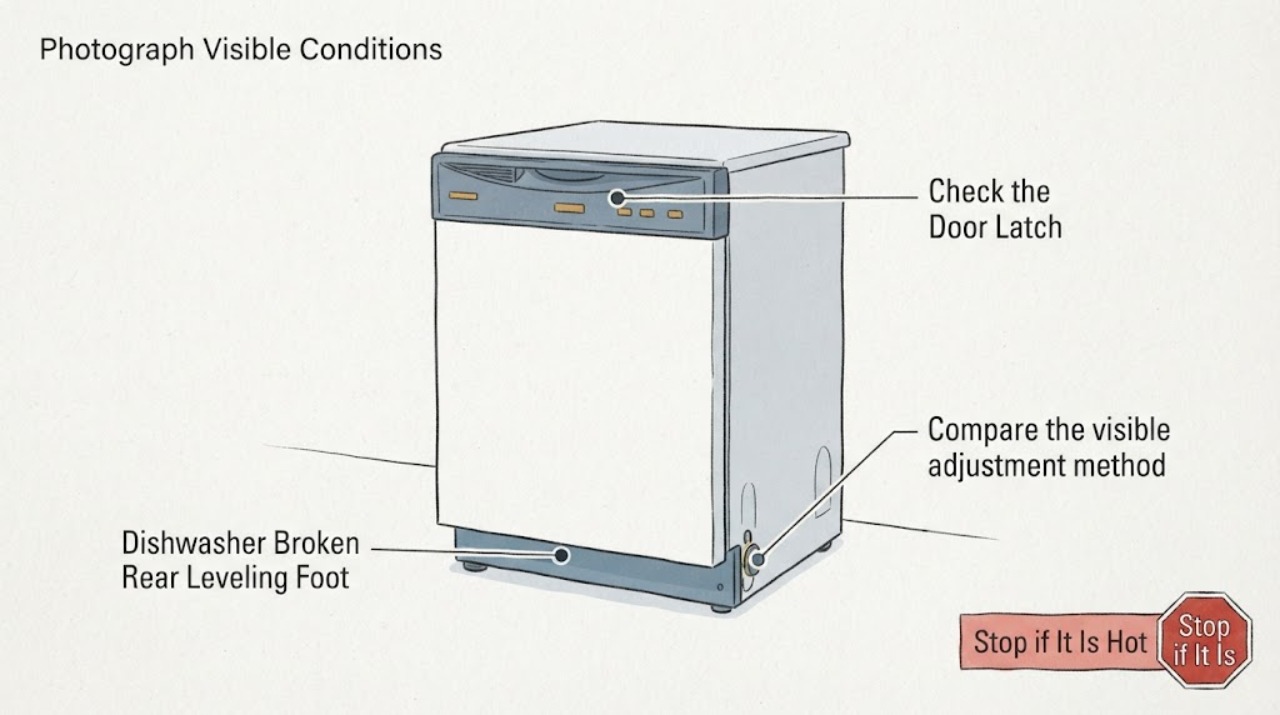
Leave the dishwasher idle and record the complete Bosch E-Nr. from the rating plate or paperwork. From outside the opening, photograph the front, toe-kick area, any visible center adjustment screw, and the damaged foot or fragment; do not pull the appliance out just to inspect its rear.
Expected result: The E-Nr. is readable and the support is visibly cracked, missing, displaced, or merely out of adjustment; or the model and support design cannot be identified.
Next step: Use only the matching Bosch installation and parts information. If the model or damaged assembly is uncertain, keep the unit out of use and request model-specific service rather than borrowing a procedure from another Bosch series.
Stop if: Do not reach behind a built-in unit, remove the toe kick near wet or energized areas, or continue if the cabinet is leaning or unstable.
Why this matters
Why: Bosch uses model-specific installation geometry and its parts finder requires the E-Nr. A visible gap or broken piece does not establish whether the affected item is a rear foot, a center-screw assembly, a locking component, or a mounting part.
-
Check 2
With the appliance fully installed and stable, check the door and cabinet from the front: note whether the door rubs or will not latch normally, whether the top clearance to the counter has changed, whether the tub opening appears out of square, and whether the dishwasher rocks when the door is handled gently. Do not use the dishwasher to test an unstable installation.
Expected result: The dishwasher is level and stable with normal door clearance, or it rocks, leans, has changed clearance, or the door no longer aligns.
Next step: If stable and the exact manual identifies an adjustment, follow only that adjustment. If it rocks, leans, or the door/counter clearance is wrong, leave it off and arrange a qualified installer or Bosch service visit.
Stop if: Stop immediately if the unit shifts, tips, the door drops, the cabinet contacts the counter, or there is water, a leak, exposed wiring, a hot connection, or any electrical odor.
Why this matters
Why: Bosch installation guidance calls for a level dishwasher, centered cabinet fit, and minimum door-to-counter clearance. A stable, correctly aligned unit may need only the model-documented adjustment; rocking or changed alignment indicates that the support or securing installation needs correction before operation.
-
Check 3
Compare the visible adjustment method with the exact Bosch document. Some Bosch guides direct the installer to turn front feet and a center screw to raise or lower the back; another shows pre-leveling feet before placing the unit under the counter and installing a rear locking screw. Do not turn a screw or force a foot unless the matching document identifies it and the appliance is safe and supported.
Expected result: The E-Nr.-matched guide identifies the same center screw or foot and gives an adjustment procedure, or the visible hardware does not match the guide or cannot be turned without force.
Next step: Make only the documented adjustment, then verify level and door clearance. For a mismatched, seized, cracked, or inaccessible support, stop and have a qualified installer or appliance technician assess it; do not improvise a spacer or replacement screw.
Why this matters
Why: A matching adjustment path indicates a leveling correction may be possible without diagnosing a broken internal component. A mismatch or seized/broken adjuster means the model's installation design is not established and force could damage the base, floor, hoses, or cabinet fit.
-
Check 4
If the foot or leg is visibly broken or missing, use the Bosch parts finder with the complete E-Nr. and compare the diagram and description. Check whether the listing identifies a leveling leg/foot for that exact model; do not order from a generic dimension, a search result, or an example Bosch part number.
Expected result: The Bosch parts result confirms a compatible leveling leg or foot for the exact E-Nr., or no compatible result is shown and the support remains damaged.
Next step: If the exact model confirms the part and the model instructions allow owner replacement, follow those instructions with the dishwasher isolated and supported. Otherwise arrange service, especially when the unit must be removed from cabinetry or the rear assembly is involved.
Stop if: Do not run the dishwasher on a missing or improvised foot, lift it alone, disconnect water or power by guesswork, or work under an unsupported appliance.
Why this matters
Why: Bosch's official listings include leveling-leg/foot products but explicitly require appliance compatibility checking. A part number shown for one platform is not proof of fit for another dishwasher.
Use your observations
Decision map
Find the observation that best matches what you see, then follow the next safe action.
-
PATH 01Next step
What you see
The Bosch E-Nr.-matched guide identifies a center rear adjustment screw or accessible leveling method, and the installed dishwasher is stable, dry, secured, and aligned.
Do this next
Follow only the matching guide, make a small documented adjustment, and recheck level and door-to-counter clearance. Stop if the screw binds, the cabinet moves, or the hardware does not match.
Why this path and its safety boundary
Why it matters: The apparent rear-foot problem may be an adjustment issue rather than a broken part; Bosch documents different rear-leveling mechanisms across installation platforms.
-
PATH 02Next step
What you see
The foot or rear support is visibly cracked, missing, stripped, unable to carry the cabinet, or the dishwasher rocks or leans after an adjustment.
Do this next
Keep the dishwasher out of use and arrange Bosch service or a qualified appliance installer. Provide the E-Nr., photos, whether the unit is built-in, and any broken fragments; do not pull or lift the unit without the proper isolation and support procedure.
Why this path and its safety boundary
Why it matters: This is a structural installation fault, not a safe wash-cycle troubleshooting condition. A generic foot, spacer, or improvised support could leave the dishwasher unstable or change its secured fit.
-
PATH 03Next step
What you see
The exact Bosch parts finder identifies a compatible foot or leveling leg, the unit can be safely isolated and supported, and the matching manual explicitly permits the required access.
Do this next
Follow the exact model procedure or have a qualified installer fit the part, then verify level, centering, securing, door clearance, and hose routing before use. Do not substitute an example part from another Bosch model.
Why this path and its safety boundary
Why it matters: A model-confirmed part may address a limited foot-only failure, but the official listing does not by itself authorize cabinet removal or prove that the surrounding base and rear adjuster are intact.
-
PATH 04Next step
What you see
The dishwasher is uninstalled or partly pulled out, the rear is unsupported, the water or electrical connection may be disturbed, or there is a leak, exposed wiring, tip-over movement, or damaged connection.
Do this next
Do not operate or reach under the unit. Isolate power and water only through the safe, model-appropriate procedure, or leave that work to a qualified installer/electrician/appliance technician; keep the dishwasher secured until inspected.
Why this path and its safety boundary
Why it matters: Bosch treats installation, rear support, and electrical work as safety boundaries. The task has moved beyond an ordinary visible adjustment and may involve shock, water, property-damage, or tip-over hazards.
Helpful context
Understand the symptom
The rear adjuster may not look like a rear foot
Bosch installation documents are platform-specific. One Bosch dishwasher guide says the front is leveled with the feet and the back is leveled by turning a center screw; another installation guide shows a rear foot and a locking screw after pre-leveling. Therefore, a broken-looking rear support cannot be identified safely from the brand name or a photograph alone. Find the exact E-Nr. and use the matching installation or repair documentation before moving the unit or ordering a part.
Stability is a safety issue, not just a cosmetic one
Bosch warns not to use an uninstalled dishwasher and to support the rear when opening its door. A broken leveling foot can leave the cabinet unsupported or change door and countertop clearances. If the dishwasher rocks, is no longer secured, or would need to be pulled out to reach the damaged support, stop using it until a qualified installer or service technician can make the appliance stable and verify the connections.
Only after diagnosis
Potential parts
- Bosch dishwasher leveling leg or rear leveling foot
Bosch's official parts catalog lists leveling legs/feet, but the catalog requires the complete E-Nr. to verify compatibility. The same visual symptom can involve a center-screw adjuster, locking screw, base, or installation damage instead of a replaceable foot alone.
Do not use example Bosch parts 00429065 or 10020572 unless the official Bosch compatibility check confirms the exact dishwasher model. Have a qualified installer fit a rear assembly when access requires removal or support of the built-in unit.
When checks do not resolve it
Need a professional?
Call Bosch service or a qualified appliance installer for a cracked/missing leveling foot, a stripped or inaccessible rear adjuster, rocking or lean, wrong door/counter clearance, or any repair that requires cabinet removal. Use a qualified electrician for an electrical connection concern and a qualified plumber for a water-line concern.
Safety scope: Do not operate an unstable or incompletely installed dishwasher, lift or pull a built-in unit without isolating and supporting it, work on energized electrical connections, disconnect water or power by guesswork, or use a spacer or generic foot. Stop immediately for a leak, exposed wiring, water near electricity, a hot connection, or tip-over movement.
Have this ready
- Provide the complete E-Nr. and serial information if available, country, built-in or freestanding status, photos of the foot and toe-kick area, whether the dishwasher rocks or the door alignment changed, which adjustment method the manual shows, and whether any hose, leak, or electrical symptom is present.
Common questions
FAQ
Does every Bosch dishwasher have a replaceable rear leveling foot?
No. Bosch installation documents differ by platform: some show the rear being adjusted through a center screw, while others show a rear foot and locking screw. Confirm the exact E-Nr. and matching installation documentation before identifying the broken piece or ordering a part.
Can I use any Bosch leveling leg if the rear foot is broken?
No. Bosch's official parts listings require checking compatibility by the dishwasher E-Nr. Example part numbers on a Bosch page are not universal fits. Do not operate on an improvised support; have a qualified installer fit a model-confirmed part when access or cabinet removal is involved.
Can I keep using the dishwasher with one broken leveling foot?
Do not use it if the cabinet rocks, leans, is unsecured, the door or counter clearance changed, or the rear is unsupported. Bosch warns against using an uninstalled dishwasher and requires rear support when its door is opened. Leave it off and arrange qualified service or installation help.
Read the exact guide
Official sources
- Installation instructionsBosch Home Appliances · Used to show that Bosch installation designs vary; its dimensions and procedure must not be transferred to an unidentified dishwasher.
- 10020572 FootBosch Home Appliances · Supports that another Bosch foot listing exists and that compatibility is model-dependent; it is not a universal dishwasher part claim.
- Installation instructionsBosch Home Appliances · Used for the platform-specific leveling and safety instructions; it is not a universal procedure for every Bosch dishwasher.
- 00429065 Leveling LegBosch Home Appliances · Supports that Bosch offers a leveling-leg product, but the page requires an E-Nr. compatibility check and is not evidence that this part fits every dishwasher.
- Installation instructionsBosch Home Appliances · Used only to establish platform variation and the need for a rear locking step; it is not a repair procedure for an unknown E-Nr.
- Dishwasher Spare PartsBosch Home Appliances · Directly applicable to the parts-identification boundary; Bosch requires the dishwasher model number before presenting the matching parts diagram.
Community feedback
Share a repair observation
Share a plain-text repair observation. Accepted observations are published automatically; this page may take a moment to update.