
On this page
Start here
Quick answer
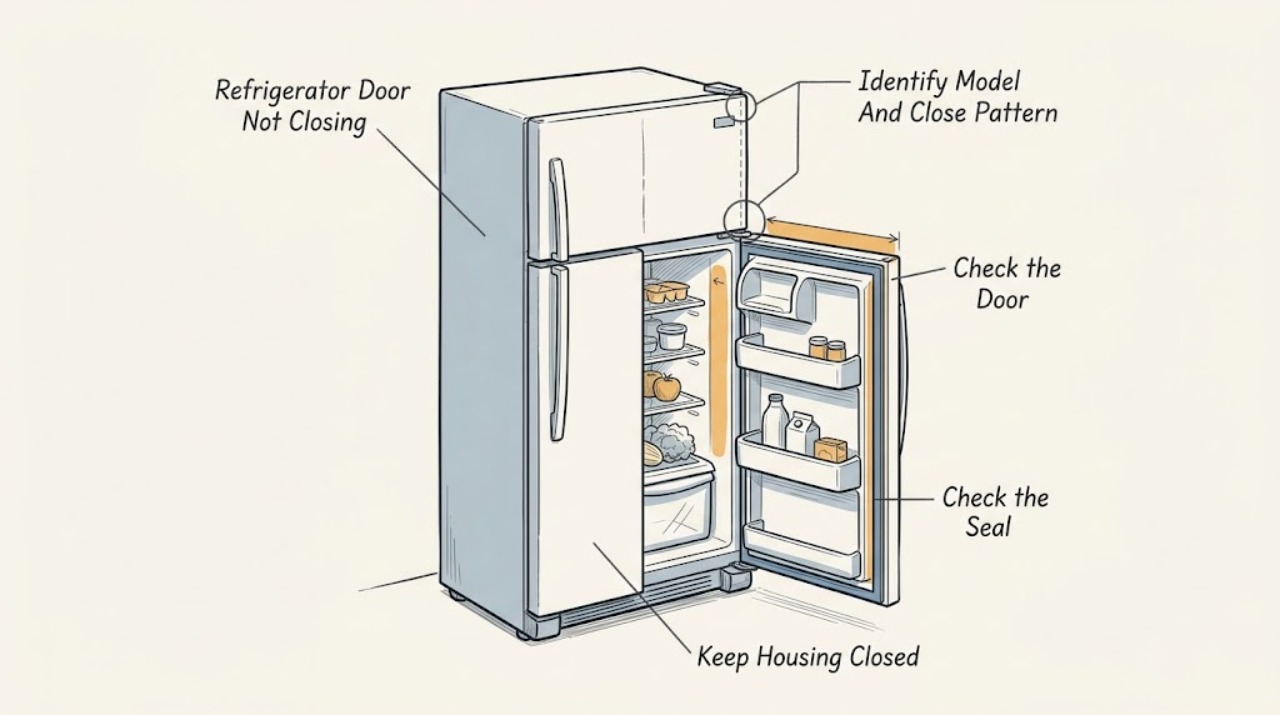
A Crosley refrigerator door that will not close is usually blocked by a bottle, shelf, drawer, package, loose door bin, or a gasket folded out of position. Empty the door shelves enough to see the contact path, slide every interior shelf and drawer fully home, and check that no food or packaging projects past the cabinet front. With the refrigerator stationary, inspect the gasket for twists, gaps, hardened sections, or debris and wipe it with a soft, damp cloth; do not cut, glue, heat, or stretch it. Check that the cabinet stands firmly on all corners and is level as the model manual directs. Crosley guides describe front-to-back leveling and door alignment so the doors can seal, and some top-mount models use adjustable front rollers; use only the adjustment method and tools specified for the exact model. A door that closes only when pushed, rubs at one corner, sits visibly low/high, or springs back after the load and gasket are corrected points toward leveling, alignment, hinge, door-stop, or seal geometry. Do not lift or pull a loaded refrigerator, remove a door, loosen hinge hardware, or move it sideways by yourself: the doors are heavy, some models have wiring or water connections, and Crosley guidance refers door removal/reversal and electrical components to qualified or authorized personnel. If the gasket is damaged, the door is sagging, hinges or pins are loose, the cabinet is unstable, the door still will not seal after safe external checks, or cooling/condensation problems appear, keep the door closed as far as safe and contact Crosley or an authorized appliance technician with the exact model and serial information.
Before you begin
Safety first
- This article covers only safe, unloaded, external checks of the closing path, gasket surface, cabinet stability, and model-documented user leveling. A qualified provider must handle heavy movement, door removal, hinge/pin/stop work, electrical or water connections, structural damage, and model-specific seal or roller replacement.
Work through in order
Diagnostic checks
Use only checks that match the exact appliance or system and its official guide.
-
Check 1
Record the complete Crosley model and observe the closing pattern with the door nearly empty: does it stop against an object, fail to meet the cabinet at one corner, sit visibly high or low, rub the frame, rebound, or close but leave a gasket gap?
Expected result: The door is blocked at a repeatable point, the gap is around the whole perimeter, only one corner stays open, the door sags, or the seal is visibly folded or damaged.
Next step: Use the matching external check below and consult the exact model manual before moving rollers, feet, or hinge-related parts.
Stop if: Do not keep forcing a door that binds, scrapes, drops, or has damaged glass, hinge hardware, cord, or water connections.
Why this matters
Why: A repeatable contact point makes an obstruction more likely. A perimeter gap or one-sided gap makes gasket seating, cabinet level, door alignment, hinge geometry, or a door stop more relevant; the pattern does not by itself select a replacement part.
-
Check 2
Open the refrigerator carefully and inspect the closing path: reseat shelves and drawers, push food fully behind their stops, check door bins for bottles or packages extending beyond the liner, and look for packaging or trim catching the opposite cabinet or mullion. Remove only loose items that can be lifted safely.
Expected result: A shelf, drawer, bin, bottle, package, or loose trim was projecting into the door path, or the path is clear but the door still stops at the same point.
Next step: Close the door gently and check that the gasket contacts the cabinet continuously. If the path is clear but the door binds or remains open, continue without forcing it.
Stop if: Do not bend shelves, remove a drawer by force, pry trim, or use the door as a handle or support while reaching inside.
Why this matters
Why: A corrected obstruction is the most direct explanation and should allow the door to close without force. A clear path with the same stop shifts suspicion toward the gasket, level, alignment, hinge, or door-stop geometry.
-
Check 3
With the door and cabinet surfaces clean and dry, inspect the magnetic gasket around all four sides for twists, folds, trapped food, tears, flattening, or sections pulled out of the channel. Wipe it with a soft damp cloth, let it dry, and press only a loose edge gently back into its existing seat; do not cut, glue, heat, or stretch it.
Expected result: The seal was dirty or folded and now lies flat, one section does not touch the cabinet, the gasket is torn/hardened, or the seal appears sound but the door still will not close.
Next step: Close the door without slamming and check for an even contact path. If a damaged or loose gasket remains, stop short of ordering a generic seal and arrange service using the exact model.
Stop if: Do not use heat guns, adhesives, knives, solvents, or improvised magnets on the gasket, and do not continue if the door cannot stay safely supported.
Why this matters
Why: Debris or a displaced seal can create a localized gap. A torn, deformed, or persistently non-contacting gasket needs model-specific replacement or adjustment; an intact gasket with a displaced door points more toward level or hinge geometry.
-
Check 4
With the doors closed and the refrigerator in its normal position, check whether the cabinet rocks, whether all supported corners sit firmly, and whether the door gap changes when the unit is gently observed from front to back. If the exact manual permits user adjustment, use its stated front roller or leveling-foot method in small increments; do not pull the loaded refrigerator out or tilt it.
Expected result: The cabinet rocks, sits visibly out of level, the door gap changes with cabinet position, or the cabinet is stable and level but the door remains misaligned.
Next step: If the model documents a safe roller/foot adjustment, restore a stable level position and recheck the gasket. If the unit is built-in, heavy, connected to water, or needs lifting, stop and arrange professional help.
Stop if: Do not move sideways, tip, lift, or slide a heavy refrigerator alone; do not remove the anti-tip or hinge hardware to gain adjustment access.
Why this matters
Why: Crosley guidance links firm support and front-to-back leveling with door closing and sealing. A stable level cabinet makes an obstruction, gasket, door alignment, hinge, or stop issue more likely; it does not prove that hinge screws or a seal are serviceable by the owner.
-
Check 5
Compare the door edges, hinge side, handle side, and gasket contact with the cabinet through the full safe swing. Note a dropped corner, rubbing at the top or bottom, a loose hinge cover, unusual hinge noise, a door that will not stay open/closed as before, or damage after a move or impact.
Expected result: Only the door is out of square, a hinge/pin/stop appears loose or bent, the gasket contact remains uneven after external corrections, or the door closes and seals evenly.
Next step: If alignment remains wrong or any hinge/door structure is damaged, keep use to a minimum and contact Crosley or an authorized appliance technician with the model and photos. If the door seals evenly, monitor for frost, condensation, or temperature changes.
Stop if: Do not remove the door, loosen hinge fasteners, disconnect hinge wiring/tubing, or use a pry bar or improvised shim.
Why this matters
Why: A door-specific shift or rubbing pattern makes hinge, pin, door-stop, bearing, or structural alignment more likely than cabinet leveling. These parts can carry the full door load and may contain wiring or water connections on some models, so visual evidence is a service clue rather than a DIY repair authorization.
Use your observations
Decision map
Find the observation that best matches what you see, then follow the next safe action.
-
PATH 01Safety boundary
What you see
The door stops at the same point and a shelf, bin, drawer, package, bottle, or trim piece projects into the closing path.
Do this next
Reseat or remove only the loose obstruction, then close the door gently and verify continuous gasket contact.
Why this path and its safety boundary
Why it matters: An interior obstruction is more likely than a hinge or gasket failure.
Safety stop: Do not force, bend, or pry the interior component if it does not move as the model manual describes.
-
PATH 02Safety boundary
What you see
The closing path is clear but the gasket is folded, dirty, torn, hardened, or leaves a gap along one side or corner.
Do this next
Clean and gently reseat an intact loose edge once. Arrange service for a damaged or persistently non-contacting gasket and do not choose a generic seal by appearance alone.
Why this path and its safety boundary
Why it matters: Seal seating or a model-specific gasket problem is more likely; a gasket gap can allow warm air and condensation even if the latch feels closed.
Safety stop: Do not cut, glue, heat, stretch, or magnetize the gasket.
-
PATH 03Safety boundary
What you see
The door path and gasket are sound, the cabinet rocks or is visibly out of level, and the door gap changes with cabinet position.
Do this next
Use only the documented user-accessible leveling adjustment in small increments. If the refrigerator is heavy, built-in, connected to water, or requires lifting or moving, use a qualified installer or appliance technician.
Why this path and its safety boundary
Why it matters: Positioning, front rollers, feet, or floor support are more likely than a failed door part, subject to the exact model's installation instructions.
Safety stop: Do not slide the refrigerator sideways, tip it, remove anti-tip hardware, or adjust it while unsupported.
-
PATH 04Safety boundary
What you see
The cabinet is stable and level, the path is clear, but the door is dropped, rubs, has a loose/bent hinge or stop, or still cannot seal.
Do this next
Stop forcing the door and contact Crosley or an authorized technician. Provide the exact model, whether the fault followed a move/impact, and photos of the gap and hinges.
Why this path and its safety boundary
Why it matters: Door alignment, hinge pins/bearings, door stop, structural damage, or a model-specific seal interface is more likely; the symptom does not establish a compatible part.
Safety stop: Do not remove the door or loosen, shim, or replace hinge hardware without the exact service procedure and appropriate lifting support.
Helpful context
Understand the symptom
First separate an obstruction from an alignment problem
“The door will not close” can mean that the last inch is blocked by an item, the gasket is not contacting the cabinet, the cabinet is out of level, the door has dropped or shifted, or a hinge/door-stop component is damaged. Crosley sells more than one refrigerator layout, and its manuals state that some models differ from the illustrations. Record the exact model before adjusting rollers or touching hinge hardware.
Make only cool, unloaded, external checks
Keep fingers clear of hinge gaps and do not let a door swing onto a child or another person. Remove or stabilize heavy items before inspecting the seal, but do not lift the appliance or door. Unplug the refrigerator before any cleaning or movement that the model manual permits, and never work around wiring, water tubing, the refrigerant circuit, or hinge hardware without qualified help. Stop if the cabinet rocks, the glass or door is damaged, the cord is damaged, or the gasket cannot keep the door safely supported.
A door that rebounds tells you where to look
If the door stops at the same point every time, look for a projecting bin, shelf, drawer, package, or trim obstruction. If it reaches the frame but a corner remains open, compare the gasket contact around the perimeter and look at the cabinet and door from the front. A gap that changes when the cabinet is leveled suggests positioning; a gap that follows a visibly dropped or rubbing door suggests alignment or hinge geometry. These observations narrow the service request but do not identify a compatible hinge, cam, seal, or fastener.
Safety boundary
Stop conditions
- Stop immediately if the door drops, glass or hinge hardware is damaged, the cabinet rocks, the cord is damaged, or a water connection or refrigerant circuit may have been disturbed.
- Do not lift, tip, slide sideways, or move a heavy refrigerator alone; keep it supported and use qualified help for repositioning or door removal.
- Do not loosen or remove hinges, pins, door stops, anti-tip hardware, wiring, or water tubing as a way to make the door close.
- Do not cut, glue, heat, stretch, or substitute a gasket, or order a hinge/seal/roller from the symptom without the exact model match.
When checks do not resolve it
Need a professional?
Safety scope: This article covers only safe, unloaded, external checks of the closing path, gasket surface, cabinet stability, and model-documented user leveling. A qualified provider must handle heavy movement, door removal, hinge/pin/stop work, electrical or water connections, structural damage, and model-specific seal or roller replacement.
Common questions
FAQ
Why will my Crosley refrigerator door not close all the way?
Clear the door path first: reseat shelves and drawers, push food back, and remove anything projecting from a door bin. Then inspect and clean the gasket and check that the cabinet is stable and level. If one corner remains open or the door sags or rubs, a model-specific alignment or hinge issue is more likely and needs service.
How do I check the Crosley refrigerator door seal?
Inspect the gasket around the full perimeter for folds, debris, tears, flattening, or a section pulled out of its seat. Wipe it with a soft damp cloth and gently reseat only a loose edge. Do not heat, glue, cut, stretch, or substitute the seal; a damaged or persistent gap requires an exact-model service diagnosis.
Can an unlevel Crosley refrigerator cause the door not to close?
Yes. Crosley installation guidance links firm, level cabinet positioning and aligned doors with proper closing and sealing. If your exact model documents adjustable rollers or feet, make only that external adjustment in small increments. Do not lift, tip, or slide a heavy refrigerator alone.
Should I tighten or remove the Crosley refrigerator door hinges?
Do not remove the door or loosen hinge hardware based only on a gap. Crosley manuals show model-specific door-removal procedures and warn about heavy doors, electrical components, and qualified handling. Contact Crosley or an appliance technician if the door is dropped, rubbing, damaged, or still misaligned after external checks.
Does a Crosley refrigerator door need to seal if it still feels closed?
Yes. A door can appear closed while a folded gasket, cabinet misalignment, or a corner obstruction leaves a leak path. Check continuous gasket contact around the frame and watch for frost, condensation, temperature rise, or a door alarm. Persistent gaps should be serviced rather than held shut with an improvised object.
Read the exact guide
Official sources
- CRS185UD/B/W - Crosley Home ProductsCrosley Home Products · Official Crosley product page for the CRSN185 family; it confirms the model-specific manual link and configuration, not a universal procedure for all Crosley refrigerators.
- Customer Service - Crosley Home ProductsCrosley Home Products · Official Crosley customer-service page; service contacts vary by product, so the exact Use & Care Guide or dealer remains the applicable route.
- Crosley-hosted Refrigerator User and Care Guide: Cabinet Leveling and Door AlignmentCrosley Home Products · Official Crosley-hosted generic/Conservator-family guide; use only its general leveling and seal-contact principles when they match the appliance. It is not evidence for a particular Crosley model's hinge, gasket, roller, or door-removal procedure.
- CRSN185UD/B/W Crosley User's Operation ManualCrosley Home Products · Official Crosley-hosted manual for the CRSN185 side-by-side model family; its controls, dimensions, hinge construction, and adjustment details must not be assumed for other Crosley refrigerator families.
Community feedback
Share a repair observation
Share a plain-text repair observation. Accepted observations are published automatically; this page may take a moment to update.