
On this page
Start here
Quick answer
Do not pull or pry a locked Crosley washer door. A front-load door can remain locked while a cycle is running, while water is in the drum, while the load is still hot or moving, or briefly while the control completes a drain or unlock sequence. Press Pause or Power/Cancel only as the model manual directs, wait for the drum to stop and the lock indicator to clear, and check whether water remains visible. If water is in the drum, use only the model-specific drain procedure; do not force the door or open a filter with the machine energized. Crosley manuals say a door may take up to 30 seconds to unlock after pausing under some conditions and identify a door-not-locking code as a reason to check full closure and items blocking the latch. If the door remains locked after a completed safe drain, the latch is damaged, the washer leaks, the control shows an error, or there is a smell, spark, hot plug, or other electrical warning, keep the machine out of service and arrange qualified appliance service.
Before you begin
Safety first
- A homeowner may wait for a normal unlock and inspect loose, visible obstructions only when the washer is safe. Emergency release, pump access, lock or control wiring, panel removal, and live electrical diagnosis require the exact manual and qualified service.
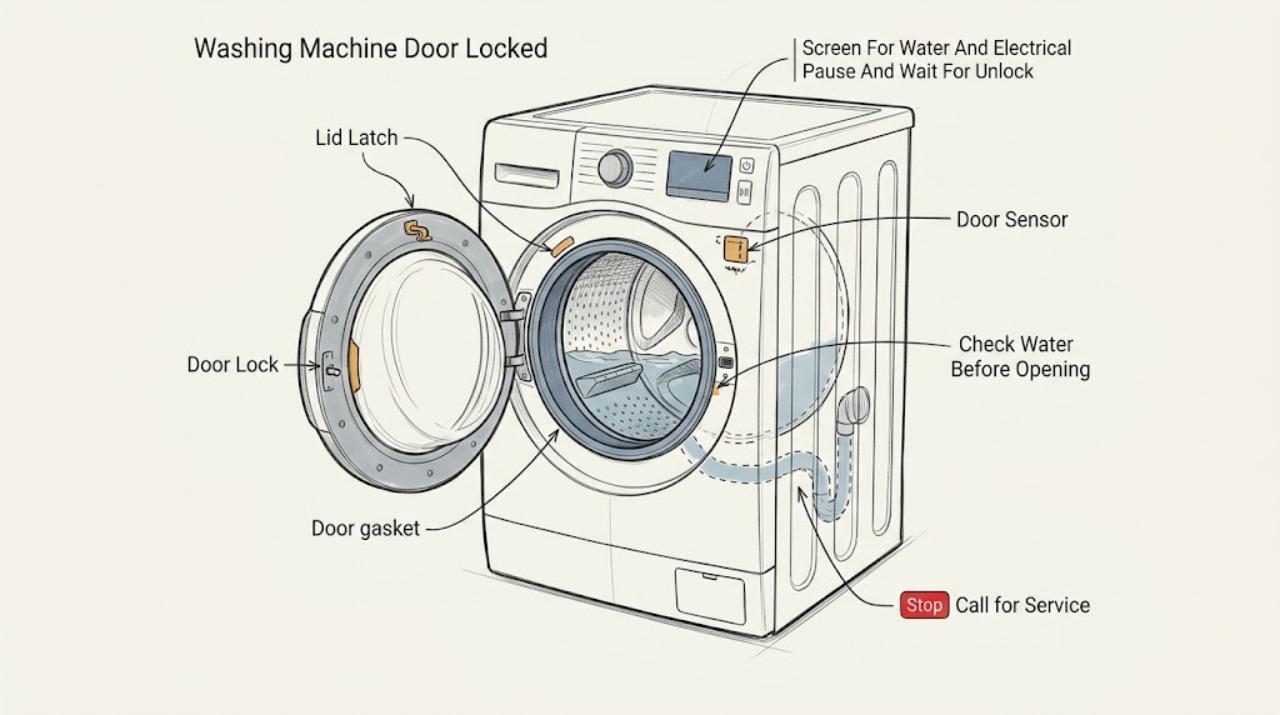
Work through in order
Diagnostic checks
Use only checks that match the exact appliance or system and its official guide.
-
Check 1
Stop interacting with the door and assess the washer from a safe position for visible water, a moving drum, hot or unusual smell, smoke, sparks, a hot plug, or a tripped protection device.
Expected result: Record whether the drum is moving, water is visible, the floor or plug is wet, the cable or door is damaged, or there is any electrical or burning warning.
Next step: Keep away from the hazard, isolate power only if the control or plug is dry, cool, intact, and safely reachable, and arrange qualified appliance or electrical service. If there is fire or immediate danger, use the local emergency response.
Stop if: Do not touch the washer, plug, socket, or pooled water together, and do not move the machine, when any electrical or flooding hazard is present.
Why this matters
Why: Water, movement, heat, sparks, or electrical damage changes this from a simple lock timing issue to a safety stop.
-
Check 2
Use Pause or the model's documented Power/Cancel control and wait without pulling the door until the drum stops and the lock indicator or symbol clears.
Expected result: Note whether the washer drains, whether the lock releases within the manual's stated delay, whether the control remains responsive, and whether the drum is still turning or water remains.
Next step: If the door unlocks, remove laundry normally. If it does not, continue to the water and latch checks without forcing the door.
Stop if: Do not repeat the control sequence indefinitely, pry the door, or defeat the lock with a tool or wire.
Why this matters
Why: A brief locked period can be a normal response to an active cycle, movement, temperature, or water level. No unlock after the documented sequence points to a drain, lock, sensor, or control issue.
-
Check 3
Look through the door glass or use the model's normal indicators to determine whether water remains in the drum; do not open the door while the drum contains water.
Expected result: Record whether the drum is empty, partly or fully filled, the cycle stopped during fill or drain, and whether there is water on the floor or around the pump area.
Next step: If the drum is empty, inspect closure and latch access. If water remains, use only the exact model's drain procedure; if draining is not safe or does not complete, arrange service.
Stop if: Do not pull the emergency release, open a filter, or disconnect hoses while water is present unless the model manual explicitly permits the safe procedure and power and flood controls are satisfied.
Why this matters
Why: A water-filled drum can keep the lock engaged and a forced opening can release water onto the floor. A floor leak also creates an electrical safety boundary.
-
Check 4
With the washer safe and the door accessible, inspect the door edge, gasket, strike, and visible latch opening for clothing, debris, misalignment, or damage without removing the lock.
Expected result: Note whether a garment is trapped, the door is fully seated, the gasket is folded or torn, the strike is bent, or the latch area is visibly damaged or obstructed.
Next step: Remove only a loose, visible obstruction without tools and close the door normally. If the latch still will not operate or a part is damaged, keep the washer out of service and arrange qualified repair.
Stop if: Do not pull the gasket out, insert tools into the lock, force the hinge, or bypass the interlock.
Why this matters
Why: An obstruction or incomplete closure can prevent a lock or unlock sequence. A damaged gasket, strike, or lock needs model-specific service rather than pressure on the door.
-
Check 5
Read the displayed error or indicator pattern and compare it with the exact Crosley manual; use a reset only when the manual's conditions are met and there is no water or electrical hazard.
Expected result: Record a door-lock code, water-supply or drain code, power interruption, repeated beeps, or a code that returns after the documented clear sequence.
Next step: Follow the model-specific instructions once. If the code returns, the door remains locked, or draining and closure are not normal, arrange qualified service and do not restart a wash load.
Stop if: Do not enter diagnostic mode, jumper the lock, remove panels, or repeat resets to suppress a safety code.
Why this matters
Why: A door-lock code can reflect closure or latch conditions, while a water or drain code may keep the door locked until the washer completes its required sequence. A returning code indicates a fault requiring service.
-
Check 6
If the door remains locked after the safe cycle, water, closure, and manual checks, keep the washer out of service and prepare a complete service handoff.
Expected result: Document the model and serial information, door position, water level, cycle phase, error pattern, latch and gasket condition, leak evidence, and any electrical smell or protection trip.
Next step: Use Crosley's dealer or Use and Care Guide for the correct service contact and provide the notes and safe photographs. Follow the technician's instructions for preserving the appliance condition.
Stop if: Do not force the door, bypass the lock, test live wiring, remove the cabinet, or replace a lock from the symptom alone.
Why this matters
Why: This history helps separate a normal lock condition from a drain pump, water-level sensor, door-lock, control, alignment, or electrical fault.
Use your observations
Decision map
Find the observation that best matches what you see, then follow the next safe action.
-
PATH 01Safety boundary
What you see
Water is on the floor or near power, the drum is moving, or there is smoke, a spark, burning smell, hot plug, or damaged wiring.
Do this next
Keep away from the washer, isolate only if safely reachable, and use qualified appliance or electrical service; use the local emergency response for fire or immediate danger.
Why this path and its safety boundary
Safety stop: Do not open the door, move the washer, touch wet electrical parts, or attempt a repair.
-
PATH 02Safety boundary
What you see
The cycle is active or recently paused, the drum is stopping, and no water or electrical hazard is present.
Do this next
Use the model's Pause or Cancel control and wait for the documented unlock delay and drain sequence.
Why this path and its safety boundary
Safety stop: Do not pull the door or use an emergency release while the drum moves or water remains.
-
PATH 03Safety boundary
What you see
Water is visible in the drum or the washer stopped during fill or drain.
Do this next
Keep the door closed and follow only the exact Crosley manual's safe drain procedure; arrange service if it does not complete.
Why this path and its safety boundary
Safety stop: Do not force the door, open a filter without safe isolation and flood control, or disconnect hoses as a test.
-
PATH 04Safety boundary
What you see
The drum is empty and a garment, debris, gasket fold, or visible alignment issue prevents complete door closure.
Do this next
Remove only a loose visible obstruction without tools and close the door normally, then follow the manual's single retry.
Why this path and its safety boundary
Safety stop: Arrange service for a damaged gasket, strike, hinge, latch, or lock; do not force or bypass it.
-
PATH 05Safety boundary
What you see
The door-lock or water/drain code returns, or the door remains locked after the model's safe sequence with an empty drum.
Do this next
Keep the washer out of service and arrange qualified repair using the model and symptom history.
Why this path and its safety boundary
Safety stop: Do not enter diagnostic mode, bridge the lock, remove panels, or repeat resets to suppress the fault.
Helpful context
Understand the symptom
A locked door can be normal during a cycle
The lock protects the user from a moving drum and from water spilling out. Pausing does not always release it immediately: the washer may first finish a drain or check its conditions. Wait for the drum to stop and use the exact control sequence in the model manual. Never defeat the lock with a wire, tool, or force.
Water changes the safe next step
If water is visible in the drum, do not open the door. Cancel or drain only through the procedure documented for that Crosley model, with power isolated when the manual requires it and with a shallow pan and towels if an accessible pump filter is involved. A full drum, blocked drain, or leak can make a forced opening a flood and electrical hazard.
Inspect the latch area without dismantling the washer
Once the machine is safe and the door is accessible, look for clothing caught between the door and gasket, debris at the latch, a distorted strike, or a torn gasket. Crosley guidance for a door-not-locking condition says to check complete closure and items in the drum. Do not pull the gasket from its channel or remove the lock assembly; visible damage is a service finding.
Escalate persistent lock faults
A door that remains locked after the cycle has ended and the drum is empty can involve the lock, water-level sensing, drain system, control, or door alignment. An error that returns after the manual's safe reset or closure check is not a reason to bypass the interlock. Keep the washer out of service and use Crosley's model-specific service route.
Only after diagnosis
Potential parts
- door lock or lid latch assembly
Consider only after a qualified diagnosis confirms the door is empty, aligned, and the lock does not release or engage as commanded.
Front-load locks and top-load lid latches differ; confirm the exact Crosley model before any part decision. - door strike, hinge, or gasket
Consider only when a visible obstruction is absent but the door cannot seat or the strike, hinge, or gasket is damaged or misaligned.
Do not pull the gasket or force the hinge; model-specific fit and safe installation must be confirmed. - drain pump or water-level sensing component
Consider only when water remains in the drum or a drain or water-level fault prevents the lock from opening after the documented user checks.
Water and electrical access require safe isolation and qualified diagnosis; no part should be selected from a locked-door symptom alone. - control board or door-lock wiring
Consider only after service confirms the lock mechanism is sound but its command or feedback circuit fails.
Do not bypass the interlock or test live wiring; confirm the exact model and revision through qualified service.
When checks do not resolve it
Need a professional?
Arrange qualified appliance service when the door remains locked after the documented cycle and drain sequence, water cannot be removed safely, a door-lock or drain code returns, the gasket, strike, hinge, or latch is damaged, the washer leaks, or any electrical warning is present.
Safety scope: A homeowner may wait for a normal unlock and inspect loose, visible obstructions only when the washer is safe. Emergency release, pump access, lock or control wiring, panel removal, and live electrical diagnosis require the exact manual and qualified service.
Have this ready
- Provide the exact Crosley model and serial information, door position, water level, cycle phase, error pattern, latch and gasket condition, leak evidence, and any electrical smell or protection trip.
Common questions
FAQ
Why is my Crosley washer door still locked after the cycle?
The washer may still be draining, sensing water, or completing its unlock sequence. Wait for the drum to stop, check whether water remains, and follow the exact model manual. Do not force the door.
Can I force open a locked Crosley washing-machine door?
No. Water, heat, movement, or a damaged lock can make forced opening unsafe and can cause flooding. Use only the model-specific safe procedure and arrange service if the door does not release.
What if there is water inside the washer?
Keep the door closed. Use the exact Crosley manual's drain procedure only when power and flood conditions are safe; if water will not drain or a leak is present, keep the washer out of service and arrange repair.
What does a door-lock error mean?
Crosley guidance says to cancel the cycle, check that the door closes and latches completely, and look for an item in the drum that blocks closure. If the code returns, arrange service rather than bypassing the lock.
When is a locked door an electrical emergency?
Treat a spark, smoke, burning smell, hot plug, damaged cable, or water near electrical parts as a stop condition. Do not touch the appliance or run another cycle; move away and use qualified or emergency help as appropriate.
Read the exact guide
Official sources
- Door Will Not Lock or Unlock - Front Load WasherWhirlpool · Cross-brand manufacturer guidance used only as supporting context; Crosley model instructions take precedence.
- Customer Service - Crosley Home ProductsCrosley Home Products · Crosley customer-service guidance; the correct dealer or Use and Care Guide route varies by product.
- Crosley Washer Use & Care Guide (45125)Crosley Home Products · Applies to the washer models covered by this guide; use the exact model manual for a different Crosley washer.
- Crosley CFWH4084GW Use and Care GuideCrosley Home Products · Applies to the CFWH4084GW guide's covered models and illustrates model-specific error handling; other Crosley models may differ.
Community feedback
Share a repair observation
Share a plain-text repair observation. Accepted observations are published automatically; this page may take a moment to update.