
On this page
Start here
Quick answer
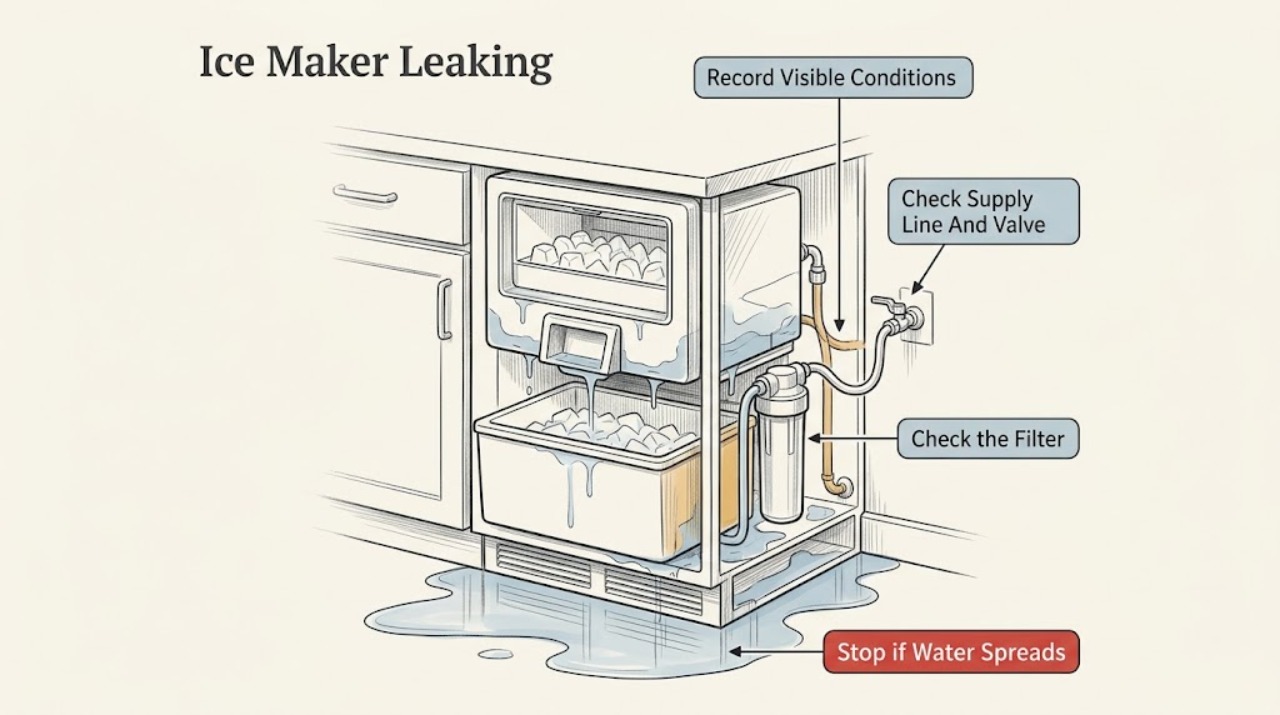
First locate when and where the water starts: at the rear supply connection or valve, filter housing, dispenser chute, ice bin, underside of the ice maker, or inside/under the cabinet. Electrolux’s model-specific refrigerator guidance identifies loose or kinked water lines, a filter that is not seated or is clogged/cracked, air after installation or a filter change, melted/refrozen ice, and a restricted supply as different causes. Turn the ice maker off, stop dispensing, and disconnect the refrigerator from power only from a dry safe position before inspecting visible connections, filter seating, or a removable ice bin; close the household water shutoff if a continuing leak can be stopped safely. Water near the outlet, plug, controls, or wiring, a burst line, cabinet leak, unexpected spray, or flooding requires immediate isolation and qualified service. Do not open the freezer liner, remove the inlet valve or ice-maker mechanism, thaw a hidden fill tube with heat, or test live wiring.
Before you begin
Safety first
- This article covers safe location tracing, ice-maker shutoff, dry external connection inspection, model-directed filter seating/purge, and removable-bin cleaning/thawing. An authorized technician must handle the internal valve, fill tube, ice-maker mechanism, dispenser, filter housing, defrost path, water lines, sensors, and wiring.
Work through in order
Diagnostic checks
Use only checks that match the exact appliance or system and its official guide.
-
Check 1
Turn the ice maker off at its model-specific control, stop using the dispenser, and photograph or note the first wet point without touching wet electrical parts. Record whether water appears during an ice fill, after dispensing, after a filter change, when the ice bin is full, after a door has been left open, or continuously. Record the refrigerator model and serial information before choosing a manual.
Expected result: The first wet point is at the rear supply line/valve, filter housing, dispenser chute, ice bin, underside of the ice maker, or sealed cabinet/door area.
Next step: Keep water and electricity separated, then follow only the matching visible check below. If the source is hidden, pressure-related, or near electrical parts, leave the ice maker and refrigerator disconnected and arrange service.
Stop if: Do not run an ice harvest or fill cycle with covers removed, move a leaking refrigerator across a wet floor, or touch water near controls, the plug, or wiring.
Why this matters
Why: Location and timing separate an external plumbing/filter issue from meltwater, dispenser-chute ice, fill overflow, defrost/airflow effects, or an internal valve, tube, or ice-maker mechanism. A wet spot farther away may be downstream water, not the source.
-
Check 2
With the ice maker off and power disconnected from a dry safe position, inspect only the visible rear water line, shutoff, inlet connection, and tubing for a loose fitting, kink, crack, rubbing point, or water trail. Close the household water shutoff if a connection continues to leak and the valve is safely accessible. Do not remove the refrigerator’s rear cover or loosen a pressurized fitting while water is flowing.
Expected result: Water begins at the household connection, rear inlet valve, tubing, or a fitting; the line is kinked behind the refrigerator; or the visible exterior is dry while water appears inside.
Next step: Keep the water supply off for a continuing or damaged-line leak and arrange a qualified appliance or plumbing repair. Only reseat a clearly accessible connection exactly as the model installation instructions permit; recheck for leaks without energizing a wet refrigerator.
Stop if: Do not over-tighten compression fittings, cut tubing, replace a valve, open the rear cover, or reconnect power while water remains near electrical parts.
Why this matters
Why: A rear connection or supply-line failure can leak independently of the ice-maker mold. A dry exterior with cabinet or door water shifts suspicion to the filter housing, internal tube, fill path, defrost/meltwater, or another sealed area.
-
Check 3
If the leak began after a filter change or the water/ice flow is slow, turn the ice maker off and inspect the user-accessible filter housing only as the exact model guide shows. Confirm the cartridge is the matching type, fully locked, and not cracked; wipe visible drips and follow the model’s controlled purge/prime procedure with a container under the dispenser when it is safe to do so.
Expected result: The filter is loose, incorrectly oriented, cracked, frozen, overdue, or followed by spurts and sputters; the housing stays dry and flow is normal; or water leaks from behind the housing.
Next step: Replace only with the exact model-specified filter, seat it fully, and purge air as the model guide directs. Keep the water supply/ice maker off and arrange service for a cracked housing, persistent filter leak, or water inside the cabinet.
Stop if: Do not force the filter, use an unverified cartridge, bypass the filter housing, or purge water when the dispenser or surrounding electrical area is wet.
Why this matters
Why: Electrolux says a filter that is not seated, cracked, clogged, or recently replaced can affect ice/water flow; air after a filter change can cause temporary spurts. A housing leak that persists after correct seating suggests a seal, housing, or internal line problem.
-
Check 4
After stopping the ice maker and making the area safe, remove the ice bin only if the exact manual allows it. Look for a wet bin, hollow or clumped ice, ice frozen around the auger, frost at the dispenser chute, or a bin that is not seated. Empty, thaw naturally away from the refrigerator, clean, and dry the removable bin before reinstalling it; do not use forced heat.
Expected result: Ice has melted and refrozen, water is pooling in the bin, ice is blocking the chute, frost surrounds the chute, the bin is mis-seated, or the bin is dry while water starts above/behind the ice maker.
Next step: Dry and correctly reseat the bin, clear only loose accessible ice, and monitor for recurrence without forcing the auger. If water returns from the ice-maker assembly, chute housing, or cabinet, keep the system off and arrange service.
Stop if: Do not chip ice with a sharp tool, apply a hair dryer/heat gun, rotate a jammed auger under force, or run the dispenser while water is present near electrical parts.
Why this matters
Why: Electrolux documents melt/refreeze around the auger after infrequent use, temperature fluctuations, or power interruption, and says hollow cubes can break and leak water onto other ice. Chute ice can melt and run down the dispenser. Water starting above or behind the bin is not explained by cleaning the bin.
-
Check 5
Without removing the freezer liner or ice-maker cover, inspect from the outside for water pooled under the ice maker, an overfilled ice mold, a frozen-looking fill opening, or meltwater associated with a door left open or unusual frost. Check that the freezer door closes and the ice bin is properly positioned. Do not manually trigger a harvest or fill cycle to reproduce a leak.
Expected result: Water appears immediately after the ice-maker fill, the mold overflows, water comes from a hidden fill opening, frost/ice is widespread after a door was left open, or water appears while the ice maker is off.
Next step: Keep the ice maker off and close the water shutoff for fill-related or continuing leaks. Allow only model-documented automatic defrost; arrange service for a hidden/frozen fill tube, overflow, valve, ice-maker mechanism, internal line, or persistent meltwater.
Stop if: Do not thaw hidden tubing with heat, pierce ice, remove the freezer liner, or access the inlet valve or ice-maker wiring.
Why this matters
Why: Fill-time leakage can involve the model’s inlet valve, fill tube, ice-maker timing or mold, while widespread frost and door-air leakage can create meltwater below the ice maker. Water while the ice maker is off points more toward a supply/filter/internal line or meltwater path than an ordinary harvest.
-
Check 6
Record the model, leak location and timing, ice-maker on/off state, filter age and recent replacement, supply-line condition, bin/chute observations, door/frost history, dispenser behavior, and whether water reaches the cabinet floor or electrical area. Keep water and power isolated as needed and provide the record to authorized Electrolux service.
Expected result: The leak returns after visible connection/filter/bin checks, comes from the cabinet or door, occurs during fill with no accessible source, or is accompanied by water near wiring, abnormal valve noise, a damaged line, or flooding.
Next step: Stop using the ice maker and arrange authorized Electrolux appliance service; close the household water valve for a continuing leak. If the refrigerator itself has been wet internally or electrically, keep it disconnected until inspected.
Stop if: Do not open the cabinet or liner, run a fill test, bypass the ice-maker switch, test live wiring, replace an inlet valve/line/module, or reconnect after flooding.
Why this matters
Why: An internal inlet valve, fill tube, ice-maker module, water reservoir/line, filter housing seal, dispenser assembly, defrost path, sensor, or wiring fault is more likely. These parts vary by model and cannot be safely diagnosed by a user from an external puddle.
Use your observations
Decision map
Find the observation that best matches what you see, then follow the next safe action.
-
PATH 01Safety boundary
What you see
The first wet point is a visible household water connection, rear valve, or kinked/cracked supply line.
Do this next
Turn off the household water supply if safely accessible and arrange qualified plumbing/appliance service. Reseat only a clearly accessible connection according to the exact installation guide, then recheck while keeping power off if the area is wet.
Why this path and its safety boundary
Why it matters: An external plumbing connection or tubing failure is more likely than a leaking ice mold or dispenser chute.
Safety stop: Do not over-tighten, cut tubing, open the rear cover, or power a wet refrigerator.
-
PATH 02Safety boundary
What you see
Water began after a filter change, the filter is loose/cracked/frozen, flow is slow, or the dispenser spurts while air is being purged.
Do this next
Turn off the ice maker, seat or replace the exact model filter, and follow the model-specific purge instructions only when the area is dry and safe. Arrange service for a housing or internal-line leak.
Why this path and its safety boundary
Why it matters: Filter seating, cartridge condition, or air in the water system is more likely; a persistent housing drip is not normal purge behavior.
Safety stop: Do not force the cartridge, use a substitute filter, or purge water into a wet electrical area.
-
PATH 03Safety boundary
What you see
The bin is wet, cubes are clumped or hollow, the auger/chute is iced, or water runs from the dispenser opening after ice has melted.
Do this next
Turn off the ice maker, remove and naturally thaw the removable bin if permitted, clean and dry it, clear only loose accessible ice, and reseat it. Escalate if water returns or starts behind the bin.
Why this path and its safety boundary
Why it matters: Melt/refreeze or chute ice is more likely than a pressurized supply leak, especially after infrequent use, temperature fluctuation, or a power interruption.
Safety stop: Do not chip ice, apply forced heat, force the auger, or operate a wet dispenser.
-
PATH 04Safety boundary
What you see
Water appears under the ice maker immediately after a fill, the mold overflows, or a hidden fill opening is frozen or leaking while the bin is dry.
Do this next
Keep the ice maker off and close the water shutoff for a continuing leak. Arrange authorized service rather than thawing, probing, or removing the freezer liner.
Why this path and its safety boundary
Why it matters: An inlet valve, fill tube, ice-maker timing/mold, or internal water path is more likely than a bin spill; the exact fault is model-specific.
Safety stop: Do not manually trigger a harvest/fill, apply heat, pierce ice, or access the valve or ice-maker wiring.
-
PATH 05Safety boundary
What you see
The leak is below the ice maker after a door was left open or frost built up, and no supply/filter/bin source is wet.
Do this next
Close the door fully, keep the ice maker off if water is accumulating, and follow only the exact model’s defrost guidance. Arrange service for repeated frost, blocked drainage, or cabinet water.
Why this path and its safety boundary
Why it matters: Door-air leakage and evaporator frost can produce meltwater below the ice maker on applicable Electrolux refrigerators; a persistent leak still needs diagnosis.
Safety stop: Do not remove the liner, scrape coils, pour water into a drain, or use a heat source near plastic or wiring.
-
PATH 06Safety boundary
What you see
Water comes from inside the door/cabinet, returns after external checks, reaches an outlet or wiring, sprays under pressure, or causes flooding.
Do this next
Stop the ice maker, close the household water valve if safely accessible, disconnect power from a dry safe position if possible, and arrange urgent qualified service.
Why this path and its safety boundary
Why it matters: An internal line, filter housing, valve, ice-maker mechanism, dispenser, defrost path, or electrical-area fault is more likely and presents water/electrical risk.
Safety stop: Do not restart, move a wet refrigerator, open panels/liners, or touch wet wiring or controls.
Helpful context
Understand the symptom
Trace the water before choosing a cause
“Ice maker leaking” can describe a water-line fitting behind the refrigerator, a filter housing, water dripping from a dispenser chute, a melted ice bin, overflow from the ice mold, or a hidden line inside the door or cabinet. Electrolux refrigerator architectures differ: some top-freezer models have a separate or optional ice maker, while French-door and side-by-side models may integrate the ice maker with a dispenser and filter. This article is for Electrolux refrigerator-integrated ice makers; use the exact product manual for a standalone unit, controls, shutoff location, and removable parts.
Water and mains electricity require a hard stop
Turn the ice maker off and stop dispensing. If water is reaching the plug, outlet, controls, light, or wiring, do not touch the wet area; disconnect power only from a dry safe position if the plug can be reached without contact with water or damage, and close the household water shutoff if it is safely accessible. Keep the refrigerator upright and do not pull it out over a wet floor. Do not open the rear cover or freezer liner, remove an inlet valve or fill tube, probe a frozen passage, use a hair dryer or heat gun, or test live wiring. A continuing leak, spray, flooding, or any internal water/electrical path needs qualified service.
Safety boundary
Stop conditions
- Stop immediately for water near the outlet, plug, controls, lights, or wiring; a burst or spraying line; flooding; smoke, scorching, or a damaged cord; or a leak that continues with the water supply on.
- Turn the ice maker off and stop dispensing. Close the household water shutoff for a continuing leak when it is safely accessible, and disconnect power only from a dry safe position; do not touch wet electrical parts.
- Do not open the rear cover or freezer liner, thaw hidden tubing with heat, chip ice, probe a fill tube, bypass the ice-maker switch, run a fill/harvest test with covers removed, or test live wiring.
- Persistent water from the cabinet, door, filter housing, inlet valve, hidden fill path, ice-maker module, dispenser, or wiring requires authorized Electrolux service.
When checks do not resolve it
Need a professional?
Safety scope: This article covers safe location tracing, ice-maker shutoff, dry external connection inspection, model-directed filter seating/purge, and removable-bin cleaning/thawing. An authorized technician must handle the internal valve, fill tube, ice-maker mechanism, dispenser, filter housing, defrost path, water lines, sensors, and wiring.
Common questions
FAQ
Why is my Electrolux ice maker leaking from the back?
Inspect only the visible supply line, shutoff, and rear inlet connection with the ice maker off and power isolated from a dry position. A loose, kinked, cracked, or wet connection can leak independently of the ice maker. Close the household water valve and arrange service for a continuing leak or damaged line; do not open the rear cover.
Can a water filter cause an Electrolux ice-maker leak?
Yes, on models with the described filter system: a filter that is not fully locked, is cracked, frozen, clogged, or recently replaced can affect flow or leak at the housing. Use the exact model filter and seating/purge procedure. A persistent housing or cabinet leak requires service.
Why is water leaking from the Electrolux ice bin or dispenser chute?
Melted/refrozen ice, hollow cubes, or frost in the chute can release water into or down from the bin/dispenser. Turn off the ice maker, naturally thaw and dry a removable bin if the manual allows, and clear only loose accessible ice. Water starting above or behind the bin needs service.
Why does the Electrolux ice maker overflow during filling?
An overflow or leak immediately after fill can involve a model-specific inlet valve, fill tube, mold, timing, or internal water path. Keep the ice maker off and close the household water valve for a continuing leak. Do not thaw hidden tubing with heat, trigger a fill test, or remove the freezer liner; arrange authorized service.
When should I stop using an Electrolux ice maker that is leaking?
Stop immediately for water near electrical parts, a burst or spraying line, flooding, a cabinet/door leak, smoke, scorching, a hot or damaged cord, or repeated electrical trips. Turn the ice maker off, close the water supply if safely accessible, disconnect power only from a dry safe position, and arrange qualified service. Do not open or live-test the refrigerator.
Read the exact guide
Official sources
- Refrigerator Error Code DI SP or DISP - Ice JamElectrolux · Official Electrolux US guidance for refrigerator models using the DI SP/DISP indication; the melt/refreeze mechanism is relevant only where the described ice-bin/dispenser architecture exists.
- EQE6879 User ManualElectrolux · Official Electrolux Arabia manual for the EQE6879SA family; its controls, filter, bin, and capacities are not universal across Electrolux refrigerators.
- Where can I find my model and serial number?Electrolux · Official Electrolux support article for all appliances; refrigerator label placement varies by model.
- How to change the water filter in my fridge freezer? (located inside)Electrolux UK · Official Electrolux UK guide for side-by-side fridge freezers with the filter inside; it does not apply to every filter location or cartridge.
- My refrigerator was just installed and the ice maker is not working, how do I fix it?Electrolux · Official Electrolux US support article covering French-door, side-by-side, and top-freezer refrigerator ice makers; exact controls differ by model.
Community feedback
Share a repair observation
Share a plain-text repair observation. Accepted observations are published automatically; this page may take a moment to update.