
On this page
Start here
Quick answer
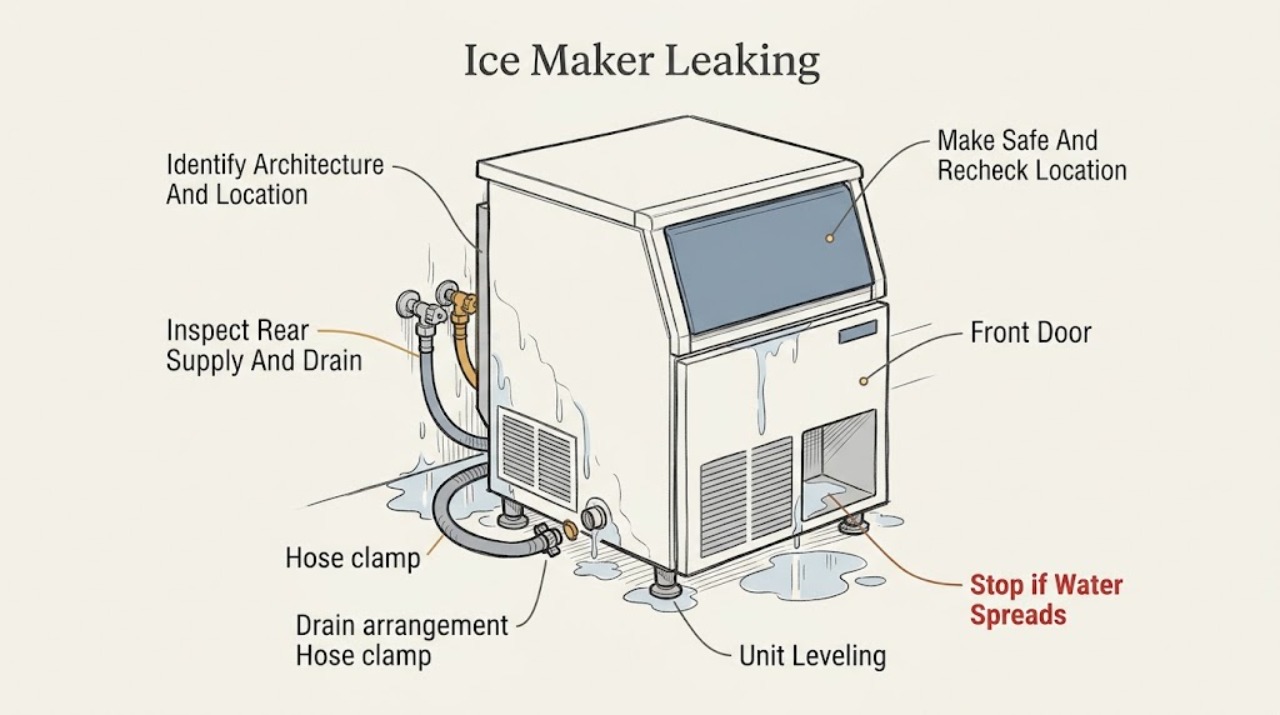
First confirm whether this is a KitchenAid freestanding or undercounter ice maker, rather than a refrigerator's built-in ice maker, and note whether water is at the rear, bottom front, inside the bin or door, or only at the drain. KitchenAid's published leak checks are explicitly for freestanding ice makers: inspect visible water-supply connections and clamps, verify the drain hose is aligned over the drain and inserted about 6 inches into the drain pipe, and check that the machine is level. Exact models differ: KitchenAid documents a built-in drain pump on some 15-inch models and a gravity-drain arrangement on an 18-inch model, so do not transfer a drain-pump or hose procedure between models. Stop the unit and close its water supply if it is safely accessible; if water is near electrical parts, there is a damaged hose, the unit is built into a refrigerator, or the leak persists after the exact model's external checks, keep it out of service and arrange model-specific service.
Before you begin
Safety first
- Owner checks stop at model-approved external observation of connection points, clamps, drain alignment, supply-line installation, and leveling. Concealed plumbing, internal pump or valve work, refrigerator ice-maker access, electrical work, and live testing require qualified service.
Work through in order
Diagnostic checks
Use only checks that match the exact appliance or system and its official guide.
-
Check 1
Record the complete model number and decide whether the unit is a freestanding or undercounter ice maker, or an ice maker built into a refrigerator. Without moving a built-in unit, note whether fresh water appears at the rear, bottom front, drain, door or bin, inside a refrigerator compartment, or from an inaccessible cabinet area.
Expected result: The label identifies a KitchenAid undercounter model such as a 15-inch or 18-inch machine, or the ice maker is part of a refrigerator; the water location is visible or remains hidden.
Next step: Use the freestanding path only when the model and installation match it. For a refrigerator-integrated or hidden leak, go to the exact refrigerator manual or service branch.
Stop if: Stop if identifying the model would require removing a cover, moving a built-in appliance, or reaching into a wet electrical area.
Why this matters
Why: KitchenAid documents different drain arrangements for different undercounter models, and its published leak articles are specifically for freestanding ice makers. Architecture and location determine which checks are applicable; they do not identify a failed internal part.
-
Check 2
Stop ice production and keep hands and tools away from wet electrical areas. If the ice maker's water shutoff is clearly identified and safely reachable, close it; otherwise do not reach behind or under the appliance. Blot only an accessible floor area, then observe where new water forms without operating the machine repeatedly.
Expected result: Water is near a plug, cord, control, or other electrical area; the supply cannot be safely isolated; the leak stops with the supply closed; or water reappears at a defined external location.
Next step: Keep the unit out of service when water is near electrical parts or the supply cannot be safely controlled. If the area is dry and safe, continue with the matching external-location check.
Stop if: Do not reset or run the ice maker to reproduce a leak, touch wet electrical parts, remove panels, or use a live electrical test.
Why this matters
Why: A continuing water supply can enlarge a leak, while a defined location helps select the manufacturer's rear, bottom-front, or model-specific service path. These observations do not prove a valve, pump, drain, or control failure.
-
Check 3
For a matching freestanding KitchenAid ice maker with water at the rear, visually inspect the accessible water-supply connection points, valve or nuts, hose clamps, drain hose, and visible supply line. Check that the drain hose is aligned over the drain and, where the exact manual uses this arrangement, inserted approximately 6 inches into the drain pipe.
Expected result: A connection is visibly wet, a clamp is loose or absent, the drain hose is misaligned or shallow, or the supply line is cracked or damaged; alternatively, all visible plumbing is dry and correctly positioned.
Next step: With the water supply isolated and only if the model instructions permit, correct a clearly loose external connection or hose position; otherwise document the result and arrange service. Do not move a flush installation to reach hidden plumbing.
Stop if: Stop for a split line, uncontrolled flow, water near electrical parts, a hidden connection, or any need to remove a panel or use tools on a pressurized or energized assembly.
Why this matters
Why: KitchenAid identifies connection points, clamps, drain-hose alignment and a damaged water line as rear-leak checks. A dry external path makes an inaccessible or internal cause more likely, but does not identify which component failed.
-
Check 4
For a matching freestanding or undercounter model with water at the bottom front, compare the visible supply-line installation and hose clamps with the exact owner instructions and check whether the cabinet is level without opening the unit. Do not assume the drain arrangement: the KUIX535HPS and KUID318SPS product pages document different pump or gravity-drain configurations.
Expected result: A connection or clamp is wet, the supply line is not installed as the model specifies, the unit is visibly out of level, or the external installation appears correct but water continues.
Next step: Correct only an accessible, model-approved installation condition. If leveling would require moving a built-in unit, or the leak continues, leave the water off and schedule model-specific service.
Stop if: Do not remove the toe-kick or cabinet panels, tilt or pull out a built-in machine, touch internal plumbing, or order a pump or valve from the symptom alone.
Why this matters
Why: KitchenAid's bottom-front guidance supports connection, supply-line, clamp, and leveling checks. The product pages show that pump-versus-gravity-drain behavior is model-specific, so an apparently correct exterior does not justify an internal diagnosis.
-
Check 5
If the ice maker is refrigerator-integrated, the water is inside the cabinet or bin, the location cannot be traced externally, or the leak persists after the matching external checks, document the model, location, timing, and whether water is near electrical parts. Keep the supply isolated and arrange qualified KitchenAid or appliance service.
Expected result: The leak is hidden or internal, the appliance is a refrigerator ice-maker assembly, a damaged line or uncontrolled flow is present, or an approved external correction does not stop the leak.
Next step: Provide the exact model and the documented leak pattern to service; do not select a replacement valve, pump, drain, sensor, or control without model-specific diagnosis.
Stop if: Stop immediately for water near electrical parts, smoke, arcing, a damaged power cord, uncontrolled flow, or any need for energized or concealed-component work.
Why this matters
Why: The opened KitchenAid leak guidance supports external checks for freestanding ice makers but does not establish a universal refrigerator-integrated or internal repair. Continued operation can worsen water or electrical risk.
Use your observations
Decision map
Find the observation that best matches what you see, then follow the next safe action.
-
PATH 01Safety boundary
What you see
The model is a KitchenAid freestanding or undercounter ice maker, and water reappears at a visible rear connection or drain area.
Do this next
Isolate the water safely, compare the plumbing with the exact model instructions, and correct only a clearly accessible model-approved connection or hose position; escalate for damage or persistence.
Why this path and its safety boundary
Why it matters: A supply connection, clamp, drain-hose alignment, or damaged visible water line is more consistent with the manufacturer's rear-leak checks than an unverified internal part diagnosis.
Safety stop: Do not move a flush installation, remove panels, or work on wet or energized plumbing.
-
PATH 02Safety boundary
What you see
A matching freestanding or undercounter model leaks at the bottom front, while the water supply can be safely isolated and no electrical hazard is present.
Do this next
Check the visible installation and level condition against the model instructions. If the unit is built in or the leak continues, keep it off and arrange service.
Why this path and its safety boundary
Why it matters: The manufacturer's supported external possibilities include a connection, supply-line installation, hose clamp, or leveling condition; the correct drain architecture remains model-specific.
Safety stop: Do not pull out a built-in machine or access internal plumbing to test a pump, valve, or drain.
-
PATH 03Safety boundary
What you see
The ice maker is inside a KitchenAid refrigerator, or water is inside the freezer/refrigerator compartment rather than at an exposed undercounter machine connection.
Do this next
Use the refrigerator's exact model literature for external identification and keep the water supply off if safe; arrange service for an internal or hidden leak.
Why this path and its safety boundary
Why it matters: The opened KitchenAid leak articles are explicitly for freestanding ice makers and do not support applying their drain-hose, pump, or leveling procedure to the refrigerator assembly.
Safety stop: Do not remove refrigerator panels, reach into the ice-maker mechanism, or substitute an undercounter ice-maker diagnosis.
-
PATH 04Safety boundary
What you see
Water is around the storage bin or door, appears only during an unknown part of the cycle, or cannot be traced to a visible external connection.
Do this next
Do not repeatedly cycle the machine. Record when the water appears and provide the model and photos of the dry, de-energized exterior to service.
Why this path and its safety boundary
Why it matters: The published freestanding pages do not assign a universal cause to this pattern, so ice melt, overflow, internal fill, drain, or pump explanations remain unconfirmed and model-dependent.
Safety stop: Stop immediately if water reaches electrical parts or any inspection would require a cover or energized test.
-
PATH 05Safety boundary
What you see
Water is near electrical components, the supply line is split, flow is uncontrolled, there is smoke or arcing, or an external correction does not stop the leak.
Do this next
Stop using the appliance, isolate water and power only when it can be done without contact with wet electrical parts, and arrange qualified service.
Why this path and its safety boundary
Why it matters: This is outside safe owner troubleshooting; the KitchenAid pages direct unresolved cases to contact or schedule service and do not support live or concealed-component repair.
Safety stop: Do not restore power or water merely to retest, bypass a safety device, or open the cabinet.
Helpful context
Understand the symptom
Confirm which KitchenAid ice maker you have
KitchenAid's ice-maker category describes undercounter automatic ice machines, including 15-inch and 18-inch models. The KUIX535HPS is a 15-inch model with a built-in drain-pump system, while the KUID318SPS is an 18-inch model that can use a gravity drain and has a different installation arrangement. A refrigerator door with an ice-maker assembly is a different architecture. The published leak articles below are labeled freestanding ice maker, so do not apply their drain-hose or leveling instructions to a refrigerator-integrated ice maker without the refrigerator's exact manual.
Use the leak location as the first diagnostic split
Dry the surrounding floor only if it can be done without reaching around live or wet electrical areas, then identify where fresh water reappears: behind the machine, at the bottom front, around the storage door or bin, or at the drain connection. KitchenAid's rear-leak guidance covers supply-line connections, clamps, drain-hose alignment and a damaged water line. Its bottom-front guidance adds correct supply-line installation and leveling. Water appearing inside a refrigerator ice-maker compartment, in the bin, or from an internal cabinet is not assigned a universal cause by these freestanding pages; use the exact model manual or service instead of guessing.
Rear leaks: inspect only visible external plumbing
For a freestanding KitchenAid ice maker, look at the visible water-supply connection points, valve or nuts, hose clamps, and drain-hose position. The manufacturer says leaking connection points should be tightened and that the drain hose should be aligned over the drain and inserted approximately 6 inches into the drain pipe. It also says a cracked or damaged household water line can cause a rear leak. Do not move a flush or built-in installation just to reach the back; use the model's installation instructions or arrange service.
Bottom-front leaks: check the model-approved installation conditions
KitchenAid's bottom-front troubleshooting page directs owners to check connection points, correct water-supply-line installation, secure hose clamps, and level the ice maker. These checks are most relevant to the freestanding or undercounter models for which the page is written. Do not infer that leveling, a drain pump, a gravity drain, or a particular tubing arrangement applies to every KitchenAid ice maker: compare the rating-label model with its owner literature first.
When the refrigerator or an internal section is involved
If the ice maker is part of a KitchenAid refrigerator, or if water appears from inside the cabinet, around an internal fill assembly, or from an inaccessible drain or pump, stop at external observation. The freestanding leak pages do not establish a refrigerator-wide diagnosis, a valve or pump failure, or a safe owner repair. Record the full model number, exact water location, whether the leak occurs while filling or draining, and any ice or water- dispenser symptoms, then use the refrigerator's exact manual or qualified service.
Safety boundary
Stop conditions
- Stop using the ice maker for water near a plug, cord, control, or other electrical part; isolate power only if it can be done without touching wet electrical areas.
- Close the ice maker's water supply only when the shutoff is clearly identified and safely reachable; do not reach behind or under a wet or built-in appliance.
- Do not repeatedly run the machine to reproduce the leak, remove covers, move a flush or built-in unit, perform live electrical tests, or work on concealed plumbing.
- Do not assume that a KitchenAid refrigerator ice maker has the drain hose, pump, gravity-drain, or leveling arrangement documented for an undercounter freestanding model.
When checks do not resolve it
Need a professional?
Arrange qualified KitchenAid or appliance service when the ice maker is refrigerator-integrated, the leak is inside the cabinet or storage area, the water line is damaged, the external plumbing is hidden, the unit would need to be moved or opened, or the leak continues after the exact freestanding model's accessible connection, clamp, drain-position, and leveling checks. Provide the complete model number, installation type, water location, timing, and photos taken with power and water safely isolated.
Safety scope: Owner checks stop at model-approved external observation of connection points, clamps, drain alignment, supply-line installation, and leveling. Concealed plumbing, internal pump or valve work, refrigerator ice-maker access, electrical work, and live testing require qualified service.
Common questions
FAQ
Why is my KitchenAid ice maker leaking from behind?
For a matching freestanding KitchenAid ice maker, inspect visible water-supply connections, clamps, drain-hose alignment, and the supply line. KitchenAid specifies approximately 6 inches of drain-hose insertion into the drain pipe on its rear-leak guidance. Use the exact model instructions and stop for a damaged line or hidden connection.
What should I check if water is coming from the bottom front?
KitchenAid's freestanding bottom-front guidance covers connection points, correct water-supply-line installation, secure clamps, and level condition. Do not assume the same drain or leveling arrangement applies to a refrigerator-integrated ice maker or another model.
Does every KitchenAid ice maker use a drain pump?
No universal statement is safe. KitchenAid describes a built-in drain pump on the KUIX535HPS, while its KUID318SPS page describes a gravity-drain arrangement and a different pump option. Check the exact model before troubleshooting the drain.
Can I use this freestanding ice-maker leak procedure on a KitchenAid refrigerator?
Not automatically. The opened KitchenAid leak pages are labeled for freestanding ice makers. If the ice maker is inside a refrigerator or the water is inside a cabinet, use the refrigerator's exact manual and arrange service for hidden or internal components rather than borrowing an undercounter drain diagnosis.
Should I keep running the ice maker to find the leak?
No. Stop ice production and isolate the water supply when it is safely accessible. Do not run the appliance repeatedly, touch wet electrical areas, move a built-in unit, or open a cover to trace an internal leak. Have service handle a persistent or concealed leak.
Read the exact guide
Official sources
- Undercounter Ice MakersKitchenAid · KitchenAid undercounter ice-maker category; product-family context only.
- Leaking from Bottom Front - Freestanding Ice MakerKitchenAid Product Help · Freestanding KitchenAid ice makers; exact model controls water-line and leveling details.
- 15-Inch Automatic Ice Maker with Clear Ice Technology KUIX535HPSKitchenAid · KUIX535HPS only; not a universal claim about KitchenAid ice makers.
- 18-Inch 35 lb. Automatic Ice Maker with Clear Ice Technology KUID318SPSKitchenAid · KUID318SPS only; not a universal claim about KitchenAid ice makers.
- Where to Check if Ice Maker is Leaking WaterKitchenAid Product Help · KitchenAid freestanding ice makers; not a refrigerator-integrated universal procedure.
- Leaking from Behind - Freestanding Ice MakerKitchenAid Product Help · Freestanding KitchenAid ice makers; model installation instructions control.
Community feedback
Share a repair observation
Share a plain-text repair observation. Accepted observations are published automatically; this page may take a moment to update.