
On this page
Start here
Quick answer
If a Frigidaire ice maker is actively leaking, stop the water first at the refrigerator's accessible shutoff or household supply valve, and disconnect power only from a safe, dry location if water is near electrical parts. Then identify where the water begins: a rear connection or filter points to the supply path; water from the ice bin or chute may be melted or clumped ice; a drip from the dispenser tip can follow air in the line; and water from below the ice maker can follow frost from a door-left-open condition or an internal ice-maker/fill-path fault. Check only external connections, a recently changed or cracked filter, the removable ice bin and visible chute, and the exact model's ice-maker setting. Frigidaire's layouts differ between top-freezer, side-by-side, French-door, and other models, so do not assume a valve, fill tube, bucket, or filter fits across models. If the leak continues after water is shut off, returns during a fill cycle, comes from inside the cabinet, or requires a valve, fill tube, ice-maker module, wiring, or sealed refrigerator access, keep the refrigerator and ice maker off and arrange qualified service.
Before you begin
Safety first
- This article covers safe water isolation, external connection and filter observations, removable bin/chute care, and frost-related classification. Water valves, fill tubes, ice-maker modules, dispenser internals, wiring, door tubing, and cabinet access require qualified service.
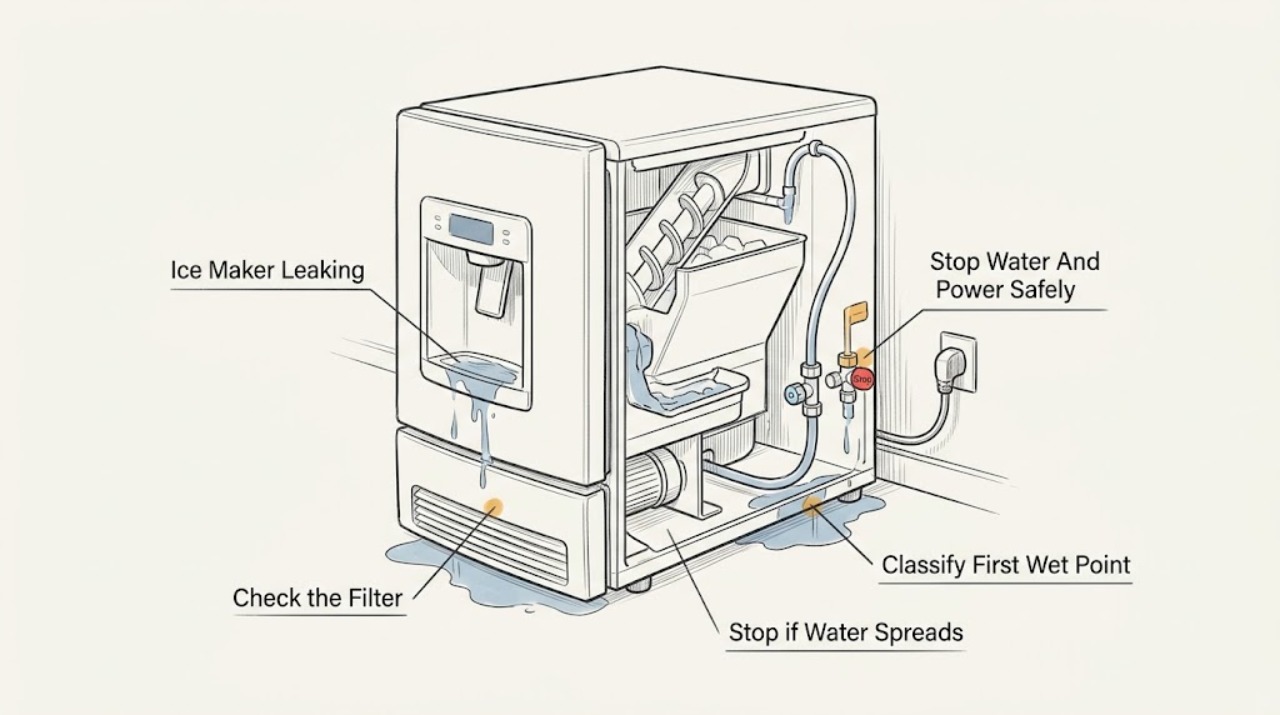
Work through in order
Diagnostic checks
Use only checks that match the exact appliance or system and its official guide.
-
Check 1
With hands and floor dry, note whether water first appears at a rear supply connection, the filter housing, inside the refrigerator/freezer, under the ice maker, in the ice bin or chute, at the dispenser tip, or beneath the cabinet. Photograph the location and timing before wiping it dry.
Expected result: The rear line/valve is wet; the filter housing is wet; ice is wet or clumped; the dispenser chute or tip drips; water is below the ice maker; or the source cannot be seen.
Next step: Use the matching branch below. If water is still flowing, shut off the refrigerator's accessible water supply before continuing.
Stop if: Do not touch wet electrical parts, reach into a moving auger, or keep the ice maker energized while water is entering uncontrolled.
Why this matters
Why: The first wet point separates the supply/filter path from melted ice, dispenser drip, defrost/frost water, or an internal fill/ice-maker fault. Water that travels along a door or floor can appear far from its source.
-
Check 2
For an active or repeated leak, close the refrigerator's accessible water shutoff or the household supply valve feeding it. If water is near the cord, outlet, controls, or wiring, isolate power only from a dry, safe location; do not unplug through standing water or move the refrigerator to reach a valve.
Expected result: The leak stops when water is shut off; it continues after the supply is closed; water is near electrical parts; or the shutoff cannot be reached safely.
Next step: Leave the ice maker and dispenser off while tracing a stopped leak. Arrange service if the source is internal, water continues, or the shutoff requires moving or disassembling the appliance.
Stop if: Stop immediately for water at an outlet or control, electric shock, smoke, sparking, damaged cord, or inability to isolate water safely.
Why this matters
Why: A leak that stops with the water supply is in the pressurized supply, filter, valve, or fill path. Continued water can be residual melt/defrost water or an internal reservoir path. An unsafe shutoff or wet electrical area needs professional help.
-
Check 3
With water off and the appliance dry, inspect only the accessible rear tubing, push-fit connections, water valve area, and filter housing. Use a dry paper towel to locate a fresh wet connection. If the filter was recently changed, confirm it is seated exactly as the model guide shows and inspect it for a crack; do not force or cross-thread the housing.
Expected result: A rear connection or valve area is wet; the filter is loose, cracked, or wet; the filter was changed just before the leak; or all accessible supply points are dry.
Next step: Correct only a visibly loose, model-approved external connection or replace a damaged filter with the exact model part after water is isolated. If the valve body, tubing behind a cover, or filter housing itself leaks, stop and call service.
Stop if: Do not tighten a plastic valve body aggressively, cut tubing, open rear covers, or restore water to a connection that cannot be secured without force.
Why this matters
Why: Loose connections can leak to the floor, and a poorly installed or cracked filter can leak inside the cabinet. If the supply and filter are dry, the leak is more likely at the ice-maker fill path, bin/chute, dispenser, or frost/defrost path.
-
Check 4
If the water is in the ice bin, door chute, or around the dispenser opening, turn the ice maker/dispenser off and remove only the removable ice bin according to the exact model guide. Look for partially melted, fused, or frost-coated cubes and visible ice in the chute; thaw the bin away from the refrigerator, empty it, wash and dry it, and refit it.
Expected result: Cubes are fused or wet; ice is jammed in the chute or around the auger; the bin is cracked or not seated; the chute is clear and dry; or water returns without new ice being dispensed.
Next step: Restore the dry bin and run one limited test only after the water supply is secure. If the bin is damaged, the auger will not move normally, or water returns, keep the ice function off and arrange service.
Stop if: Do not chip ice with a knife or sharp tool, pour hot water into the chute, reach into the auger, or force a frozen bin free.
Why this matters
Why: Melted and refrozen ice can block the chute or auger and then leak as it melts. A cracked/mis-seated bin can spill, while a clear bin with a new leak points away from a simple ice clump.
-
Check 5
If the drip begins at the dispenser tip or chute rather than the ice maker, check whether the chute has visible frost or ice and whether the dispenser tip remains wet after the paddle is released. If the model has a water filter, confirm it is seated and not overdue according to the exact manual.
Expected result: Frost or ice surrounds the chute; a small drip follows dispensing; the filter was recently changed or is loose; or the tip continues to drip while the ice maker is not cycling.
Next step: Clear only visible frost/ice as the model guide permits, reseat the exact filter if needed, and keep the dispenser/ice maker off while a persistent drip is investigated. Escalate for an internal valve or water-line diagnosis.
Stop if: Do not insert tools into the chute, disassemble the dispenser, or restore water if the drip reaches controls or wiring.
Why this matters
Why: Frigidaire attributes chute leaks to melting ice and dispenser-tip drips can follow air in the water line. A filter seating or flow issue affects applicable shared water systems, but it does not prove the ice-maker valve is faulty.
-
Check 6
If water appears below or inside the ice-maker compartment, note whether it follows a door being left open, heavy frost, a thaw, or an ice-making/fill event. Inspect only visible frost, door closure, and compartment surfaces; do not remove the ice maker, fill tube, valve, or wiring.
Expected result: The refrigerator door was open for a long period and frost is melting; water appears exactly when the ice maker fills; the ice maker area is continuously wet; or no frost or fill pattern explains the leak.
Next step: Close the door and allow only a normal thaw to finish if that clearly explains the water. Keep the ice maker off and arrange service for a fill-timed, continuous, or unexplained internal leak.
Stop if: Do not melt heavy ice with a heat gun, scrape hidden ice, remove panels, or test a water valve while powered.
Why this matters
Why: Frigidaire says an extended-open door can ice the evaporator and allow water to leak from the bottom of the ice maker. Water synchronized with filling or persistent internal wetness makes a valve, fill path, ice-maker assembly, or drain issue more likely and needs model-specific diagnosis.
-
Check 7
After the water source is isolated or an external connection, exact filter, dry bin, or visible chute issue has been corrected, restore water only if every connection is dry and secure. Keep the first ice-making or dispensing test supervised and stop at the first fresh drip.
Expected result: No water returns; a leak reappears at the same external point; water appears during an ice-maker fill; the bin/chute leaks again; or water reaches the cabinet floor or electrical area.
Next step: Shut off water and the ice function again, retain the exact model and leak timing, and arrange Frigidaire or qualified refrigerator service for any repeat or internal leak.
Stop if: Do not continue cycling the ice maker, leave water pressure on an active leak, or perform internal electrical or water-valve tests.
Why this matters
Why: Recovery after a documented external correction supports a connection, filter seating, or removable ice blockage. A repeat leak during operation points to the model-specific valve, fill tube, ice-maker module, dispenser, drain, or internal tubing.
Use your observations
Decision map
Find the observation that best matches what you see, then follow the next safe action.
-
PATH 01Safety boundary
What you see
A dry paper towel finds fresh water at a rear connection, water valve area, or recently changed/cracked filter.
Do this next
Keep water off, correct only an accessible model-approved connection or exact filter seating, and call service for a valve body, tubing, or housing leak.
Why this path and its safety boundary
Why it matters: The pressurized supply or filter path is more likely than a melted ice-bin problem.
Safety stop: Do not move the refrigerator or open rear covers to reach hidden water parts.
-
PATH 02Safety boundary
What you see
The bin contains wet/fused cubes or the chute/auger has visible frost or an ice jam.
Do this next
Turn off the ice function, remove and thaw the removable bin safely, clean and dry it, and refit it. Escalate if the bin is damaged or water returns.
Why this path and its safety boundary
Why it matters: Melt-and-refreeze or chute blockage is more likely than an uncontrolled inlet valve.
Safety stop: Do not chip ice, force the auger, or pour hot water into the dispenser.
-
PATH 03Safety boundary
What you see
Water begins at the dispenser tip or runs out of a visibly frosted chute while the ice maker compartment is dry.
Do this next
Clear visible frost only as the exact guide permits, verify the exact filter is seated, and call service for persistent dripping or internal dispenser access.
Why this path and its safety boundary
Why it matters: Dispenser air-in-line drip, filter seating/flow, or melting chute ice is more likely than an ice-maker mold leak.
Safety stop: Do not disassemble the dispenser or work around wet controls.
-
PATH 04Safety boundary
What you see
Water appears below the ice maker after a door was left open or after visible frost melts, without a pressurized connection wetness.
Do this next
Close the door and monitor only after water is isolated. If water continues or the compartment stays wet, keep the ice maker off and arrange service.
Why this path and its safety boundary
Why it matters: Frost-related thaw water is more likely; an ongoing leak after the thaw is not explained by that observation alone.
Safety stop: Do not use sharp tools or forced heat to remove hidden frost.
-
PATH 05Safety boundary
What you see
Water returns during an ice-making fill, continues with water shut off, comes from inside the cabinet, or has no owner-accessible source.
Do this next
Keep the water supply and ice function off, isolate power safely if needed, and contact qualified service with the model and leak timing.
Why this path and its safety boundary
Why it matters: A model-specific inlet valve, fill tube, ice-maker module, internal line, drain, or residual water path needs diagnosis.
Safety stop: Do not open panels, test a valve while powered, or continue operating to collect more evidence.
Helpful context
Understand the symptom
The drip location matters more than the ice-maker label
Water on the floor behind the refrigerator, water inside the cabinet, a wet ice bin, and a drip from the dispenser chute are different paths. The ice maker may share a filtered supply with the dispenser, or the refrigerator may have a different freezer and dispenser layout. Trace the first wet point, not just the place where water finally appears.
Melted ice can look like a water-valve leak
In a dispenser model, frost or ice in the chute can melt and run down the door. Infrequent use, temperature changes, or an outage can also melt and refreeze cubes around an auger or at the rear of the bin. A removable bin can be safely cleaned and dried; an internal fill or ice-maker fault cannot be identified by replacing the bin at random.
Treat a continuous leak as a water and electrical safety problem
Shut off the water before wiping or tracing a persistent leak. If water is near the outlet, cord, controls, or wiring, do not touch wet electrical parts; isolate power only from a safe, dry position and leave the appliance off. Do not move a heavy refrigerator or remove rear covers just to reach a suspected valve.
Safety boundary
Stop conditions
- Shut off the refrigerator water supply and stop the ice maker for a continuous leak, water inside the cabinet, water near controls or wiring, or a leak that returns during filling.
- Do not touch wet electrical parts, unplug through standing water, move a heavy refrigerator to reach hidden plumbing, or open rear/control covers.
- Do not chip ice with sharp tools, force a frozen bin or auger, pour hot water into a chute, or test a valve, fill tube, or ice-maker wiring while powered.
- A cracked bin, leaking valve/filter housing, internal tubing or fill-path leak, persistent leak after water is shut off, or any part replacement without exact-model confirmation requires qualified service.
When checks do not resolve it
Need a professional?
Arrange Frigidaire or qualified refrigerator service when the leak returns after an exact filter or accessible connection correction, appears during an ice-maker fill, comes from below or inside the ice-maker compartment without a clear frost explanation, continues with the supply isolated, reaches electrical parts, or requires access to the water valve, fill tube, ice-maker module, dispenser, internal tubing, or wiring.
Safety scope: This article covers safe water isolation, external connection and filter observations, removable bin/chute care, and frost-related classification. Water valves, fill tubes, ice-maker modules, dispenser internals, wiring, door tubing, and cabinet access require qualified service.
Common questions
FAQ
Why is my Frigidaire ice maker leaking into the ice bin?
Wet or fused cubes can melt and refreeze around the auger or between the ice maker and rear of the bin, then leak as the blockage melts. Turn the ice function off, remove the removable bin, thaw it safely, empty and clean it, dry it fully, and refit it. A repeat leak or damaged bin needs service.
Could a water filter cause an ice-maker leak?
On models that route ice-maker water through a filter, an incorrectly seated or cracked filter can leak inside the cabinet. Shut off water, follow the exact model procedure to inspect and reseat or replace the filter, and do not assume a filter from another Frigidaire model fits.
Why does water come out of the ice dispenser chute?
Frigidaire says ice or frost in the door chute can melt and leak down the chute. It also notes that air in the water line can cause a dispenser-tip drip. Clear only visible ice as the exact guide permits and escalate for persistent dripping or internal dispenser work.
Why is water leaking from below the ice maker?
An extended-open door can let the evaporator ice up and later release water from below the ice maker. If the leak is synchronized with an ice-maker fill, continuous, or unexplained after the frost has thawed, keep the water and ice function off and arrange service for the model-specific fill path or ice-maker assembly.
Should I keep using an ice maker that is leaking?
No. Shut off the water supply and the ice-maker function. If water is near electrical parts, isolate power only from a safe, dry location. Do not keep cycling a leaking valve or use internal tests; a recurring or cabinet leak needs qualified service.
Read the exact guide
Official sources
- What should I do if the dispenser on my refrigerator is not dispensing water?Frigidaire · Official Frigidaire article for French-door, side-by-side, and top-freezer refrigerator dispenser systems; it does not establish a universal ice-maker filter or valve fit.
- Refrigerator Water LeaksFrigidaire · Official Frigidaire owner-support article for refrigerators; exact ice-maker, filter, valve, and dispenser architecture varies by model.
- Refrigerator Error Code DI SP or DISP - Ice JamFrigidaire · Official Frigidaire article for refrigerator models that show DI SP or DISP or have the described dispenser/ice-bin architecture; do not generalize it to non-dispenser ice makers.
Community feedback
Share a repair observation
Share a plain-text repair observation. Accepted observations are published automatically; this page may take a moment to update.