
On this page
Start here
Quick answer
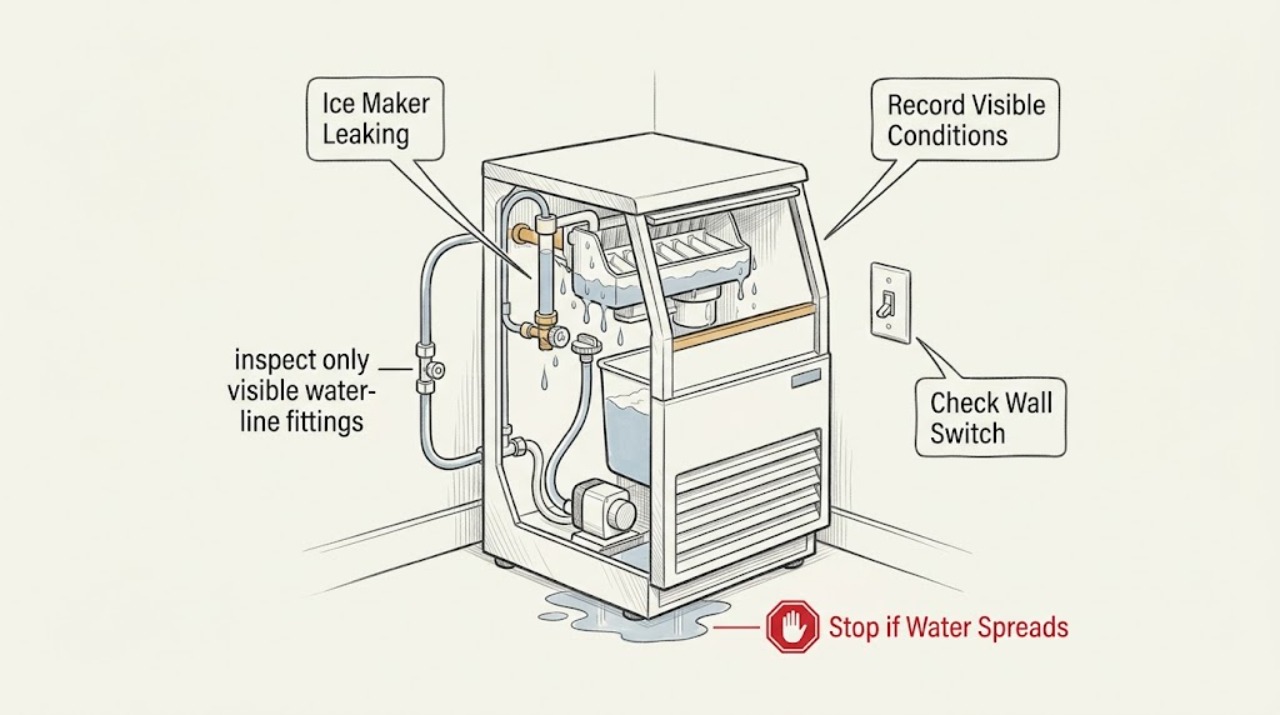
First identify the product: GE's refrigerator icemaker guidance is not the same as its stand-alone ice maker guidance, and an Opal unit has its own troubleshooting path. If water is near a plug or outlet, stop the appliance and disconnect power only from a safe, dry position. For an icemaker built into a refrigerator, turn the icemaker off; if it continues flooding, turn off the refrigerator's icemaker water supply, then inspect only visible fittings, the water valve area, fill-tube extension, defrost-drain symptoms, and refrigerator level. For a stand-alone unit, GE lists a loose reservoir drain cap, misaligned or clogged house drain, poor leveling, or damaged water/drain hose; an optional drain-pump connection is model-specific. For an Opal, a small drip under the ice bin can be condensation and the included drip tray is intended to collect it, while water that escapes the reservoir or persists needs model-specific service. Do not open the icemaker, remove a refrigerator fill tube, bypass a water valve, or continue operation after a persistent leak or electrical hazard.
Before you begin
Safety first
- The owner may turn the icemaker or unit off, close an accessible water shutoff, dry and observe visible parts, inspect a stand-alone drain cap or hose, use an Opal drip tray, and follow the exact manual. A qualified technician must assess internal valves, fill tubes, refrigerator drains, reservoirs, pumps, wiring, cabinets, and sealed refrigeration systems.
Work through in order
Diagnostic checks
Use only checks that match the exact appliance or system and its official guide.
-
Check 1
Stop ice production and inspect the floor, cord, plug, outlet, cabinet, and water source from outside. If water is near electrical parts, disconnect power only when the plug and surrounding area are safe and dry; otherwise leave the appliance isolated and obtain electrical help. Record the model and whether the unit is a refrigerator icemaker, stand-alone ice maker, or Opal.
Expected result: Water is in the refrigerator ice bucket or freezer, under a refrigerator, at a stand-alone reservoir or drain, under an Opal bin, or coming from a fitting or cabinet. The cord or outlet may be wet, hot, damaged, or discolored.
Next step: Keep the appliance unplugged if electrical hardware is wet, hot, damaged, or exposed. Otherwise continue only with the identified product's external, model-appropriate checks.
Stop if: Do not touch wet electrical equipment, restore power to watch a leak, move the unit through standing water, or open any panel.
Why this matters
Why: The architecture and first water location determine which GE procedure applies. Water at electrical hardware is a stop-use condition, not evidence for replacing an icemaker part.
-
Check 2
For a refrigerator-mounted icemaker, turn the icemaker off using the model's switch or control. If it continues flooding after it is off, turn off the refrigerator's icemaker water supply at the accessible shutoff described by GE. Do not remove the icemaker or disconnect an internal water line.
Expected result: Water stops when the icemaker is off, continues while it is off, or the shutoff cannot be reached safely. Note whether water is at a visible supply fitting, valve area, fill-tube extension, ice bucket, or freezer floor.
Next step: Leave a continuing refrigerator leak isolated with the icemaker and water supply off, and arrange qualified refrigerator service. If water stopped, proceed only with a dry visual inspection of the visible fittings and the exact refrigerator manual.
Stop if: Do not repeatedly energize the icemaker, pinch or bypass tubing, remove the fill tube, or probe the water valve.
Why this matters
Why: Stopping with the icemaker off makes an active fill or harvest event more likely; continued flooding after shutoff points toward the water supply or a valve that needs service. A freezer-floor leak can also be a defrost-drain issue rather than the icemaker itself.
-
Check 3
With a refrigerator icemaker isolated and dry, inspect only visible water-line fittings, the water-valve area, and the fill-tube extension for drips or evidence of overflow. Check whether the refrigerator is visibly out of level and whether water is collecting on the freezer floor or outside the case.
Expected result: A fitting or valve area is wet, the fill-tube extension shows water, the case is wet, the freezer floor has water or ice, or no visible source is found.
Next step: Do not operate if the leak persists or originates inside the cabinet. Record the location and arrange service; use the refrigerator-style defrost-drain guidance only if the model manual explicitly supports an external check.
Stop if: Do not remove freezer panels, pull out the icemaker, thaw with an open flame or heat gun, or work on internal water or electrical parts.
Why this matters
Why: GE lists secure water-line fittings, a leaking water valve, a fill-tube extension, a clogged or overflowing defrost drain, exterior moisture, and refrigerator leveling as separate possibilities. A hidden fill-tube or valve fault is not an owner-accessible diagnosis.
-
Check 4
For a stand-alone GE ice maker, unplug it and inspect the reservoir drain cap, the drain tube and standpipe alignment, the receiving household drain, the water-supply or drain hose, and the unit's level. If an optional drain-pump kit is installed, inspect only its visible connections and where the drain tube enters the house drain.
Expected result: The reservoir cap is loose, the tube is misaligned, the house drain is clogged, the unit has moved or is not level, a hose is damaged, or a pump connection drips.
Next step: Correct only the accessible cap, alignment, drain blockage, hose condition, and leveling described by the exact Installation Instructions. If the leak persists or a pump or internal reservoir is involved, keep the unit unplugged and arrange service.
Stop if: Do not remove the cabinet, run an exposed pump, force a drain fitting, or substitute a drain-pump arrangement not approved for the model.
Why this matters
Why: These observations match GE's stand-alone architecture and point to the accessible drain or installation path. They do not establish a refrigerator icemaker fault and do not justify opening the stand-alone cabinet.
-
Check 5
For an Opal, identify whether the water is a small drip under the ice bin, water in the back of the bin during startup, or water escaping the reservoir or lower cabinet. Check that the bin is fully inserted and that the supplied metal screen or approved filter remains at the reservoir inlet, following the model manual for cleaning.
Expected result: A small underside-of-bin drip occurs during normal operation, water appears in the back of the bin for the initial flush, the reservoir or lower cabinet leaks, or the bin or inlet screen/filter is not correctly installed.
Next step: Use the included drip tray for condensation, reseat the bin or approved screen/filter only as the manual shows, and keep the Opal unplugged for a reservoir or cabinet leak. Contact Opal-qualified support or service if the water source remains unexplained.
Stop if: Do not remove the screen during operation, use unapproved filtration, open the refrigeration system, or keep running an Opal with a persistent leak.
Why this matters
Why: GE describes condensation under the Opal bin and an approximately five-minute startup flush as normal observations. A reservoir or cabinet leak, missing screen/filter, or water that continues beyond those conditions is not explained by normal condensation.
-
Check 6
After one external correction and only when the product, floor, and electrical area are dry, use a brief supervised check permitted by the exact manual. Watch the original water location from a dry position and stop immediately for renewed flooding, water near electricity, smoke, burning odor, unusual heat, or water from inside the cabinet.
Expected result: The leak is gone, returns only during a refrigerator fill or harvest, returns at a stand-alone drain or hose, remains a small Opal condensation drip, or comes from an internal location.
Next step: Turn the icemaker or unit off again, close the applicable water supply, keep it unplugged when appropriate, and arrange qualified service for any recurring or internal leak. Provide the model, architecture, first water location, and timing.
Stop if: Do not repeat the test to force a leak, leave a water supply on to an active flood, open the unit, or perform live electrical tests.
Why this matters
Why: A dry result after correcting a supported external setup favors installation or routing. A recurring fill event, pump or valve leak, reservoir leak, or internal cabinet source requires model-specific diagnosis.
Use your observations
Decision map
Find the observation that best matches what you see, then follow the next safe action.
-
PATH 01Next step
What you see
The leaking device is an icemaker inside a GE refrigerator.
Do this next
Turn off the icemaker and, if it continues flooding, the icemaker water supply. Leave the refrigerator for qualified service if the leak persists or its source is internal.
Why this path and its safety boundary
Why it matters: An active fill or harvest problem is more likely when stopping the icemaker stops the leak; continued flooding raises concern about the supply or valve. A freezer-floor source may be a defrost-drain issue instead.
-
PATH 02Next step
What you see
The device is a stand-alone GE ice maker rather than a refrigerator icemaker.
Do this next
Unplug and correct only the accessible, model-approved drain or installation condition. Persistent reservoir, pump, or cabinet leaks need service.
Why this path and its safety boundary
Why it matters: A drain-cap, house-drain, leveling, hose, or optional-pump installation issue is more likely than a refrigerator fill-valve issue.
-
PATH 03Next step
What you see
The device is a GE Opal ice maker and the only water is a small drip under the ice bin.
Do this next
Use the drip tray for the condensation pattern. Stop and arrange Opal-qualified service for reservoir or cabinet leaks or for a drip that persists beyond the documented normal condition.
Why this path and its safety boundary
Why it matters: GE identifies condensation under the Opal bin as a possible normal condition and supplies a drip tray. Reservoir or cabinet water is a different, unresolved leak.
-
PATH 04Safety boundary
What you see
The water source is not identified, or water has reached electrical parts.
Do this next
Keep the product isolated, close the accessible water supply where applicable, and arrange qualified electrical or appliance service. Do not restore power to locate the leak.
Why this path and its safety boundary
Why it matters: The product cannot safely be used as a diagnostic test. A hidden water path or electrical exposure exceeds external owner troubleshooting.
Safety stop: Do not touch wet electrical parts or open the cabinet.
-
PATH 05Next step
What you see
A supported external correction stops the leak during one brief supervised check.
Do this next
Monitor without repeated testing if dry. If water returns, turn the icemaker or unit off, isolate water and power safely, and arrange service with the recorded timing and model.
Why this path and its safety boundary
Why it matters: A stable dry result supports a drain or installation correction but does not prove internal parts are sound. Recurrence identifies the product path that needs qualified diagnosis.
Helpful context
Understand the symptom
Confirm which GE ice maker is leaking
A freezer icemaker inside a GE refrigerator uses a water valve, fill tube, ice mold, and sometimes a defrost-drain path. A stand-alone ice maker has a reservoir and drain cap, and an Opal is a distinct countertop product with its own bin and condensation behavior. Do not transfer a refrigerator procedure to an Opal or stand-alone unit; record the model and where the water starts.
A few Opal drips are not the same as a flooding leak
GE says condensation under an Opal ice bin can collect and drip down the lower front surfaces, and the included drip tray can collect it. That normal explanation does not cover a reservoir leak, a misrouted drain, or water that continues after the unit is dry and correctly positioned.
Keep water shutoff and internal repair within the safety boundary
Owner checks are limited to switching the icemaker off, using an accessible water shutoff, drying and observing visible fittings, checking a stand-alone drain cap or hose, confirming level, and following the exact manual. Do not reach into moving or energized parts, remove a refrigerator icemaker or fill tube, expose wiring, bypass a valve or float, or open a sealed refrigeration system.
Safety boundary
Stop conditions
- Stop using the ice maker for water near the cord, plug, outlet, or internal electrical parts; smoke, burning odor, unusual heat, visible damage, or repeated flooding.
- For a refrigerator icemaker, turn it off and turn off its water supply if it continues flooding. Do not restore water just to reproduce a leak.
- Do not open an icemaker or Opal cabinet, remove a refrigerator fill tube, bypass a valve or sensor, run an exposed drain pump, or perform live electrical tests.
- Use the exact GE refrigerator, stand-alone ice-maker, or Opal manual for model-specific drain, level, filter, pump, and service instructions.
Only after diagnosis
Potential parts
- water inlet valve or visible water-line fitting
Consider only after qualified diagnosis confirms a refrigerator-mounted icemaker leak at the valve, fitting, or controlled fill path.
Valve, tubing, and fitting design are model-specific; do not disconnect internal water lines or order from the leak symptom alone. - stand-alone reservoir drain cap or drain hose
Consider only when the exact stand-alone model has a damaged or non-sealing drain cap or hose after alignment and household-drain checks.
Stand-alone drain components and optional pump kits are model-specific; confirm the Installation Instructions and fitment before replacement. - Opal ice-bin or water-path component
Consider only if Opal-qualified diagnosis finds damage or a failed model-specific bin or water-path component rather than normal condensation under the bin.
Opal product generations and accessories differ; use the exact model support path and do not open the refrigeration system.
When checks do not resolve it
Need a professional?
Arrange qualified refrigerator service when a built-in icemaker continues leaking after it is turned off and its water supply is closed, when a visible valve or fill-tube area leaks, or when water comes from an internal or defrost-drain path. Arrange stand-alone ice-maker service for a persistent reservoir, pump, cabinet, or installation leak after the accessible cap, drain, hose, and leveling checks. For Opal, use Opal-qualified support or service for reservoir, cabinet, or persistent non-condensation leaks. Keep any product with water near electrical hardware unplugged and have the electrical condition assessed before restarting.
Safety scope: The owner may turn the icemaker or unit off, close an accessible water shutoff, dry and observe visible parts, inspect a stand-alone drain cap or hose, use an Opal drip tray, and follow the exact manual. A qualified technician must assess internal valves, fill tubes, refrigerator drains, reservoirs, pumps, wiring, cabinets, and sealed refrigeration systems.
Common questions
FAQ
Why is my GE refrigerator ice maker leaking water?
Turn the refrigerator icemaker off first. If it continues flooding, turn off its water supply. GE lists visible water-line fittings, the water valve, fill-tube extension, a clogged or overflowing defrost drain, exterior moisture, and refrigerator leveling as possible paths; an internal source needs service.
Is a stand-alone GE ice maker the same as the icemaker in my refrigerator?
No. GE's stand-alone ice-maker leak guidance specifically says it is not about the automatic icemaker inside a refrigerator. Stand-alone checks include the reservoir drain cap, house-drain alignment, household drain, level, hose, and optional drain-pump connections; use the refrigerator procedure for a built-in unit.
Why is my GE Opal ice maker dripping underneath the bin?
GE says condensation can form on the bottom of the Opal ice bin and drip down the lower front surfaces during normal operation; the included drip tray can collect it. A reservoir or cabinet leak, or water that persists beyond this pattern, needs the Opal model manual and service path.
Should I turn off the water if the GE ice maker keeps flooding?
For a refrigerator-mounted icemaker, GE says to turn the icemaker off first and, if it is still flooding, turn off the icemaker water supply. Do this only at an accessible shutoff and keep the appliance isolated if water is near electrical parts.
Can I remove the GE refrigerator ice maker to find the leak?
Do not remove it as a generic troubleshooting step. GE's leak guidance supports turning it off, closing the water supply if flooding continues, and inspecting visible conditions; removal, fill-tube, valve, wiring, and internal water-path diagnosis belongs with qualified service.
Read the exact guide
Official sources
- Refrigerator and Freezer Troubleshooting and SupportGE Appliances · Use for model-specific support routing and the refrigerator icemaker leak summary; it does not replace the exact model manual.
- FAQs | IcemakersGE Appliances · Use to confirm GE treats leaking and dripping as a refrigerator/icemaker support topic; the linked detailed article controls the procedure.
- Opal Ice Maker - TroubleshootingGE Appliances · Use only for GE Opal products and their documented architecture.
- Refrigerator Icemaker Leaking or FloodingGE Appliances · Use for refrigerator-mounted icemakers; it does not establish Opal or stand-alone procedures.
- Refrigerator - Icemaker Leaking or Dripping WaterGE Appliances · Use only for automatic icemakers inside GE refrigerators, not stand-alone or Opal products.
- Ice Maker - LeakingGE Appliances · Use only for a stand-alone GE ice maker; GE explicitly distinguishes it from a refrigerator-mounted automatic icemaker.
Community feedback
Share a repair observation
Share a plain-text repair observation. Accepted observations are published automatically; this page may take a moment to update.