
On this page
Start here
Quick answer
Start with the door itself, not a hinge adjustment: remove any bottle, shelf, bin, furniture panel, or nearby cabinet obstruction that prevents the door from reaching the frame, and check that the gasket is clean, seated, and not folded or damaged. Gaggenau's installation guidance says the appliance must be level for the doors to close properly, while its built-in refrigeration instructions warn that the appliance is very heavy and can tip when the door is opened; do not pull a built-in unit forward or attempt a loaded hinge adjustment as a casual DIY test. Check from the front that the cabinet and door sit squarely, and note whether the problem is a uniform gasket gap, a rub at one corner, a sagging door, or a door that closes but reopens. Gaggenau requires the appliance E-Nr. to retrieve the correct manual, and its official repair guidance treats gasket grooves and adjustable hinge attachments as model-specific service work. If the gasket is torn or out of its groove, the hinge/furniture panel is loose, the door cannot seal, the appliance is unstable, or frost and temperature problems follow, keep the door closed as far as possible and arrange Gaggenau-qualified service. Do not remove the door, loosen hinge hardware, defeat a door-closing aid, or force the door against an obstruction without the exact manual.
Before you begin
Safety first
- The owner may remove a visible loose obstruction, inspect and gently clean the accessible gasket as the exact manual permits, and record the door pattern. Qualified personnel must move or level a built-in appliance, adjust or remove hinges, align furniture panels, replace a gasket in its groove, access door wiring or automatic closing hardware, and diagnose any cooling or electrical consequence.
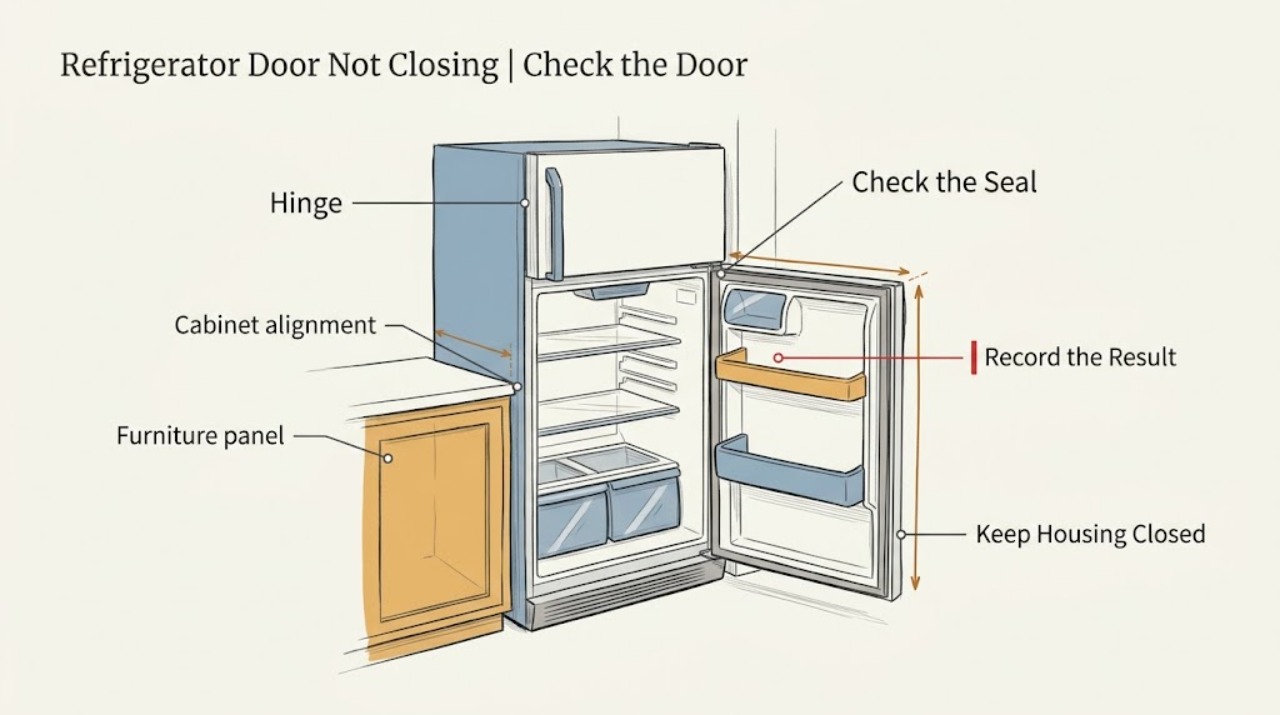
Work through in order
Diagnostic checks
Use only checks that match the exact appliance or system and its official guide.
-
Check 1
Record the Gaggenau E-Nr. and identify the door pattern before changing anything. From the front, note whether the door is stopped by an object, rubs one corner, sits low or high, springs back open, or reaches the frame but leaves a continuous gap. Retrieve the exact manual using the E-Nr.
Expected result: The door is blocked before contact; one corner rubs; the door appears sagged; the gasket contacts unevenly; or the door reaches the frame but will not seal.
Next step: Follow the matching check below and the exact Gaggenau manual. Do not loosen hardware to see what changes.
Stop if: Stop if the appliance moves, the door or glass is damaged, the furniture panel is loose, or the built-in unit appears unstable.
Why this matters
Why: An object or furniture-panel obstruction is a different path from a level/hinge geometry issue or a gasket-seal issue. The same visual symptom can map to different adjustments on Gaggenau models, so the E-Nr. is required before a hinge or door-closing procedure.
-
Check 2
With the door supported normally, remove only an obvious loose obstruction such as a bottle, bin, shelf item, or packaging that is visibly preventing closure. Check that a handle, furniture front, adjacent cabinet, or trim is not contacting the door through its normal swing. Do not remove the door panel or built-in trim.
Expected result: The door closes after the item is removed; the same point still catches; the furniture panel or handle rubs; or nothing visible blocks the swing.
Next step: Rearrange only the loose item and confirm the door closes without force. For panel, cabinet, hinge, or repeated clearance interference, stop and arrange qualified service or an installer inspection.
Stop if: Do not force the door, shave a cabinet, bend a panel, or remove built-in trim to create clearance.
Why this matters
Why: A closure that returns after removing one item identifies a loading or clearance issue. Persistent rubbing at the same point makes cabinet, panel, hinge, or installation alignment more likely and is not solved by forcing the gasket.
-
Check 3
Inspect the entire visible gasket and the mating cabinet surface with the door open. Look for food or debris, a folded section, a corner pulled out of its groove, a tear, hardening, or a section pinched by the door or furniture panel. Wipe light soil with the model-approved method and let the seal sit naturally; do not remove it for a trial.
Expected result: The gasket is dirty but intact; a corner is displaced; it is torn or missing; it is compressed unevenly; or the gasket looks uniform while the door remains misaligned.
Next step: Clean only as directed by the exact manual. If the gasket is damaged, out of its groove, or the gap persists, arrange qualified service; do not stretch, glue, heat, or substitute a generic seal.
Stop if: Do not pull the gasket from its groove, use a heat gun or boiling water, apply adhesive, or operate with a damaged seal if food safety or cooling is affected.
Why this matters
Why: Surface soil or a displaced section can prevent a seal, while a torn or missing gasket needs replacement matched to the E-Nr. A uniform gasket with a one-corner gap makes door alignment, leveling, hinge, or panel geometry more likely than a seal-only issue.
-
Check 4
From a safe standing position, check whether the refrigerator appears level and stable, whether the door gap is even, and whether the door collides with adjacent cabinetry at the intended opening angle. Do not pull a built-in appliance forward, tip it, or reach behind the plinth to adjust feet.
Expected result: The cabinet rocks or appears out of level; the door gap changes from top to bottom; the door hits a neighboring cabinet; or the unit is stable and the gap is even but the seal still fails.
Next step: If leveling or installation appears wrong, arrange qualified installation service. If only an adjacent object is obstructing the door, remove that loose object; do not modify fixed cabinetry or hardware yourself.
Stop if: Do not open the door wide on an unstable unit, defeat anti-tip attachment, move the appliance, or adjust hinges without the exact manual and suitable support.
Why this matters
Why: Gaggenau's installation guidance links leveling to proper door closure and identifies neighboring cabinetry and installation geometry as clearance concerns. A stable, level-looking unit with an even but persistent gap points toward the gasket or model-specific door hardware.
-
Check 5
If the door appears closed, look for a continuous light gap, frost or moisture near the edge, a door alarm, or a refrigerator that runs longer than usual. Keep the door closed as much as possible while recording the affected compartment and timing; do not use paper, tape, or a clamp to force the seal.
Expected result: There is no gap or cooling change; the door alarm or frost appears; the unit runs longer; or the gasket/door cannot maintain contact.
Next step: Minimize door openings and arrange service for a persistent gap, alarm, frost, or temperature change. Protect perishable contents using a known-safe alternative if the compartment cannot hold temperature.
Stop if: Do not continue normal storage if the refrigerator cannot maintain a safe temperature, and do not force a damaged door closed.
Why this matters
Why: A persistent gap can admit warm air and lead to frost, moisture, temperature drift, or long running. If cooling consequences are present, the door-seal issue becomes a food-preservation and appliance-performance concern, not merely a cosmetic alignment issue.
-
Check 6
Stop owner troubleshooting when the door needs hinge adjustment, gasket replacement, furniture-panel alignment, removal from a built-in niche, or investigation of an automatic closing aid. Provide the technician the E-Nr., door position, obstruction point, gasket pattern, level/stability observation, and cooling or alarm symptoms.
Expected result: The door closes after a loose obstruction is removed; the gasket is only dirty; or the door remains misaligned, damaged, loose, unstable, or unable to seal.
Next step: Use the exact guide only for an explicitly owner-approved cleaning or adjustment. Otherwise keep the door closed and arrange Gaggenau-qualified service or a qualified installer.
Stop if: Do not remove the door, loosen hinge screws, disconnect wiring, defeat an automatic door device, or slide the appliance out.
Why this matters
Why: A simple loading issue can be corrected without disassembly. Persistent misalignment or a damaged/unstable installation requires model-specific service, and the heavy built-in cabinet creates a tipping and property-damage risk.
Use your observations
Decision map
Find the observation that best matches what you see, then follow the next safe action.
-
PATH 01Safety boundary
What you see
A bottle, bin, shelf item, packaging piece, handle, furniture panel, or neighboring cabinet stops the door before it reaches the frame.
Do this next
Remove only the loose obstruction and make one gentle closure. If a fixed panel or cabinet still rubs, stop and arrange an installer or appliance service inspection.
Why this path and its safety boundary
Why it matters: This is a clearance or loading branch, not proof of a bad hinge or gasket.
Safety stop: Do not force, bend, cut, or remove fixed cabinetry or trim.
-
PATH 02Safety boundary
What you see
The gasket is dirty, folded, pulled out of its groove, torn, missing, or compressed unevenly.
Do this next
Clean only as the E-Nr.-specific manual permits and arrange qualified service for displacement, damage, or persistent gaps.
Why this path and its safety boundary
Why it matters: The seal itself can prevent closure or allow warm-air leakage. A model-matched gasket and groove procedure is required; generic stretching or adhesive can worsen the seal.
Safety stop: Do not pull the gasket out, heat it, glue it, or substitute an unverified seal.
-
PATH 03Safety boundary
What you see
The door is low, rubs one corner, has a changing gap, the cabinet rocks, or the built-in panel is visibly out of alignment.
Do this next
Do not move the appliance or loosen hinges. Arrange qualified installation or appliance service with the exact E-Nr. and the rub/gap location.
Why this path and its safety boundary
Why it matters: Leveling, hinge, furniture-panel, niche, or mounting geometry is more likely than a simple surface cleaning issue. Gaggenau's built-in units are heavy and secured against tipping.
Safety stop: Do not open the door wide on an unstable unit or attempt a loaded hinge adjustment.
-
PATH 04Safety boundary
What you see
The door appears shut but leaves a continuous gap or causes frost, moisture, long running, temperature drift, or an alarm.
Do this next
Minimize openings, check only the visible gasket and loose obstructions, and arrange service if the gap or cooling symptom persists.
Why this path and its safety boundary
Why it matters: The door is not maintaining a reliable seal. A gasket, frame, hinge, panel, or alignment fault can allow warm air into the compartment.
Safety stop: Do not clamp, tape, or force the door shut, and do not rely on the cooler for perishables if temperature cannot be maintained.
-
PATH 05Safety boundary
What you see
The door has an automatic closing aid, special furniture-front hardware, or a model-specific hinge/door device that prevents closure.
Do this next
Retrieve the exact Gaggenau manual and stop at external observations. Arrange service if the device does not return to its documented position or the door will not close.
Why this path and its safety boundary
Why it matters: These mechanisms vary by E-Nr. and can be damaged by repeated force or incorrect adjustment. A general refrigerator-door procedure is not sufficient.
Safety stop: Do not defeat, remove, or manually reset an automatic closing aid or door mechanism without the exact instructions.
Helpful context
Understand the symptom
A door gap can be an obstruction or an alignment symptom
First look for the simple pattern: a bottle, bin, shelf, furniture panel, handle, or adjacent cabinet is stopping the door before the gasket reaches the frame. If the door rubs at one corner, sits low, or closes only when lifted, the pattern is more consistent with alignment, leveling, hinge, or mounting geometry. Do not infer a bad gasket until the door can reach the cabinet without obstruction.
The gasket must seal without being forced
Inspect the visible gasket around the entire door. It should lie evenly against the frame, with no fold, tear, pulled-out corner, debris, or section trapped behind a shelf or panel. Gaggenau's repair guidance refers to the gasket groove and notes that some appliances have adjustable hinges or hinge attachments; those are not interchangeable procedures across E-Nr. models. Clean the accessible seal gently, but do not pull it from the groove or reshape it with heat unless the exact manual explicitly directs that work.
Protect a built-in appliance from tipping
Gaggenau's built-in refrigeration installation material describes heavy appliances, anti-tip attachment, level installation, and door-opening clearance. A door that will not close is not a reason to slide the refrigerator out, remove a trim panel, or lean into the cabinet. If the unit moves, the furniture panel is loose, or the hinge needs access, stop and use qualified installation or appliance service.
Safety boundary
Stop conditions
- Stop for an unstable or moving built-in appliance, loose furniture panel, damaged glass/door, a torn or missing gasket, exposed wiring, or a door that cannot seal.
- Do not pull, tip, or slide a Gaggenau built-in refrigerator; heavy appliances can tip when a door is opened and require secure installation.
- Do not remove the door, loosen hinge hardware, disconnect door wiring, defeat an automatic closing aid, or alter fixed cabinetry without the exact E-Nr.-specific instructions and qualified support.
- If frost, moisture, an alarm, or temperature drift follows the gap, minimize door openings and protect perishable contents until qualified service restores a reliable seal.
Only after diagnosis
Potential parts
- door gasket
Consider only when the exact E-Nr. manual and qualified inspection identify a torn, missing, permanently deformed, or groove-damaged gasket as the cause of the seal failure.
Gasket profile and installation vary by Gaggenau E-Nr.; verify the model and groove design before ordering or fitting. - hinge or door-closing hardware
Consider only after qualified diagnosis identifies hinge, attachment, furniture-panel, or automatic closing hardware damage or misalignment after obstructions and leveling are ruled out.
Built-in and freestanding door mechanisms are model-specific and can affect appliance stability; use qualified service and confirm E-Nr. fitment.
When checks do not resolve it
Need a professional?
Arrange Gaggenau-qualified appliance or installation service when the door remains blocked, rubs, sags, will not seal, needs gasket or hinge work, has a loose furniture panel, or the unit is not level or stable. Call promptly for frost, moisture, a door alarm, temperature drift, or long running caused by the gap. Do not move a built-in refrigerator or work on automatic door hardware yourself.
Safety scope: The owner may remove a visible loose obstruction, inspect and gently clean the accessible gasket as the exact manual permits, and record the door pattern. Qualified personnel must move or level a built-in appliance, adjust or remove hinges, align furniture panels, replace a gasket in its groove, access door wiring or automatic closing hardware, and diagnose any cooling or electrical consequence.
Common questions
FAQ
Why will my Gaggenau refrigerator door not close?
Look first for a bottle, shelf, bin, furniture panel, handle, or cabinet obstruction. Then inspect the visible gasket for dirt, folds, or displacement and check whether the appliance appears level and stable. A corner rub, sagging door, continuous gap, loose panel, or unstable built-in unit needs qualified service; do not force or move the appliance.
Can an unlevel Gaggenau refrigerator prevent the door from closing?
Yes. Gaggenau's built-in refrigeration installation guidance says the appliance must be level and that an unlevel appliance can prevent the doors from closing properly. Because these appliances are heavy and secured against tipping, do not pull the unit out or adjust its feet casually; arrange qualified installation service.
Can I push the Gaggenau door gasket back into place?
Inspect the visible seal and clean light soil only as the exact E-Nr. manual permits. Gaggenau repair guidance treats the gasket groove and any hinge optimization as model-specific work. If the seal is pulled out, torn, missing, or will not remain seated, arrange service rather than using heat, glue, or a generic gasket.
What if the refrigerator door closes but leaves a gap or causes frost?
A visible gap can admit warm air and lead to frost, moisture, alarms, temperature drift, or longer running. Minimize door openings, check only for loose obstructions and visible gasket damage, and arrange service if the door does not seal. Do not clamp or tape the door shut.
How do I adjust a Gaggenau refrigerator hinge?
Do not use a generic hinge procedure. Gaggenau requires the correct manual by appliance number/E-Nr., and its repair documentation describes model-specific hinge attachments and closing behavior. Built-in appliances are heavy and can tip; arrange qualified service or an installer for hinge, furniture-panel, or door-removal work.
When is a Gaggenau refrigerator door problem urgent?
Arrange prompt service for a door that cannot seal, a persistent alarm, frost or temperature drift, a damaged gasket or glass, a loose panel, a moving or unstable built-in unit, or any need to access hinges or wiring. Protect perishable contents if the compartment cannot maintain temperature, and do not move the refrigerator yourself.
Read the exact guide
Official sources
- AC_MA-SD_GG-en.bookGaggenau · Applies to the built-in refrigeration families covered by this installation document; use it for safety and installation principles, not as a universal adjustment manual for every Gaggenau refrigerator.
- Download appliance documentationGaggenau · Brand-level source establishing that the correct manual is selected by appliance number/E-Nr.; it does not replace the exact refrigerator manual.
- Appliance Information - built-in fridge | RC462700/01Gaggenau US · Use only as proof that Gaggenau has built-in refrigerator models with E-Nr.-specific manuals and parts; do not generalize RC462700/01 hinge geometry.
- bi60_10_premium-fridge-repair_hintsGaggenau / BSH Hausgeräte GmbH · Technical repair document for the covered Gaggenau premium refrigeration family; use it to establish model-specific service boundaries, not as permission for an owner to dismantle a door.
Community feedback
Share a repair observation
Share a plain-text repair observation. Accepted observations are published automatically; this page may take a moment to update.