
On this page
Start here
Quick answer
If a GE refrigerator is not making ice, first confirm which ice maker is affected and whether it is turned on at the ice maker or refrigerator controls. Then check that the freezer is cold enough, the water supply is on, and a water filter is not restricting flow. Look for a visible cube blocking the ejector or a piled-up bin that has moved the feeler arm or paddle to its stop position; do not touch a potentially hot ice-maker mold. A newly installed ice maker may need time to cool and purge air from the water line. GE's green-light diagnostic applies only to ice makers with an On/Off switch and LED, and its mold can become hot during the test, so do not generalize it to every model. If the fill tube is frozen, the ice maker is in a fresh-food door or dual-ice configuration with an unclear control, the diagnostic fails, or no ice returns after safe checks, arrange qualified refrigerator service.
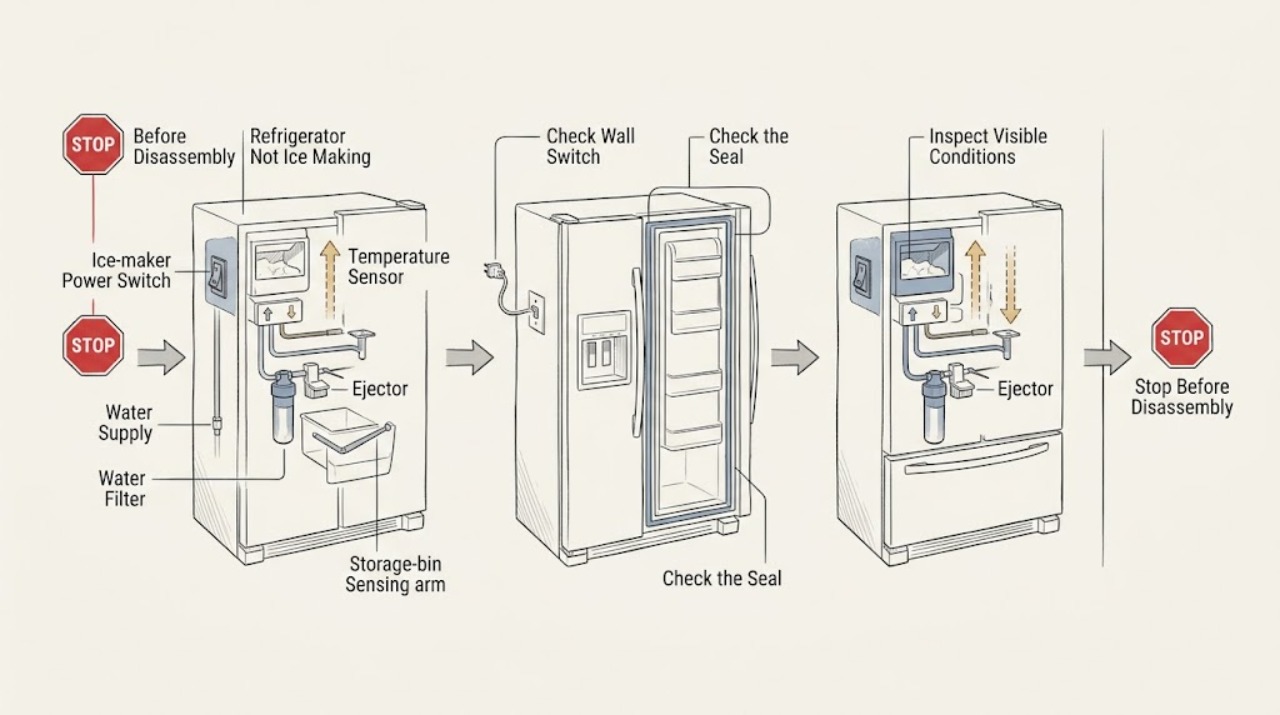
Work through in order
Diagnostic checks
Use only checks that match the exact appliance or system and its official guide.
-
Check 1
Identify the affected ice-maker location and inspect only accessible controls and the storage bin. Confirm the correct ice maker is selected ON at the refrigerator panel or at its feeler arm, paddle, toggle, or slide switch; if there are top and bottom ice makers, verify the control for the affected one. Do not reach into the ejector mechanism or force a control.
Expected result: The ice maker is off, paused, has a raised feeler arm or rear paddle, shows an off state for one of two ice makers, or is on but the mold remains empty. Note whether the dispenser has ice even though new ice is not being made.
Next step: Turn on only the affected ice maker using the exact manual and level or remove excess bin ice as GE describes. If the control is unclear, inaccessible, or the ice maker remains inactive, continue with temperature and water checks or arrange service.
Why this matters
Why: A model-specific off or paused state can explain no production without proving a failed component. Existing bin ice with no new production points to the ice-making cycle, while a full or clumped bin can also hold production off.
-
Check 2
Check the refrigerator and freezer temperature displays or a safe, model-approved measurement, and allow a newly installed refrigerator or ice maker time to cool. Keep the freezer adequately loaded without blocking vents or the ice maker, and ensure doors close and seal. Do not scrape frost from the ice maker, remove freezer panels, or change the setting repeatedly.
Expected result: The freezer is warmer than the model's recommended setting, the ice maker is newly installed, the refrigerator has little food load, or the freezer is at the expected temperature but the mold remains empty.
Next step: Correct only the model-approved temperature or loading condition and allow the documented settling period. If the freezer is cold enough and no ice forms, continue with water and filter checks; do not open the sealed cooling or defrost system.
Why this matters
Why: GE says temperature controls ice production and a new ice maker may take up to 24 hours to reach its cycle temperature. A cold freezer with persistent no ice makes water supply, controls, ejector, or an internal fault more likely.
-
Check 3
Inspect the accessible water supply valve to the refrigerator and the filter status. Confirm the valve is open, look for a kink in visible tubing, and replace a filter only with the exact model-compatible procedure; if the model supplies a bypass plug, use it only as the owner's manual directs. Do not disconnect pressurized tubing or remove the water valve.
Expected result: The valve was closed, the filter is overdue or flow at the dispenser is slow, water flow improves with the approved bypass arrangement, or the dispenser works but the ice-maker mold stays dry.
Next step: Open the accessible valve and follow the exact filter or bypass instructions once. If the mold still does not fill, do not remove the ice maker or tubing; arrange qualified refrigerator service for a fill tube, valve, wiring, or control diagnosis.
Why this matters
Why: A closed valve or restricted filter can stop or reduce the fill. If the dispenser works while the ice-maker fill tube is frozen, GE says the fill tube needs technician inspection; dispenser flow alone does not prove that the ice maker receives water.
-
Check 4
With the ice maker off, inspect for a visible cube blocking the mold or ejector and for ice piled high or clumped in the bin. Remove only loose, reachable ice without tools and restore the bin, shelf, and feeler arm or paddle as the exact model instructions show. Do not touch the mold body if it may be hot or rotate the rake by force.
Expected result: A loose cube blocks the ejector, the bin is piled up, the feeler arm or paddle is held in its stop position, the ejector is empty but does not move, or no accessible obstruction is present.
Next step: Clear only the loose obstruction and turn the ice maker back on as directed. If the ejector, feeler arm, paddle, or mold is damaged, hot, frozen in place, or still does not cycle, stop and arrange service.
Why this matters
Why: GE says a stuck cube or full bin can stop the harvest cycle. An unmoving ejector with no accessible jam may indicate an ice-maker motor, heater, or control issue, but the specific part cannot be identified from this check.
-
Check 5
If the affected ice maker has an On/Off switch with a flashing green LED, use GE's exact model-limited diagnostic: turn it off for 15 seconds, turn it on, and actuate the paddle only as the official procedure specifies. Keep hands away from the mold body during harvest and stop if it becomes hot, the rake jams, or the cycle does not finish.
Expected result: The green light becomes solid and the mold fills, the rake does not complete its motion, the light keeps flashing, or the mold does not fill after the diagnostic.
Next step: Turn the ice maker off and arrange qualified refrigerator service for a failed diagnostic, persistent flashing light, hot or damaged mold, or any need to test wiring. If your unit lacks this exact LED design, skip this action and use its manual.
Why this matters
Why: This diagnostic is not universal. GE associates an unsuccessful harvest with a jam, heater, or motor condition and warns that the body can become very hot; a failed result needs service rather than repeated testing.
-
Check 6
After one safe correction, allow the refrigerator to complete a normal ice-making cycle and record whether water enters the mold and cubes eject. Do not repeatedly pour water into the mold, run a heater, or remove an ice maker to test it; any optional fill test must be explicitly permitted by the exact GE guidance and performed without touching hot parts.
Expected result: Ice production resumes, the mold fills but cubes do not eject, the mold remains dry, the refrigerator is cold but the ice maker is silent, or an ice maker in a fresh-food door or dual configuration behaves differently from the freezer unit.
Next step: Keep the refrigerator and affected ice maker in a safe normal state and arrange qualified service for persistent no ice, a frozen fill tube, damaged controls, abnormal heat, or any internal water, wiring, motor, heater, or valve work.
Why this matters
Why: Recovery after an ON, temperature, water, filter, or loose-jam correction supports that external condition. A dry mold, failed ejector, silent unit, or architecture-specific failure requires model-specific diagnosis.
Use your observations
Decision map
Find the observation that best matches what you see, then follow the next safe action.
-
PATH 01Next step
What you see
The affected ice maker is off, paused, or the storage bin is full or clumped.
Do this next
Turn on the correct ice maker and level or remove excess loose ice using the model instructions. If production does not resume, continue to temperature and water checks.
Why this path and its safety boundary
Why it matters: A control or storage-bin state is more likely than a failed water valve or motor.
-
PATH 02Next step
What you see
The freezer is warm or the ice maker was just installed.
Do this next
Restore the model-approved temperature and airflow/load condition and allow the documented time to cool. Escalate if the freezer reaches temperature but no cycle begins.
Why this path and its safety boundary
Why it matters: Insufficient temperature or new-installation conditions are more likely than an ice-maker component failure.
-
PATH 03Next step
What you see
The freezer is cold but the ice-maker mold is dry or only partially fills.
Do this next
Correct only the accessible valve or model-approved filter path. Do not remove the ice maker or fill tube; arrange service for a dry mold that persists.
Why this path and its safety boundary
Why it matters: A water-supply, filter, valve, or fill-tube problem is more likely than a temperature problem.
-
PATH 04Next step
What you see
The mold contains ice but cubes do not eject, or an exact LED diagnostic fails.
Do this next
Clear only loose ice with the ice maker off and follow the exact manual. Keep it off and arrange qualified service for a failed diagnostic, hot/damaged mold, or internal component issue.
Why this path and its safety boundary
Why it matters: A jam may be accessible when loose and safe to remove; a failed harvest, heater, motor, or control condition requires model-specific service.
Helpful context
Understand the symptom
Identify the affected ice maker and symptom
GE refrigerators can have an ice maker in the freezer, a fresh-food door, or more than one ice maker, with controls on the appliance, a feeler arm, a toggle, or a slide switch. “Not making ice” is different from an ice dispenser that cannot deliver an existing supply. Record whether the mold is empty, cubes are frozen but stuck, the bin is full or clumped, or water is missing before changing a setting.
Temperature and water flow decide whether a cycle begins
GE says the refrigerator and ice maker must reach the proper temperature before a cycle starts; its general guidance uses 37°F for fresh food, 0°F for the freezer, and about 16°F at the ice maker. A closed supply valve, restricted filter, or frozen fill tube can prevent water from entering. Do not remove an ice maker to inspect a fill tube or work on the water valve yourself.
Use the LED diagnostic only on the matching design
GE's paddle-and-LED harvest diagnostic is specifically for ice makers with an On/Off switch and LED. The heater can make the ice-maker body very hot during the test, and a flashing light can reflect a jam, heater, or motor condition. If your model does not have that exact control design, use its owner's manual instead; do not force the rake or perform electrical tests.
When checks do not resolve it
Need a professional?
Arrange qualified refrigerator service if the GE ice maker remains off or silent after the correct model control is enabled, the freezer is at temperature and the mold stays dry, the fill tube may be frozen, an ejector or mold is damaged or unusually hot, a model-specific LED diagnostic fails, a dual or fresh-food-door ice maker cannot be identified, or no ice returns after safe external checks. Do not remove the ice maker, water valve, fill tube, freezer panels, or wiring; do not force the rake, bypass a sensor, or perform live electrical tests.
Common questions
FAQ
Why is my GE refrigerator not making ice?
Check the correct ice maker's ON state, freezer temperature, water shutoff, filter flow, storage-bin position, and visible loose cubes. A new installation may need time to cool and purge air. If the freezer is cold and the mold stays dry or the ejector will not cycle, arrange qualified service rather than removing the ice maker.
How do I turn on a GE refrigerator ice maker?
GE uses several designs: lower a metal feeler arm, move a labeled slide switch, move a toggle to ON, or enable the affected top or bottom ice maker at the refrigerator control. Controls vary by refrigerator style, so use the exact owner's manual and do not assume that one ice maker's setting controls another.
Why is my GE ice maker mold empty when the freezer is cold?
Confirm the water valve is open and the filter is not restricting flow. If the dispenser works but the ice-maker mold remains dry, GE notes that the fill tube may be frozen and should be checked by a service technician. Do not remove the ice maker or water valve yourself.
Read the exact guide
Official sources
- Refrigerator - Icemaker Doesn't Fill With WaterGE Appliances · GE refrigerator ice-maker water fill, supply, filter, fill-tube, and model-specific service checks
- Refrigerator - Icemaker Not Producing IceGE Appliances · GE refrigerator built-in ice-maker power, temperature, filter, stuck-cube, and service checks
- Refrigerator - Frost in FreezerGE Appliances · GE refrigerator door, gasket, alignment, and frost conditions affecting freezer temperature
- Refrigerator - Green Light on Icemaker FlashingGE Appliances · GE LED ice-maker diagnostic scope and hot-mold safety boundary
- Refrigerator - New Icemaker Not Producing IceGE Appliances · GE newly installed refrigerator ice-maker temperature, power, and air-purge conditions
- Refrigerator - Cubes Won't Drop From Icemaker MoldGE Appliances · GE refrigerator ice-maker paused, bin, stuck-cube, and temperature checks
- Refrigerator - How to Turn Icemaker On or OffGE Appliances · GE refrigerator feeler-arm, toggle, slide-switch, single- and dual-ice-maker controls
Community feedback
Share a repair observation
Share a plain-text repair observation. Accepted observations are published automatically; this page may take a moment to update.