
On this page
Start here
Quick answer
If a Haier freezer is not making ice, first identify whether it is a built-in refrigerator ice maker or a standalone ice-making unit, then confirm power and that the ice maker is switched on. Check the bin for a full-level indication, clumped cubes, or a tray blocked by ice; verify that the freezer is cold enough for ice production and allow the model's startup time after a new installation or power-up. Check the external water supply, filter, and line for a closed tap, kink, poor connection, or restricted flow. For a standalone Haier ice maker, clean the accessible condenser only with power disconnected and only as the Haier procedure permits. Stop for a leak near electrics, smoke, damaged wiring, repeated breaker trips, or an internal blockage or fault that would require panel removal. Haier's built-in guidance says the freezer must be 10°F or colder and that initial ice can take up to 24 hours, but exact requirements vary by model.
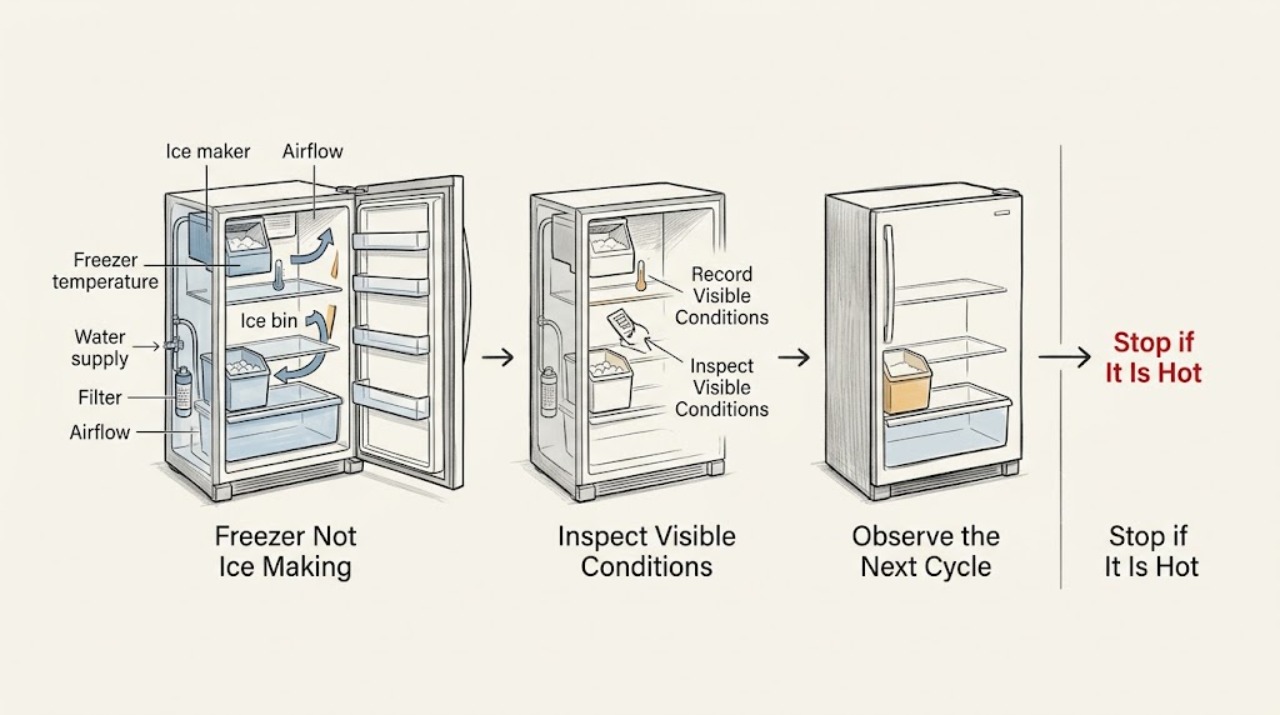
Work through in order
Diagnostic checks
Use only checks that match the exact appliance or system and its official guide.
-
Check 1
Identify whether the Haier appliance is a standalone ice maker or a refrigerator/freezer with a built-in ice maker. Record whether production is absent or merely slow, whether a bin-full light or message is present, and whether the freezer is otherwise freezing food normally.
Expected result: A full-bin indication, slow harvest, no water fill, and a freezer that is not cold enough point to different branches. A standalone unit also has different room-temperature and condenser guidance from a built-in refrigerator ice maker.
Next step: Continue with the power and on-state check, then use the branch matching the observed bin, temperature, or water symptom. Use the exact model manual for any control or access not visible from the user area.
Why this matters
Why: The appliance type determines which Haier instructions apply; applying standalone ice-maker maintenance to a built-in unit can lead to the wrong access or cleaning procedure.
-
Check 2
Confirm that the appliance is plugged into a working outlet, the house breaker or fuse has not opened, and the ice-maker switch or control is in the on position. If a breaker has opened, reset it once only and observe the appliance; do not repeatedly reset it.
Expected result: If the unit comes back on and the ice-maker control was off, production may resume after the normal startup interval. If the breaker opens again, the outlet is dead, or the control will not remain on, there is an electrical or control problem rather than a simple ice-bin issue.
Next step: Leave the appliance off and arrange qualified appliance or electrical service for a repeated trip, damaged cord, scorch mark, smoke, or unresponsive control. If power and the on state are normal, inspect the ice bin.
Why this matters
Why: Haier lists power and the on state as first checks. A recurring breaker trip is a safety signal and should not be treated as a reset routine.
-
Check 3
Remove only the accessible ice bin or drawer as the model manual directs. Look for a full-bin indicator, cubes packed into a bridge, a large block in the tray, or ice obstructing the outlet. Do not use a knife, screwdriver, heat gun, or other tool inside the ice maker.
Expected result: A full bin or clumped cubes can stop harvesting or make the unit appear not to produce ice. A tray frozen into one large block is a blockage that should not be forced apart by reaching into the mechanism.
Next step: Remove excess loose ice and separate safe, accessible clumps by hand, reinstall the bin correctly, and monitor one normal cycle. If the tray is solidly frozen, the mechanism is jammed, or the symptom returns, stop and arrange service.
Why this matters
Why: Haier says production stops when the bin is full and advises checking for clumping or a blocked tray on built-in models. The result determines whether a simple accessible bin clear is reasonable or service is required.
-
Check 4
Check the freezer temperature using the appliance display or a suitable appliance thermometer without changing settings beyond the model's instructions. For a built-in Haier ice maker, compare the reading with Haier's 10°F-or-colder guidance, and note how long the freezer has been running and how often the door is opened.
Expected result: A built-in freezer above the ice-making threshold, a recently started appliance, or frequent warm-air entry can explain no or slow ice. Haier says a new refrigerator can need about 48 hours to stabilize and first ice can take up to 24 hours after switch-on.
Next step: Correct an obviously open door, obstructed air path, or incorrect setting allowed by the manual and allow the documented stabilization period. If the freezer remains warm, alarms, or cannot hold temperature, arrange appliance service rather than forcing an ice-maker cycle.
Why this matters
Why: Ice production cannot be judged until the freezer reaches its model-specific operating temperature. If food is also soft or the freezer cannot reach the required temperature, the ice maker is likely not the primary fault.
-
Check 5
Inspect the external water supply only: confirm the shutoff tap is open, the visible line is not kinked or crushed, the connection is secure, and any installed filter is seated and within its service interval. Do not loosen a pressurized fitting or remove an internal valve cover.
Expected result: A closed tap, disconnected line, restricted filter, or weak flow explains a tray that never fills. A built-in Haier system may also need air bled after installation or filter work; follow the model manual rather than repeatedly cycling the valve.
Next step: Restore only an obviously closed tap, correctly seated filter, or visible kink that can be corrected without tools, then monitor one cycle. If flow is weak, a connection leaks, air will not clear, or a shutoff or plumbing repair is needed, stop and use qualified appliance or plumbing service.
Why this matters
Why: No fill is a water-path branch, not evidence that the ice-making motor or heater has failed. Water pressure requirements vary by appliance type and model; Haier's published built-in and standalone guidance is not interchangeable.
-
Check 6
For a standalone Haier ice-making unit only, and only if its manual identifies the lower front louver and condenser as user-accessible, disconnect power, remove the louver gently, vacuum visible lint with a brush attachment, reinstall the louver, and reconnect power. Do not use this procedure on a built-in freezer unless its manual specifically permits it.
Expected result: Visible lint or a clogged condenser can reduce ice capacity and raise operating temperature on the standalone models covered by Haier's procedure. If the condenser is not accessible, heavily iced, damaged, or still followed by no production after cleaning, the result is not a cue to open the cabinet.
Next step: Run one normal cycle after the approved cleaning. If the unit remains warm or makes no ice, or if cleaning would require removing panels, stop and arrange qualified service.
Why this matters
Why: Airflow maintenance is a model-specific cause of slow or stopped ice production. The power-disconnect step is part of the safety boundary, and generic freezer disassembly is outside the user check.
-
Check 7
After the accessible checks, observe one complete normal ice-making attempt without repeatedly opening the door or forcing a harvest. Note whether the ice maker fills, freezes, harvests, and returns to an on state, and preserve any display message or fault indication.
Expected result: A normal fill and harvest after the bin, temperature, water, or airflow correction confirms that branch. No fill with normal water supply, a tray that repeatedly freezes into a block, a failure to harvest, or a recurring fault points to an internal valve, sensor, motor, heater, control, or temperature problem.
Next step: Stop using the appliance for smoke, burning odor, leaks near electrics, damaged wiring, unusual heat, or repeated breaker trips. Otherwise arrange qualified appliance service for persistent no ice after the documented checks, and provide the model, appliance type, temperature, water symptoms, and any displayed message.
Why this matters
Why: The final observation separates a corrected operating condition from an internal fault. Those components are not safe to diagnose by cabinet removal or live testing for an ordinary user.
Use your observations
Decision map
Find the observation that best matches what you see, then follow the next safe action.
-
PATH 01Next step
What you see
The bin is full, a bin-full indication is lit, or cubes are clumped at the outlet.
Do this next
Remove excess loose ice and clear only accessible clumps by hand, reinstall the bin, and monitor one normal cycle. Escalate if a tray is frozen solid or the blockage returns.
-
PATH 02Next step
What you see
The freezer is warmer than the model's ice-making requirement or the appliance was just installed or switched on.
Do this next
Correct only the allowed temperature or airflow setting and allow the model's startup or stabilization period. Arrange service if the freezer cannot hold temperature or food is also soft.
-
PATH 03Next step
What you see
The ice maker is off or the appliance has no power.
Do this next
Restore the switch or power once if safe. A recurring breaker trip, dead outlet, damaged cord, or unresponsive control requires qualified service.
-
PATH 04Next step
What you see
The tray does not fill and the external water tap, line, or filter is not correct.
Do this next
Correct an obvious tap, filter, or kink only without opening a pressurized fitting, then monitor one cycle. Use appliance or plumbing service for weak flow, leaks, air that will not clear, or an internal valve.
-
PATH 05Next step
What you see
A standalone unit has a visibly dirty accessible condenser and its Haier instructions permit user cleaning.
Do this next
Disconnect power, vacuum the visible condenser with the specified brush attachment, restore the louver, and run one normal cycle. Do not transfer this procedure to a built-in freezer without model-specific permission.
-
PATH 06Next step
What you see
No ice persists after power, on-state, bin, temperature, water, and permitted maintenance checks, or the appliance leaks, smokes, smells burnt, damages wiring, or trips a breaker again.
Do this next
Stop using it and arrange qualified appliance service; use qualified electrical or plumbing help when the fault is in the supply. Do not open panels, force the mechanism, bypass a safety device, or perform live tests.
Helpful context
Understand the symptom
First separate the appliance type and symptom
Haier uses different guidance for a standalone ice-making unit and a refrigerator with a built-in ice maker. Note which one you have, whether there is no ice at all or only slow production, whether the bin is full, and whether the freezer itself is holding its normal temperature. Do not infer an internal ice-maker failure from a single short cycle or from a full storage bin. A new or recently powered appliance also needs its model's startup interval before production can be judged.
Keep water and electrical work outside the cabinet
Only inspect the plug, breaker, switch, bin, temperature display, filter housing, and visible water line as user-accessible items. Do not remove the cabinet or electrical cover, insert tools into the ice-maker mechanism, force a frozen tray, test live wiring, or bypass a sensor or safety device. Disconnect power before an approved accessible condenser-cleaning procedure. If water reaches electrical parts, the cord is damaged, there is smoke or a burning smell, or a breaker trips again, stop using the appliance and arrange qualified service.
When checks do not resolve it
Need a professional?
Professional diagnosis is appropriate for persistent no ice after accessible checks, an internal water valve, sensor, motor, heater, control, or sealed cooling problem, or any electrical, leak, or repeated fault symptom.
Common questions
FAQ
How long should a Haier freezer take to make ice after it is switched on?
For the built-in refrigerator ice maker covered by Haier's support guidance, first ice can take up to 24 hours after the freezer is switched on, and a new refrigerator can take about 48 hours to stabilize. Use the exact model manual for a standalone freezer or ice maker.
Why does my Haier ice maker have water but make no ice?
Check that the freezer is at the model's ice-making temperature, the ice maker is on, and the tray or bin is not blocked by clumped or frozen-solid cubes. If the freezer is cold and the tray still does not fill or harvest, arrange service rather than forcing the mechanism.
Can a water filter stop a Haier freezer from making ice?
Yes, a filter that is restricted, overdue, or not seated correctly can reduce water flow on models that use one. Check only the external filter procedure in the model manual; do not loosen a pressurized fitting or open the ice-maker cabinet.
Should I remove a large block of ice from the Haier ice-maker tray?
Do not pry or chip a frozen-solid tray with a tool. Remove only loose, accessible bin ice by hand and arrange qualified service if the tray or mechanism is frozen into a block or the blockage returns.
When should I stop troubleshooting a Haier freezer ice maker?
Stop for a leak near electrical parts, smoke, a burning smell, damaged wiring, unusual heat, or a breaker that trips again. Persistent no ice after the accessible checks also needs qualified appliance service; do not remove panels or perform live electrical tests.
Read the exact guide
Official sources
- Haier - Refrigerator Normal Icemaker Operation | Haier AppliancesHaier Appliances · Official Haier support page describing normal harvest timing and the accessible causes of no or slow ice production on applicable refrigerator models.
- Haier Ice Maker - Not Working | Haier AppliancesHaier Appliances · Official Haier support page for the standalone ice-maker symptoms and accessible condenser-cleaning procedure; apply its room-temperature, pressure, and access details only where the appliance type and model match.
- Haier Refrigerator - Ice Maker Not Making Ice | Haier AppliancesHaier Appliances · Official Haier support page for built-in refrigerator ice makers; its temperature, timing, pressure, and air-bleeding guidance is model- and appliance-type-specific.
Community feedback
Share a repair observation
Share a plain-text repair observation. Accepted observations are published automatically; this page may take a moment to update.