
On this page
Start here
Quick answer
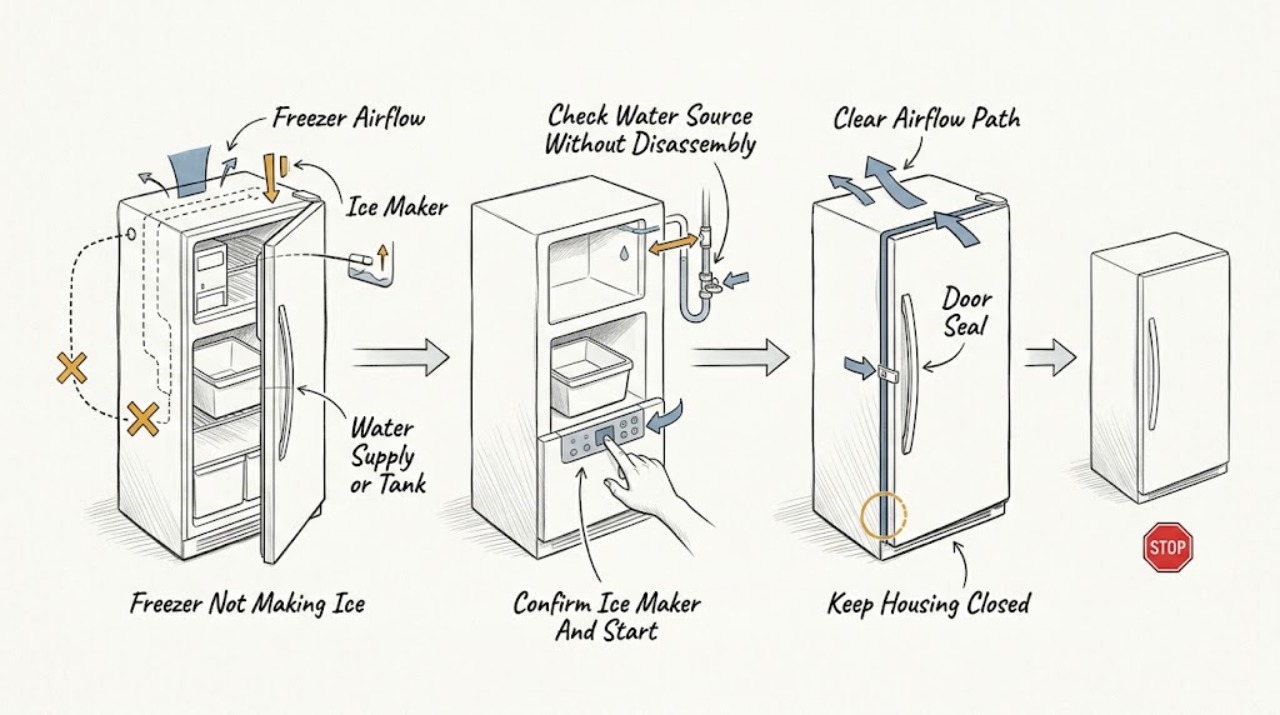
First confirm that this Beko freezer is an ice-making model and whether it uses a plumbed water supply or a refillable tank. If it was newly connected, Beko says the first ice can take eight to twelve hours while the freezer reaches operating temperature. Then check the model's ice-maker or dispenser setting, the water tap or tank, the freezer temperature and frost pattern, and whether the ice bin or chute is blocked by a bridge of ice. Beko notes that excessive frost can restrict airflow and says to use the product manual for temperature and defrost instructions. Clear only loose, accessible ice or debris as the manual allows; never chip ice with a sharp object or force an auger, tray, valve, or frozen drawer. If the freezer is warm, the water path leaks, the ice maker remains inactive after the model-directed checks, or internal components need access, stop and arrange qualified appliance service.
Before you begin
Safety first
- No live electrical work, pressurized-line disconnection, sharp-object defrosting, forced ice-mechanism movement, cabinet or sealed-system disassembly, or refrigerant work.
Work through in order
Diagnostic checks
Use only checks that match the exact appliance or system and its official guide.
-
Check 1
From the front and without removing panels, confirm that the Beko appliance has an ice-maker or ice-dispenser feature and note whether it is a newly installed/connected unit. Read the control display and exact manual for an ice-maker enable, vacation, or dispenser setting before changing anything.
Expected result: Record whether the model makes ice automatically, uses a plumbed inlet or refillable tank, shows an ice-maker-off indicator, and whether it has had at least the manufacturer's initial operating time after connection.
Next step: Enable the feature only as the model manual describes, ensure the initial wait requirement is met, and continue to the water and temperature checks if ice is still absent.
Stop if: Do not remove the ice maker, bypass a switch, or force a tray or ejector mechanism to test it.
Why this matters
Why: A freezer without an automatic ice maker cannot produce cubes by itself. A newly connected dispenser may simply be waiting for the freezer to reach its operating temperature; an off setting or wrong mode can prevent production without a component failure.
-
Check 2
Identify the model's water source. For a plumbed unit, inspect only the visible tap and tubing for an obvious closed supply, kink, disconnection, or leak; for a tank model, check from ordinary access whether the tank is present, seated, filled, and clean as the manual permits.
Expected result: Classify the water path as correctly connected and filled, empty or incorrectly seated, kinked or visibly disconnected, leaking, or not identifiable from safe access.
Next step: Restore only a visibly displaced tank or an approved control setting. If a plumbed connection is leaking, close the accessible water supply from a dry location, keep the ice feature off, and arrange qualified appliance or plumbing service.
Stop if: Do not disconnect a pressurized line, remove an inlet valve, pierce tubing, or work near wet electrical equipment.
Why this matters
Why: A plumbed appliance depends on its water inlet, while a non-plumbed model depends on its tank. A visible leak or an inaccessible inlet needs service; it is not safe to infer a valve or filter failure by opening the rear of the appliance.
-
Check 3
Read the freezer temperature display or control position against the exact Beko manual and inspect the compartment from the front for heavy frost, blocked vents, tightly packed food, or a door that does not close and seal normally. Do not remove panels or probe the evaporator.
Expected result: Record a stable manual-approved setting, high-temperature warning, heavy frost, blocked airflow, overloading, or a door seal that is not closing evenly.
Next step: Rearrange only accessible food to restore the manual's airflow clearances and close the door fully. If heavy frost is present, follow the model-directed defrost branch; if the freezer remains warm or shows a persistent high-temperature warning, arrange service and protect food.
Stop if: Do not chip frost, use sharp objects, remove an evaporator cover, or keep the door open while food is warming.
Why this matters
Why: Ice production needs the freezer to reach its intended operating condition. Beko says excessive frost can restrict airflow, and tightly packed items or a poor seal can also prevent proper cooling; an appliance that is warm has a cooling fault that takes priority over the ice maker.
-
Check 4
With the freezer door open only briefly, inspect the ice bin, visible chute, and dispenser outlet for a solid bridge, clumped cubes, an overfilled bin, or an object blocking the path. Remove only loose cubes that lift out normally; do not force the bin, auger, flap, or ice-maker tray.
Expected result: Record an empty bin, loose but clumped ice, a frozen bridge at the outlet, a full bin with no dispensing, or a mechanism that is stuck or inaccessible.
Next step: Use only the exact manual's cleaning or thawing procedure for accessible dispenser parts. If ice does not release without force or the bin refreezes, keep the dispenser off and request service.
Stop if: Do not pry frozen parts, pour liquid into the dispenser, insert tools into the auger, or disassemble the ice maker.
Why this matters
Why: Ice may be produced but unavailable when a bin or chute is jammed. If the bin is empty and the temperature/water checks are normal, the maker's fill, harvest, sensor, or control system may need professional diagnosis.
-
Check 5
If heavy frost is blocking the freezer or its vents and the exact model is not frost-free, follow Beko's manual-directed defrost process: transfer frozen food safely, turn off and unplug from a dry safe location, allow ice to melt with towels/containers ready, and dry the interior before restarting. Do not use sharp objects or force drawers.
Expected result: Record whether frost melts completely, vents and drawers become clear, the door seal remains intact, and ice production resumes after the freezer returns to its manual-approved operating condition.
Next step: Restart only after the interior is dry and follow the manual's waiting/food guidance. If cooling or ice production does not recover, stop using the ice maker and arrange service.
Stop if: Do not defrost with sharp tools, direct heat, water near the plug, or a fan placed where melting water can reach it; do not open the sealed refrigeration system.
Why this matters
Why: Improved cooling after a complete permitted defrost supports frost-related airflow restriction. Frost that rapidly returns, persists on a frost-free model, or accompanies weak cooling suggests a defrost, seal, fan, or refrigeration fault.
-
Check 6
After a safe setting, water-source, bin, or model-approved defrost correction, keep the ice-maker area and floor dry and observe the next normal ice-making attempt without opening covers or repeatedly cycling the controls. Keep frozen food protected while the freezer stabilizes.
Expected result: Record new ice production, ice in the bin but no dispensing, no water reaching the maker, a new leak, persistent high-temperature warning, or an unchanged inactive maker.
Next step: If ice does not return after the manual-approved recovery period, keep the ice feature off and request qualified repair with the model and observations. Do not continue repeated cycles to provoke a harvest.
Stop if: Stop for water leaks, electrical smell, heat, unusual noise, a damaged cord, rapidly warming food, or any need to access internal components.
Why this matters
Why: Ice in the bin but no dispensing indicates a chute/bin path issue; no fill with normal cooling indicates a water inlet, tank, valve, sensor, or control issue. A warm freezer or leak is a broader appliance fault and takes priority.
Use your observations
Decision map
Find the observation that best matches what you see, then follow the next safe action.
-
PATH 01Safety boundary
What you see
The Beko American-style freezer was just connected and the ice maker has not yet produced its first batch.
Do this next
Confirm the water source and enabled setting, then allow the model's initial period without repeatedly opening or cycling the appliance.
Why this path and its safety boundary
Why it matters: Beko says initial ice production can take eight to twelve hours while the freezer reaches optimum temperature.
Safety stop: Stop for a leak, warm freezer, high-temperature warning, or electrical symptom.
-
PATH 02Safety boundary
What you see
Cooling is normal but a non-plumbed tank is empty/not seated, or a visible plumbed connection is closed, kinked, disconnected, or leaking.
Do this next
Refill/reseat only a tank the manual identifies, or close a leaking supply and arrange appliance/plumbing service for a plumbed connection.
Why this path and its safety boundary
Why it matters: The ice maker cannot fill normally until its model-specific water source is available.
Safety stop: Do not undo a pressurized line, remove an inlet valve, or continue with wet electrics.
-
PATH 03Safety boundary
What you see
The freezer is warm, heavily frosted, overloaded, or has blocked vents/poor door sealing.
Do this next
Rearrange accessible items and follow the exact Beko defrost procedure if applicable; request service if temperature remains high or frost returns.
Why this path and its safety boundary
Why it matters: Cooling and airflow must be restored before ice-making diagnosis is meaningful.
Safety stop: Do not chip ice, remove sealed covers, or keep using an ice maker in a warming freezer.
-
PATH 04Safety boundary
What you see
The bin contains ice but cubes are clumped, bridged at the outlet, or not dispensing.
Do this next
Remove only loose accessible cubes and follow the model manual for cleaning; request service for a stuck auger, tray, flap, or recurring bridge.
Why this path and its safety boundary
Why it matters: The maker may be producing ice while the storage or dispensing path is blocked.
Safety stop: Do not pry, pour liquid into the mechanism, or insert tools into the ice path.
-
PATH 05Safety boundary
What you see
The freezer is cold, water source and bin are normal, but no ice forms; or a leak, warning, unusual noise, or internal access is involved.
Do this next
Turn off the ice-maker feature if the manual permits, protect frozen food, and arrange qualified appliance service with the model and observations.
Why this path and its safety boundary
Why it matters: A fill valve, sensor, heater/ejector, control, fan, or sealed cooling issue cannot be identified safely from external checks.
Safety stop: Do not bypass controls, dismantle the ice maker, probe wiring, or open the sealed refrigeration system.
Helpful context
Understand the symptom
Separate making ice from dispensing it
A freezer can make ice that is stuck in the bin, bridge-frozen at the outlet, or unable to pass through the dispenser. Conversely, an empty ice bin may reflect no water reaching the maker, an inactive setting, a freezer that is not cold enough, or a long first-start delay. Identify whether the ice maker is empty, the bin is full but the chute is blocked, or both ice and water functions have stopped before choosing a check.
Water supply and freezer temperature are model-dependent
Beko describes both plumbed and non-plumbed American-style appliances: some use a mains-water connection and others use a manually filled tank. Temperature controls, indicator meanings, and the presence of a dedicated ice maker vary by model. Do not assume a standard freezer has an automatic ice maker or apply a plumbing procedure to a tank model.
Defrost only by the approved method
Beko says excessive frost can restrict airflow and recommends following the manual for defrosting. If manual defrost is appropriate, switch off and unplug only from a dry, safe location, protect frozen food, let ice melt naturally, and dry the interior before restarting. Sharp tools, forced drawers, heat applied directly to the appliance, and cabinet disassembly can damage the freezer or create an electrical hazard.
Safety boundary
Stop conditions
- Stop for a warm freezer, persistent high-temperature warning, water leak, damaged cord, electrical smell, unusual heat/noise, or rapidly thawing food; protect food and request qualified service.
- Do not chip ice with sharp objects, force drawers or the ice mechanism, pour water into the dispenser, or remove cabinet, evaporator, or sealed refrigeration covers.
- Do not disconnect a pressurized water line or work near wet electrical equipment; isolate water or power only from a dry safe location and only when safe.
- Stop repeated cycling when the ice maker remains inactive after the model-directed wait and external checks, or when the fault is internal or uncertain.
When checks do not resolve it
Need a professional?
Use qualified service for internal ice-maker, valve, sensor, fan, defrost, control, or sealed-system faults, and for any leak or unresolved failure after safe model-directed checks.
Safety scope: No live electrical work, pressurized-line disconnection, sharp-object defrosting, forced ice-mechanism movement, cabinet or sealed-system disassembly, or refrigerant work.
Have this ready
- Exact Beko model, whether plumbed or tank-fed, ice-maker/dispenser setting, time since connection, freezer temperature/warning, frost pattern, bin/chute result, and any leak or noise.
Common questions
FAQ
How long should a new Beko freezer take to make ice?
For a newly connected American-style dispenser, Beko says initial ice production can take eight to twelve hours while the freezer reaches optimum temperature. Check the water source and model setting during that period.
How do I know whether my Beko freezer is plumbed for ice?
Check the exact model manual and look only for an accessible water tank or visible mains-water connection. Beko makes both plumbed and non-plumbed American-style appliances.
Can frost stop a Beko freezer from making ice?
Yes. Beko says excessive frost can restrict airflow and interfere with cooling. Follow the exact manual's defrost procedure and never chip ice with a sharp object.
What if the ice bin is full but no ice dispenses?
Inspect only the accessible bin and chute for clumped or bridged cubes and follow the model manual for cleaning. Do not pry the auger or pour liquid into the dispenser; recurring blockage needs service.
When should I call a technician for a Beko ice-maker problem?
Call when the freezer is warm, a warning persists, water leaks, no ice forms after the model-directed wait and external checks, or access to valves, sensors, wiring, the sealed system, or internal ice-maker parts is required.
Read the exact guide
Official sources
- American Style Fridge Freezers: To Plumb or Not to Plumb?Beko UK · Distinguishing mains-water and refillable-tank ice/water systems
- How long will I have to wait to use my ice dispenser after connecting it?Beko UK · Initial ice-production delay after connection and freezer temperature readiness
- My appliance is no longer running?Beko UK · Beko freezer compressor, airflow, frost, loading, door-seal, and manual-defrost checks relevant to ice production
- Appliance ManualsBeko UK · Model-specific controls, ice-maker configuration, temperature, defrost, and cleaning instructions
- Ice is not being crushed evenly?Beko UK · Conditional ice-bin/dispenser cleaning guidance when ice is present but dispensing is abnormal
- What temperature should a freezer be?Beko UK · Freezer temperature, indicator interpretation, frost, manual guidance, and service escalation
- How to defrost a freezerBeko UK · Model-directed manual defrost, frost/airflow recovery, and sharp-object safety boundary
Community feedback
Share a repair observation
Share a plain-text repair observation. Accepted observations are published automatically; this page may take a moment to update.