
On this page
Start here
Quick answer
First decide whether this is a manual ice tray or an automatic ice maker, and whether the freezer has a connected water supply. A manual tray needs water placed in the tray and a freezer that is cold enough to freeze it; it does not have an automatic valve, filter, or reset button. For an automatic maker, check that ice production is enabled, the bin and door are seated correctly, the freezer is at the model's recommended temperature, and the water valve and line are open, connected, and not kinked. A recently installed or restarted machine may need the model-specific waiting period. Inspect the filter only as the manual directs and check for a jam without forcing the ejector. Use one documented reset at most. Stop for a water leak near electrical parts, damaged tubing, warming food, smoke, burning odor, arcing, repeated breaker trips, or any need to open a panel or sealed water system.
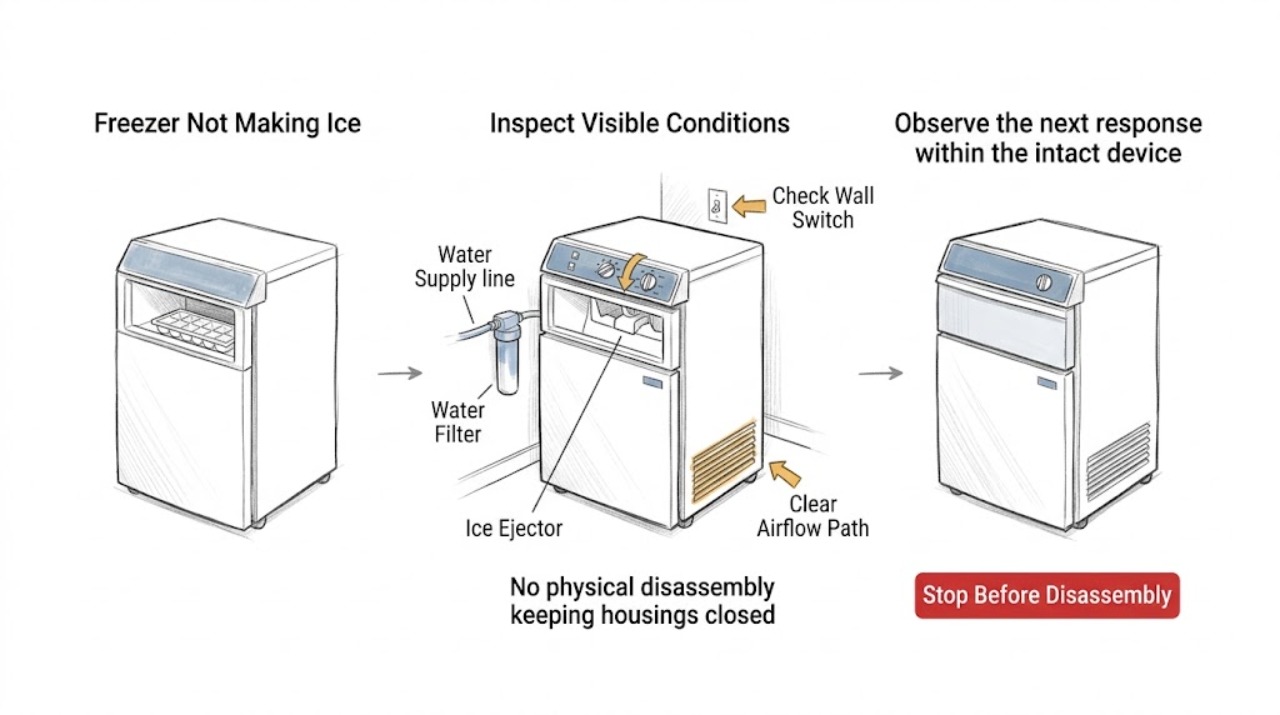
Work through in order
Diagnostic checks
Use only checks that match the exact appliance or system and its official guide.
-
Check 1
Identify the ice-making method before troubleshooting: look for a refillable manual tray, or an automatic maker with an ejector, bin, on/off control, or water connection. Record whether the freezer is a chest, upright, or refrigerator-freezer design.
Expected result: A tray with no water needs a simple fill-and-freeze path; an automatic maker may have an enabled state, bin sensor, water valve, filter, and reset procedure. Some freezers have no ice-making feature at all.
Next step: Use the model manual to confirm the design and control labels. Continue only with checks that apply to that design; stop for a leak, warming food, smoke, or electrical danger.
Why this matters
Why: The wrong method leads to irrelevant checks. A manual tray does not use an automatic valve or maker reset, and a maker without a water connection cannot fill through a water line.
-
Check 2
For a manual tray, verify that the tray is intact, filled as the manual directs, seated level, and placed in a compartment that is actually freezing. For an automatic maker, verify that the bin is fully inserted, the door or lid closes, and the maker is switched on according to the manual.
Expected result: Water in a level tray that freezes confirms the freezer can make ice but does not test an automatic system. An automatic maker that is off, blocked by the bin, or inhibited by a door or control state will not start a normal fill cycle.
Next step: Correct only an empty tray, misseated bin, open door, or clearly disabled setting described by the manual. If the freezer is not cold enough or the maker remains inactive, continue to temperature and water checks.
Why this matters
Why: This separates a user-supply or control state from a cooling or automatic-maker fault. Bin and door designs vary, so a visible switch or sensor must not be forced.
-
Check 3
Check the freezer temperature display or normal freezing performance and compare it with the model manual's recommended setting. Note whether food is softening, an alarm is active, the compartment was recently loaded or restarted, or the unit has heavy frost blocking airflow.
Expected result: A freezer that is too warm or still stabilizing can delay or prevent ice production. Stable freezing with no frost obstruction shifts attention to the maker's enabled state, water path, bin, or control.
Next step: Use the manual's temperature and startup guidance and allow its specified stabilization time. Protect food and arrange service if the compartment remains warm, an alarm persists, or frost blocks an air path.
Why this matters
Why: Ice production depends on the freezer reaching the design temperature; changing a setting cannot fix a freezer that is losing cooling or has an internal frost fault.
-
Check 4
For an automatic maker that is supposed to use water, inspect only the visible supply connection and line for an open supply, secure connection, kink, or obvious leak. Do not pull a heavy appliance forward alone or disconnect a pressurized line.
Expected result: No water, a kink, an unconnected line, a closed valve, or a visible leak supports a supply-path problem. A clear dry line with normal water dispensing shifts attention to the filter, maker, or control.
Next step: Restore only an accessible valve or line position that the manual permits. Stop and close the supply or request service for a leak, damaged tube, inaccessible valve, or water near electrics.
Why this matters
Why: A restricted supply can stop filling; a leak changes the priority to water safety. A manual tray has no automatic supply-line branch.
-
Check 5
If the appliance has a water filter, note whether it was recently installed, is seated and locked as the manual shows, is overdue according to the model indicator, or coincided with slower water dispensing. Do not substitute an unverified filter or bypass a leaking housing.
Expected result: A misseated, clogged, or old filter can reduce or stop flow and may cause a leak at the housing. Normal dispensing with no filter warning makes the filter a less likely cause.
Next step: Follow the model manual for one correct reseat or replacement and check for leaks. If water does not return, the housing leaks, or the model has no user filter, arrange service rather than altering the water path.
Why this matters
Why: Filter arrangements and replacement intervals vary. A filter symptom does not prove that the inlet valve or ice maker has failed.
-
Check 6
With the maker off or safely idle, look for a small amount of loose ice obstructing the accessible ejector area or bin. Remove only loose cubes with a plastic utensil if the model manual specifically allows it; do not pry, twist, or reach behind a cover.
Expected result: A loose cube clears and the maker later cycles, or the ejector remains jammed, frozen in place, or inaccessible. A jam that returns suggests a maker, temperature, or fill problem rather than a one-time obstruction.
Next step: Stop if the ice is fused, the arm will not move freely, water is present, or a cover must be removed. Use qualified service for a persistent jam or internal obstruction.
Why this matters
Why: An ejector jam can prevent a harvest cycle, but forcing it can damage the mechanism or create a hand injury. The safe access point differs by maker design.
-
Check 7
Only after the design, temperature, bin, supply, filter, and jam checks are normal, perform the single reset or short power cycle specified in the owner's manual. Do not repeatedly reset the maker or freezer and do not use a reset sequence from another model.
Expected result: The maker may resume a fill or harvest sequence after the documented reset, or it may remain silent, show an error, buzz without water, leak, or fail to produce ice after the model's waiting period.
Next step: If the documented reset does not restore production, stop experimenting, protect food if cooling is affected, and arrange qualified service with the recorded results.
Why this matters
Why: A reset can clear a temporary control state but does not establish that the valve, motor, sensor, wiring, or cooling system is healthy. Repeated failure is evidence for service.
-
Check 8
Record the model number, ice-making method, water connection status, freezer temperature behavior, maker setting, bin position, filter history, visible ice jam or frost, display or alarm, and any leak or electrical symptom before contacting service.
Expected result: A complete record separates a manual-tray cooling issue from an automatic maker, water, filter, bin, or control issue and prevents an unsafe part guess.
Next step: Give the record to the manufacturer or a qualified appliance technician and follow food-safety guidance if the freezer temperature is rising.
Why this matters
Why: Ice-maker assemblies and water systems are model-specific; the phrase not making ice is not enough to select a valve, filter, motor, or control.
Use your observations
Decision map
Find the observation that best matches what you see, then follow the next safe action.
-
PATH 01Next step
What you see
Do this next
Fill and seat the tray as the owner's manual directs, then address the freezer temperature if water does not freeze. There is no automatic valve or maker reset to test.
Why this path and its safety boundary
Why it matters: The appliance has only a manual tray and the tray is empty or not freezing.
-
PATH 02Next step
What you see
Do this next
Correct the setting or reseat the bin only as the model manual shows, then allow the specified production interval. Do not bypass a sensor or latch.
Why this path and its safety boundary
Why it matters: The automatic maker is off, the bin is misseated, or the door or lid is not closing.
-
PATH 03Next step
What you see
Do this next
Treat ice production as a consequence of a cooling or airflow issue. Protect food and arrange service if the manual-approved setting and stabilization period do not restore safe freezing.
Why this path and its safety boundary
Why it matters: The freezer is too warm, warming food, heavily frosted, or showing a temperature alarm.
-
PATH 04Next step
What you see
Do this next
Check only the accessible supply or filter steps in the manual. For leaks, damaged tubing, water near electrics, or inaccessible connections, stop, close the supply if safe, and call service.
Why this path and its safety boundary
Why it matters: The automatic maker has no water, a kinked line, a closed supply, an incorrectly seated filter, or a visible leak.
-
PATH 05Next step
What you see
Do this next
Do not pry or chip the ice. Leave the mechanism alone and arrange qualified service; use a model-approved defrost procedure only when the manual provides one.
Why this path and its safety boundary
Why it matters: Ice is jammed in the ejector or maker and cannot be removed without force or a cover removal.
-
PATH 06Next step
What you see
Do this next
Stop repeated testing and provide the model, temperature, water, filter, bin, jam, and display observations to qualified service. Do not order a part from the symptom alone.
Why this path and its safety boundary
Why it matters: A single manual-approved reset does not restore ice production after the specified waiting period.
-
PATH 07Next step
What you see
Do this next
Stop using the appliance immediately. From a safe dry position isolate power if possible, leave for smoke or fire, and seek emergency or qualified electrical help. Do not touch wet electrics or the water system.
Why this path and its safety boundary
Why it matters: Smoke, burning odor, arcing, a hot cord or outlet, repeated breaker trips, or water near electrical parts is present.
Helpful context
Understand the symptom
Not making ice is not one universal fault. A manual tray can be empty because no one filled it or because the compartment is not freezing. An automatic maker can be off, too warm, blocked by the bin or ejector, short of water, restricted by a filter or line, or affected by a model-specific control or sensor. Identify the design before pressing a reset or touching a water connection.
The checks below are external and model-aware. Keep the freezer door closed as much as practical, protect food if the temperature is rising, and use the manual for the exact control labels and waiting period. Do not treat an internet temperature or reset sequence as universal.
Manual tray or automatic ice maker?
A manual tray requires water added by the user and has no automatic fill valve or ice-maker reset. An automatic system may have an on/off control, fill valve, ejector, bin sensor, water filter, and supply line. If the freezer is integrated with a refrigerator, the maker may be in the freezer compartment even though water controls or a filter are elsewhere.
Do not force the ice or water system
Do not pry a stuck ice rake, use a sharp tool to remove ice, disconnect a pressurized water line, bypass a bin or door sensor, or remove a cover to test a valve. If water is leaking, a tube is damaged, or water is near the plug or controls, stop and isolate the appliance only from a safe dry position.
When a reset is not a repair
A single manual-approved reset can clear a minor control state, but it cannot correct poor cooling, a blocked water path, a failed valve, or a damaged maker. If production does not resume after the documented waiting period and safe checks, record the result and arrange service.
Safety boundary
Stop conditions
- Stop immediately for a water leak near a plug or control, damaged or pressurized tubing, warming food with an alarm, smoke, burning odor, arcing, a hot cord or outlet, or repeated breaker trips.
- Do not pry a jammed ejector, chip ice with sharp tools, remove panels, bypass a bin or door sensor, disconnect a pressurized water line, or open a sealed refrigeration system.
- Protect frozen food if the freezer is warming and use qualified appliance, electrical, or plumbing help when the safe external checks do not restore operation.
Only after diagnosis
Potential parts
- ice-maker assembly
Consider this category only after a qualified diagnosis confirms that the automatic maker itself is not cycling despite correct temperature, setting, bin, water, filter, and jam checks.
Manual trays and automatic makers are different systems. Confirm the exact model and maker design before ordering; do not infer fit from appearance. - water inlet valve
Consider this category only when a qualified technician confirms a valve or fill fault after the accessible supply line, filter, and water-pressure checks are normal.
Valve and tubing fittings are model-specific and involve water-safety work. Do not disconnect a pressurized line or choose a valve from no-ice symptoms alone. - water filter
Consider this category only when the model has a replaceable filter and the manual or indicator shows it is clogged, incorrectly seated, or due for replacement after flow symptoms.
Confirm the model, filter location, seal, and approved replacement information. A filter change must not create a leak or bypass required filtration. - ice-maker control or sensor
Consider this category only after service rules out freezer temperature, bin position, water flow, filter, jam, and maker mechanical causes.
Controls and sensors vary by design and require model-specific diagnosis. Do not bypass a sensor or open the appliance to test it.
When checks do not resolve it
Need a professional?
Arrange qualified appliance service when the freezer is cold but the automatic maker remains inactive after its model-approved setting, supply, filter, bin, jam, and single-reset checks, or when a manual tray does not freeze because the freezer is not maintaining temperature. Use electrical or emergency help for smoke, arcing, hot wiring, fire, or repeated breaker trips.
Have this ready
- Provide the model number, freezer type, manual or automatic method, water connection and filter status, temperature and frost behavior, maker setting, bin and ejector observations, reset result, and any leak, odor, smoke, or electrical symptom.
Common questions
FAQ
How do I know whether my freezer uses a manual ice tray or an automatic maker?
A manual tray must be filled by hand and has no automatic fill valve or maker reset. An automatic system usually has an on/off control, ejector, bin, and sometimes a water line or filter. Check the exact model manual before using any reset or water check.
Can a freezer temperature problem stop ice making?
Yes. Automatic ice production depends on the freezer reaching its design temperature. Use the model's recommended setting and startup guidance; protect food and arrange service if the freezer is warming, heavily frosted, or alarming.
What should I check when the ice maker has no water?
For an automatic maker, check only the accessible supply valve, visible line, filter seating, and obvious leaks as the manual permits. A kink, closed supply, unconnected line, or filter restriction can stop filling. Do not disconnect a pressurized line.
Can I force ice out of a jammed maker?
No. Remove only loose cubes with a plastic utensil if the model manual explicitly allows it. Do not pry, chip ice, reach behind a cover, or bypass a sensor; a persistent jam needs qualified service.
When should I stop troubleshooting a freezer that is not making ice?
Stop for water near electrics, a leak or damaged tube, warming food, smoke, burning odor, arcing, a hot outlet, or repeated breaker trips. Use a single model-approved reset at most; recurring no-ice after safe checks should go to qualified service.
Read the exact guide
Official sources
- Not Making Ice - Existing Installation - Top Freezer Refrigerator - Product Help | WhirlpoolWhirlpool Corporation · Supports conditional checks for enabled state, bin and ejector jam, filter, water-line installation, and one model-directed reset; not a universal procedure for every freezer.
- Ice Maker Not Working - Troubleshooting - Product Help | WhirlpoolWhirlpool Corporation · Supports the general branches for water supply, freezer temperature, enabled state, reset, unconnected supply, and water-filter flow; exact model controls vary.
- What should I do if my ice maker is not making enough ice in my refrigerator?Frigidaire · Supports the general relationship between freezer temperature, water filter, line clearance, loading or door use, and ice output; do not transfer brand-specific settings or rates.
- Not Making Ice - Exisiting Installation - Upright Freezer - Product Help | WhirlpoolWhirlpool Corporation · Supports upright-freezer branches for water-line kinks, enabled state, ice jam, water pressure, and model-specific manual or service escalation.
Community feedback
Share a repair observation
Share a plain-text repair observation. Accepted observations are published automatically; this page may take a moment to update.