
On this page
Start here
Quick answer
If a Haier washer-dryer will not fill, first confirm that the selected cycle has been started and the door is fully closed and locked. Then open the water tap, check for a supply problem, and inspect the inlet hose and accessible inlet filter for a kink or blockage. Haier also warns that a drain hose routed too low or left submerged can siphon water away before the level is reached. Do only ordinary-access checks with the tap closed before hose or filter work; stop for a leak, damaged hose, electrical abnormality, a persistent fill error, or any condition that requires opening the cabinet, and arrange qualified appliance service.
Before you begin
Safety first
- This article covers ordinary-access checks only. Turn off the tap before hose or filter work, keep water away from electrical parts, and leave cabinet, live-wiring, door-lock bypass, valve, control, and concealed plumbing work to qualified service.
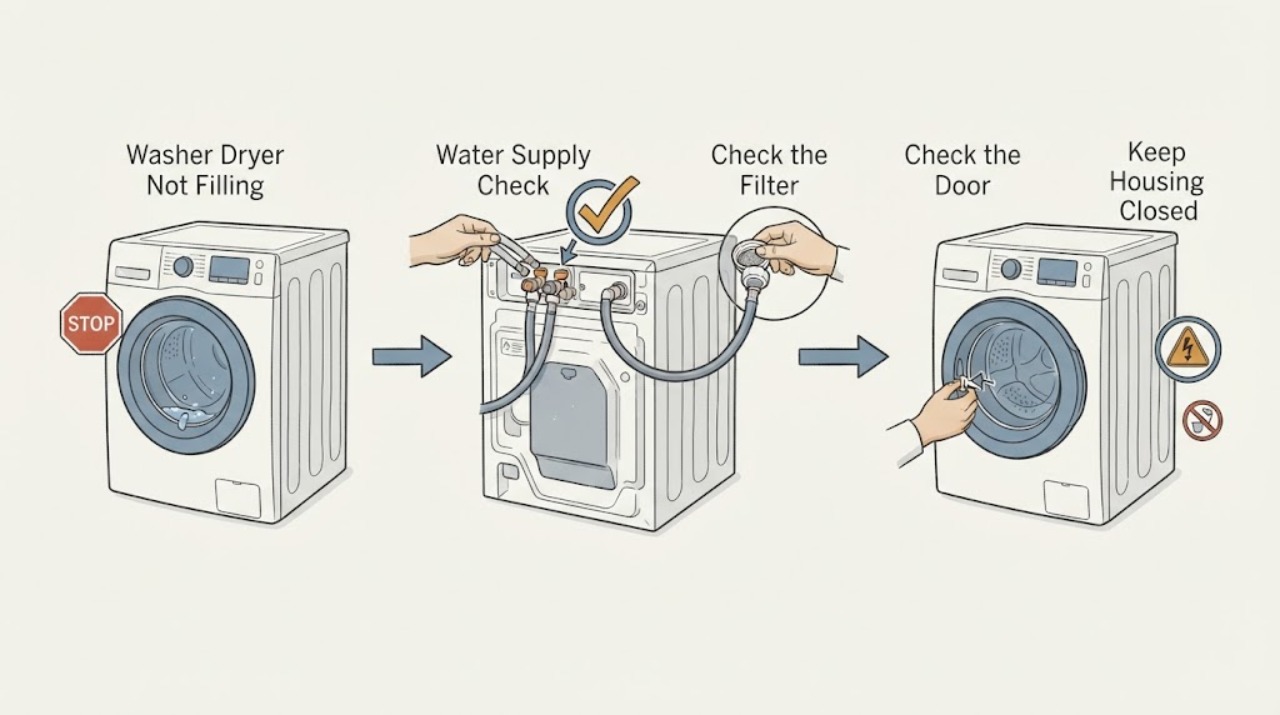
Work through in order
Diagnostic checks
Use only checks that match the exact appliance or system and its official guide.
-
Check 1
With the drum empty and the controls dry, select the intended cycle, press Start or Pause as the panel requires, and close the door firmly until the lock indication or normal start behavior appears.
Expected result: Observe whether the cycle begins and whether a door or lock indication remains, flashes, or prevents the inlet from opening; do not push, bypass, or defeat the lock.
Next step: Recheck the selected program and door seating once. If the lock indication persists, the latch is damaged, or the door must be forced, stop and request service.
Stop if: Stop for a cracked door, damaged latch, exposed wiring, burning smell, electrical trip, or any need to bypass the door-lock system.
Why this matters
Why: If the cycle was not started or the door is not accepted as closed, the appliance may intentionally withhold water. If the cycle starts normally but no water arrives, continue to the supply and inlet checks.
-
Check 2
Check that the washer's water tap is fully open and that the home's water supply is available; compare another cold-water tap if that can be done without creating a leak or disturbing the appliance connection.
Expected result: Record whether the tap supplies water normally, has weak or intermittent flow, or has no flow at all. Do not disconnect a pressurized hose to test it.
Next step: Restore the tap only if it is safe and dry to do so, then retry the cycle once. If household pressure is persistently abnormal or the tap or shutoff leaks, arrange plumbing or appliance service rather than increasing pressure improvisedly.
Stop if: Stop for a leaking shutoff, burst or damaged supply hose, water damage, or pressure severe enough to make the connection unsafe.
Why this matters
Why: A closed tap, supply outage, or low pressure can prevent filling even when the washer's controls are normal. A normal nearby supply moves the check toward the appliance inlet hose, filter, or valve.
-
Check 3
After turning the water tap off and making the appliance electrically safe, inspect the visible inlet hose for a sharp kink, crushing, loose connection, or visible damage. If the model manual identifies an accessible inlet filter, inspect it only by the manual's procedure and catch residual water.
Expected result: Classify the path as open and undamaged, kinked or crushed, visibly blocked at the accessible filter, leaking, or impossible to inspect without cabinet disassembly.
Next step: Correct only a gentle, accessible hose routing issue without twisting the fittings, or clean an accessible filter only as the manual allows. Reopen the tap slowly and run one supervised test while watching for leaks; if filling remains absent, stop and call service.
Stop if: Do not force threaded fittings, open the cabinet, probe the inlet valve, work with the tap open, or continue after a leak appears.
Why this matters
Why: A kink or accessible blockage can restrict the fill path. A leak, damaged hose, or internal filter or valve that cannot be reached safely is not a reason to remove covers; it needs qualified diagnosis.
-
Check 4
If water enters but the washer does not reach its level, inspect the visible drain hose routing against the model's installation instructions; check that it is not routed too low and that its end is not submerged in standing water.
Expected result: Record whether the hose end is submerged, the hose has dropped below the specified installation height, or the routing matches the model guidance. Do not pull a secured hose out of a wall standpipe or alter a sealed drain connection by force.
Next step: Restore only the hose position allowed by the model manual and secure it so it cannot fall, then run one supervised fill test. If the level still does not rise, or the drain connection is concealed or damaged, request service.
Stop if: Stop for a drain leak, standing water near electrical parts, a blocked or concealed drain requiring plumbing work, or any routing change that would leave the hose loose or submerged.
Why this matters
Why: A low or submerged drain hose can let incoming water siphon away, making the appliance appear unable to fill. Correct routing can remove that branch; a correctly routed hose makes an inlet restriction, valve, control, or other fault more likely.
-
Check 5
After the preceding safe checks, run one normal cycle or fill portion while remaining nearby and watching the inlet connection, door area, drum, and drain hose; do not repeat tests if water is leaking or the appliance behaves electrically abnormally.
Expected result: Record whether water enters normally, enters slowly, enters and drains away, remains absent, or causes a leak, unusual noise, error indication, or electrical trip.
Next step: Stop testing and provide the model label, error indication, observed water behavior, hose and filter findings, and drain routing to qualified appliance service.
Stop if: Stop immediately for a leak, burning smell, smoke, shock, repeated electrical trip, uncontrolled filling, or any need to open the cabinet.
Why this matters
Why: Normal filling after a corrected tap, hose, filter, door, or drain-routing issue supports that branch. Slow or absent filling after the checks leaves an internal inlet valve, sensor, control, lock, or supply fault unresolved and does not justify live testing.
Use your observations
Decision map
Find the observation that best matches what you see, then follow the next safe action.
-
PATH 01Safety boundary
What you see
The cycle was not started or the door is not accepted as closed and locked.
Do this next
Reselect the cycle and close the door once without forcing it; if the lock indication or latch problem remains, request service.
Why this path and its safety boundary
Why it matters: The appliance may intentionally withhold water until the program command and door condition are valid.
Safety stop: Do not bypass or defeat the door lock, force the door, or operate with a damaged latch.
-
PATH 02Safety boundary
What you see
The tap is closed, the supply is unavailable, or nearby water pressure is too low or intermittent.
Do this next
Correct the supply or have the leaking shutoff or plumbing assessed, then perform one supervised fill test.
Why this path and its safety boundary
Why it matters: The appliance cannot fill until a safe, adequate supply is restored.
Safety stop: Do not disconnect a pressurized hose or continue with a leaking supply connection.
-
PATH 03Safety boundary
What you see
The inlet hose is kinked or the accessible inlet filter is blocked, with no leak or damage.
Do this next
Restore hose routing or clean the accessible filter only under the model manual, then retry once while watching the connection.
Why this path and its safety boundary
Why it matters: Restricted inlet flow can explain slow or absent filling.
Safety stop: Stop if the hose is damaged, a fitting is seized, a leak appears, or the filter or valve requires cabinet access.
-
PATH 04Safety boundary
What you see
Water enters but the level does not rise and the drain hose is too low or submerged.
Do this next
Restore the drain hose to the model-specified routing and secure it, then make one supervised test.
Why this path and its safety boundary
Why it matters: Incoming water may be siphoning out through the drain path before the required level is reached.
Safety stop: Stop when the drain connection leaks, is concealed or damaged, or cannot be routed safely under the manual.
-
PATH 05Safety boundary
What you see
The door, supply, inlet path, and drain routing are correct but filling is still absent or abnormally slow.
Do this next
Stop user testing and arrange qualified appliance service with the model information and complete observations.
Why this path and its safety boundary
Why it matters: An internal inlet valve, sensor, control, lock, or another appliance fault remains possible and cannot be isolated safely by live probing.
Safety stop: Do not remove covers, bypass the lock, probe wiring, or replace an internal part based only on the symptom.
Helpful context
Understand the symptom
What the fill symptom means
A washer-dryer can appear not to fill because the cycle was not started, the door was not accepted as closed, the house water supply is unavailable, or water cannot pass through the inlet path. Haier's troubleshooting guidance points to these checks before treating the symptom as a failed internal part. If water enters and then the level does not rise, inspect the drain-hose routing as well: Haier describes a low or submerged drain hose as a possible siphoning path.
Keep water and electricity separate
For an accessible hose or inlet-filter check, turn the water tap off first, unplug the appliance only when the plug and outlet are dry and safely reachable, and use a towel or shallow container for residual water. Do not remove covers, probe live wiring, bypass the door lock, or work on a wet electrical connection. A leak, damaged hose, burning smell, repeated electrical trip, or persistent fault belongs with qualified service.
Use model-specific drain-hose guidance
Drain-hose height and securing details vary by model and installation. Haier's UAE guidance for the referenced setup calls for the drain end to be about 80–100 cm above the floor and not submerged; use the own-model manual when it differs. The purpose of this check is to prevent siphoning, not to make an unsupported installation change.
Safety boundary
Stop conditions
- Turn the water tap off and stop use for a leaking, split, or damaged inlet or drain hose.
- Unplug only when the plug and outlet are dry and safely reachable; never work on wet electrical connections.
- Do not bypass the door lock, remove cabinet covers, probe live wiring, or diagnose an internal valve or control by improvised testing.
- Do not force fittings, disconnect a pressurized hose, or alter a concealed drain connection by guesswork.
- Stop for burning smell, smoke, shock, repeated electrical trips, uncontrolled filling, water damage, or a persistent error after safe checks.
Only after diagnosis
Potential parts
- water inlet hose
Consider this category only if inspection confirms the hose is split, crushed, leaking, or otherwise damaged and the model-specific replacement is approved.
Confirm the exact Haier model, hose connection, pressure rating, and installation instructions before ordering; shut off the tap before replacement. - water inlet valve
Consider this internal part only after qualified testing confirms that the supply, door condition, hose, filter, and drain routing are correct but the appliance still does not admit water.
Confirm the exact model and electrical specification with the manufacturer or technician; do not test or replace an internal valve while energized.
When checks do not resolve it
Need a professional?
Arrange qualified appliance service when the washer-dryer still will not fill after the cycle, door, tap, inlet path, and drain-routing checks; when the door lock, inlet valve, sensor, or control may be involved; or when there is a leak, electrical symptom, damaged hose, concealed connection, or persistent error.
Safety scope: This article covers ordinary-access checks only. Turn off the tap before hose or filter work, keep water away from electrical parts, and leave cabinet, live-wiring, door-lock bypass, valve, control, and concealed plumbing work to qualified service.
Common questions
FAQ
Why is my Haier washer-dryer not taking in water?
Check that the cycle was started, the door is closed and locked, the tap is open, and the household supply is available. Then inspect the visible inlet hose and any model-approved accessible inlet filter for a kink or blockage.
Could the drain hose make a washer look like it is not filling?
Yes. If water enters but the level never rises, a drain hose routed too low or left submerged can siphon water away. Compare the routing with the exact model manual and do not make a loose or concealed drain connection by guesswork.
Can I remove the washer cover to test the inlet valve?
No. A valve and control diagnosis can involve live electrical parts and model-specific procedures. Stop after safe external checks and arrange qualified appliance service.
What should I do if the washer inlet hose leaks?
Turn the water tap off, stop using the appliance, and keep water away from electrical parts. Unplug only if the plug and outlet are dry and safely reachable; replace or repair the hose using model-approved parts or qualified service.
Read the exact guide
Official sources
- Washing machine can not be filled with waterHaier Pakistan · Haier's troubleshooting guidance for a washer that cannot be filled; exact controls and installation details remain model-specific.
- No water, Can not be filled with waterHaier Malaysia · Haier's no-water troubleshooting guidance; model-specific manual instructions control filter access and installation.
- The door lock light flashes 5 times and stops for 4 seconds then repeats. Audio alarm beeps 5 times then stops for 1 minute. No water coming in the washing machine or water did not reach the correct water level in time (low flow rate).Haier UAE · Haier guidance for a low-flow or no-water symptom on the referenced washer family; use the exact model manual for hose-height details.
Community feedback
Share a repair observation
Share a plain-text repair observation. Accepted observations are published automatically; this page may take a moment to update.