
On this page
Start here
Quick answer
First confirm that the refrigerator actually has a factory water or ice dispenser and record the exact model and rating-plate information. IKEA sells refrigerators with different architectures, and its ÖVERSKÅDLIG product page specifically requires a water line for the water dispenser and ice function; do not apply a dispenser procedure to a non-dispenser model. Then separate the symptom: no water points to the door being closed, supply shutoff, kinked line, filter, pressure, or a locked control; no ice with water working points to the ice maker being off, a new-installation wait, the bin, or a blocked chute; neither function working points first to a shared supply, lock, door, or control condition. Use only the exact manual for the model. Keep water and power safe, use a sturdy glass for ice, and do not use sharp tools or open panels. A concealed leak, damaged tube, repeated fault, electrical hazard, or internal valve, door-line, control, or ice-maker problem requires qualified service.
Before you begin
Safety first
- The user may confirm the model, observe the dispenser, close doors normally, check an accessible shutoff and visible line, follow the exact manual for a filter or flush, and clear loose accessible ice only as instructed. Qualified service must handle door tubing, valves, filter heads, controls, wiring, ice-maker drives, sensors, and concealed leaks.
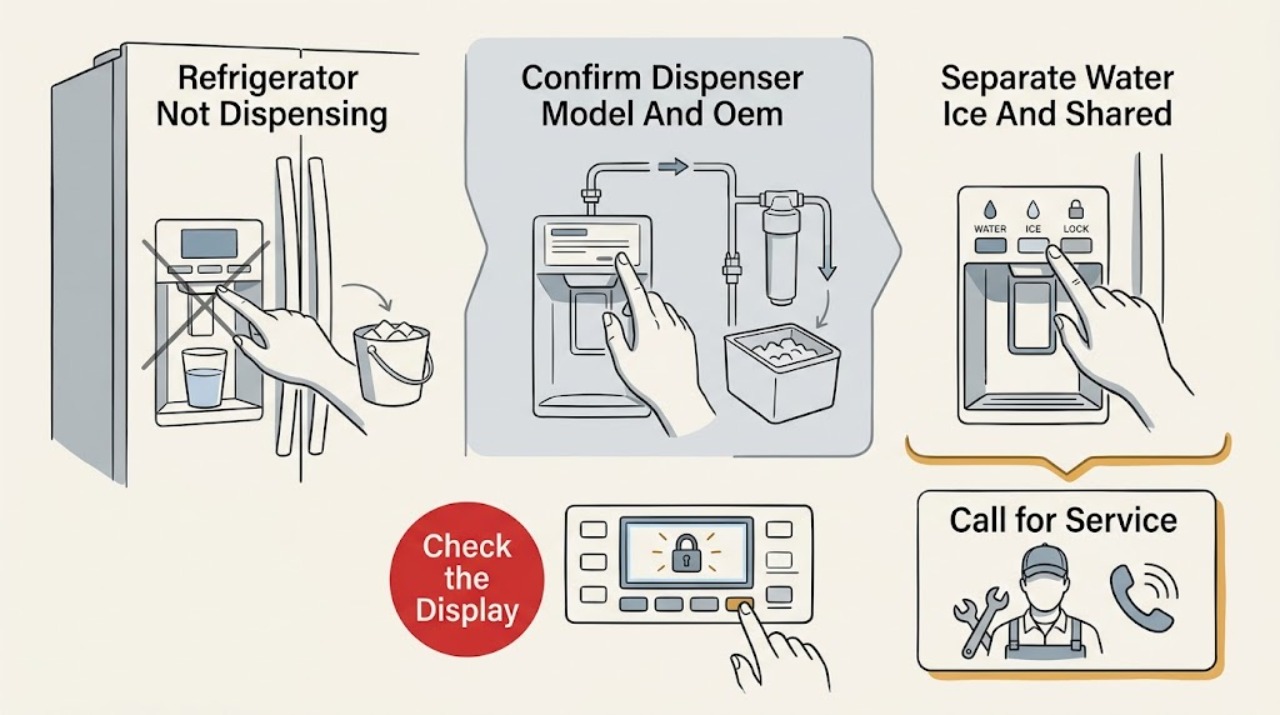
Work through in order
Diagnostic checks
Use only checks that match the exact appliance or system and its official guide.
-
Check 1
With the refrigerator stable and dry, record the rating-plate model, article or product information, serial number, installation type, and the manufacturer named on the plate. Confirm in that model's product page or manual that a water dispenser, ice dispenser, or both are fitted.
Expected result: The model documents through-the-door water or ice; it has only an ice maker without dispensing; it is an externally manufactured IKEA appliance; or the identity cannot be read.
Next step: Use the exact manual and support route for a confirmed dispenser model. If the feature or model cannot be confirmed, stop at identification and contact IKEA or the manufacturer shown on the rating plate.
Stop if: Do not pull out a built-in refrigerator or remove trim or panels to find the model or dispenser parts.
Why this matters
Why: Dispenser controls, door tubing, filters, locks, ice bins, and service ownership vary by architecture. A refrigerator without the feature cannot be repaired using a dispenser checklist, and an unidentified model cannot safely inherit another model's procedure.
-
Check 2
From the normal dispenser controls, record three separate results: does water flow, is usable ice present in the bin, and does the ice lever or chute respond? Note whether the flow is absent, weak, intermittent, or leaking after release.
Expected result: Water works but ice does not; ice is present but will not leave the chute; both water and ice fail; or water is weak or continues dripping.
Next step: Follow the matching water, ice, or shared-failure branch. Keep the refrigerator out of use if water reaches electrical parts or if the source of a leak is concealed.
Stop if: Do not keep pressing a stuck lever, run the dispenser unattended, or use a hand or sharp object inside the chute.
Why this matters
Why: Water working with ice absent or jammed shifts attention to ice-maker, bin, chute, or ice-mode conditions. Both functions failing makes a shared door, lock, supply, filter, pressure, or control condition more likely. Weak flow or continued dripping adds a supply, air, filter, or leak branch.
-
Check 3
Close the refrigerator and freezer doors normally, check the visible dispenser display for a lock or sleep state, and use only the exact manual's front-panel unlock or wake procedure. Do not hold or defeat a door switch.
Expected result: The display wakes after a normal button press; a lock indicator is shown; a door is not closing firmly; the model requires the freezer door closed; or the dispenser remains unresponsive with closed doors.
Next step: Clear only an accessible obstruction, close the door firmly, and apply the exact model's documented unlock or wake step. If the door, gasket, switch area, or controls are damaged or still unresponsive, stop and arrange service.
Stop if: Do not tape, press, bypass, or electrically defeat a door switch or dispenser lock, and do not remove door panels.
Why this matters
Why: Sleep mode, a dispenser lock, or a door-closed interlock can stop dispensing without a water-line or ice-motor failure. A door that does not close can also prevent both water and ice functions. A persistent unresponsive panel is a control or service issue.
-
Check 4
For no or weak water, inspect only the visible water shutoff position and accessible section of the supply line for a kink. Check whether installation or filter replacement was recent, and follow the exact manual for filter seating and system flushing.
Expected result: The shutoff is closed; the line is kinked; the filter was recently replaced or is not seated as the manual shows; the refrigerator was newly connected; or all visible supply checks are normal.
Next step: Open the shutoff only if it is safely accessible, straighten only a visible kink, and reseat or flush the filter only as the exact manual permits. If flow remains absent or pressure is uncertain, use a qualified plumber or appliance technician.
Stop if: Do not disconnect a pressurized line, cut or splice tubing, remove a concealed filter housing, or continue if water is near electrical parts.
Why this matters
Why: A closed valve, kink, trapped air, or filter installation condition can reduce or stop flow. If the visible path and exact manual steps are correct but flow remains absent, household pressure, an inlet valve, door tube, or internal control becomes more likely; the symptom does not identify a part.
-
Check 5
For an ice complaint, inspect the visible ice level and bin seating with the exact manual's removal instructions. Look for cubes frozen together or blocking the chute, confirm the model-specific ice-maker state, and use a plastic utensil only where the manual permits it; never use a sharp tool.
Expected result: The bin is not fully seated; the ice maker is off; ice is clumped in the bin or chute; the bin is empty after a recent installation or large draw; crushed mode jams while cubed mode works; or the bin and chute are clear but no ice dispenses.
Next step: Correct only a visible seating or mode condition and clear loose accessible ice according to the model manual. Allow the documented production time after installation or a large draw. Arrange service for a recurring jam, absent ice production, or any mechanism that needs disassembly.
Stop if: Do not chip ice with a knife, force the ejector or auger, store objects in the bin, or remove the dispenser mechanism or freezer door panels.
Why this matters
Why: A bin-position, lock, mode, wait-time, or visible clump can stop the ice path without proving an internal motor or valve fault. A clear, correctly seated bin with water available shifts attention to the ice maker, ejector, dispenser motor, sensor, or control.
-
Check 6
If dispensing remains unavailable, record the exact model, which function failed, door and lock indicators, water-line and filter history, ice-bin condition, any display code, and where water appears. Keep the supply or refrigerator off when the exact manual or a technician indicates that is necessary.
Expected result: The issue returns after an accessible correction; water leaks from the base or door; the dispenser has no response despite correct supply and settings; a code appears; or the fault requires a panel, door, valve, control, or ice-maker mechanism to be reached.
Next step: Provide the recorded evidence and model or serial information to IKEA or the manufacturer shown on the rating plate, and arrange qualified appliance service. Do not restore use while water is near electrical parts or a concealed leak continues.
Stop if: Do not open panels, make internal electrical checks, bypass a lock or door switch, or disassemble the water or ice mechanism.
Why this matters
Why: Recurrence or concealed water makes an internal tube, valve, filter head, door connection, or control problem more likely. A clear supply with no ice can involve the ice maker or dispenser drive. None of these observations safely identifies a replacement part.
Use your observations
Decision map
Find the observation that best matches what you see, then follow the next safe action.
-
PATH 01Safety boundary
What you see
Ice is available or the ice side responds, but the water dispenser has no flow or weak flow.
Do this next
Check the accessible supply and exact filter or flushing instructions. Use qualified plumbing or appliance service if flow stays absent, the line is concealed, or water pressure is uncertain.
Why this path and its safety boundary
Why it matters: The water branch is more likely: closed supply valve, kinked line, air after installation or filter change, filter seating, pressure, or the water-side valve or door tube. The ice result makes a total refrigerator power loss less likely.
Safety stop: Do not disconnect a pressurized water line or continue when water approaches electrical parts.
-
PATH 02Safety boundary
What you see
Water dispenses normally, but the ice chute gives no ice, jams, or the bin is empty.
Do this next
Check the exact model's ice-maker state and bin seating, then clear only loose accessible ice with the permitted plastic utensil or cleaning method. Use service for a recurring jam or a mechanism that needs disassembly.
Why this path and its safety boundary
Why it matters: The shared water supply is less likely. An off ice maker, new-installation wait, incorrectly seated bin, clumped cubes, chute blockage, crushed-mode jam, ejector, sensor, or dispenser drive is more likely.
Safety stop: Do not use sharp tools, force an auger or ejector, or reach behind the chute or door panel.
-
PATH 03Safety boundary
What you see
Neither water nor ice dispenses, especially when the display is locked, asleep, or a door is not closing firmly.
Do this next
Wake and unlock the panel using the exact manual, close the required door, and inspect only the visible supply shutoff and line. Escalate if the display remains unresponsive, the supply is correct, or a code appears.
Why this path and its safety boundary
Why it matters: A shared door-closed condition, dispenser lock, supply interruption, filter or pressure problem, or control state is more likely than two separate motor failures. Model manuals differ on whether one or both doors must be closed.
Safety stop: Do not defeat a door switch or dispenser lock, repeatedly force the lever, or remove panels.
-
PATH 04Safety boundary
What you see
Water leaks at the dispenser, under the base grille, or from the door area instead of stopping cleanly after the lever is released.
Do this next
Stop dispensing, protect the floor, and use the exact manual for any visible filter or drip guidance. Keep the appliance off if water reaches electrical parts and arrange qualified service for a base, door, or concealed leak.
Why this path and its safety boundary
Why it matters: A small model-documented residual drip can differ from a continuing leak, but recurring water suggests trapped air, filter seating, a door-tube connection, valve, or internal water path. Water near electrical parts is an immediate safety boundary.
Safety stop: Do not pull out a built-in refrigerator, disconnect tubing, or touch wet plugs, sockets, or wiring.
-
PATH 05Safety boundary
What you see
The refrigerator is IKEA-branded but the exact product documents do not show a water or ice dispenser, or the model identity cannot be confirmed.
Do this next
Return to the exact product identity and use the matching ice-maker, refrigerator, or accessory guidance. Contact IKEA or the rating-plate manufacturer rather than applying a dispenser repair sequence.
Why this path and its safety boundary
Why it matters: The not-dispensing intent is not established for that appliance. An internal ice tray or a separate beverage container is a different mechanism from a plumbed, through-the-door dispenser.
Safety stop: Do not drill, add a water line, or alter the refrigerator to create or test a dispenser.
Helpful context
Understand the symptom
Confirm the appliance has the dispenser architecture
This page is for an IKEA refrigerator that has a documented water or ice dispenser, not for a refrigerator with only an internal ice tray or a separately purchased drink container. IKEA's ÖVERSKÅDLIG listing identifies through-the-door ice service and a water-line requirement. Other IKEA models and externally manufactured units can differ in dispenser controls, door tubing, filter position, lock behavior, and service route, so use the exact model number before copying a button sequence.
Water and ice are related but not the same fault
Ask whether water dispenses, whether ice is present in the bin, and whether the complaint is a weak flow, no flow, a jammed chute, or no ice production. Water and ice can share a supply line, filter, lock, and door-closed condition, but the ice side also adds the ice maker, bin, ejector, and chute. New installations or a recently changed filter can leave air in the water system and require the exact manual's flushing procedure; do not guess a flush volume from another IKEA family.
Keep water, ice, and electrical boundaries conservative
Use a sturdy glass for ice, keep the floor dry, and stop if water reaches the base, plug, socket, or wiring. Do not chip ice with a knife or other sharp object, force the lever, remove cabinet panels, pull a built-in refrigerator out, or reach into a concealed water or electrical path. A persistent leak, damaged door tube, internal valve, control, ice-maker mechanism, or wiring fault belongs to qualified service.
Safety boundary
Stop conditions
- Stop dispensing and keep the refrigerator off if water reaches the base, plug, socket, cord, or wiring, or if a concealed leak continues.
- Do not use a knife or other sharp tool to break ice, force a chute, or pry the ice bin or dispenser mechanism.
- Do not bypass a dispenser lock, door switch, door-closed interlock, or control; do not remove door or cabinet panels.
- Do not disconnect a pressurized water line, cut or splice tubing, pull out a built-in refrigerator, or reach into a concealed water or electrical path.
- Use the exact IKEA model manual for filter seating, flushing, door requirements, ice-maker controls, wait times, and error meanings; do not transfer NUTID steps to an unidentified model.
- A recurring jam, absent ice production with correct water supply, no response after correct settings, damaged door tubing, valve, control, or internal ice-maker fault requires qualified appliance service.
When checks do not resolve it
Need a professional?
Safety scope: The user may confirm the model, observe the dispenser, close doors normally, check an accessible shutoff and visible line, follow the exact manual for a filter or flush, and clear loose accessible ice only as instructed. Qualified service must handle door tubing, valves, filter heads, controls, wiring, ice-maker drives, sensors, and concealed leaks.
Common questions
FAQ
Does every IKEA refrigerator have a water or ice dispenser?
No. Dispenser checks apply only when the exact IKEA product documents a water or ice dispenser. For example, IKEA's ÖVERSKÅDLIG listing identifies through-the-door ice service and a water-line requirement; other models may have a different ice-only or non-dispensing architecture.
Why does my IKEA refrigerator dispense neither water nor ice?
Check the exact model's door-closed requirement, dispenser lock or sleep state, accessible water shutoff, visible line, and filter history. Both functions failing makes a shared supply, lock, door, or control condition more likely, but a persistent failure requires service.
Why does IKEA refrigerator water flow slowly or not at all?
An IKEA manual lists a closed supply valve, kinked line, low household pressure, trapped air after installation or filter change, or a clogged or incorrectly installed filter among possible causes. Use only the exact model's filter and flushing instructions, and use qualified help for a concealed or pressurized-line problem.
Why is there ice in the bin but none comes out?
Check the model-specific bin seating, dispenser lock, selected ice mode, and visible clumping or chute blockage. Clear only loose accessible ice with the permitted plastic utensil or cleaning method; never use a sharp tool or force the auger or ejector.
When should an IKEA refrigerator dispenser be professionally serviced?
Arrange qualified service for a recurring jam, no ice despite correct supply and settings, a damaged door tube, an unresponsive dispenser, a recurring or concealed leak, an error code, or water near electrical parts. Do not remove panels or bypass a lock or door switch.
Read the exact guide
Official sources
- NUTID side-by-side refrigerator user manualIKEA · Opened official IKEA NUTID side-by-side manual; details such as the dispenser lock, sleep display, ice-bin arrangement, and water-flow check apply only where the exact model uses this architecture.
- NUTID French-door refrigerator user manualIKEA · Opened official IKEA NUTID French-door manual; its 4-gallon flushing, pressure, tubing, and drip details are model-family examples and are not universal values.
- NUTID S25 side-by-side refrigerator user manualIKEA · Opened official IKEA NUTID S25 manual; its dispenser troubleshooting is a model-family reference and is not transferred to every IKEA refrigerator.
- What can I do if my appliance isn’t working as it should?IKEA · Opened official IKEA US support page; it directs owners to the manufacturer, model, and serial number on the rating plate and distinguishes IKEA products from externally manufactured appliances.
- ÖVERSKÅDLIG french door refrigerator, 4-door/stainless steel, 22 cu.ftIKEA · Opened official IKEA US product page for ÖVERSKÅDLIG; it proves that this IKEA refrigerator architecture has a through-the-door dispenser and requires a water line, but does not establish that every IKEA refrigerator has those features.
Community feedback
Share a repair observation
Share a plain-text repair observation. Accepted observations are published automatically; this page may take a moment to update.