
On this page
Start here
Quick answer
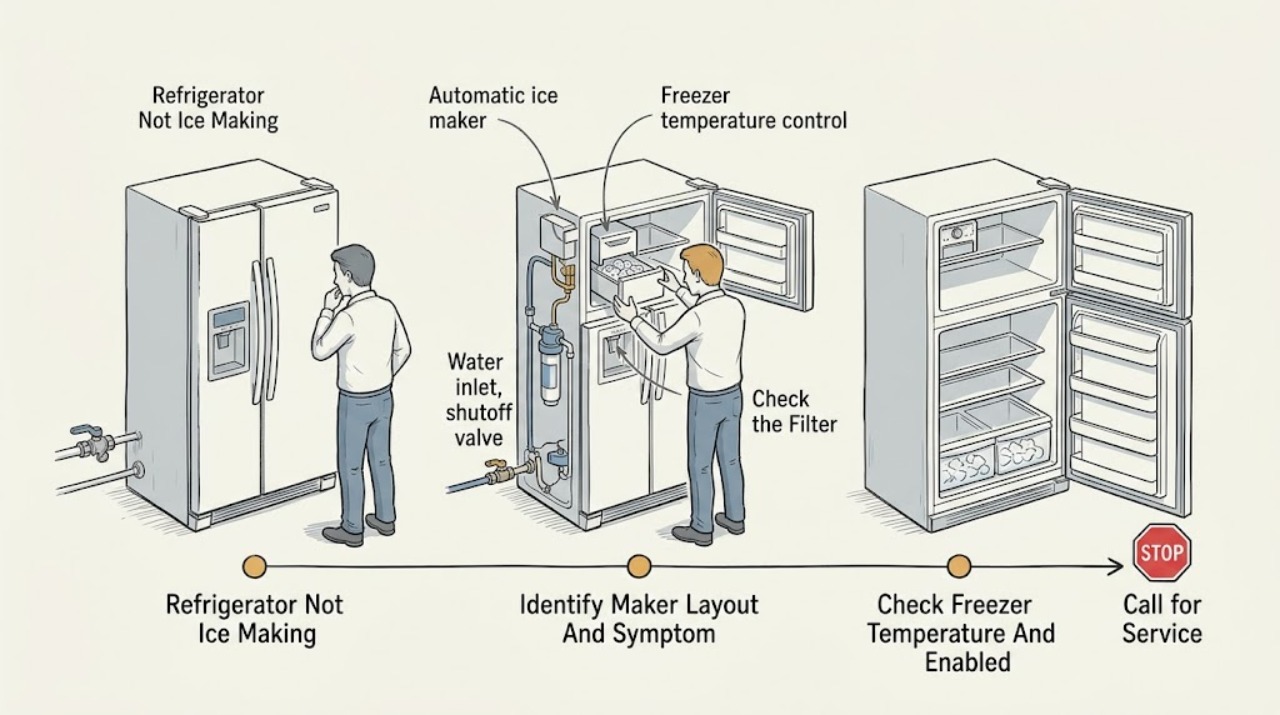
First separate ice production from ice dispensing: an empty mold means the maker is not receiving or freezing water, while a full bin with no ice at the chute is a storage or dispenser problem. Inglis’s official Canadian guide covers side-by-side and top-mount refrigerators and says ice making may depend on the freezer being cold enough, the model’s wire arm or switch being on, the refrigerator’s water valve being open, and a correctly installed, unclogged filter. A newly installed maker may need up to 72 hours for full production, and the guide says a large amount of ice removed can take 24 hours to replace. Check only the model-appropriate controls, visible water connection, filter installation, and accessible ice bin or ejector obstruction. Do not use sharp tools, bypass a door or ice-maker safety, open panels, or perform live electrical or water-valve tests. If the mold remains dry after the exact model checks, the water line leaks or is kinked, the maker jams repeatedly, or the refrigerator shows electrical or temperature hazards, stop and arrange qualified service.
Before you begin
Safety first
- The user may identify the model, check the model-specific temperature and arm or switch, inspect a visible valve and filter, and clear accessible ice with a plastic utensil. Qualified personnel must handle internal ice-maker and valve access, auger or dispenser mechanisms, door switches, wiring, live tests, hidden water lines, and control replacement.
Work through in order
Diagnostic checks
Use only checks that match the exact appliance or system and its official guide.
-
Check 1
Read the model and serial label from its accessible location, identify whether the Inglis refrigerator is side-by-side or top-mount, and inspect only the accessible ice area. Decide whether the ice mold is dry, contains frozen cubes, the bin is full but the dispenser is empty, or ice production is merely slow.
Expected result: The mold is dry; the mold or bin contains ice; the bin is full but ice will not dispense; the unit is newly installed; or the ice-maker hardware cannot be identified.
Next step: Follow the dry-mold, dispensing, or new-installation branch below and use the exact Use and Care Guide. Do not assume a dispenser failure means the ice maker itself is not producing.
Stop if: Stop for an unstable refrigerator, a damaged ice maker or door, a water leak near electrics, exposed wiring, smoke, burning odor, or abnormal heat.
Why this matters
Why: A dry mold points toward temperature, enabled-state, water supply, filter, fill valve, or maker control. Frozen cubes with no delivery points toward bin, auger, chute, door, or dispenser hardware. A new installation or recent large withdrawal changes the expected recovery time.
-
Check 2
Use the exact model guide to check whether the freezer is cold enough for ice production and whether the ice-maker wire arm or switch is in its ON position where fitted. Note whether the refrigerator was recently installed, restarted, or heavily loaded with warm food.
Expected result: The freezer is not at the model’s required condition; the arm or switch is off; the unit is newly installed or recently restarted; the freezer is cold and the maker is enabled; or the exact model has no such control.
Next step: Correct only the model-documented setting, keep the freezer door closed, and allow the exact guide’s recovery period. If the mold stays dry after the documented period, continue to the water and filter check or arrange service.
Stop if: Do not remove covers, touch the ejector mechanism while energized, bypass the shutoff arm or switch, or keep running the refrigerator when it is overheating or electrically unsafe.
Why this matters
Why: Inglis says ice production depends on freezer temperature and model-dependent arm or switch settings, and that new installations can take time to reach full production. A cold, enabled maker with a dry mold makes water delivery or internal maker service more likely.
-
Check 3
Inspect the visible refrigerator water shutoff valve and connection without disconnecting the line. Check that any model-specific filter is installed in the correct orientation and is not overdue or visibly blocked. Look at the ice mold for water, without touching internal wiring or forcing a frozen assembly.
Expected result: The water valve is off, the line is visibly kinked, the filter is incorrectly seated or blocked, the mold contains water, or the visible supply and filter appear correct but the mold is dry.
Next step: Open the valve or reseat the filter only as the exact manual allows, then monitor one production period. Call a technician for a suspected kink inside the cabinet, a leak, a dry mold after correct supply, or any need to test a valve.
Stop if: Close the water valve and stop for leaking tubing, water near electrical parts, a swollen or damaged filter, or any need to disconnect plumbing or remove a cover.
Why this matters
Why: A closed valve, kink, or filter restriction can prevent the maker from filling. Water in the mold makes supply less likely and shifts attention toward freezing, ejector, thermostat or sensor, or control behavior. A clear external supply with a dry mold makes an internal valve, fill tube, or maker fault more likely.
-
Check 4
If frozen cubes are present, inspect the accessible ice bin or freezer-door bucket for correct seating, frozen clumps around the auger, an ejector-arm jam, or ice in the delivery chute. Remove only loose ice with a plastic utensil as the model guide permits; never use a knife or other sharp object.
Expected result: The bin or bucket is misaligned; cubes are frozen together; a cube is caught at the ejector arm or chute; the freezer door is not fully closed; or the bin is correctly seated and the dispenser remains inactive.
Next step: Reseat or clear only the accessible storage path, then test the dispenser briefly with the door fully closed. If the motor, auger, door switch, or control remains inactive, arrange service instead of opening the dispenser housing.
Stop if: Do not use sharp tools, reach into moving parts, defeat the freezer-door switch, remove the auger, or operate with a cracked bucket or leaking water.
Why this matters
Why: These findings support a storage or delivery restriction rather than failure to make ice. Inglis documents different interior-bin and door-bucket arrangements and warns that sharp tools can damage the ice bucket or chute. A correctly seated, clear bin with no dispensing still needs model-specific dispenser service.
-
Check 5
After the model, temperature, enabled-state, water, filter, mold, and bin checks, record whether production starts, remains slow after the model-appropriate recovery period, or repeatedly fails. Keep the exact model information and any display or control symptoms for service.
Expected result: Ice production resumes; the mold remains dry despite a cold freezer and correct visible supply; ice forms but the ejector or dispenser repeatedly jams; or production is accompanied by a leak, unusual heat, odor, smoke, or electrical trip.
Next step: Monitor a stable maker only when there is no hazard. For persistent no-production, repeated jams, suspected internal water-line faults, or control symptoms, disconnect power and water when safe and arrange qualified Inglis or refrigerator service.
Stop if: Do not restart to test after smoke, burning odor, abnormal heat, exposed wiring, a hot cord, water near electrics, or repeated breaker trips; do not perform live voltage or valve tests.
Why this matters
Why: Recovery after a setting or supply correction supports that external cause. A dry mold with correct conditions makes the internal fill valve, maker motor, sensor, wiring, or control more likely; repeated jams suggest maker or storage hardware. Safety symptoms override further testing.
Use your observations
Decision map
Find the observation that best matches what you see, then follow the next safe action.
-
PATH 01Safety boundary
What you see
The refrigerator or ice maker was recently installed or restarted, the freezer is reaching the model’s required temperature, and there is no leak or electrical hazard.
Do this next
Keep the freezer closed and allow the exact model’s documented period. Escalate when the mold remains dry or production never begins after that period.
Why this path and its safety boundary
Why it matters: A normal initial recovery period is more likely than a failed component. Inglis says a new ice maker may need up to 72 hours for full production and a large withdrawal may need 24 hours to restock.
Safety stop: Do not wait through a water leak, abnormal heat, burning odor, smoke, or electrical trip.
-
PATH 02Safety boundary
What you see
The ice mold is dry, the freezer is not cold enough or the model’s arm or switch is off, and no internal inspection has been attempted.
Do this next
Correct only the setting shown in the exact manual and allow the documented recovery period. If the freezer is cold and the maker is enabled but the mold stays dry, check visible water and filter conditions.
Why this path and its safety boundary
Why it matters: Freezer temperature or a model-dependent ice-maker enable state is more likely than a blocked dispenser. Inglis lists both checks for its refrigerator models.
Safety stop: Do not bypass the arm or switch, touch the ejector mechanism, or remove covers.
-
PATH 03Safety boundary
What you see
The freezer is cold and the maker is enabled, but the mold is dry while the water valve is off, the visible line is kinked, or the filter is misinstalled or restricted.
Do this next
Correct or reseat only the accessible condition allowed by the exact manual, then observe one production period. Arrange service for internal tubing, valve, or fill faults.
Why this path and its safety boundary
Why it matters: An external water-supply or filter restriction is more likely. Inglis directs owners to check the water shutoff valve, supply connection, and filter condition on applicable models.
Safety stop: Close the valve and stop for leaks, water near electrics, a suspected hidden kink, or any need to disconnect plumbing.
-
PATH 04Safety boundary
What you see
Frozen cubes are present in the mold or bin, but the dispenser delivers no ice or the bucket cannot seat correctly.
Do this next
Reseat the model-appropriate bin or bucket and clear only loose accessible ice with a plastic utensil. If the path is clear but dispensing remains inactive, arrange service.
Why this path and its safety boundary
Why it matters: A storage, auger, ejector, chute, door-switch, or dispenser path issue is more likely than failure to make ice. Inglis distinguishes interior bins from freezer-door buckets and warns against sharp tools.
Safety stop: Do not use sharp objects, remove the auger or dispenser housing, defeat a door switch, or reach into moving parts.
-
PATH 05Safety boundary
What you see
The mold remains dry after a cold freezer, correct enabled state, open visible supply, and correctly installed filter, or the maker repeatedly jams or shows a leak, heat, odor, smoke, or electrical symptom.
Do this next
Stop and isolate power and water when safe, then contact Inglis support or qualified refrigerator service with the model, layout, mold state, filter and valve observations, and any hazard symptoms.
Why this path and its safety boundary
Why it matters: An internal inlet valve, fill tube, ice-maker motor, thermostat or sensor, door switch, wiring, control, or mechanical assembly fault is possible. The symptom does not safely identify a replacement part.
Safety stop: Do not perform live electrical tests, open panels, bypass the maker or door safety, or use the refrigerator after an electrical or water hazard.
Helpful context
Understand the symptom
Confirm that the refrigerator has an automatic ice maker
Not every Inglis refrigerator has the same ice hardware. The official guide separates side-by-side and top-mount families and says some models use a wire shutoff arm, some an ice-maker switch, some an interior ice bin, and some a freezer-door bucket. Identify the model and determine whether the mold is dry, contains frozen cubes, or is producing ice that cannot leave the bin before choosing a check.
A dry mold points toward water, temperature, or an enabled-state issue
If the mold has no water, check the model’s freezer temperature, the ice-maker arm or switch, the refrigerator water shutoff valve, and any water filter installation. Inglis says a newly installed maker can need up to 72 hours for full production and that the freezer must be cold enough. These are model-dependent observations, not permission to energize a valve or remove the rear cover.
A full mold with no dispensed ice is a different problem
When the mold contains ice but the user receives none, inspect the model-appropriate bin or bucket alignment, frozen clumps, auger area, delivery chute, and freezer-door closure. Inglis warns against using sharp objects to clear ice and describes interior-bin and door-bucket arrangements separately. Do not confuse a dispenser jam with an ice-maker that never fills.
Do not guess at the maker or water-line part
If safe external checks leave the mold dry, the filter and valve open, and the freezer at the model’s required temperature, the fault may involve the inlet valve, fill tube, ice-maker motor, thermostat or sensor, door switch, wiring, or control. Those parts vary by Inglis layout and model. Stop for a leak, exposed wiring, burning odor, abnormal heat, or repeated electrical trips, and arrange qualified refrigerator service.
Safety boundary
Stop conditions
- Stop and disconnect power when safe for smoke, sparks, flame, burning odor, abnormal heat, exposed wiring, a hot or damaged cord, water near electrical parts, or repeated breaker trips.
- Close the refrigerator water shutoff valve for a leak and do not restart until the water and electrical safety are assessed.
- Do not use knives or sharp tools to clear ice, bypass a door or ice-maker safety, or reach into a moving ejector, auger, or dispenser.
- Do not remove rear or control covers, disconnect hidden water lines, or perform live voltage or valve tests.
- Do not keep resetting or cycling the maker when the mold stays dry after safe model-specific checks; arrange qualified service.
Only after diagnosis
Potential parts
- model-matched water filter, ice bin, ice bucket, ejector or auger component, or dispenser chute part
Consider only when the exact model guide and safe inspection identify a blocked, damaged, missing, or incorrectly seated accessible part after distinguishing production from dispensing.
Side-by-side and top-mount Inglis refrigerators use different ice-storage and dispenser arrangements. Confirm the exact model and fit information before ordering. - model-matched ice-maker assembly, fill valve, fill tube, thermostat or sensor, door switch, or control board
Consider only after qualified diagnosis confirms a dry mold, failed fill, temperature or maker-control fault, or a corresponding door or electrical symptom; no ice alone does not identify the part.
Automatic ice-maker hardware and controls vary by Inglis refrigerator layout and model. Internal water and electrical components require exact fitment and qualified service.
When checks do not resolve it
Need a professional?
Arrange Inglis or qualified refrigerator service when the freezer is at the model’s required condition, the ice-maker arm or switch and visible water supply are correct, the filter is correctly installed, and the mold remains dry; also call for repeated ejector or dispenser jams, a suspected internal water-line or fill-valve problem, a damaged ice bin or bucket, or a maker that fails after the exact model’s initial recovery period. Stop and disconnect power when safe for smoke, sparks, burning odor, abnormal heat, exposed wiring, a hot or damaged cord, water near electrical parts, or repeated breaker trips, and close the water valve for a leak. The user may identify the model, check temperature and model controls, inspect the visible valve and filter, and reseat or clear accessible ice with a plastic utensil. Internal ice-maker, valve, auger, dispenser, wiring, control, door-switch, and sealed or water-line work belongs to qualified personnel.
Safety scope: The user may identify the model, check the model-specific temperature and arm or switch, inspect a visible valve and filter, and clear accessible ice with a plastic utensil. Qualified personnel must handle internal ice-maker and valve access, auger or dispenser mechanisms, door switches, wiring, live tests, hidden water lines, and control replacement.
Common questions
FAQ
Why is my Inglis refrigerator not making ice?
Check whether the mold is dry or whether ice is present but not dispensing. For a dry mold, check the model’s freezer temperature, ice-maker arm or switch, water valve, and filter. For ice that will not leave the bin, inspect the model-appropriate bucket, auger, and chute instead.
How long does a new Inglis ice maker take to make ice?
Inglis’s official guide says a newly installed ice maker may need up to 72 hours for full production once the refrigerator is cooled. Use the exact model instructions and escalate if the mold remains dry after the documented period.
What if my Inglis ice-maker mold is dry?
Confirm the freezer is cold enough, the model’s wire arm or switch is on, the refrigerator water valve is open, and any filter is correctly installed and not clogged. A cold, enabled maker with a dry mold after those checks needs qualified diagnosis of the internal water and maker path.
Why is there ice in my Inglis refrigerator but none comes from the dispenser?
The ice maker may be working. Inglis says an interior bin or freezer-door bucket must be correctly seated; frozen clumps, an ejector-arm jam, or a blocked chute can prevent delivery. Clear loose ice only with a plastic utensil and never use a sharp tool.
When should I call for an Inglis ice-maker repair?
Call when the freezer is cold enough, the model-specific maker control and visible water supply are correct, and the mold remains dry, or when jams repeat after safe bin and chute checks. Stop immediately for a leak near electrics, exposed wiring, smoke, burning odor, abnormal heat, or repeated breaker trips.
Read the exact guide
Official sources
- About Inglis - Inglis Home AppliancesInglis Home Appliances / Whirlpool Canada LP · Official Inglis Canada brand page; it establishes the brand and regional context, not a model-specific ice-maker procedure.
- Troubleshooting - Inglis Home AppliancesInglis Home Appliances / Whirlpool Canada LP · Official Inglis Canada troubleshooting page; ice-maker hardware, ice storage, dispenser design, and controls vary by exact refrigerator model.
- Contact Us - Inglis Home AppliancesInglis Home Appliances / Whirlpool Canada LP · Official Inglis Canada customer-care page; support availability and service process are regional.
Community feedback
Share a repair observation
Share a plain-text repair observation. Accepted observations are published automatically; this page may take a moment to update.