
On this page
Start here
Quick answer
First look in the ice bin and identify the JennAir refrigerator architecture. Ice already in the bin means ice has been produced; a clump, seated-bin problem, lock, chute, or dispenser symptom is not the same as no ice production. If the bin is empty, use the exact model manual to confirm that the ice maker is on, the freezer is at an ice-making temperature, and the cold-water valve and visible line are connected and not kinked. JennAir's refrigerator guide lists 0–5°F (-17 to -15°C) as the freezer range for optimal ice production, while a new installation may need 24 hours to begin and up to 72 hours for full production. A recently replaced filter can restrict flow if it is not sealed or seated correctly. If ice is present but will not dump or dispense, follow that separate path. Do not reach into the ejector, force the wire arm, remove panels, pull a built-in unit, or repair the valve or ice-maker mechanism; stop for a leak near electrics or any electrical hazard and arrange qualified service.
Before you begin
Safety first
- This article covers bin observation, model identification, documented control checks, normal freezer-setting review, accessible water/filter observations, startup waiting, and safe separation of production from dispensing. Do not reach into ejectors or augers, force the wire arm, use sharp tools, pull fixed appliances, remove panels, repair valves or fill lines, test live wiring, or continue after a water or electrical hazard.
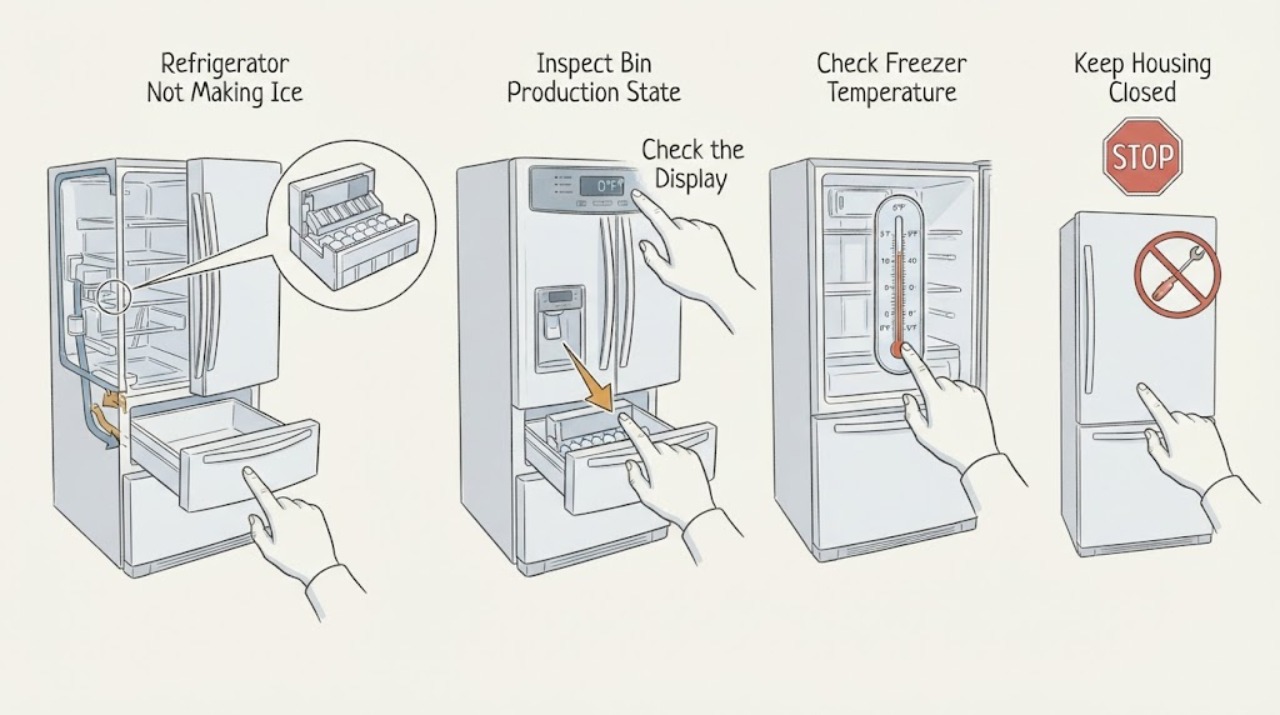
Work through in order
Diagnostic checks
Use only checks that match the exact appliance or system and its official guide.
-
Check 1
Inspect the ice storage bin without reaching into the ejector or dispenser mechanism. Record whether it is empty, full, clumped, not seated, or contains ice that will not leave the dispenser.
Expected result: The bin is empty; ice is present but clumped; the bin is not seated; the bin is full; or ice is present but not dispensing.
Next step: Use the no-production path only for an empty bin. For existing ice that will not dump or dispense, use the separate dispenser/ejection path and do not order an ice-maker part based on that symptom alone.
Stop if: Do not insert fingers or tools into the ejector, chute, auger, or dispenser mechanism.
Why this matters
Why: An empty bin supports a production, temperature, water, or control path. Ice in the bin proves production occurred and shifts the diagnosis to storage, ejection, or dispensing.
-
Check 2
Read the complete JennAir model number and identify whether the refrigerator is French-door/bottom-freezer, built-in, column, or another documented arrangement. Use the exact manual to locate the ice-maker switch, control-panel setting, wire arm, and bin.
Expected result: The model's ice-maker control is identified and on; the display says Ice Maker Off or Showroom; the wire arm is raised; or the model and control arrangement remain uncertain.
Next step: Enable only the documented control for the exact model. If the architecture cannot be identified, stop at model research or arrange service rather than borrowing a reset sequence.
Stop if: Do not force the wire arm, bypass a control, remove a fixed unit, or open a panel to locate a switch.
Why this matters
Why: JennAir uses different ice-maker styles and control locations. An off setting, raised shutoff, or showroom/demo mode can stop production without an internal ice-maker failure, but a similar-looking control from another model is not evidence.
-
Check 3
Check the freezer setting and the normal temperature display or indicator, and confirm that the freezer door closes fully. Do not remove an evaporator cover or scrape frost to reach a sensor.
Expected result: The setting is above the documented ice-production range, the freezer is not maintaining its setting, the door does not close, or the freezer setting is within the cited 0–5°F range and stable.
Next step: Correct only an obvious documented setting or door-position issue and allow the appliance to stabilize. If the freezer cannot hold temperature or needs internal access, arrange appliance service.
Stop if: Do not dismantle cooling parts, force a defrost, chip ice with a sharp object, or test a sensor with live power.
Why this matters
Why: A warm freezer or poor door closure can delay or stop ice production. A stable, cold freezer makes control, water, filter, or model-specific mechanism causes more likely, but does not prove a component fault.
-
Check 4
For a water-connected model, inspect only the accessible shutoff valve and visible supply line for an obvious closed valve, kink, or leak. If the filter was recently changed, confirm from the exact manual that it is fully seated and sealed; do not disconnect hidden tubing.
Expected result: The valve is closed, the line is kinked or leaking, the filter is not locked or was just replaced, the model uses reverse osmosis, or the visible path appears normal.
Next step: Open an obviously closed valve only when there is no leak and the model instructions permit it; straighten only an accessible line without moving the refrigerator. Reseat a filter only according to its manual. Stop for leaks, hidden fittings, or pressure concerns.
Stop if: Do not pull a built-in or column refrigerator, dismantle a filter head or valve, tighten hidden fittings, or work on water and electricity together.
Why this matters
Why: Restricted supply and filter installation can reduce or stop flow to the ice maker. A normal visible path does not rule out an internal valve, filter head, pressure, or fill fault.
-
Check 5
Record whether the refrigerator or ice maker was newly installed, reconnected, had a filter changed, or had a large amount of ice removed. Keep the doors closed as normally required and allow the exact documented recovery period.
Expected result: A new installation or connection is under 24 hours old; the initial period passed but full production has not reached 72 hours; a large amount of ice was recently removed; or the unit is established and still empty.
Next step: Wait through the applicable model-specific period before escalating a new installation. If an established, cold, enabled unit remains empty after the safe water checks, arrange service.
Stop if: Do not run repeated forced harvest cycles, remove covers, or continue operating with a leak or electrical warning.
Why this matters
Why: JennAir's cited guidance allows 24 hours to begin production and up to 72 hours for full production in the referenced refrigerator instructions. A recently emptied bin can also need time to refill.
-
Check 6
If ice is present, distinguish a bin that will not dump from a dispenser that will not deliver. Check only the model-documented dispenser lock, Sabbath mode indication, bin seating, clumping, chute, and paddle or pad operation; never use a sharp object in the chute.
Expected result: Ice is made but stuck in the mold, clumped in the bin, the bin is not seated, a lock or Sabbath indication is present, the chute is blocked, or the dispenser does not respond while ice remains available.
Next step: Use the exact dispensing instructions; remove and clean only accessible bin/chute areas as the manual permits, and arrange service for a jammed ejector, auger, switch, or persistent control fault.
Stop if: Do not reach into an ejector or auger, use a knife or metal tool, bypass a dispenser lock, or disassemble the bin mechanism.
Why this matters
Why: Production has occurred, so this is not a no-ice-making diagnosis. Storage, ejection, dispenser controls, chute, and model-specific bin engagement are the relevant branches.
Use your observations
Decision map
Find the observation that best matches what you see, then follow the next safe action.
-
PATH 01Safety boundary
What you see
The bin is empty, the exact model's ice maker is off or in showroom/demo mode, the freezer is above its documented range, or the freezer door does not close.
Do this next
Use the exact manual to enable the maker, correct only an obvious setting or closure issue, and allow the appliance to stabilize before further diagnosis.
Why this path and its safety boundary
Why it matters: A control state, temperature, or door condition is more likely than a proven ice-maker component failure.
Safety stop: Do not force a wire arm, defeat a control, or open the cooling compartment.
-
PATH 02Safety boundary
What you see
The freezer is cold and the maker is enabled, but the visible valve is closed, the line is kinked or leaking, or a recently installed filter is not seated or sealed.
Do this next
Correct only an obvious safe external condition or reseat the filter by its manual. Stop for a leak, hidden connection, pressure concern, or any need to move a built-in unit.
Why this path and its safety boundary
Why it matters: A restricted or interrupted water path is more likely, subject to the exact model's plumbing and filter arrangement.
Safety stop: Do not dismantle the filter head, valve, water line, or rear cover.
-
PATH 03Safety boundary
What you see
The refrigerator or ice maker was newly installed, reconnected, or recently emptied and the applicable 24-hour or 72-hour period has not passed.
Do this next
Allow the exact model's documented period, then reassess the bin, control, temperature, and visible water path. Escalate if an established unit remains empty.
Why this path and its safety boundary
Why it matters: An initial production or refill delay remains plausible and should not be mislabeled as an internal failure.
Safety stop: Do not force cycles, remove panels, or keep an unconnected ice maker turned on if the manual warns of buzzing or excess cooling.
-
PATH 04Safety boundary
What you see
Ice is present in the bin or mold, but it will not dump, the bin is clumped or unseated, or the dispenser/chute does not deliver it.
Do this next
Follow the exact dispensing path and clean only accessible areas as documented. Arrange service for a jammed or persistent mechanism fault.
Why this path and its safety boundary
Why it matters: The ice maker has produced ice; the relevant problem is ejection, storage, dispenser control, chute, paddle, or a model-specific bin interface, not no production.
Safety stop: Do not use sharp tools, reach into the auger or ejector, or bypass a lock or interlock.
-
PATH 05Safety boundary
What you see
The exact maker is enabled, the freezer is stable, the startup period passed, the visible water path and filter are appropriate, and the bin remains empty, or a leak/electrical warning is present.
Do this next
Stop routine troubleshooting and arrange qualified JennAir appliance service; use qualified electrical service when the household circuit or supply is implicated.
Why this path and its safety boundary
Why it matters: An internal valve, fill path, control, sensor, motor, heater, or connection fault is more likely; a leak or electrical sign is an immediate safety issue.
Safety stop: Do not test live parts, remove panels, pull a built-in appliance, bypass the shutoff, or continue with water near electrics, smoke, burning odor, sparking, or a repeat breaker trip.
Helpful context
Understand the symptom
Confirm whether the problem is production or dispensing
Open the storage bin before changing settings. An empty bin means no recent production is visible, while ice in the bin proves that the ice maker has produced at least some ice. Ice that will not dump into the bin, clumps in storage, or fails to leave the dispenser belongs to a separate ejection or dispensing path. JennAir's dispenser guidance explicitly tells owners to check whether the ice maker is making ice before diagnosing the dispenser.
Keep architecture and model instructions conditional
JennAir uses several refrigerator arrangements, including French-door/bottom-freezer, built-in, column, and other full-size designs. Some use a wire shutoff arm, others a control-panel setting or a model-specific switch. The ice-bin location, filter, water path, and reset method therefore cannot be borrowed from a similar-looking refrigerator. Record the complete model number and use its manual before removing a bin or changing a setting.
Check temperature, water, control, and filter at the user level
For an empty bin, check the freezer setting and whether the freezer door closes normally, verify that the ice maker is enabled in the exact model's control scheme, and inspect only visible water-line and shutoff-valve conditions. A kinked line, closed valve, reverse-osmosis restriction, or incorrectly installed filter can reduce or stop flow. JennAir's general guide lists 0–5°F as an optimal freezer setting range, but a setting check does not justify removing panels or measuring hidden pressure.
Allow the documented startup period
After a new installation or water connection, do not treat an empty bin as an immediate component failure. JennAir says ice production can take 24 hours to begin and 72 hours to reach full production for the cited built-in and refrigerator guidance. After a large amount of ice has been removed, the use-and-care guide also says to allow about 24 hours for more ice. Exact timing and controls remain model dependent.
Escalate hidden water and ice-maker faults
If the exact model is enabled, the freezer is in its documented range, the startup period has passed, and the visible water path and filter are appropriate, continued no production needs model-specific service diagnosis. A fill valve, internal line, sensor, motor, heater, control, or sealed connection may be involved. These are not generic owner tests. A leak, damaged wiring, water near electrical parts, or an inaccessible connection overrides routine ice troubleshooting.
When checks do not resolve it
Need a professional?
Arrange qualified JennAir appliance service when the exact model's maker remains empty after its documented control, freezer, startup, filter, and accessible water checks; when ice is made but the ejector or dispenser remains jammed; or when a built-in/column unit needs movement or panel access. Use qualified electrical or plumbing service for household supply, water pressure, or hidden-line problems. Stop immediately for leaks near electrical parts, damaged wiring, smoke, burning odor, sparking, or repeated breaker activity. Do not bypass the shutoff, remove panels, or perform live testing.
Safety scope: This article covers bin observation, model identification, documented control checks, normal freezer-setting review, accessible water/filter observations, startup waiting, and safe separation of production from dispensing. Do not reach into ejectors or augers, force the wire arm, use sharp tools, pull fixed appliances, remove panels, repair valves or fill lines, test live wiring, or continue after a water or electrical hazard.
Common questions
FAQ
How do I know whether my JennAir refrigerator is making ice?
Inspect the bin and mold without reaching into the mechanism. Ice in the bin proves that production occurred, even if it is clumped or will not dispense. An empty bin is the starting point for the no-production checks.
What freezer temperature does JennAir recommend for ice production?
JennAir's general refrigerator ice-maker guide lists 0–5°F (-17 to -15°C) for optimal production. Use the exact model manual and actual temperature behavior for the final diagnosis; a setting alone does not prove the freezer is operating correctly.
How long should a newly installed JennAir ice maker take?
The cited JennAir built-in and refrigerator guidance allows about 24 hours for production to begin and up to 72 hours for full production. A large refill after removing much of the ice can also take about 24 hours.
Can I reset or repair the JennAir ice maker myself?
Use only the exact model's documented on/off or reset control. Do not force the wire arm, reach into the ejector or auger, remove panels, repair a valve, or test internal wiring. Persistent no production or any water/electrical hazard requires qualified service.
Read the exact guide
Official sources
- Not Making Ice - Existing Installation - Built-In RefrigeratorJennAir Product Help · Existing JennAir built-in refrigerator installations; do not generalize its access or controls to columns, French-door units, or other arrangements.
- Ice Maker Not Making Ice - ColumnJennAir Product Help · JennAir column refrigerators only; do not use its control or water assumptions for other JennAir refrigerator architectures.
- Not Dispensing Ice - RefrigeratorJennAir Product Help · JennAir French-door/bottom-freezer refrigerator dispenser guidance; exact bin, lock, Sabbath, chute, and paddle behavior varies by model.
- How to Turn the Ice Maker On and OffJennAir Product Help · General JennAir refrigerator guidance illustrating multiple ice-maker styles; exact model manual controls the applicable method.
- Not Making Ice - RefrigeratorJennAir Product Help · French-door/bottom-freezer JennAir refrigerator guidance; use conditionally for that architecture and consult the exact model manual for others.
- USE AND CARE GUIDEJennAir · Specific JennAir refrigerator use-and-care guide; cited for its explicit timing and user-level checks, not as a universal control sequence.
- Ice Maker Not Working - TroubleshootingJennAir Product Help · General JennAir full-size refrigerator ice-maker troubleshooting; exact controls and architecture remain model dependent.
- Not Making Ice - New Installation - Built In RefrigeratorJennAir Product Help · New JennAir built-in refrigerator installations; exact model and installation instructions govern any water-line work.
Community feedback
Share a repair observation
Share a plain-text repair observation. Accepted observations are published automatically; this page may take a moment to update.