
On this page
Start here
Quick answer
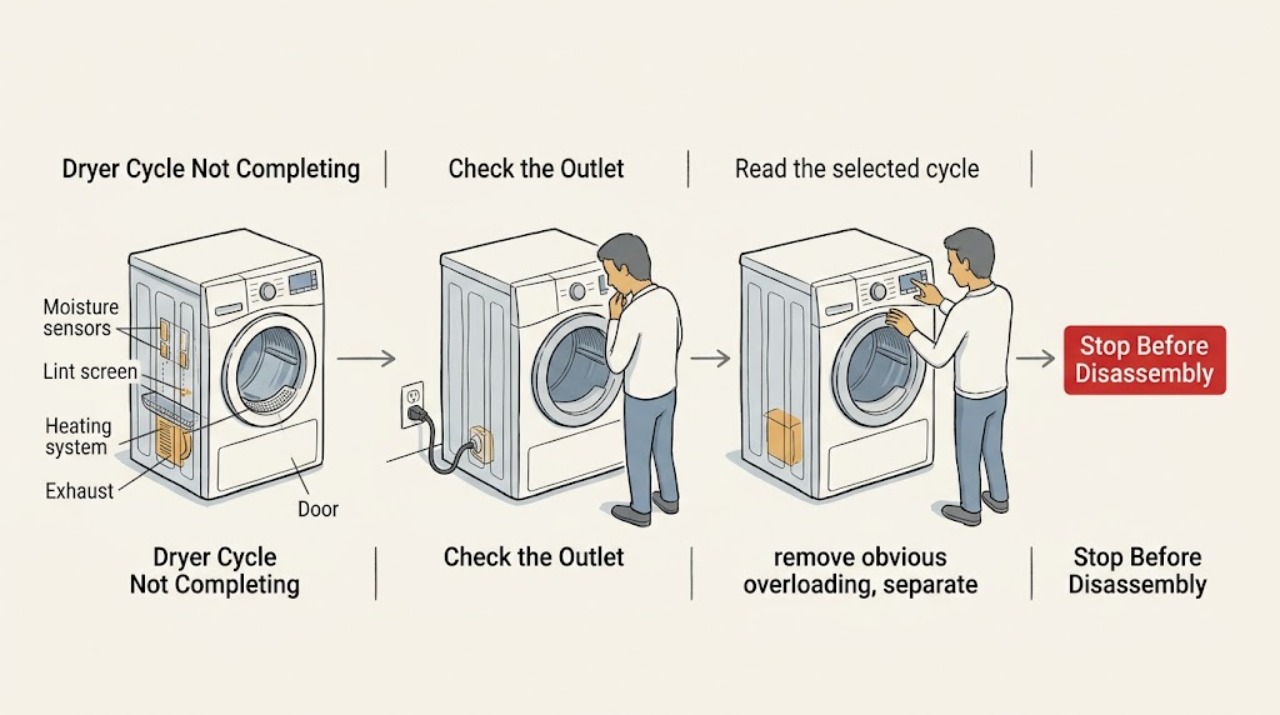
A KitchenAid dryer that does not complete its cycle can be ending early because a sensor cycle is not seeing a representative load, or it can be running too long because the load, exhaust airflow, heat, power, or door signal is wrong. First identify whether the drum stops early, never reaches the end, or stops before the cool-down portion. Then check the selected cycle and dryness setting, use a balanced load that tumbles freely, clean the lint screen and accessible exhaust hood, confirm the door closes, and check only the accessible plug and labeled breaker. Automatic cycles sense moisture or air temperature and stop at the selected dryness, while Timed Dry runs for the selected time. Stop immediately for smoke, a burning or gas odor, sparking, scorching, a cabinet that is dangerously hot, a damaged cord or outlet, or a breaker that trips again; do not open panels or work on live, heating, gas, or exhaust components.
Work through in order
Diagnostic checks
Use only checks that match the exact appliance or system and its official guide.
-
Check 1
Stop the dryer and leave it off if there is smoke, a burning or gas odor, sparking, scorching, a dangerously hot cabinet, a damaged cord or outlet, water near electrical parts, or a breaker that trips again; otherwise note whether the drum stops early, runs indefinitely, or stops before cool-down.
Expected result: A hazard is present, or the dryer is safe but the symptom can be classified as early stop, long or endless cycle, or an interrupted end phase.
Next step: For a hazard, leave the dryer off, clear the area when appropriate, and arrange qualified appliance or electrical service. If safe, continue with the cycle and load check without opening the cabinet.
Stop if: Do not restart the dryer to reproduce smoke, sparks, a gas odor, scorching, dangerous heat, or a repeat electrical trip.
Why this matters
Why: Fire, gas, electrical, and severe-heat signs take priority over cycle troubleshooting. The symptom timing determines whether to examine sensor decisions, airflow and heat, or a door and control interruption.
-
Check 2
Read the selected cycle and dryness option, then run only a safe, correctly sorted load on the cycle intended for its fabric; compare an early stop with the documented behavior of Automatic and Timed Dry settings.
Expected result: The dryer stops when a small or mixed load is still damp, completes a timed run but not an automatic run, stays in a cycle without reaching the end, or changes behavior when the intended cycle and dryness level are selected.
Next step: Use a representative load and the matching cycle. If the same safe load still ends early or never completes, continue to the load and drum check, then the airflow check; do not compensate for a hazard with a longer cycle.
Stop if: Stop if the dryer becomes excessively hot, smells burnt, smokes, sparks, or trips a breaker during the comparison.
Why this matters
Why: Automatic cycles make a moisture or air-temperature decision, so load composition and dryness selection affect when they end. A timed cycle that runs normally but an automatic cycle that ends early points toward sensing or load contact; neither result excuses a hot, smoky, or poorly vented dryer.
-
Check 3
With the drum stopped and cool, remove obvious overloading, separate a single very small item from a test load, and reload loosely so items can tumble; check that the selected fabric type matches the cycle and that the drum interior and accessible sensing area are clean and dry.
Expected result: The load is tightly packed, unusually small, mixed with heavy and light fabrics, not tumbling freely, or the symptom improves after a balanced load; or the load and accessible sensing area appear normal.
Next step: Repeat only with a safe, representative load and the appropriate cycle. If the dryer still stops early or does not complete, do not scrub, bend, bypass, or replace a sensor; continue to the lint and exhaust check or arrange service.
Stop if: Stop if the drum will not rotate freely, an object is caught, the cabinet is hot, or investigating the sensor would require panel removal or live testing.
Why this matters
Why: An unrepresentative load can make an automatic dryness decision too soon or prolong the run. Improvement with a balanced load makes a loading or sensing condition more likely; persistence with a normal load shifts attention to airflow, heat, door, or control behavior.
-
Check 4
After the dryer is off and cool, clean the lint screen, confirm the screen is seated, inspect the accessible exhaust hood and visible vent section for lint, blockage, crushing, or a disconnected joint, and keep the surrounding area clear.
Expected result: The lint screen or hood is blocked, the accessible vent is crushed or loose, outside airflow is weak, the vent is clear, or the cycle improves after the safe obstruction is corrected.
Next step: Correct only a loose external obstruction without tools. If the full duct needs cleaning, the hood remains weak, the vent is damaged, or the cycle remains long, stop using heat and arrange qualified vent or appliance service; do not push tools into the duct or add a booster fan.
Stop if: Stop if lint is heavily accumulated, exhaust air is extremely hot or absent, the vent is damaged, the dryer overheats, or smoke or burning odor appears.
Why this matters
Why: KitchenAid states that good airflow is needed with heat for efficient drying and recommends a clean lint screen, a clear exhaust hood, and maintained venting. Restricted airflow can lengthen a cycle and increase heat even when the controls appear normal.
-
Check 5
Check without tools that the door closes fully and latches, no garment is trapped at the seal, the control still shows the intended cycle, the accessible plug is seated, and the labeled breaker has not tripped; use only the model guide's documented reset behavior.
Expected result: The door is not latching, a garment blocks closure, the control resets or loses the cycle, the accessible supply is interrupted, or the door and supply look normal.
Next step: Correct only an obvious load obstruction or accessible plug issue and make one documented reset if permitted. If the door will not latch, the cycle loses state, power is normal but the fault repeats, or the breaker trips again, arrange qualified service.
Stop if: Stop for a damaged latch, frayed cord, warm outlet, repeated breaker operation, exposed wiring, or any need to measure energized circuits or remove a panel.
Why this matters
Why: A door signal or interrupted supply can stop or restart a cycle without proving a drying-system fault. A normal door and supply with a repeatable cycle problem shifts the diagnosis to airflow, heat, sensing, or control components.
-
Check 6
Make one final safe observation from outside the cabinet: record whether the dryer produces normal tumbling and heat, reaches cool-down, displays a fault, and sends warm air through the accessible exhaust without smoke or unusual odor.
Expected result: The dryer completes after a documented external correction, or it still stops early, runs indefinitely, has no expected heat, has abnormal noise, displays a fault, or shows abnormal exhaust behavior.
Next step: If the fault persists, stop ordinary use as appropriate and arrange appliance repair. Give the technician the exact model, cycle and option, load type, end behavior, lint and vent observations, power history, and any heat, odor, noise, or display changes.
Stop if: Do not open the cabinet, access heating or gas components, bypass a door or thermal safety, work on a live circuit, or modify the exhaust system.
Why this matters
Why: A repeatable fault after the basic cycle, load, airflow, door, and supply checks needs model-specific diagnosis. Possible areas include sensing, thermal protection, heating, gas ignition, motor, door switch, or controls, but the symptom alone does not identify a part.
Use your observations
Decision map
Find the observation that best matches what you see, then follow the next safe action.
-
PATH 01Next step
What you see
Smoke, burning or gas odor, sparks, scorching, dangerous cabinet heat, water near electrical parts, cord or outlet damage, or a repeat breaker trip is present.
Do this next
Arrange qualified service and follow the exact model guidance.
Why this path and its safety boundary
Why it matters: Stop using the dryer, do not reproduce the symptom, clear the area as appropriate, and arrange qualified appliance, electrical, or gas assistance.
-
PATH 02Next step
What you see
An automatic cycle stops early with damp clothes, especially with a tiny, mixed, or tightly packed load, while a suitable timed comparison behaves differently.
Do this next
Arrange qualified service and follow the exact model guidance.
Why this path and its safety boundary
Why it matters: Use the correct cycle and dryness option with a balanced load that tumbles freely. If the same representative load still ends early, arrange service for sensing or control diagnosis.
-
PATH 03Next step
What you see
The dryer runs long or repeatedly, clothes remain damp, lint or the hood is blocked, or accessible exhaust airflow is weak.
Do this next
Arrange qualified service and follow the exact model guidance.
Why this path and its safety boundary
Why it matters: Clean the lint screen and correct only a visible external obstruction. Have the full vent and dryer airflow assessed if the condition persists; do not dismantle the duct or dryer.
-
PATH 04Next step
What you see
The door does not latch, a garment prevents closure, the control loses the cycle, or the accessible supply is interrupted.
Do this next
Arrange qualified service and follow the exact model guidance.
Why this path and its safety boundary
Why it matters: Remove only the obvious load obstruction, confirm the accessible plug and labeled breaker, and follow the exact model guide for one permitted reset. Persistent latch, control, or power faults need service.
-
PATH 05Next step
What you see
The dryer tumbles but has no expected heat, shows a fault, makes abnormal noise, or remains hot without completing after airflow and load checks.
Do this next
Arrange qualified service and follow the exact model guidance.
Why this path and its safety boundary
Why it matters: Stop ordinary use and arrange qualified appliance repair. Heating circuits, gas ignition, thermal protection, motors, sensors, and controls require model-specific diagnosis.
-
PATH 06Next step
What you see
A safe cycle completes after a documented cycle, load, lint, external airflow, door, or accessible supply correction and no hazard returns.
Do this next
Arrange qualified service and follow the exact model guidance.
Why this path and its safety boundary
Why it matters: Keep the same loading and maintenance pattern, clean the lint screen before each load, and request service if the symptom returns.
Helpful context
Understand the symptom
Separate an early stop from a long cycle
The same complaint can mean two different control decisions. If the drum stops while clothes are still damp, an automatic cycle may have reached its sensor decision early or the load may not be contacting the sensing area consistently. If the dryer runs for a long time, a full or mixed load, restricted exhaust, weak heat, or a door or control interruption is more likely. Record the cycle, dryness option, approximate load, and whether the final cool-down occurred before changing several things at once.
Make the load and sensor decision meaningful
Automatic cycles are not a fixed countdown: KitchenAid says they sense moisture or air temperature and stop at the selected dryness. A single small item, a tightly packed load, or fabrics with very different weights can produce a result that feels premature. Use a suitable, balanced load that tumbles freely and compare the same safe load on the appropriate cycle. Use Timed Dry only as a controlled comparison, not as a reason to ignore overheating or poor airflow.
Treat exhaust airflow as a drying system
The dryer needs both heat and airflow. Clean the lint screen before loading, keep the outside exhaust hood and the area around it clear, and look for a crushed or visibly damaged accessible vent section without pulling the appliance out. Do not insert tools into the duct or dismantle the dryer. If the vent has not had its full length professionally cleaned or the cycle is getting hotter and longer, arrange qualified service.
Use a model-specific service boundary
KitchenAid dryer designs and controls vary. A door that will not latch, a persistent no-heat condition, a repeated interruption, or a fault display needs the exact model guide and, when the safe external checks do not resolve it, appliance service. Gas connections, heating circuits, internal sensors, thermal protection, motors, and control boards are not ordinary user adjustments.
Only after diagnosis
Potential parts
- moisture sensor or control component
Consider only if a representative load and correct automatic cycle still end early after the accessible load and lint checks, and qualified diagnosis links the behavior to sensing or control input.
Confirm the exact dryer model and manufacturer fit information before any part decision; the symptom alone does not establish fit. - heating, thermal, or gas-ignition component
Consider only after qualified service confirms a persistent no-heat, overheating, or heat-control fault once airflow has been assessed.
Gas and electric dryer designs differ; a qualified technician must identify the model-specific component and safe repair path. - blower, exhaust, door-latch, or control component
Consider only when diagnosis ties persistent weak airflow, a door signal problem, or repeated cycle interruption to a specific component after safe external checks.
Verify the complete model identifier and manufacturer fit information; do not alter a safety interlock or exhaust design.
When checks do not resolve it
Need a professional?
Smoke, a burning or gas odor, sparks, scorching, dangerous cabinet heat, or water near electrical parts appears., The cord, outlet, door latch, or vent is damaged, or the breaker trips again., The dryer remains damp or does not complete after a suitable load, correct cycle, lint-screen cleaning, and accessible airflow check., The dryer tumbles without expected heat, runs excessively hot, displays a persistent fault, or makes abnormal noise., The full exhaust duct needs cleaning, the outside airflow remains weak, or lint repeatedly accumulates., Diagnosis would require opening panels, measuring energized circuits, accessing heating or gas components, bypassing a safety, or changing the sealed control or exhaust system.
Common questions
FAQ
Why does my KitchenAid dryer stop before clothes are dry?
An automatic cycle can stop when its moisture or air-temperature decision reaches the selected dryness. A tiny, mixed, or tightly packed load may give an unrepresentative result. Use the correct cycle and a balanced load, clean the lint screen, and arrange service if the same suitable load still ends early.
Can a blocked vent make a dryer cycle not complete?
Yes. KitchenAid says the dryer needs good airflow along with heat and recommends a clean lint screen, a clear exhaust hood, and maintained venting. Correct only a visible external obstruction; have persistent weak airflow or a long hot cycle assessed by qualified service.
Should I use Timed Dry when an automatic cycle ends early?
A timed cycle can be a controlled comparison because it runs for the selected time, but it is not a repair. Use only a safe, correctly sorted load and stop for smoke, unusual heat, burning or gas odor, sparks, or poor airflow.
Why does my dryer stop just before the end?
Check whether it is reaching the cool-down portion, whether the door is latching, and whether the control or accessible supply is losing state. Do not repeatedly stop a hot load or open the cabinet; persistent interruption needs model-specific appliance service.
When should I stop troubleshooting a KitchenAid dryer?
Stop for smoke, a burning or gas odor, sparks, scorching, dangerous heat, water near electricity, damaged power parts, a repeat breaker trip, or a damaged vent. Also stop when the next step would involve panels, energized circuits, heating or gas parts, safety bypasses, or internal exhaust work.
Read the exact guide
Official sources
- DRYER SAFETYKitchenAid · Opened official KitchenAid installation and safety document; model-specific installation instructions control the applicable setup.
- DRYER CYCLE GUIDEKitchenAid · Opened official KitchenAid cycle guide; available cycles and options depend on the exact model.
- WASHER/DRYER USE AND CARE GUIDEKitchenAid · Opened official KitchenAid owner guide; controls and procedures vary by model, so the exact model guide takes precedence.
Community feedback
Share a repair observation
Share a plain-text repair observation. Accepted observations are published automatically; this page may take a moment to update.