
On this page
Start here
Quick answer
First decide whether the GE dryer has actually stopped, is taking a long time to dry, or is behaving normally on an automatic cycle. GE says an automatic-cycle timer can advance sporadically, and a brief pause can occur when the drum reverses direction. A sensor model may also stop early when it detects no load or when the load has moved away from its moisture sensors. For a safe dryer, clean the lint filter, inspect the accessible exhaust hose and outside hood for restriction, confirm the drum is not overfilled or nearly empty, and check that the dryer is level. Avoid operating a gas dryer without its vent. If the cabinet is unusually hot, the vent alert remains, the dryer smells burnt, the motor stops and will not recover, the breaker trips again, or the cycle still ends early after these checks, keep it off and arrange qualified service.
Before you begin
Safety first
- A user may clean the lint filter, inspect accessible airflow, check load distribution and level, and observe a safe complete-vent cycle. Gas vent removal, internal thermal or heater work, live electrical diagnosis, motor access, and control repair require qualified service.
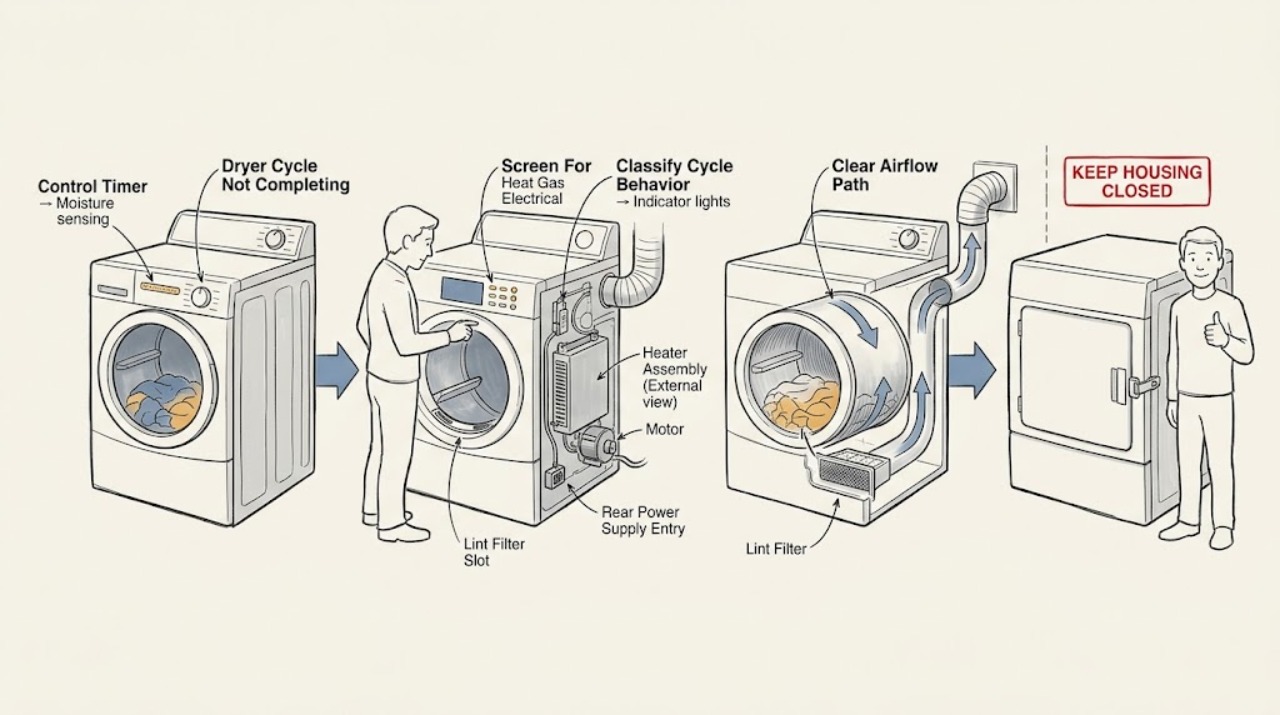
Work through in order
Diagnostic checks
Use only checks that match the exact appliance or system and its official guide.
-
Check 1
Stop the dryer and check from a safe position for a burning smell, smoke, sparks, a hot plug or cabinet, gas odor, damaged cord, water near electricity, or a breaker that trips again; do not restart after any of these signs.
Expected result: Record whether the drum is hot, whether the odor persists, whether lint is accumulating around the appliance or vent, whether a gas odor is present, and whether electrical protection has opened.
Next step: Keep the dryer off, leave the area if there is a gas odor or smoke, and arrange the appropriate qualified appliance, electrical, or gas help. Do not continue cycle testing.
Stop if: Stop immediately for smoke, burning odor, gas odor, sparking, a hot plug, abnormal cabinet heat, damaged wiring, or repeated protection trips.
Why this matters
Why: These signs indicate a fire, combustion, overheating, or electrical boundary rather than an ordinary timer pause.
-
Check 2
Note the selected cycle and whether the dryer is still tumbling, the timer is advancing in jumps, the display says complete, or the drum stops completely; listen for the short pause and sound change associated with reverse tumbling.
Expected result: Compare the behavior on an automatic or sensor cycle with the behavior on a model-supported timed cycle, without changing a setting while the drum is moving.
Next step: If the drum resumes and the load dries, treat the pause as normal operation. If it stops completely, ends early repeatedly, or only one cycle fails, continue to the load, airflow, and service checks.
Stop if: Do not repeatedly start, stop, or open the cabinet to force the timer to advance.
Why this matters
Why: GE says automatic timers may advance sporadically and reverse tumbling can create a brief pause. A completely stopped drum or an immediate end on every safe cycle is a different symptom.
-
Check 3
With the dryer off and cool, clean the lint filter as the manual allows and inspect the visible exhaust hose, rear connection, outside hood, and front air intake for lint, kinks, collapse, snow, nesting, or other blockage.
Expected result: Record whether the filter is coated, the duct is crushed or disconnected, the outside damper can move, and airflow at the hood is weak when the model is safely operating with its complete vent installed.
Next step: Correct only an accessible lint-filter or visible obstruction issue using the manual and arrange duct cleaning or service when the path is inaccessible, damaged, or still restricted.
Stop if: Do not operate a gas dryer without the vent, use plastic flexible ducting, reach into a hot duct, or remove internal panels.
Why this matters
Why: GE says restricted airflow keeps heat and humidity inside, increases drying time, can make the dryer hot, and can let lint accumulate in the vent.
-
Check 4
Check that the load is not packed tightly, not a single poorly distributed item, and not shifted away from the sensor area; confirm the dryer is level and the selected dryness setting suits the fabric and load.
Expected result: Note whether clothes tumble freely, whether the load is still damp at the early stop, whether a very small load ends quickly, and whether the machine rocks or is tilted toward the rear.
Next step: Redistribute or adjust the load and level the appliance only through the documented user procedure. If the same load still ends early or the dryer stops with a normal load, arrange service.
Stop if: Do not climb on the appliance, move a stacked unit alone, defeat a sensor, or use an unsafe load or fabric setting.
Why this matters
Why: GE links load size, leveling, and contact with moisture sensors to sensor-cycle behavior. Some GE Profile models can stop when no load is detected, including when a rear tilt moves clothes away from the sensors.
-
Check 5
Check the displayed cycle, dryness or heat option, door closure, and visible household power indication; if the dryer is electric, confirm the dedicated supply protection has not opened, without removing an electrical cover.
Expected result: Record whether the panel resets, whether the door latch is recognized, whether the same cycle stops after the cabinet warms, and whether the breaker or fuse opens again.
Next step: Correct only a clearly wrong documented setting or fully closed door. If supply protection trips again, the panel loses power, or the dryer stops after warming, keep it off and arrange service.
Stop if: Do not repeatedly reset a breaker, use an extension cord, bypass a door switch, or test live voltage.
Why this matters
Why: A wrong option, unrecognized door closure, incomplete supply, or repeated protection trip can make a cycle appear incomplete. GE notes that electric dryers require their specified dedicated supply and that a front obstruction can contribute to overheating.
-
Check 6
After the safe external checks, run one correctly loaded, model-supported cycle and observe it without leaving the dryer unattended; stop at the first hazard, overheating symptom, repeated early end, or complete loss of drum movement.
Expected result: Record the exact stopping time or stage, whether heat and airflow remain normal, whether the timer advances, whether the drum tumbles, whether the clothes are dry, and any alert or unusual noise.
Next step: Arrange qualified GE dryer service and provide the model and serial information, cycle settings, load details, vent observations, stopping pattern, and safety symptoms.
Stop if: Do not remove panels, test live wiring, bypass thermal or door controls, operate without a vent, or keep restarting a dryer that overheats or smells burnt.
Why this matters
Why: A cycle that completes after a load, level, lint, or setting correction supports an operating-condition cause. A recurring early stop with a normal load and clear airflow supports a motor, thermal, sensor, power, or control diagnosis.
Use your observations
Decision map
Find the observation that best matches what you see, then follow the next safe action.
-
PATH 01Safety boundary
What you see
There is smoke, burning odor, gas odor, sparking, a hot plug or cabinet, damaged cord, water near electricity, or repeated protection trips.
Do this next
Keep the dryer off, leave a gas-odor or smoke area as appropriate, and arrange qualified appliance, electrical, or gas help.
Why this path and its safety boundary
Safety stop: Do not restart, open panels, or continue airflow testing.
-
PATH 02Safety boundary
What you see
The timer advances in jumps, the drum continues tumbling, or a brief pause occurs during reverse tumbling.
Do this next
Observe the complete cycle and compare the finished dryness with the selected setting.
Why this path and its safety boundary
Safety stop: A fully stopped drum, repeated early end, or damp load after the cycle moves to the next checks.
-
PATH 03Safety boundary
What you see
The lint filter or vent is blocked, kinked, collapsed, disconnected, or the dryer is hot with weak exhaust.
Do this next
Clean the accessible filter and arrange proper duct cleaning or repair using the model installation instructions.
Why this path and its safety boundary
Safety stop: Never run a gas dryer without its complete vent, and stop using the dryer if heat or lint accumulation persists.
-
PATH 04Safety boundary
What you see
A sensor cycle ends early with a very small, poorly distributed, or rear-shifted load, or the dryer is not level.
Do this next
Redistribute the load and correct leveling through the documented user procedure.
Why this path and its safety boundary
Safety stop: If a normal load still ends early or the model's sensor behavior does not match its manual, arrange service.
-
PATH 05Safety boundary
What you see
The panel loses power, a door state is not recognized, or electrical protection opens during the cycle.
Do this next
Check only visible settings and the documented household supply indication, then stop if the condition repeats.
Why this path and its safety boundary
Safety stop: Do not repeatedly reset protection, bypass the door switch, or test live wiring.
-
PATH 06Safety boundary
What you see
The cycle still stops with a suitable load, clean filter, clear airflow, correct level, and safe settings.
Do this next
Keep the dryer off and arrange qualified diagnosis of motor, thermal protection, sensor, heater, power, or control components.
Why this path and its safety boundary
Safety stop: Do not replace internal parts by guesswork or continue operating to reproduce the failure.
Helpful context
Understand the symptom
A timer that pauses is not always a failed cycle
On an automatic or sensor cycle, the timer may advance in jumps rather than continuously. GE also describes a short pause and sound change when some models reverse tumble direction. Record whether the drum is still turning, whether heat is present, whether the display says complete, and whether the clothes are dry or still damp before treating the behavior as a fault.
Airflow and load contact decide sensor-dry behavior
Lint restriction traps hot, moist air and can lengthen a cycle or make the cabinet hot. An overfilled load dries slowly, while a very small or poorly distributed load may not contact moisture sensors reliably. The dryer should be level, the lint filter clean, and the exhaust path free of visible kinks or blockage.
Use the correct boundary for gas and electric models
A user can clean the lint filter and inspect accessible airflow from a safe position. A gas dryer must retain its vent during operation because GE warns that combustion fumes could enter the room without it. Electrical supply, heater, motor, thermal protection, and internal control diagnosis belongs to qualified service, especially after a trip or overheating symptom.
Document the exact stopping pattern
Tell the technician whether the dryer stops at the same point, only on sensor cycles, only with a small load, after the cabinet heats, or after the motor has run for a while. Include the model and serial information, cycle and dryness setting, lint and vent observations, load size, and any alert or unusual sound.
Only after diagnosis
Potential parts
- lint filter or exhaust duct component
Consider only when the filter or duct is visibly damaged, cannot maintain airflow after cleaning, or a qualified inspection confirms restriction.
Verify the exact model and installation requirements; gas models must retain a safe vent path during operation. - moisture sensor or sensor control
Consider only when a correctly loaded and level dryer with clear airflow repeatedly ends a sensor cycle early.
Sensor layout and control compatibility vary by model and require qualified diagnosis. - motor or motor thermal protection
Consider only when the drum stops completely, especially after warming, while safe load and airflow checks are normal.
Internal motor and thermal diagnosis is not a live user test; confirm the exact model before any part decision. - heater or temperature-control component
Consider only when qualified testing confirms abnormal heat control, a heater fault, or a thermal safety response after airflow is verified.
Do not bypass thermal protection or infer a heater part from a cycle symptom alone. - cycle control or timer
Consider only when the timer or control fails to complete a cycle after normal automatic-timer behavior, load, airflow, and power checks are ruled out.
Confirm the exact model and control revision through qualified diagnosis before replacement.
When checks do not resolve it
Need a professional?
Arrange qualified dryer service for smoke, burning or gas odor, abnormal heat, weak airflow that persists, repeated protection trips, a motor that stops, a panel that loses power, a cycle that repeatedly ends early with a normal load, or any internal heater, sensor, thermal, motor, electrical, or control diagnosis.
Safety scope: A user may clean the lint filter, inspect accessible airflow, check load distribution and level, and observe a safe complete-vent cycle. Gas vent removal, internal thermal or heater work, live electrical diagnosis, motor access, and control repair require qualified service.
Have this ready
- Provide the exact GE model and serial information, gas or electric type, cycle and dryness setting, load size and fabric mix, stopping stage, timer behavior, lint and vent observations, cabinet temperature, and any alert, odor, noise, or power-event notes.
Common questions
FAQ
Why does my GE dryer stop before the cycle is complete?
An automatic timer may advance in jumps, and reverse tumbling can cause a brief pause. If the drum truly stops or the cycle ends early, check load distribution, level, lint filter, exhaust airflow, and the model's settings before arranging service.
Can a blocked vent make a GE dryer stop mid-cycle?
Restricted airflow keeps heat and humidity inside, increases drying time, and can make the cabinet hot. Clean the accessible lint filter and inspect the vent path; arrange service or duct cleaning if restriction persists.
Why does my GE sensor cycle end with damp clothes?
A small or poorly distributed load may not contact the moisture sensors consistently, and an overfilled load or restricted vent can slow drying. Redistribute the load, check level and airflow, and use a model-supported setting.
Is it safe to run a GE gas dryer without the vent to test it?
No. GE warns that combustion fumes could enter the room without the vent. Keep the complete vent installed during operation and arrange qualified help for vent or gas-related diagnosis.
When should I stop using a GE dryer that stops mid-cycle?
Stop for smoke, burning or gas odor, sparks, a hot plug or cabinet, weak airflow with overheating, repeated protection trips, a damaged cord, or a motor that stops. Keep it off and arrange qualified appliance, electrical, or gas help.
Read the exact guide
Official sources
- Dryer - Taking Too Long To Dry Clothes or Not Drying at AllGE Appliances · Use the load, lint, vent, level, sensor, power, and cycle guidance with the exact model's instructions.
- Dryer - Things To Check For A Venting IssueGE Appliances · The page covers vent material, airflow, outside hood, location, level, and gas safety; installation instructions for the exact model control duct limits.
- Dryer - Timer Stops During the CycleGE Appliances · The page covers model-dependent automatic-timer, no-load, reverse-tumble, power, and overheating checks; confirm the installed model manual.
- Dryer - Check Vent Sensor AlertGE Appliances · Use the airflow and vent-cleaning guidance with the installed model's owner and installation instructions.
Community feedback
Share a repair observation
Share a plain-text repair observation. Accepted observations are published automatically; this page may take a moment to update.