
On this page
Start here
Quick answer
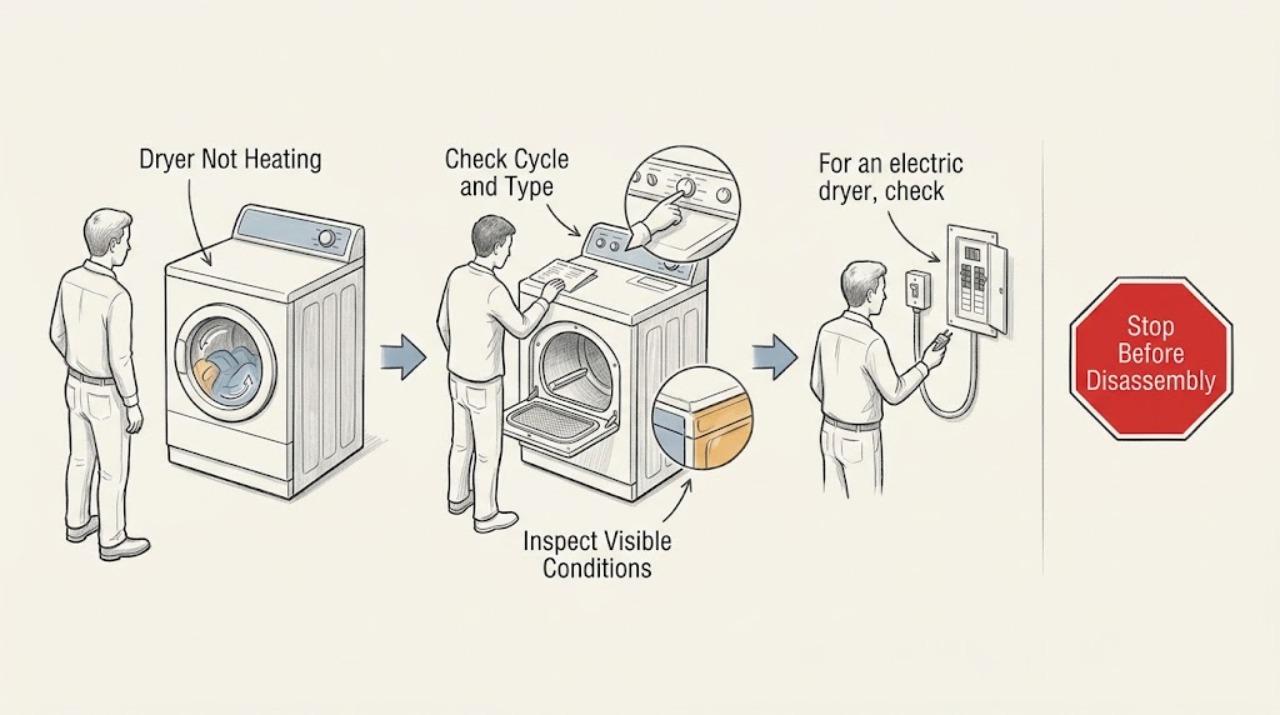
Start with the cycle: Air Only intentionally tumbles without heat, so select a heat cycle appropriate for the load. Then confirm the dryer door is closed, the controls and Start command are accepted, and the power supply is stable. An electric dryer can tumble while one of its two supply fuses or breakers has lost the heating leg; a gas dryer also needs its external supply-line valve open. Clean the lint screen and check the accessible exhaust path for crushing, kinks, lint, or a blocked outside hood. If there is a burning or gas odor, smoke, sparking, abnormal heat, water near electrical parts, or a repeated trip, stop immediately and do not open the cabinet or work on live power or gas components.
Work through in order
Diagnostic checks
Use only checks that match the exact appliance or system and its official guide.
-
Check 1
Record the full KitchenAid model number and dryer type, then select a known heat cycle rather than Air Only; confirm the temperature option is not a no-heat setting and start the cycle using the normal control sequence.
Expected result: The drum runs on a heated cycle, or the dryer remains on Air Only, fails to start, or stops before the heat stage.
Next step: If the cycle still runs without heat, continue with the supply and airflow checks; if the dryer will not start, resolve the start/door/power branch first.
Why this matters
Why: Air Only intentionally provides no heat, while failure to reach a heated stage points to a control, door, power, or model-specific operating condition rather than proving a heater failure.
-
Check 2
With no hazard present, confirm the dryer door closes fully, the controls show a running or On state, and the Start command is pressed firmly for the time specified by the model; observe whether the drum continues into the heated portion.
Expected result: The door latches and the drum continues, or the dryer beeps, will not begin, or stops when the door is not fully closed.
Next step: If the door or start control remains unreliable, stop and arrange service; if the drum runs but remains cold, continue to the supply branch.
Why this matters
Why: A door or control-state problem can prevent a heat cycle from being engaged; it is not evidence that the thermal or heating assembly has failed.
-
Check 3
For an electric dryer, check the accessible household fuse or breaker status without opening the dryer or taking electrical measurements; for a gas dryer, check only that the external supply-line valve is open and there is no gas odor.
Expected result: A fuse or breaker is tripped, the electrical supply is otherwise stable, the gas supply-line valve is closed, or the supply check shows no accessible issue.
Next step: Correct only an obvious accessible supply setting if safe, then run one supervised heat-cycle observation; if heat is still absent or protection trips again, stop and request qualified help.
Why this matters
Why: KitchenAid notes that an electric dryer can tumble with no heat when a heating supply fuse or breaker is lost, while a gas dryer needs its supply-line valve open; neither check proves an internal component failure.
-
Check 4
Switch the dryer off, clean the lint screen, inspect the visible exhaust run from the dryer to the wall for crushing or kinks, and look at the outside exhaust hood for lint or debris; do not open the cabinet or disconnect an inaccessible duct to work inside.
Expected result: The screen and accessible vent path are clear with visible exhaust movement, or the screen/hood/path is restricted and exhaust is weak.
Next step: After the path is safe and accessible, run one heat-cycle observation; if the Check Vent indication remains, airflow stays weak, or the dryer becomes unusually hot, stop heated operation and arrange qualified service.
Why this matters
Why: Restricted airflow can lengthen drying and raise heat; clearing an accessible restriction may restore performance, but persistent weak exhaust requires vent-system attention and does not identify a heater part.
-
Check 5
After the cycle and accessible supply/airflow checks, observe the dryer once during a heat cycle: open the door only through the normal user control after the dryer has run long enough for heat, and note whether the drum is warm, completely cold, or becoming excessively hot.
Expected result: Heat is present, absent throughout the heated cycle, or excessive heat appears with weak airflow or an odor.
Next step: Stop for excessive heat or odor; for persistent no heat with correct settings and clear accessible airflow, provide the model, dryer type, and observations to qualified appliance service.
Why this matters
Why: Heat that is present but slow points back to load, cycle, or airflow conditions; no heat after correct setup points to a supply, heating, or control diagnosis; excessive heat is a safety stop, not a repair test.
-
Check 6
Check the safety context before any further run: note smoke, a burning or gas odor, sparking, water near electrical parts, unusual valve behavior, or a repeated fuse/breaker trip; preserve the model and cycle details rather than restarting to see whether heat returns.
Expected result: No safety symptom is present, or one of the stop symptoms occurs.
Next step: For any stop symptom, stop using the dryer and obtain qualified help from a safe location; do not open panels, bypass protection, or work on gas or live electrical components.
Why this matters
Why: A safety symptom can indicate fire, fuel, electrical, or water risk and overrides ordinary no-heat troubleshooting.
Use your observations
Decision map
Find the observation that best matches what you see, then follow the next safe action.
-
PATH 01Next step
What you see
Air Only or another no-heat/cool-down setting is selected.
Do this next
Arrange qualified service and follow the exact model guidance.
Why this path and its safety boundary
Why it matters: Select the model-appropriate heated cycle and temperature, then observe one complete heat-cycle start; no heat on Air Only is expected.
-
PATH 02Next step
What you see
An electric dryer tumbles but a supply fuse or breaker is tripped.
Do this next
Arrange qualified service and follow the exact model guidance.
Why this path and its safety boundary
Why it matters: Have the accessible household protection checked and restored only if safe; if heat remains absent or the protection trips again, stop and use qualified electrical or appliance service.
-
PATH 03Next step
What you see
A gas dryer has a closed external supply-line valve and there is no gas odor.
Do this next
Arrange qualified service and follow the exact model guidance.
Why this path and its safety boundary
Why it matters: Have the supply setting corrected only through the normal accessible valve operation if safe; do not open or adjust internal gas components. If heat does not return, request qualified service.
-
PATH 04Next step
What you see
The lint screen, exhaust run, or outside hood is restricted, crushed, kinked, or has weak exhaust.
Do this next
Arrange qualified service and follow the exact model guidance.
Why this path and its safety boundary
Why it matters: Clean or correct only the accessible airflow path, then observe one cycle; persistent restriction, a Check Vent indication, or excess heat needs qualified vent or appliance service.
-
PATH 05Next step
What you see
The heated cycle and accessible supply and airflow checks are correct but the dryer remains cold.
Do this next
Arrange qualified service and follow the exact model guidance.
Why this path and its safety boundary
Why it matters: Treat this as an unresolved supply, heating, sensor, or control diagnosis; stop repeated testing and provide the exact model and observations to qualified appliance service.
-
PATH 06Next step
What you see
There is a gas or burning odor, smoke, sparking, abnormal heat, water near electrical parts, or repeated protection trip.
Do this next
Arrange qualified service and follow the exact model guidance.
Why this path and its safety boundary
Why it matters: Stop immediately, keep clear of the hazard, and obtain qualified help from a safe location; do not continue the heat test or open the dryer.
Helpful context
Understand the symptom
Separate a no-heat cycle from a failed heater
A dryer can run normally while intentionally using no heat, especially on Air Only or during a cool-down portion of a cycle. Begin with the exact cycle and temperature selection, then observe heat only after the dryer has run long enough for that cycle to produce it. Do not diagnose a heater from cold clothes immediately after a cool-down or a short automatic cycle.
Power and gas supplies behave differently
An electric dryer may still tumble when one supply fuse or breaker has lost the heating leg. A gas dryer needs the supply-line valve open, but its internal gas components are not a homeowner adjustment. The model manual and the appliance type determine which supply checks are relevant.
Airflow is part of the heating diagnosis
Lint at the screen, a crushed or kinked exhaust run, or a blocked outside hood can restrict air movement and extend drying. Check only accessible surfaces and the outside hood. Persistent weak exhaust, a Check Vent message, or excess heat calls for qualified vent or appliance service rather than cabinet disassembly.
Safety boundary
Stop conditions
- Stop the dryer immediately for a gas odor, burning odor, smoke, sparking, flame abnormality, or abnormal cabinet or laundry heat.
- Stop if water is near the dryer, plug, outlet, or controls, or if a fuse or breaker trips repeatedly; do not touch wet electrical areas.
- Do not open panels, bypass a door or thermal safety, adjust internal gas parts, or perform live electrical measurements as a homeowner troubleshooting step.
- Do not continue heated cycles when the vent is blocked, exhaust is weak, or a Check Vent indication remains with rising heat; arrange qualified vent or appliance service.
Only after diagnosis
Potential parts
- heating element or thermal protection component
Consider this category only after qualified diagnosis confirms persistent no heat on a correct heated cycle with stable supply and clear airflow.
No-heat symptoms and a tripped supply do not establish a part or fit; confirm the complete model and manufacturer documentation before ordering. - gas heating or ignition component
Consider this category only for a gas model after the external supply-line valve is open, no gas hazard is present, and qualified service confirms an internal heating or ignition fault.
Do not open or adjust gas components; verify the exact model and qualified diagnosis before selecting any part. - dryer control or temperature-sensing component
Consider this category only when qualified diagnosis rules out cycle selection, supply, airflow, and heating hardware and identifies a control or sensing fault.
A cold drum alone does not prove a control or sensor failure; use model-specific parts information and diagnosis.
When checks do not resolve it
Need a professional?
Request qualified appliance service when a correct heated cycle remains cold after the accessible supply and airflow checks, or when the same symptom returns., Request a qualified electrician when an electric dryer's supply protection trips again or the accessible supply issue cannot be resolved safely., Request qualified gas-appliance service for a gas dryer that remains cold with its supply-line valve open, and use the emergency stop path for any gas odor.
Have this ready
- Full KitchenAid model number and dryer type
- Cycle and temperature selected
- Whether the drum tumbled
- Whether heat was ever present
- Fuse/breaker or gas-valve observation
- Lint screen and outside exhaust observation
- Any code, odor, smoke, spark, water, or unusual heat
Common questions
FAQ
Why is my KitchenAid dryer tumbling but not heating?
First rule out Air Only or a no-heat setting. Then check accessible supply protection for an electric dryer, the external supply-line valve for a gas dryer, and the lint screen and exhaust path. If a correct heated cycle remains cold, request qualified service.
Can a tripped breaker cause a KitchenAid dryer to tumble with no heat?
Yes. KitchenAid's dryer manual notes that an electric dryer can tumble while one of its two household fuses or breakers has lost the heating supply. If protection trips again, stop and use qualified electrical help.
Does Air Only mean the KitchenAid dryer is broken?
No. Air Only is a no-heat cycle. Select a model-appropriate heated cycle before judging heat performance, and do not confuse a cool-down period with a failed heater.
What should I do if the dryer has weak exhaust or a Check Vent indication?
Clean the lint screen and inspect the accessible vent run and outside hood for lint, crushing, or kinks. Persistent weak exhaust, rising heat, or a remaining Check Vent indication needs qualified vent or appliance service.
Read the exact guide
Official sources
- Owners Center | KitchenAidKitchenAid · The opened KitchenAid Owners Center lists dryer model-number locations and links owners to model-specific troubleshooting and documentation.
- Owners ManualKitchenAid · The opened KitchenAid electric-dryer manual instructs users to avoid Air Only for a heat test, check both supply protection devices, observe heat after a cycle starts, and address crushed or blocked venting.
- TROUBLESHOOTING – DRYERKitchenAid · The opened KitchenAid dryer manual identifies Air Only, two-fuse or breaker supply, gas supply-line valve, and restricted exhaust as distinct no-heat or drying causes.
Community feedback
Share a repair observation
Share a plain-text repair observation. Accepted observations are published automatically; this page may take a moment to update.