
On this page
Start here
Quick answer
When a KitchenAid freezer stops making ice, first confirm that the ice maker is on and that the storage bin or shutoff arm is not stopping production. Then check that the freezer is cold enough, the water valve is open, the supply line is not kinked, and a recently installed filter is seated correctly. Look for an ice jam only through the user-accessible opening and use a plastic utensil if the model instructions allow it. A new installation may need the water system flushed and time to begin production. If the freezer is warm, the water supply leaks, the ice maker overflows, or production does not return after these model-specific checks, stop and arrange qualified appliance service.
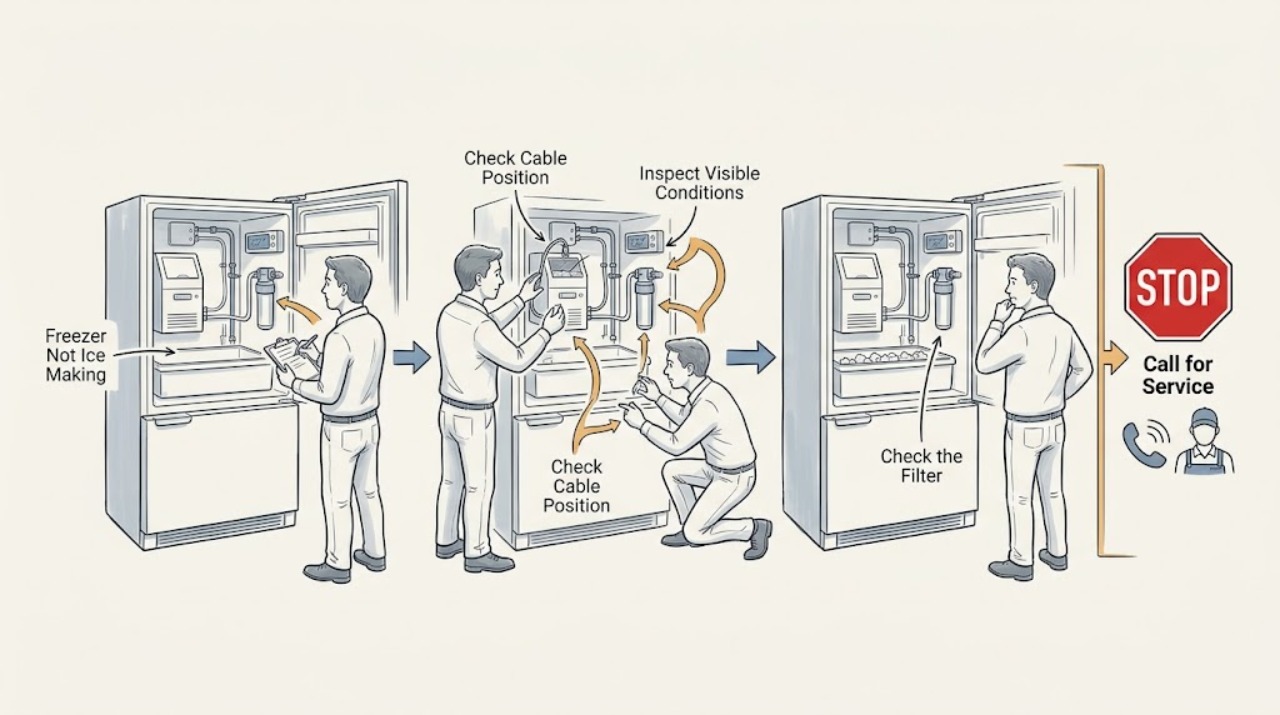
Work through in order
Diagnostic checks
Use only checks that match the exact appliance or system and its official guide.
-
Check 1
Check the ice-maker switch or wire shutoff arm and confirm that the storage bin is fully seated and not holding the shutoff in the off position; use the model manual if the control layout is different.
Expected result: The switch or arm is off, the bin is out of position, or the control is already on and the bin is correctly seated.
Next step: Restore the on position only as described by the model manual, close the freezer door, and allow a normal production cycle. If the ice maker was already on, continue to the temperature check.
Why this matters
Why: An off control or incorrectly seated bin can stop production without a failed part. If the control and bin are correct, move to temperature and water checks rather than repeatedly toggling the control.
-
Check 2
Check the freezer display or control setting and observe whether food is staying fully frozen; also make sure packages are not blocking the freezer air vents.
Expected result: The freezer is warmer than its normal setting, food is softening, or airflow is obstructed; alternatively, the freezer is cold and airflow is clear.
Next step: Restore the model-recommended temperature setting and clear only obvious vent obstructions, then monitor one normal cycle. If the freezer cannot hold temperature, stop treating this as an ice-maker-only problem and arrange service.
Why this matters
Why: Ice formation depends on the freezer reaching the temperature specified for the model. A warm compartment or blocked airflow can prevent ice production even when water and controls are correct.
-
Check 3
Follow the visible water line from the shutoff valve toward the appliance and check that the valve is open, the line is not kinked or crushed behind the cabinet, and the water filter is locked in its housing if the model uses one.
Expected result: The valve is partly closed, the line is pinched, or the filter was recently replaced and is not seated; alternatively, the visible supply path is open and clear.
Next step: Open the valve fully, gently remove an obvious kink without pulling on fittings, or reinstall the filter according to the manual. If water leaks at a connection or the path is already correct, stop and arrange qualified diagnosis.
Why this matters
Why: Restricted water flow can leave the ice mold empty or reduce production. A filter that is not sealed can also reduce or stop flow. A clear external path shifts attention to the ice-maker fill or internal valve and should not lead to improvised disassembly.
-
Check 4
With the ice maker off and the door open only as needed, look for a visible bridge or cubes jammed in the ejector area; remove only loose accessible ice with a plastic utensil when the exact manual permits it.
Expected result: Ice is visibly bridging or blocking the ejector, or the ejector area is clear but the mold remains empty or does not harvest.
Next step: Clear only the accessible jam without sharp tools, restore the ice maker, and observe one cycle. If the jam returns, the mechanism is damaged, or no ice is present to remove, stop and request service.
Why this matters
Why: A harvest jam can stop the next cycle even when the water supply is available. A clear ejector with no fill or no harvest suggests a control, fill, temperature, or internal mechanical fault rather than a jam that should be forced free.
-
Check 5
If the freezer was newly installed, the water system was recently connected, or the filter was just changed, follow the model instructions for flushing and seating the filter before judging ice production.
Expected result: The appliance is newly connected or the filter was recently handled; alternatively, it has been operating normally before this failure.
Next step: Complete only the documented setup procedure and allow the manual's stated production period. If an established appliance stopped suddenly or a properly completed setup still produces no ice, continue to the service boundary.
Why this matters
Why: KitchenAid manuals describe a delay before the first batch and recommend flushing after a new water connection. Air, an incorrectly seated filter, or an empty supply line can make a new ice maker appear failed.
-
Check 6
If the controls, temperature, water path, filter, and visible ejector are correct, record whether the mold fills, whether the ice maker makes a harvest sound, and whether any water or ice leaks into the freezer.
Expected result: The mold never fills, the ice maker never harvests, the unit overflows, or water leaks; alternatively, it completes a harvest but the bin remains empty.
Next step: Do not remove covers or apply power to exposed components. Stop for leaks or overflow and arrange qualified service; provide the recorded observation, model number, and any display message so the technician can choose the correct diagnostic path.
Why this matters
Why: No fill points toward the water inlet path or control; no harvest points toward the ice-making mechanism or temperature/control signal; overflow or leakage needs immediate attention. A completed harvest with no cubes may indicate a storage-bin or dispensing distinction rather than no ice making.
Use your observations
Decision map
Find the observation that best matches what you see, then follow the next safe action.
-
PATH 01Next step
What you see
The ice maker was off or the bin was not seated
Do this next
Correct that user setting or placement according to the exact manual, then allow one normal production cycle before making another diagnosis.
-
PATH 02Next step
What you see
The freezer is warm or its vents are blocked
Do this next
Restore the model-recommended temperature and airflow; arrange service if the freezer cannot maintain temperature.
-
PATH 03Next step
What you see
The valve, water line, or filter restricts flow
Do this next
Correct only an obvious external kink, closed valve, or filter-seating issue. Escalate any leak or an internally restricted path.
-
PATH 04Next step
What you see
The ejector is jammed or the ice maker overflows
Do this next
Clear only accessible ice with the permitted non-sharp tool; stop and arrange service if the jam returns or water overflows.
-
PATH 05Next step
What you see
All external checks pass but the mold stays empty or no harvest occurs
Do this next
Treat the fill valve, ice-maker module, temperature signal, or control as conditional service diagnoses and do not open the appliance yourself.
Helpful context
Understand the symptom
Start with the symptom, not a replacement part
A freezer can be cold while the ice maker has no water, is switched off, or is unable to harvest a jammed batch. Conversely, a warm freezer can prevent normal ice formation even when the ice maker controls are on. Before ordering a component, note whether the mold is empty, contains frozen ice, overflows, or makes a harvest sound without dropping cubes. That observation separates a water-supply problem from a harvest or temperature problem.
Stay within the user-accessible checks
Use the exact owner manual for the freezer model because KitchenAid uses more than one ice-maker control layout. Do not reach into moving ejector fingers, use a sharp object to break ice, remove electrical covers, or perform live electrical tests. If water is leaking, shut off the appliance water supply if it can be done safely and arrange service.
Safety boundary
Stop conditions
- Stop for a water leak, overflowing ice maker, exposed wiring, repeated breaker trips, smoke, or an abnormal burning smell.
- Do not use a sharp object in the ice maker or reach into moving ejector fingers; do not remove electrical covers or perform live electrical tests.
- Arrange qualified appliance service when the freezer cannot hold temperature, the water path is clear but the mold never fills, a jam returns, or no harvest occurs after the documented setup and one normal cycle.
Only after diagnosis
Potential parts
- water filter
Consider a filter only when the installed filter is clogged, incorrectly seated, or specifically identified by the model instructions as restricting flow.
Confirm the exact freezer or refrigerator model and manufacturer fit information before replacing a filter. - ice-maker water inlet valve
Consider this only when the water supply and filter are correct but a qualified diagnosis finds that the ice-maker fill path is not opening or is restricted.
Do not choose a valve from the symptom alone; verify the exact model and the diagnosed component. - ice-maker assembly
Consider this only after temperature, water flow, settings, and visible jams are ruled out and a qualified diagnosis identifies a failed harvest or control mechanism.
Ice-maker assemblies vary by model and freezer layout; confirm fitment and safety requirements before replacement.
When checks do not resolve it
Need a professional?
Arrange qualified KitchenAid appliance service for a persistent no-ice condition after the control, temperature, water line, filter, setup, and visible jam checks; call sooner for leaking or overflowing water, a warm freezer, exposed wiring, or repeated protection trips.
Common questions
FAQ
Why is my KitchenAid freezer cold but not making ice?
Confirm the ice maker is on, the bin is seated, and the water line and filter allow flow. A visible ejector jam or a fill-path fault can stop ice production even when the freezer feels cold.
How long should a KitchenAid ice maker take after installation?
Follow the exact model manual after connecting and flushing the water system. KitchenAid manuals describe a delay before the first batch and a longer period for normal bin production, so do not judge a new installation immediately.
Should I use a knife to remove ice stuck in the ice maker?
No. Do not use a sharp object. If the model instructions allow a user-accessible jam check, use only the permitted non-sharp tool and arrange service if the jam returns or the mechanism is damaged.
Read the exact guide
Official sources
- Not Making Ice - RefrigeratorKitchenAid Product Help · KitchenAid manufacturer guidance for an ice maker that does not produce ice, including reset, filter, and water-line checks
- Ice Maker Not Working - TroubleshootingKitchenAid Product Help · KitchenAid manufacturer troubleshooting for water supply, freezer temperature, ice-maker controls, and filter-related no-ice symptoms
- How to Troubleshoot the Freestanding Ice MakerKitchenAid Product Help · KitchenAid manufacturer guidance for common ice-maker mechanisms; exact controls and access vary by freezer model
- ICE AND WATERKitchenAid · KitchenAid owner-manual troubleshooting used for control, setup, water-line, filter, jam, and safety guidance; confirm the exact model manual
- TROUBLESHOOTINGKitchenAid · KitchenAid installation guidance for ice-maker water supply, on/off control, leveling, overflow, and service boundary
Community feedback
Share a repair observation
Share a plain-text repair observation. Accepted observations are published automatically; this page may take a moment to update.