
On this page
Start here
Quick answer
First separate a KitchenAid refrigerator ice maker from a freestanding or undercounter ice machine, and separate no ice production from an ice dispenser that has ice but will not release it. For a refrigerator, check that the ice maker is on, the water shutoff is open, the supply line is not kinked, the filter is correctly installed, and the freezer and refrigerator settings match KitchenAid's published guidance. For a freestanding ice maker that has power, check only the model-approved drain hose, drain cap, water filter, condenser cleanliness, and room temperature; KitchenAid says a kinked drain hose can stop production and that a room below 45°F (7°C) can make the bin thermostat shut the machine off. Newly installed freestanding models also require model-specific water-pressure and drain setup checks. Do not borrow a refrigerator reset or temperature procedure for a freestanding machine, open internal covers, or diagnose a valve, motor, sensor, or control from no ice alone.
Before you begin
Safety first
- Owner checks stop at model-approved external controls, temperature settings, accessible water line and filter observations, and freestanding drain, cap, condenser or room-condition maintenance. Internal water, electrical, control, motor, sensor, heater, sealed-system and concealed drain work requires qualified service.
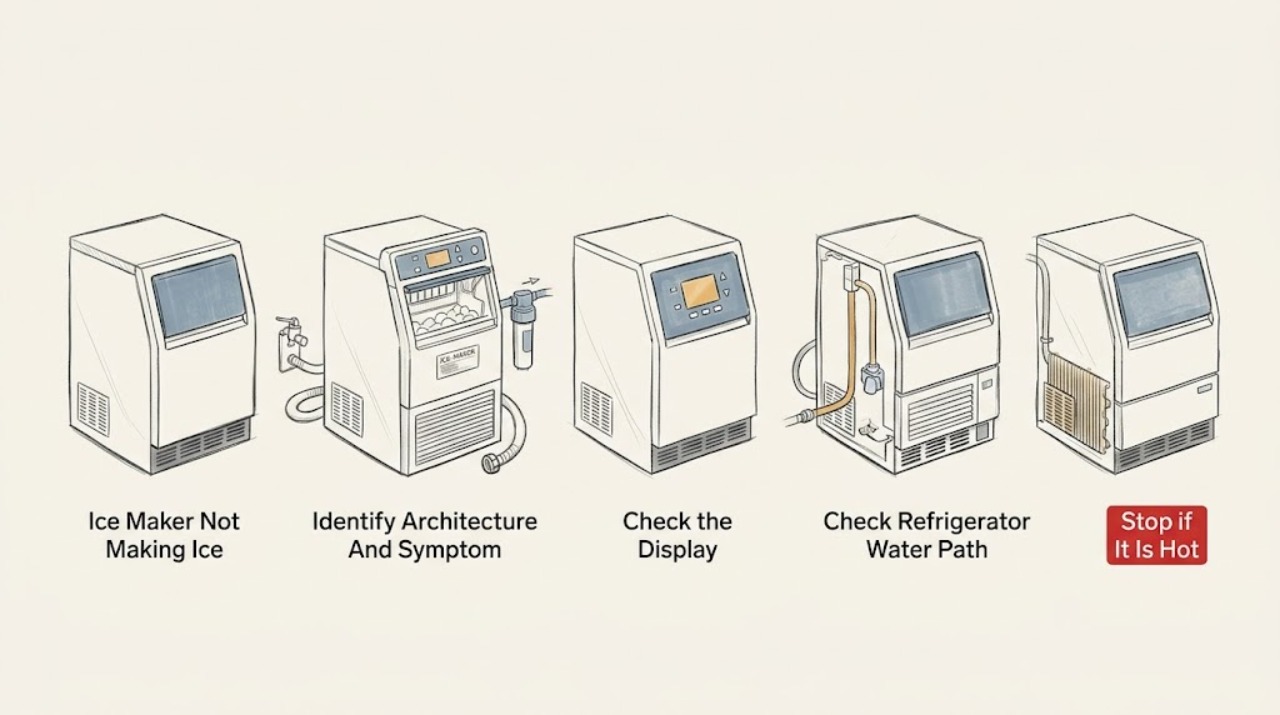
Work through in order
Diagnostic checks
Use only checks that match the exact appliance or system and its official guide.
-
Check 1
Record the complete KitchenAid model number and classify the symptom as an empty ice bin, slow or small cubes, cubes present but not dispensed, or a freestanding machine with power but no production. Note whether the appliance is a refrigerator-integrated ice maker or a freestanding/undercounter ice machine.
Expected result: The model is a refrigerator or freestanding machine, and ice is absent, reduced, stuck in the bin, or present but not released by a dispenser.
Next step: Use only the branch matching the architecture and symptom. If ice is present but the dispenser does not release it, follow the dispenser branch rather than the no-production path.
Stop if: Stop if finding the model would require removing a cover, or if there is water near electrical parts, smoke, arcing, a damaged cord, or an unusual burning odor.
Why this matters
Why: KitchenAid publishes separate paths for refrigerator production, refrigerator dispensing, and powered freestanding ice makers. This classification selects the applicable checks; it does not identify a failed component.
-
Check 2
For a refrigerator-integrated ice maker, verify from the display, switch, arm, or exact manual that the ice maker is on and not paused. Check the freezer and refrigerator settings against KitchenAid's published refrigerator guidance, using 0°F (-18°C) for the freezer and 33–40°F (0–4°C) for the refrigerator only as that refrigerator guidance specifies.
Expected result: The ice maker is off or paused, an arm or bin is not in the model's operating position, the settings are outside the published range, or the controls and temperatures are correct but no ice forms.
Next step: Correct only the model-documented control or temperature setting, allow the refrigerator to stabilize as the manual directs, and then check for production once. Escalate if the exact model remains unable to make ice.
Stop if: Do not remove an ice-maker cover, force an arm, bypass a sensor or switch, or use a reset sequence from another model.
Why this matters
Why: An off control or unsuitable refrigerator temperature can explain absent production, but correct settings do not prove a fill-valve, motor, sensor, heater, or control failure.
-
Check 3
For a refrigerator model, inspect only the accessible water shutoff and supply line for an open valve, kink, or visible damage. If the filter was recently changed, check its exact manual for removal and reseating, and verify that it is locked and sealed as KitchenAid describes. Do not disconnect a pressurized line or reach behind a built-in refrigerator.
Expected result: The valve is closed, the supply line is kinked, the filter is not locked or was just replaced, the filter housing leaks, or the accessible water path appears correct.
Next step: Open or straighten only a clearly accessible model-approved external condition; reseat the filter only as its model instructions permit. If water flow remains absent or a housing leaks, stop and arrange service.
Stop if: Do not remove a filter under uncontrolled flow, open internal plumbing, change a valve, or operate with a leaking water connection.
Why this matters
Why: KitchenAid links a closed or kinked supply and an improperly installed filter to reduced or stopped water flow and low ice production. A correct external path does not distinguish an internal valve, inlet tube, or control fault.
-
Check 4
For a powered freestanding KitchenAid ice maker, inspect the accessible drain hose for a kink, incorrect routing, excessive pump run, or a blocked garbage-disposer connection; check the model-approved drain cap, filter lock, condenser access and room temperature. Use the exact installation guide for pressure, hose type, pump limits, and whether a drain cap check applies.
Expected result: The drain hose is kinked or misrouted, a disposer knockout plug remains, the drain cap is loose, the filter is clogged or unlocked, the condenser is dirty, the room is at or below 45°F (7°C), or all applicable external checks are correct.
Next step: With power disconnected and only where the exact manual permits, correct an accessible hose position, drain-cap seating, filter, condenser or room-temperature condition. If the unit would need to be pulled from a cabinet or opened, arrange service.
Stop if: Do not remove panels, reach into a condenser or moving mechanism, use a sharp tool on ice, alter pump plumbing, or apply a freestanding check to a refrigerator.
Why this matters
Why: KitchenAid's freestanding troubleshooting page associates these conditions with low or no ice production, but the pump, gravity-drain, cap and filter arrangement remains model-specific.
-
Check 5
If a refrigerator bin contains ice, test the symptom as dispensing rather than production: confirm the selected ice mode, the model's control or dispenser lock state, bin seating, and whether ice has clumped in the chute. Use a plastic utensil or natural thawing only as the exact dispenser guidance allows; never use a sharp object.
Expected result: Ice is being made but the bin is not seated, the dispenser is locked, the chute is clumped, the paddle is not engaged, or no ice is present in the bin.
Next step: Correct only the model-approved bin, lock, chute or paddle condition. If the bin is empty, return to the matching refrigerator production checks; if the dispenser still fails, arrange service.
Stop if: Do not use a knife or other sharp object, reach into the auger or chute, bypass an interlock, or open the dispenser mechanism.
Why this matters
Why: KitchenAid treats a full ice bin with no dispensing as a dispenser path and directs an empty bin back to the not-making-ice path. A dispenser symptom does not prove that the ice maker itself is faulty.
-
Check 6
After the applicable external checks, document whether the unit has power, whether water reaches an accessible point, the temperature or room condition, filter and drain observations, indicator state, and whether production ever resumes. Keep the appliance out of service if the remaining check would involve internal water, refrigeration, electrical, or control components.
Expected result: No ice remains after the model-approved checks, production is intermittent, a hidden or damaged water path is suspected, or an internal valve, motor, sensor, heater, control, wiring, or sealed system would need access.
Next step: Arrange qualified KitchenAid or appliance service with the exact model, architecture, symptom timeline, settings, and checks completed; do not choose a replacement part from no ice alone.
Stop if: Stop immediately for water near electrical parts, smoke, arcing, damaged wiring, burning odor, repeated breaker trips, or a damaged water line.
Why this matters
Why: KitchenAid's public guidance supports model-specific external checks and service escalation, not a universal internal diagnosis from the no-ice symptom.
Use your observations
Decision map
Find the observation that best matches what you see, then follow the next safe action.
-
PATH 01Safety boundary
What you see
A KitchenAid refrigerator's ice bin is empty, the appliance has normal power, and the ice-maker control is off, paused, or not in the model's operating position.
Do this next
Use the exact owner manual to turn on or unpause the ice maker, then allow the model's normal production interval. Escalate if no ice returns with correct settings.
Why this path and its safety boundary
Why it matters: KitchenAid identifies an accidentally turned-off ice maker as a common no-production condition, but the exact switch, arm, reset and bin arrangement varies by model.
Safety stop: Do not force the arm, bypass a control, or remove the ice-maker cover.
-
PATH 02Safety boundary
What you see
A refrigerator ice maker stopped or slowed after filter replacement, or the accessible water path has a closed valve, kink, damaged line, or filter that is not locked and sealed.
Do this next
Correct only the accessible, model-approved filter or line condition. If the housing leaks or water still does not flow, isolate water safely and arrange service.
Why this path and its safety boundary
Why it matters: KitchenAid links these external water-path conditions to reduced or stopped water flow and low ice production.
Safety stop: Do not disconnect pressurized plumbing or operate with a leaking filter housing or line.
-
PATH 03Safety boundary
What you see
A refrigerator ice maker is on, the accessible water path and filter are correct, temperatures match the applicable KitchenAid guidance, but no ice forms or production remains intermittent.
Do this next
Arrange model-specific service and provide the model, temperature readings, water and filter history, and whether any cycle or fill sound occurs.
Why this path and its safety boundary
Why it matters: The remaining cause may be model-specific, but the public sources do not identify a particular valve, fill tube, motor, heater, sensor, or control from this pattern.
Safety stop: Do not open the ice maker, defrost internal tubing with improvised heat, or perform live electrical tests.
-
PATH 04Safety boundary
What you see
A powered freestanding KitchenAid ice maker has no or low production and a kinked drain, loose drain cap, dirty condenser, incorrect filter, or room temperature at or below 45°F (7°C) is observed.
Do this next
Disconnect power and correct only the accessible model-approved condition, then make one restart or production check. If the unit must be pulled out or opened, use service.
Why this path and its safety boundary
Why it matters: KitchenAid's freestanding guidance directly associates these conditions with low or no ice production, subject to the exact model's drain and maintenance arrangement.
Safety stop: Do not alter hidden drain plumbing, reach into moving or energized parts, or apply this branch to a refrigerator ice maker.
-
PATH 05Safety boundary
What you see
A freestanding KitchenAid ice maker was newly installed and has no production, with possible water-pressure, drain-height, drain-length, hose-type, disposer, or room-temperature concerns.
Do this next
Compare the installation with the exact model literature and use a certified plumber for water-pressure conditions outside the documented range. Escalate if correction would require moving or opening the unit.
Why this path and its safety boundary
Why it matters: KitchenAid has a separate newly installed path; its pressure and pump-routing values are installation guidance for the matching model, not a brand-wide specification.
Safety stop: Do not guess at pump routing, change plumbing under pressure, or substitute a refrigerator installation procedure.
-
PATH 06Safety boundary
What you see
A refrigerator ice bin contains ice, but the dispenser does not release it or the chute is blocked by clumped ice.
Do this next
Check the model's lock state, bin seating, paddle engagement and chute condition; use only the manual-approved non-sharp cleaning or natural-thaw method. Escalate if dispensing remains faulty.
Why this path and its safety boundary
Why it matters: KitchenAid treats this as a dispensing path. The ice maker may be producing normally, so no-ice production checks alone would misroute the diagnosis.
Safety stop: Do not use sharp tools or reach into the auger, chute or dispenser mechanism.
Helpful context
Understand the symptom
Define “not making ice” before troubleshooting
Check whether the bin is empty because no cubes are being formed, or whether cubes are present but a refrigerator dispenser will not release them. KitchenAid treats these as different problems. Also identify the architecture: a refrigerator-integrated ice maker uses refrigerator controls, a water filter and freezer temperature, while a freestanding ice machine has a drain hose, drain cap, condenser and bin thermostat checks. The exact model manual controls any reset, arm, filter, drain, or cleaning procedure.
Refrigerator-integrated ice maker: start with controls and water flow
KitchenAid's refrigerator guidance starts with whether the ice maker is on and whether it is actually making ice. It then covers the water filter, water-supply line and temperature settings. A filter that was recently replaced can be improperly seated and reduce or stop water flow; a kinked line can also reduce flow. Use the exact refrigerator model's owner literature for the location of an ice-maker switch, arm, reset feature and filter, rather than assuming another KitchenAid model has the same controls.
Freestanding ice maker: the drain is part of the ice-making path
For a freestanding KitchenAid ice maker that has power, the manufacturer says a kinked drain hose can cause low or no ice production, and that incorrect hose type, excessive pump run, or a garbage-disposer knockout plug can also prevent proper draining. KitchenAid separately identifies a dirty condenser, a loose drain cap, an incorrectly installed or clogged filter, and a room temperature at or below 45°F (7°C) as possible causes. Apply those checks only when the appliance and page match a freestanding model; do not transfer them to a refrigerator ice maker.
New installation has different conditions
KitchenAid's newly installed freestanding-ice-maker guidance adds water pressure, drain routing and drain height or length checks. It states that a kinked line, closed water valve, clogged filter, or reverse-osmosis system can affect production, and gives a model-specific 30–120 PSI range on that page. It also repeats drain-cap and room-temperature checks. Do not treat that pressure range or pump-routing limit as universal for every KitchenAid model; use the installation literature for the rating-label model.
Stop before internal diagnosis
KitchenAid says some ice-maker problems, such as a clogged filter, may be manageable while a faulty motor or control module may require professional help, and recommends consulting the owner manual before repairs. If the matching external checks do not restore production, or the symptom requires access to a fill valve, motor, sensor, control, wiring, sealed cabinet, or hidden water path, stop and arrange model-specific service. No-ice alone does not identify a compatible part.
Safety boundary
Stop conditions
- Stop use for water near electrical parts, smoke, arcing, burning odor, damaged wiring or cord, repeated breaker trips, or an uncontrolled or damaged water line.
- Do not open covers, perform live electrical tests, bypass an arm, switch or interlock, or access a fill valve, motor, sensor, heater, control, wiring or sealed refrigeration section.
- Do not use sharp tools to break ice, force a bin or arm, or repeatedly cycle the appliance to reproduce a no-ice condition.
- Do not transfer refrigerator settings, resets, filters, drain hoses, drain caps, pump limits or temperature procedures to a different KitchenAid architecture or model family.
When checks do not resolve it
Need a professional?
Arrange qualified KitchenAid or appliance service when the exact model remains unable to make ice after its documented external control, temperature, water-path, filter, drain, condenser or room-condition checks; when the appliance is newly installed and plumbing or pressure is outside the installation guidance; when the unit must be moved or opened; or when an internal valve, motor, sensor, heater, control, wiring or sealed system is suspected. If ice is present but dispensing fails, provide the dispenser symptom separately.
Safety scope: Owner checks stop at model-approved external controls, temperature settings, accessible water line and filter observations, and freestanding drain, cap, condenser or room-condition maintenance. Internal water, electrical, control, motor, sensor, heater, sealed-system and concealed drain work requires qualified service.
Common questions
FAQ
Why is my KitchenAid refrigerator ice maker not making ice?
Confirm that the ice maker is on, the water shutoff is open, the line is not kinked, the filter is correctly installed, and the refrigerator and freezer settings match the applicable KitchenAid guidance. If those external checks are correct and the bin remains empty, use the exact model manual or arrange service rather than opening the ice maker.
What should I check on a freestanding KitchenAid ice maker with power but no ice?
Use the freestanding path: check the model-approved drain hose, drain cap, filter, condenser and room temperature. KitchenAid says a kinked drain hose and a room at or below 45°F (7°C) can stop production. Do not apply these checks to a refrigerator-integrated ice maker.
Could a water filter stop a KitchenAid ice maker from making ice?
Yes, conditionally. KitchenAid says an improperly installed or clogged refrigerator filter can reduce or stop water flow, and its freestanding guidance says a filter that is not locked or is clogged can prevent production. Use the exact model's filter procedure and stop if the housing leaks.
How do I know whether the problem is the ice maker or the dispenser?
Look in the bin. If ice is present but will not come out, KitchenAid routes the issue to dispenser lock, bin seating, paddle and chute checks. If the bin is empty, use the matching refrigerator or freestanding no-production path instead.
Does a newly installed freestanding KitchenAid ice maker need different checks?
Yes. KitchenAid has a separate newly installed path covering water pressure, drain hose type and routing, pump limits, disposer connection, drain cap and room temperature. Values such as 30–120 PSI apply to that documented installation guidance and should not be treated as universal for every model.
When should I call for KitchenAid ice-maker service?
Call when the exact model remains unable to make ice after its documented external checks, when a hidden water, drain, electrical or control component is suspected, or when the unit must be moved or opened. Provide the model number and the production, temperature, filter, water and drain observations.
Read the exact guide
Official sources
- Not Dispensing Ice - RefrigeratorKitchenAid Product Help · KitchenAid refrigerator dispenser path; exact model controls lock, bin and paddle details.
- Not Making Ice - Existing Installation - Built-In RefrigeratorKitchenAid Product Help · KitchenAid built-in refrigerator path; exact model controls switch and reset details.
- Refrigerator Ice Maker TroubleshootingKitchenAid · KitchenAid refrigerator ice makers; general guide that still defers model-specific reset and manual details.
- Not Making Ice - Has Power - Freestanding Ice MakerKitchenAid Product Help · Freestanding KitchenAid ice makers with the architecture and components named by the page; not refrigerator-integrated.
- Not Making Ice - RefrigeratorKitchenAid Product Help · KitchenAid refrigerator troubleshooting path; exact refrigerator model controls applicability.
- Not Making Ice - Newly Installed - Freestanding Ice MakerKitchenAid Product Help · Newly installed freestanding KitchenAid ice makers; pressure and routing values are installation/model conditional.
Community feedback
Share a repair observation
Share a plain-text repair observation. Accepted observations are published automatically; this page may take a moment to update.