
On this page
Start here
Quick answer
First identify which product remains: detergent in a front-load drawer, fabric softener in a cup, or bleach in its compartment. Speed Queen guidance points to a dirty or blocked dispenser, the wrong product or amount, an incompatible cycle, or insufficient water flow as the main branches. Use the exact model guide for the drawer or cup, clean only the removable dispenser parts as directed, and never mix detergent, softener, bleach, vinegar, or other cleaners. If the drawer or cup is clean but no compartment receives water, the washer leaks, water reaches electrical parts, or the problem returns, stop and arrange qualified service.
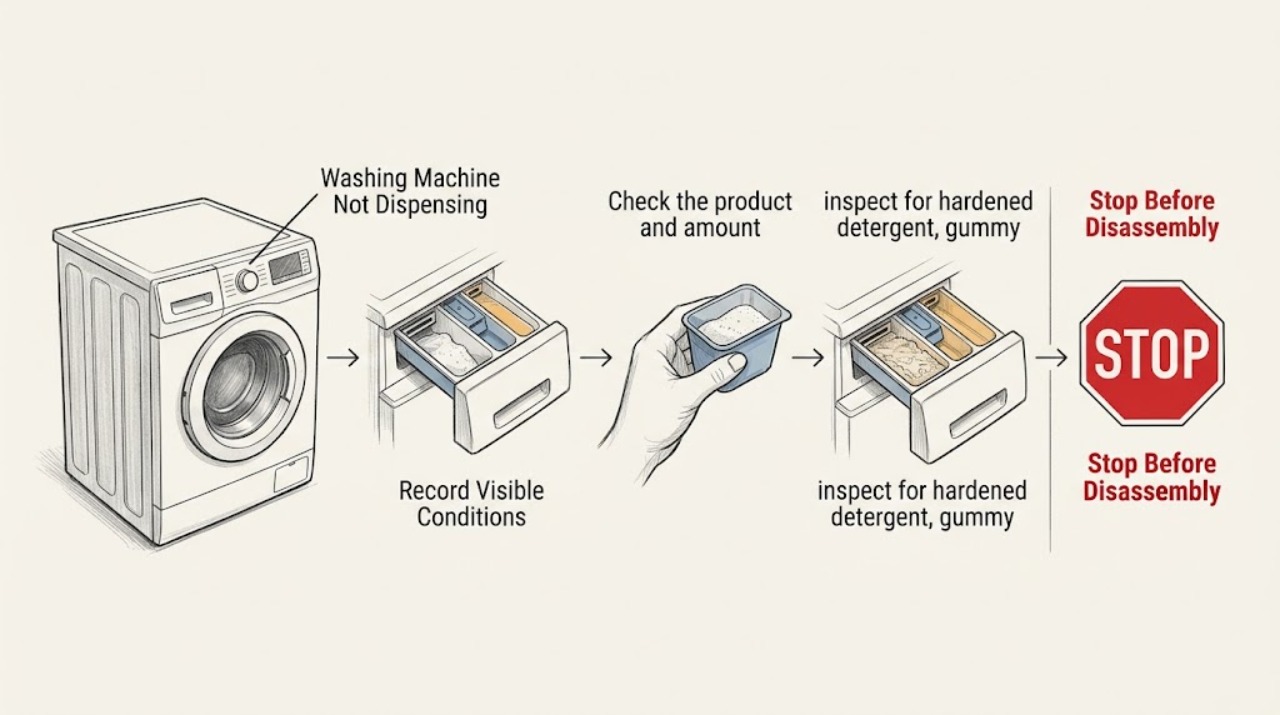
Work through in order
Diagnostic checks
Use only checks that match the exact appliance or system and its official guide.
-
Check 1
After the cycle ends, identify the product that remains and record the washer type, drawer or cup location, selected cycle, and whether another compartment dispensed normally.
Expected result: Only detergent remains, only softener or bleach remains, multiple compartments remain full, or the product was released at the wrong stage or onto the load.
Next step: Use the front-load or top-load branch that matches the model and keep the product in its designated compartment; do not move chemicals between compartments.
Why this matters
Why: A single-compartment symptom points toward that cup, residue, product compatibility, or its flush path; a whole-dispenser symptom points toward water delivery, cycle selection, or control behavior.
-
Check 2
Check the product and amount against the exact Speed Queen model guide and the product label, without filling above the compartment's marked maximum.
Expected result: The product type, liquid or powder form, amount, or cycle is not supported by the guide, or it is within the model's instructions.
Next step: Correct the product and amount on a future load only after the dispenser is clean; never mix detergent, softener, bleach, vinegar, or other cleaners in a compartment or container.
Why this matters
Why: Wrong form, excess product, or a cycle that does not call for that dispenser can leave residue, cause early release, create suds, or make a normal delay look like a failure.
-
Check 3
With the washer stopped and the drawer or cup accessible according to the model guide, inspect for hardened detergent, gummy softener, discoloration, or a blocked opening; remove only the user-removable part described by the guide.
Expected result: Residue is present and restricts a compartment, or the compartment is clean and open but the product still remains after a correctly selected cycle.
Next step: Rinse and brush the removable dispenser as directed, reinstall it correctly, and stop for service if the clean dispenser still does not receive water or dispense.
Why this matters
Why: Residue can prevent the water flush from carrying product away. A clean compartment with a repeated failure shifts suspicion to water delivery, a valve, a control command, or the model's internal path.
-
Check 4
Observe the next safe fill from outside the washer without reaching into a moving machine: note whether water enters the affected compartment, whether flow is weak, and whether the washer leaks at the drawer, hose, or floor.
Expected result: Water flushes the affected compartment normally, water enters weakly or not at all, or water leaks or reaches electrical equipment.
Next step: Stop for any leak or water near electrical parts. If there is no leak but flow remains absent after external supply checks allowed by the manual, arrange qualified service rather than opening the washer.
Why this matters
Why: Normal flush with product left behind favors product, residue, cup installation, or cycle selection. Weak or absent flow favors supply, inlet screening, valve, or control diagnosis; a leak is a stop condition.
-
Check 5
For a top-load model with a fabric-softener cup, verify from the guide that the selected cycle calls for softener and that the cup is seated and filled only to its marked level; do not add detergent to the softener cup.
Expected result: The cycle omits or delays the softener stage, the cup is overfilled or mis-seated, or the cup is correctly installed but remains full after the expected rinse.
Next step: Correct the cycle or cup setup after cleaning. If the cup remains full when the model calls for release, stop repeated testing and request service.
Why this matters
Why: Speed Queen top-load guidance ties softener release to a rinse stage and notes that excess or cross-contaminated product can become gummy or stain fabric.
-
Check 6
For a front-load model, compare the drawer layout with the exact guide and verify that the main-wash, pre-wash, bleach, and softener products are in their designated compartments before starting a load.
Expected result: The product was in the wrong compartment, detergent ran into the load during pre-wash, or all compartments match the guide but dispensing still fails.
Next step: Use the model-specific drawer instructions and stop using the washer if the drawer leaks, remains full, or cannot be seated without force.
Why this matters
Why: A compartment or pre-wash mismatch can explain an apparently empty or full cup without a failed part. A correctly loaded drawer with repeated failure needs a flush-path or service diagnosis.
-
Check 7
Prepare service information: complete model, front-load or top-load type, product and amount, cycle and stage, affected compartment, water-flow observation, cleaning result, and any leak or error indication.
Expected result: The symptom is repeatable in one compartment, across all compartments, or only with a particular product or cycle.
Next step: Keep the washer off if there is leakage, electrical exposure, or continuing failure, and arrange qualified Speed Queen service.
Why this matters
Why: This sequence helps a technician separate a user-facing dispenser issue from water supply, inlet valve, control, or internal flush-path work without unsafe disassembly.
Use your observations
Decision map
Find the observation that best matches what you see, then follow the next safe action.
-
PATH 01Next step
What you see
Only one drawer compartment or cup remains full, while another compartment receives water and there is no leak.
Do this next
Clean and reinstall the user-removable dispenser part according to the exact model guide, correct the product and amount, and request service if the same compartment fails again.
Why this path and its safety boundary
Why it matters: Residue, wrong product or amount, incorrect seating, cycle timing, or that compartment's flush path is more likely than a whole-washer water failure.
-
PATH 02Next step
What you see
Detergent and softener were mixed, a compartment is gummy, or product was poured above its maximum mark.
Do this next
Stop adding chemicals, clean the removable part only as directed, and never combine bleach, vinegar, detergent, softener, or other cleaners.
Why this path and its safety boundary
Why it matters: Residue, early release, staining, or a restricted flush path can prevent the expected dispense behavior.
-
PATH 03Next step
What you see
No dispenser compartment receives water, flow is weak, the washer fills slowly, or an external hose or inlet area leaks.
Do this next
Stop for a leak or water near electrical parts. Perform only external checks allowed by the model guide and arrange qualified service if flow does not recover.
Why this path and its safety boundary
Why it matters: Water supply, inlet screening, valve, control, or a leak may be preventing dispensing; the drawer alone is not the diagnosis.
-
PATH 04Next step
What you see
The product remains after the exact cycle's expected stage even though the dispenser is clean, correctly seated, and filled to the marked level.
Do this next
Do not open panels or run repeated chemical tests; keep the details and request qualified service.
Why this path and its safety boundary
Why it matters: A repeated clean-dispenser failure supports a water-flush, valve, control, or internal dispenser-path fault.
-
PATH 05Next step
What you see
There is standing water on the floor, water near the cord or controls, a burning smell, smoke, arcing, or repeated electrical tripping.
Do this next
Stop the washer, keep clear, and isolate power and water only from a safe, dry location; do not touch wet electrical parts or restart the machine. Arrange urgent qualified service.
Why this path and its safety boundary
Why it matters: This is a water, fire, or electrical safety condition rather than a dispenser adjustment.
Helpful context
Understand the symptom
Name the product and washer type
Not dispensing can mean different things. On a front-load Speed Queen washer, detergent, liquid bleach, fabric softener, and pre-wash detergent use separate drawer compartments. On a top-load model, bleach and fabric softener may use separate cups and may be released at a particular stage. A product left behind is evidence to record, not a reason to pour it into another compartment.
Clean residue without creating a chemical hazard
Residue can narrow the small passages that water uses to flush a drawer or cup. Follow the exact model guide to remove the drawer or cup, rinse it with warm water, and use a small soft brush where the guide permits. Do not mix products, combine bleach with vinegar or other cleaners, or use a sharp tool to force a passage open. Keep undiluted bleach off skin, clothing, and other compartments.
When a clean dispenser is not the whole diagnosis
If one compartment never receives water, if every product remains, or if the washer fills slowly, the cause may be water supply, inlet screens, a valve, a control command, or a model-specific flush path rather than the drawer itself. External observations are appropriate; internal water-valve and electrical work belong to qualified service.
Safety boundary
Stop conditions
- Stop for any water on the floor, water near the cord, outlet, controls, or other electrical parts; do not touch wet electrical equipment.
- Stop for a burning smell, smoke, arcing, a hot connection, repeated tripping, or a washer that continues filling or leaking.
- Do not mix bleach, vinegar, detergent, fabric softener, or other cleaners; do not apply a flame, use a sharp tool to force a passage, or pour chemicals into another compartment.
- Do not operate with panels or guards removed, reach into a moving washer, open internal valves or controls, or continue cycles after a repeated dispenser failure.
Only after diagnosis
Potential parts
- dispenser drawer or cup
Consider only if a qualified diagnosis finds a cracked, warped, missing, or non-seating user-replaceable dispenser part.
Confirm the complete model and exact dispenser style before selecting any part. - water inlet valve or inlet screen
Consider only if water does not reach one or more dispenser paths and qualified testing identifies the inlet side.
Water and electrical diagnosis and replacement require model-specific service information and qualified work. - dispenser water-control or flush-path component
Consider only if the dispenser is clean and seated but a qualified diagnosis finds an internal flush-path or control fault.
Do not infer fit or fault from a symptom alone; confirm the model and service diagnosis.
When checks do not resolve it
Need a professional?
Request qualified Speed Queen service when a clean, correctly seated dispenser still fails, no compartment receives water, flow is weak, the washer leaks, water reaches electrical parts, or the symptom returns across cycles. Seek urgent help for smoke, arcing, burning odor, or repeated electrical trips.
Common questions
FAQ
Why is my Speed Queen washer leaving detergent in the dispenser?
A dirty dispenser, wrong detergent form or amount, incorrect compartment, cycle timing, or weak water flush can all produce that symptom. Clean the user-removable dispenser as the exact model guide directs and stop for service if the compartment still receives no water.
Can I put detergent in the fabric-softener cup to make it dispense?
No. Keep detergent, softener, and bleach in their designated model-specific compartments. Mixing products can make residue gummy, damage fabric, or create a chemical hazard.
Why does fabric softener remain in a top-load Speed Queen cup?
Check the exact cycle stage, the cup seating, the fill mark, and residue. Speed Queen top-load guidance places softener release in a rinse stage; a clean, correctly seated cup that remains full after that stage needs qualified service.
When should I stop troubleshooting the dispenser?
Stop for a leak, water near electrical parts, burning odor, smoke, arcing, repeated tripping, or a washer that keeps filling. Also stop repeated tests when a clean dispenser still fails or no compartment receives water; arrange qualified service.
Read the exact guide
Official sources
- User's GuideSpeed Queen · Speed Queen top-load washer bleach and fabric-softener dispenser use, cycle timing, cleaning, and safety
- Stains on Clothes After Washing? What Causes Them and How to Get Them OutSpeed Queen · Speed Queen detergent and fabric-softener residue, dispensing, and product-amount guidance
- Tricks your washer or dryer might be playing on you (and how to solve them!)Speed Queen · Speed Queen washer detergent dispensing, residue, product-form, and service guidance
- Spring Cleaning Your Washing MachineSpeed Queen · Speed Queen front-load drawer and top-load fabric-softener dispenser cleaning
- User's GuideSpeed Queen · Speed Queen front-load washer dispenser compartments, products, cleaning, safety, and maintenance
Community feedback
Share a repair observation
Share a plain-text repair observation. Accepted observations are published automatically; this page may take a moment to update.