
On this page
Start here
Quick answer
Do not use a Viking oven whose door will not close and seal fully. With the oven off and completely cool, first remove only an obvious rack, pan, or food obstruction from the door path and check that the racks are fully seated. Then inspect the door frame, gasket, latch area, and both sides of the door for debris, distortion, a hinge that sits unevenly, or a gap that remains on one side. Viking manuals state that the gasket is essential to a tight seal and must not be rubbed, damaged, or moved; self-clean models can also keep the latch engaged until the oven reaches a safe temperature. Never force the door, bypass a latch, remove the door or hinges as a guess, or operate the oven with a gap. If the door is crooked, the glass or hinge is damaged, the latch stays engaged after the specified cool-down, or the problem returns after one safe obstruction check, arrange Viking-authorized or qualified appliance service.
Before you begin
Safety first
- This article supports cool-state visual inspection and correction of an obvious loose obstruction only. Do not remove the door, release hinges, bypass the latch, alter the gasket, open the control area, test gas, or operate the oven with an incomplete seal.
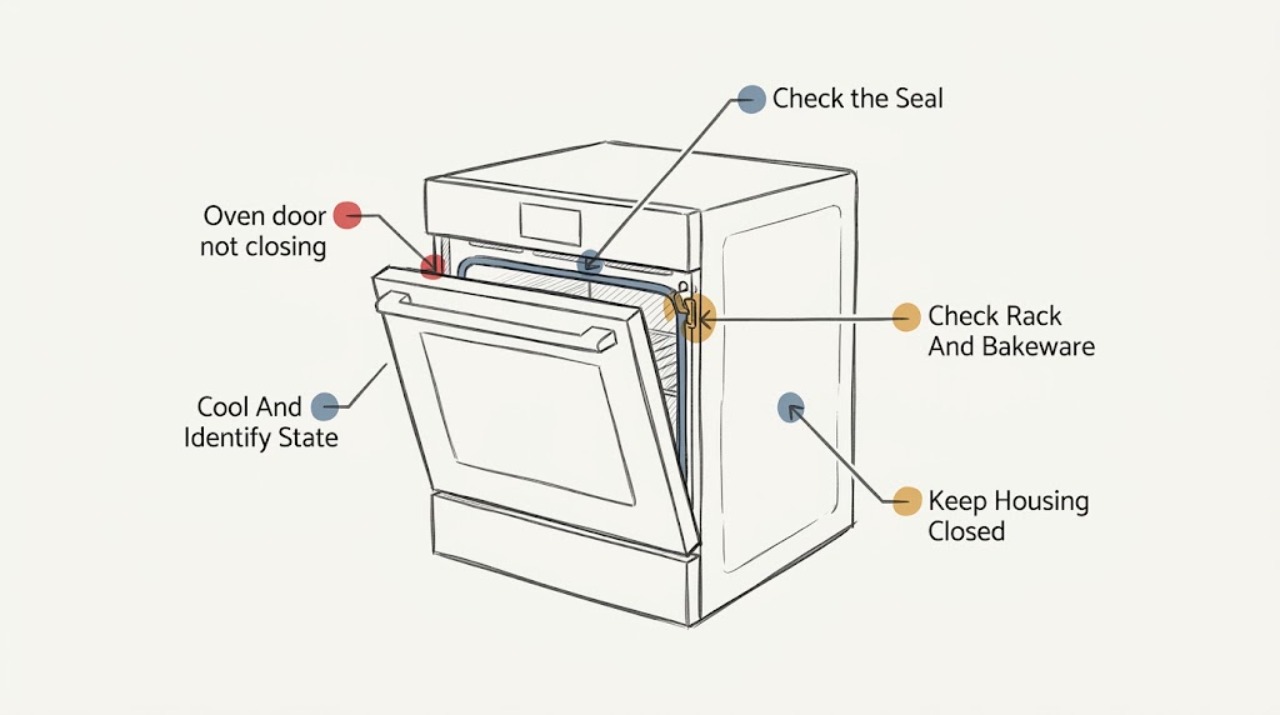
Work through in order
Diagnostic checks
Use only checks that match the exact appliance or system and its official guide.
-
Check 1
Turn every oven control to OFF and wait until the door, frame, glass, and nearby trim are cool; note whether the oven was cooking, cooling, or running self-clean when the door stopped closing.
Expected result: Record residual heat, steam, an active self-clean or lock indication, a power interruption, or any smoke, gas odor, or unusual heat; do not pull on a locked door.
Next step: If the door is cool and no emergency symptom is present, continue with a visual obstruction check; if a self-clean latch remains engaged, follow the exact Viking model instructions and request service if it does not release after the specified safe condition.
Stop if: Stop immediately for smoke, flames, a gas odor, a shattered or loose glass panel, an exposed wire, an oven that keeps heating, or a door or latch that moves suddenly.
Why this matters
Why: Heat and a self-clean latch can temporarily change door behavior, while smoke, gas odor, or abnormal heat is a safety event rather than a closure adjustment. A cool oven with a persistent gap points to an obstruction, seal, alignment, hinge, or latch issue.
-
Check 2
From the cool oven opening, check that every rack is fully inserted and level, that any roll-out rack is fully returned, and that no pan, foil, food, or stored item projects into the door path; remove only an obvious loose obstruction without forcing a rack or door.
Expected result: With the path clear, note whether the door closes evenly, stops at the same point, rubs one side, or still leaves a gap; record which rack or pan changed the result if anything was moved.
Next step: Restore only the rack and cookware arrangement allowed by the Viking manual and leave the oven unused if the door still does not close and seal fully.
Stop if: Do not bend a rack, force a roll-out mechanism, wedge the door shut, or operate the oven to see whether an open door changes heating.
Why this matters
Why: A changed result after correcting a rack or pan supports a simple obstruction. No change with a clear path shifts attention to the gasket, frame, latch, hinges, or door alignment; it does not justify pushing harder.
-
Check 3
With the oven cool, inspect the door frame, the mating cabinet frame, and the visible gasket around the perimeter using a light; look for dried food, foil, a pinched section, a tear, hardening, or a gasket pulled out of its channel, without rubbing or moving the gasket.
Expected result: Classify the path as clear and gasket even, blocked by loose residue, gasket visibly damaged or displaced, or impossible to judge without removing trim or parts.
Next step: Remove only loose surface residue with the model-approved cool cleaning method; leave a damaged, displaced, or inaccessible gasket for qualified service and do not run the oven while a gap remains.
Stop if: Do not pull, scrub aggressively, cut, glue, stretch, or replace the gasket by guesswork, and stop for hot surfaces, sharp glass, or a damaged frame.
Why this matters
Why: Loose residue can create a local closure obstruction. A damaged or displaced gasket can prevent a seal and needs model-specific service or replacement; an intact-looking gasket with a crooked door makes hinge or frame alignment more likely.
-
Check 4
From in front of the cool appliance, compare the left and right door edges, hinge positions, and gap to the control panel without lifting, pushing sideways, or touching a spring-loaded hinge.
Expected result: Record whether the door is level and centered, one corner hangs lower, the gap is uneven, a hinge is visibly bent or out of its seat, the frame is distorted, or the glass is cracked or loose.
Next step: Photograph the alignment and provide the model and serial information to Viking-authorized or qualified appliance service; keep the door closed or the oven isolated without forcing it.
Stop if: Do not remove the door, release hinge locks, loosen hinge fasteners, lift the door by its handle, or test a spring or hinge under load.
Why this matters
Why: An even door with a clear path supports a latch or gasket check. A lower corner, uneven gap, bent hinge, distorted frame, or damaged glass indicates alignment or structural repair beyond a safe user adjustment.
-
Check 5
Observe the latch area from the outside only, and compare the control display or indicator with the model manual; do not insert a tool into the latch or try to defeat it.
Expected result: Record whether the latch appears in its normal position, remains engaged after self-clean has ended and the oven is cool, is bent or obstructed, or is accompanied by a lock indication or error.
Next step: Follow one model-specific cool-down or cancellation procedure only when the manual authorizes it; if the latch does not release or the condition recurs, stop and request service with the exact indicator and model.
Stop if: Do not bypass, bend, hold, shim, or manually release the latch, and do not start self-clean or heating with a door that does not close and seal.
Why this matters
Why: A self-clean latch can remain engaged while the oven is hot. A latch that stays engaged when the model says it should release, or a visibly bent or obstructed latch, points to a control or latch fault and can prevent safe closure or operation.
-
Check 6
Use the cool-state, obstruction, gasket, alignment, latch, glass, and odor observations to decide whether the oven remains out of service and what information the technician needs.
Expected result: Choose a simple obstruction outcome only when the door now closes evenly and seals with no damage; choose appliance service for a persistent gap, crooked door, damaged gasket, hinge or frame issue, latch fault, recurring closure problem, or any gas, smoke, electrical, or heating abnormality.
Next step: Keep the oven unused and provide the model, serial information, photos, self-clean or power history, exact gap or rubbing location, and any odor, smoke, heat, or glass event to Viking-authorized or qualified appliance service.
Stop if: Stop all user checks when closure requires force, the oven can heat with a gap, the door will not stay shut, glass or hinge parts are damaged, or gas odor, smoke, fire, arcing, or repeated electrical tripping occurs.
Why this matters
Why: A door that closes once after an obstruction is removed may be usable only if the seal is even and the model instructions permit operation. A structural, latch, or safety symptom cannot be confirmed by repeated closing tests and needs qualified diagnosis.
Use your observations
Decision map
Find the observation that best matches what you see, then follow the next safe action.
-
PATH 01Safety boundary
What you see
The oven is cool, a loose rack, pan, foil, food, or surface residue was blocking the path, and the door now closes evenly without force or a visible gap.
Do this next
Restore the rack and cookware only as specified by the model manual, confirm the gasket is even and undamaged, and stop if the door rubs or the problem returns.
Why this path and its safety boundary
Why it matters: The immediate symptom is consistent with a closure obstruction, but the seal still needs a visual check before normal use.
Safety stop: Do not operate the oven if closure is incomplete, the gasket is displaced, or heat escapes at one side.
-
PATH 02Safety boundary
What you see
The racks and door path are clear, but the door remains crooked, rubs, leaves a gap, or will not latch evenly.
Do this next
Keep the oven out of service and request Viking-authorized or qualified appliance repair with photos and the model information.
Why this path and its safety boundary
Why it matters: A gasket, latch, hinge, door, or frame problem is more likely than a simple obstruction.
Safety stop: Do not force closure, remove the door, adjust hinges, or run a heating cycle as a test.
-
PATH 03Safety boundary
What you see
The door stopped closing or opening around self-clean, the lock indication remains, and the oven may still be hot.
Do this next
Leave controls OFF, keep clear of hot surfaces, and follow only the exact Viking manual's cool-down or cancellation instruction; request service if the latch remains engaged after the specified condition.
Why this path and its safety boundary
Why it matters: The latch may be performing its safety function until the oven reaches the model's safe release condition.
Safety stop: Do not pry, bypass, shim, or manually release the latch, and do not touch the door or vent until cool.
-
PATH 04Safety boundary
What you see
The glass is cracked or loose, a hinge is bent or displaced, the frame is distorted, the door drops, or a spring-like movement occurs.
Do this next
Keep people away, do not use the oven, and arrange qualified Viking appliance service; do not handle loose glass or hinge parts.
Why this path and its safety boundary
Why it matters: The door structure may be unsafe and cannot be confirmed by an ordinary closing test.
Safety stop: Do not lift by the handle, remove the door, release hinge hardware, tape over a crack, or operate with damaged structure.
-
PATH 05Safety boundary
What you see
A Viking gas or dual-fuel oven has a gas odor, delayed ignition, flame abnormality, smoke, fire, or unusual heat while the door is not closing.
Do this next
Do not operate controls or create an ignition source; leave the area and contact the local gas emergency service or fire service from a safe location, then arrange appliance repair after the area is declared safe.
Why this path and its safety boundary
Why it matters: This is an immediate gas or fire safety boundary, not a door-alignment problem.
Safety stop: Do not relight, repeatedly test, search for a leak, or continue using the appliance.
Helpful context
Understand the symptom
Keep the oven off until the door seals
A door that sits open, rubs, or leaves a visible gap can let heat escape and can expose the surrounding trim, floor, or controls to conditions they were not meant to handle. Turn the controls off and let the oven cool before looking closely. If the oven is in self-clean, the latch may be intentionally holding the door; wait for the model's normal release condition instead of pulling on it.
Start with the parts that can block closure
A rack that is not fully seated, a roll-out rack left extended, a baking tray that is too large, foil, or food residue on the frame can stop the door before a hinge or latch fault is proven. Check only from ordinary safe access while the cavity is cool. If the path is clear but one side hangs lower or the gasket is displaced, the next decision is professional alignment or repair, not more closing force.
Treat the gasket, glass, latch, and hinges as safety parts
The gasket provides the seal and should remain in its intended position. Look for a torn, pinched, hardened, or displaced section without rubbing or pulling it. A cracked window, bent latch, loose hinge, sudden crooked door, or spring-like movement is a stop signal. Door removal, hinge adjustment, electrical testing, and gas-appliance service require the exact Viking model procedure and qualified service.
Safety boundary
Stop conditions
- Do not use the oven if the door cannot close and seal evenly, remains open, rubs, or leaves a visible gap.
- Turn controls OFF and let the oven cool before inspection; do not touch hot glass, the vent, gasket, frame, or interior surfaces.
- Do not force the door, wedge it shut, bypass or shim the latch, release hinge hardware, remove the door, or perform electrical or gas testing.
- Do not rub, pull, cut, stretch, glue, or move the gasket, and do not use unapproved oven cleaner or foil to change the door fit.
- Stop for cracked or loose glass, a bent or displaced hinge, a distorted frame, a door that drops, sudden spring movement, smoke, flames, gas odor, arcing, repeated tripping, or an oven that continues heating.
- Keep children away and arrange qualified Viking appliance service when the latch remains engaged after the model-specific safe condition, the gap persists after one obstruction check, or the problem recurs.
Only after diagnosis
Potential parts
- oven door gasket
Consider this category only if the exact model's gasket is confirmed torn, hardened, displaced, or unable to seal after a qualified inspection.
Confirm the exact Viking model, gasket profile, mounting method, and manufacturer fit guidance; do not stretch, glue, or substitute a seal to correct alignment. - oven door latch assembly
Consider this category only if the exact model's latch is confirmed bent, stuck, or electrically or mechanically faulty after obstruction and safe-state checks.
Confirm the exact model and latch design with Viking-authorized or qualified service; do not bypass or manually defeat the interlock. - oven door hinge or hinge hardware
Consider this category only when qualified service confirms a bent, displaced, worn, or damaged hinge is causing the uneven gap or door drop.
Confirm the exact model, hinge side, spring or latch arrangement, and safe installation procedure; hinge work can release stored force and is not a user fit test.
When checks do not resolve it
Need a professional?
Arrange Viking-authorized or qualified appliance service when a clear cool door path does not restore an even seal, the door is crooked, the gasket is damaged or displaced, a latch stays engaged after the model-specific safe release condition, a hinge or frame is damaged, glass is cracked, or the problem returns. For gas odor, smoke, flames, delayed ignition, arcing, or continued heating, stop immediately, leave the area as appropriate, and use the relevant emergency safety service before arranging repair.
Safety scope: This article supports cool-state visual inspection and correction of an obvious loose obstruction only. Do not remove the door, release hinges, bypass the latch, alter the gasket, open the control area, test gas, or operate the oven with an incomplete seal.
Common questions
FAQ
Can I use a Viking oven if the door is slightly open?
No. Keep it off until the door closes and seals evenly. A gap can let heat escape and can expose surrounding parts to abnormal heat. First let the oven cool, check for an obvious loose rack or pan obstruction, and arrange service if the gap remains.
Why will my Viking oven door not close after self-clean?
The self-clean latch may remain engaged while the oven is hot and should release only after the model's safe condition. Leave controls off, wait according to the exact Viking manual, and do not pry or bypass the latch. If it remains engaged after that condition, request service.
Should I replace the Viking oven gasket myself?
Do not assume a gasket is the cause or stretch, glue, cut, or move it as a test. Viking states that the gasket is essential to a tight seal. Have the exact model and gasket arrangement confirmed when the seal is damaged or displaced.
What if one side of the Viking oven door is lower?
A lower corner or uneven gap suggests hinge, door, or frame alignment rather than a simple obstruction. Do not lift by the handle, release hinge hardware, or force the door. Keep the oven unused and arrange qualified appliance service.
What should I do if a gas Viking oven smells while the door will not close?
Do not operate the oven, create an ignition source, relight it, or test for a leak. Leave the area as appropriate and contact local gas emergency or fire services from a safe location. Arrange appliance repair only after the area is safe.
Read the exact guide
Official sources
- Specifications and DocumentationViking Range, LLC · Official Viking documentation index used to identify the need to match instructions to the exact model and fuel configuration.
- Recipe for Safer CookingU.S. Consumer Product Safety Commission · General U.S. cooking-fire safety guidance used only for the emergency fire boundary; it does not diagnose or repair a Viking door.
- 30"W. Self-Cleaning Gas RangeViking Range, LLC · Official product page for the RVGR3302 gas range family; it is used only to keep gas-versus-electric applicability explicit, not to generalize a model-specific door mechanism.
- Use & Care Manual — Professional Built-In Electric Single and Double OvensViking Range, LLC · Official Viking manual for the listed VSOE, VDOE, VSOF7301, and VDOF7301 electric oven families; other Viking models may differ and require their own manual.
Community feedback
Share a repair observation
Share a plain-text repair observation. Accepted observations are published automatically; this page may take a moment to update.