
On this page
Start here
Quick answer
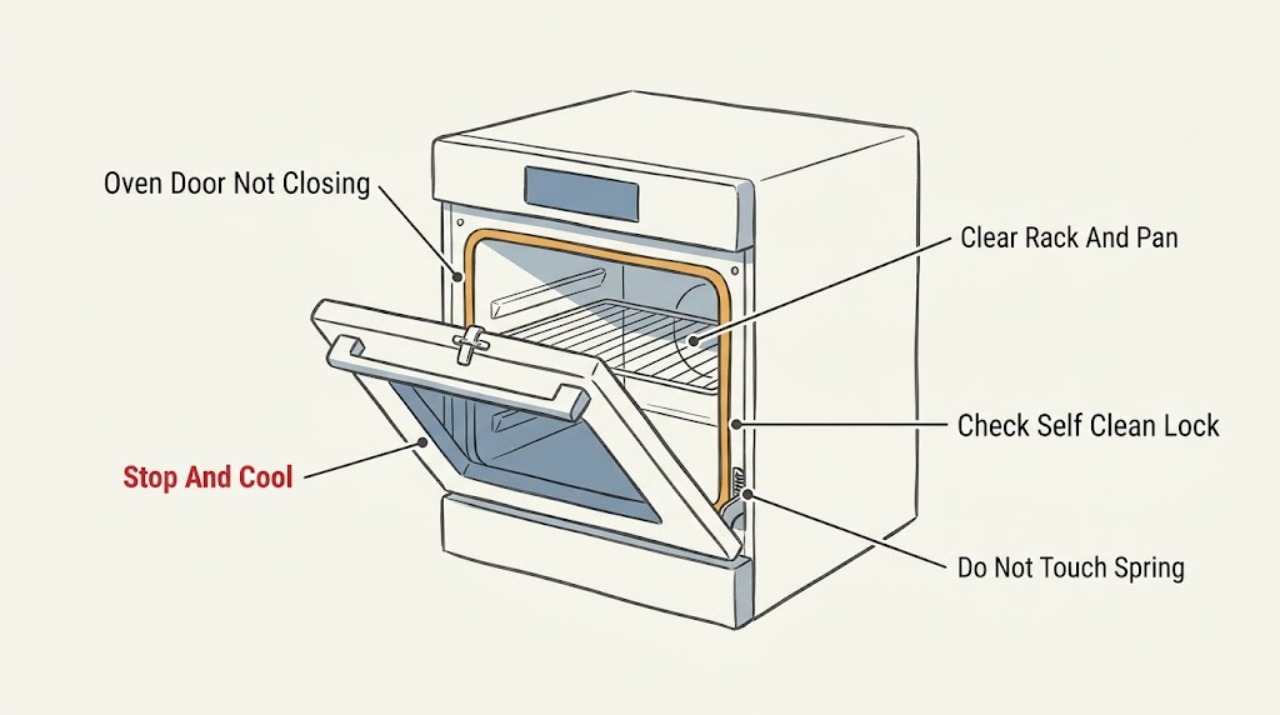
Do not run a KitchenAid oven with a door that stays open, sits crooked, or needs force to latch. Let it cool, then remove only an accessible rack, pan, or food item that is blocking the opening and check that the racks are fully seated. With the oven still off, inspect the gasket and the visible latch area for residue or damage, and compare both sides of the door for alignment. A self-clean lock that has not released, a bent latch, a loose or uneven hinge, a torn gasket, or a door that still will not close needs model-specific service rather than a forced closure or door removal.
Before you begin
Safety first
- This article supports cooling, clearing accessible obstructions, checking the model-specific lock state, and observing visible gasket, latch, hinge, and alignment symptoms only. A qualified professional should handle door removal, spring hinges, internal latches, wiring, gas components, damaged glass, and frame repair.
Work through in order
Diagnostic checks
Use only checks that match the exact appliance or system and its official guide.
-
Check 1
Stop using the KitchenAid oven, keep the door in its present safe position, and let the cavity, glass, racks, and cookware cool before touching the opening; if smoke, a gas odor, cracked glass, a falling door, or a pinch hazard is present, use the emergency or service branch.
Expected result: Record whether the door is hot, whether glass or the frame is cracked, whether there is smoke or an unusual burning smell, whether a gas-model oven has a gas odor, and whether the door is loose, sagging, or able to move unexpectedly.
Next step: For smoke or gas odor, leave the area and contact local emergency or gas help from a safe location; otherwise continue only after the appliance is cool and safe to inspect externally.
Stop if: Do not restart the oven, operate a switch near a gas odor, touch cracked hot glass, or keep testing a door that can fall or trap fingers.
Why this matters
Why: Heat, smoke, gas odor, damaged glass, or unstable hardware is a safety boundary rather than a normal closure adjustment.
-
Check 2
With the oven cool, open the door normally and remove only an accessible pan, foil, food item, or rack that is visibly projecting into the door path; reseat each rack fully without leaning on the door or forcing it.
Expected result: Check whether a rack is partly extended, a roll-out rack is not fully home, a pan is too large or too far forward, or food residue is caught at the sill; then see whether the empty, cool door meets the frame evenly.
Next step: If the door closes normally when the cavity is correctly loaded, keep bakeware within the model manual's clearance guidance; if it still will not close, leave the oven unused and continue with the external hardware checks.
Stop if: Do not bend a rack, pry a pan free, use the door as a lever, or run the oven while the door cannot close fully.
Why this matters
Why: A clear change after removing a projecting item supports an obstruction, while an unchanged gap with a clear cavity points toward the latch, gasket, hinge, or alignment.
-
Check 3
With the oven cool and the cavity clear, check the display and the visible lock control for an active self-clean or door-lock state, then follow only the exact KitchenAid model manual to cancel or wait for that state to release.
Expected result: Note whether a lock indicator or self-clean cycle is active, whether the lock control is visibly out of its normal position, or whether no lock state is shown while the door remains mechanically blocked.
Next step: If the manual-approved release completes and the cool door closes normally, do not use self-clean again until its door-lock behavior is understood; if the lock remains engaged or looks damaged, arrange service.
Stop if: Do not force the latch, bypass a door interlock, insert tools into the lock, or start self-clean to test a door that is not closed.
Why this matters
Why: A deliberate self-clean lock is a control state, whereas a lock arm that is bent, bowed, or left in the door path is a hardware problem; they require different next steps.
-
Check 4
With the door open and the appliance cool, inspect the gasket, frame, sill, and visible latch area using a light; remove only loose surface residue with a soft, non-abrasive method allowed by the manual and do not reshape any metal part.
Expected result: Look for a torn, displaced, hardened, or folded gasket; food or cleaner residue on the mating surfaces; and a latch arm above the gasket that is bent, bowed, or sitting in the door path.
Next step: If residue was the only obstruction, let the area dry and make one gentle closure check; if the gasket or latch is damaged, keep the oven off and provide photographs and the model number to service.
Stop if: Do not bend the latch, cut or glue the gasket, spray cleaner into the lock, or open the control or door assembly.
Why this matters
Why: A clean, seated gasket and unobstructed latch make a hinge or alignment issue more likely; visible damage means the door should not be forced or used.
-
Check 5
Compare the left and right door edges, the gap to the frame, and the hinge positions without lifting, removing, or disassembling the door; gently observe whether the door is square and supported when it moves through its normal range.
Expected result: Classify the door as even and supported, visibly crooked, hanging lower on one side, unable to reach the latch, or showing a hinge that is not fully seated or is visibly bent.
Next step: If the door is crooked, loose, or has a visible hinge defect, stop and arrange model-specific appliance service; if it is even but still will not latch, include the latch and gasket observations in the service request.
Stop if: Do not remove the door, compress a spring hinge, loosen hinge fasteners, or support the door by its handle; those jobs require the exact manual and qualified service.
Why this matters
Why: A one-sided gap, loose hinge, or visible misalignment indicates a door-installation or hardware issue, not a rack problem; a normal alignment with a persistent closure gap may point to the latch or seal.
-
Check 6
After the cool cavity is clear and no hazard or damage is present, make one gentle closure check using the normal handle path and confirm that the door meets the gasket evenly without force; do not start a cooking or self-clean cycle unless the manual-required closure is restored.
Expected result: Record whether the door closes and latches evenly, closes only with pressure, springs back open, leaves a visible gap, or remains blocked despite the cavity and visible surfaces being clear.
Next step: If it still does not close fully, keep the oven out of service and arrange KitchenAid appliance repair with the model, oven type, lock state, obstruction check, gasket condition, and alignment symptoms.
Stop if: Do not tape the door shut, run with a gap, force the handle, bypass the latch, or continue testing after any smoke, gas odor, cracking, pinching, or electrical problem.
Why this matters
Why: A normal cool closure supports a loading or control-state correction; persistent resistance, a gap, or a damaged component requires diagnosis before heat is applied.
Use your observations
Decision map
Find the observation that best matches what you see, then follow the next safe action.
-
PATH 01Safety boundary
What you see
The oven is hot, the glass or frame is cracked, the door is unstable, smoke or a burning odor is present, or a gas-model oven smells of gas.
Do this next
Stop use; for smoke or gas odor leave the area and seek emergency help from a safe location, and for damage or instability arrange qualified appliance service after the appliance is safe.
Why this path and its safety boundary
Why it matters: The immediate concern is burn, fire, glass, pinch, or gas safety rather than door adjustment.
Safety stop: Do not operate switches near a gas odor, touch damaged hot glass, or attempt to hold or repair the door.
-
PATH 02Safety boundary
What you see
A rack, roll-out rack, pan, foil, food item, or residue is visibly stopping the door, and the door closes evenly after the accessible obstruction is corrected.
Do this next
Use the correct rack position and bakeware clearance from the model manual; do not operate if the door becomes blocked again.
Why this path and its safety boundary
Why it matters: The symptom is consistent with a loading or surface obstruction, not proof of a failed part.
Safety stop: Do not force a pan or rack or use the oven with the door partly open.
-
PATH 03Safety boundary
What you see
A self-clean or door-lock indicator is active, or the visible lock control has not returned to its normal state.
Do this next
Follow the exact KitchenAid manual for cancellation or cooling; arrange service if the lock does not release or the latch appears bent.
Why this path and its safety boundary
Why it matters: The oven may be intentionally preventing normal movement; the correct release is model-specific.
Safety stop: Do not pry, bypass, or force the lock and do not run self-clean to reproduce the closure problem.
-
PATH 04Safety boundary
What you see
The cavity is clear but the gasket is displaced or damaged, residue remains on the mating surfaces, or the latch arm is visibly bent or in the door path.
Do this next
Only clean accessible residue if the manual allows it; keep the oven off and arrange service for a damaged gasket or latch.
Why this path and its safety boundary
Why it matters: The closure fault is at the seal or latch interface and cannot be safely corrected by applying more force.
Safety stop: Do not reshape metal, cut or glue the gasket, or open the door or control assembly.
-
PATH 05Safety boundary
What you see
The door is crooked, hangs lower on one side, has a visible hinge defect, or leaves an uneven gap after the cavity is clear.
Do this next
Keep the oven unused and arrange model-specific appliance service; report which side is low and whether the issue began after cleaning, impact, or door work.
Why this path and its safety boundary
Why it matters: A hinge seating, door installation, or alignment problem is more likely than an obstruction.
Safety stop: Do not lift the door off, compress a hinge spring, loosen fasteners, or use the handle to realign it.
-
PATH 06Safety boundary
What you see
The cool cavity is clear, no lock state is active, the gasket and latch look normal, but the door still will not close and latch evenly.
Do this next
Keep the KitchenAid oven out of service and arrange qualified appliance repair with the exact model and the recorded closure observations.
Why this path and its safety boundary
Why it matters: An internal hinge, latch, seal, frame, or door-support fault remains possible and cannot be identified safely from the symptom alone.
Safety stop: Do not run a heat cycle with a gap or try to prove the fault by forcing the door.
Helpful context
Understand the symptom
Keep an unclosed door out of service
An oven door that does not meet the frame can release heat and may leave the latch, hinge, or gasket under abnormal load. Do not hold it shut with an object, press hard on the handle, start cooking to see whether it improves, or use self-clean while the door is not correctly closed. If the glass is cracked, the door is hot, smoke or a burning odor is present, a gas model smells of gas, or the door can fall or pinch fingers, step back and arrange qualified help after the appliance is safe.
A rack or pan is a different fault from a crooked door
A rack that is not fully seated or a pan that extends too far forward can stop the door before it reaches the gasket. That is a low-risk external obstruction check when the oven is cool. If the door remains uneven after the cavity is clear, stop treating it as a loading problem: the visible latch, gasket, hinge seating, or door alignment now determines the service path.
Self-clean and door hardware need model-specific handling
Some KitchenAid ovens use a lock lever or motorized lock for self-clean. A lock that is still engaged can keep the door from closing or opening normally, but the correct release timing and control sequence depend on the model. Do not force the latch, bypass an interlock, or remove the door to reach a hinge unless the exact owner manual and a qualified technician establish that procedure.
Safety boundary
Stop conditions
- Stop immediately for gas odor, smoke, flame, a strong burning smell, cracked or shattered glass, or an unstable door.
- Do not operate the oven if the door cannot close and latch fully, if it springs open, or if it requires force or a prop to stay shut.
- Do not force, pry, bypass, or reshape a latch or hinge, and do not remove the door or open an internal panel as a household check.
- Do not run self-clean when the door or lock state is abnormal; use the exact model manual and qualified service for a lock that will not release.
- Stop after safe external checks if a gasket, hinge, frame, latch, or alignment defect remains; arrange appliance service before reuse.
Only after diagnosis
Potential parts
- oven door gasket
Consider this category only if inspection confirms that the gasket is torn, displaced, hardened, or otherwise unable to seal and a qualified diagnosis identifies it as the cause.
Confirm the exact KitchenAid model and the manual's fitment before ordering; do not use a substitute or operate with a damaged seal. - oven door hinge or latch assembly
Consider this category only after a technician confirms a bent, loose, unseated, or failed hinge or latch; a door that does not close does not identify one part by itself.
Confirm the exact model and professional diagnosis; spring-loaded hinges, locks, and door assemblies require the model procedure and safe handling.
When checks do not resolve it
Need a professional?
Arrange qualified KitchenAid appliance service when the door remains crooked or unlatched after the cool cavity and rack checks, when a latch or hinge is bent or loose, when the gasket is damaged, when a self-clean lock will not release, or when door removal or internal access would be needed. Give the technician the model number, oven type, whether self-clean was recently used, the obstruction result, which side is misaligned, and any visible gasket or latch damage.
Safety scope: This article supports cooling, clearing accessible obstructions, checking the model-specific lock state, and observing visible gasket, latch, hinge, and alignment symptoms only. A qualified professional should handle door removal, spring hinges, internal latches, wiring, gas components, damaged glass, and frame repair.
Common questions
FAQ
Can I use a KitchenAid oven if the door will not close completely?
No. Keep it off until the door closes and latches evenly without force. Let it cool, clear an accessible rack or pan, and use the exact manual for any lock state; a persistent gap or damaged hardware needs service.
Could an oven rack or pan stop the door from closing?
Yes. A rack that is not fully seated, a roll-out rack left forward, or bakeware that is too large or too far forward can block closure. Check only when cool and do not force the rack or pan.
Why will my KitchenAid oven door not close after self-clean?
A self-clean or door-lock state may still be active, or the latch may not be in its normal position. Follow the exact model manual for release timing and controls. Do not pry or bypass the lock; arrange service if it stays engaged or looks bent.
How do I know whether the hinge is causing the closure problem?
With the oven cool, compare both sides of the door. A one-sided gap, a sagging or crooked door, a visible hinge defect, or a door that does not reach the latch after the cavity is clear points to alignment or hinge service. Do not remove the door or compress a spring hinge yourself.
Should I replace the KitchenAid oven gasket myself?
Treat a gasket as a conditional part, not the diagnosis. Inspect for a tear or displacement only when the oven is cool, then confirm the exact model and procedure. If the door is also crooked, the latch is bent, or the seal is retained by door hardware, use qualified service.
Read the exact guide
Official sources
- Oven Door Not Aligned - Range - Product Help | WhirlpoolWhirlpool Corporation · Official manufacturer alignment guidance; exact KitchenAid model door construction and service instructions control.
- Oven Door is Not Closing - Checking the Latch - Product Help | WhirlpoolWhirlpool Corporation · Official manufacturer latch guidance; it supports an external visual check only and does not replace the exact KitchenAid manual.
- Oven Door Won't Close - Wall Oven - Product Help | WhirlpoolWhirlpool Corporation · Official manufacturer Product Help guidance for compatible wall-oven door closure behavior; model instructions control.
- Oven Not Heating Up: Possible Causes and Fixes | KitchenAidKitchenAid · Official KitchenAid major-appliance guidance; exact model manual controls when features differ.
- KitchenAid Electric Built-In Oven Owner's ManualKitchenAid · Official KitchenAid owner manual example; users must use the manual for their exact model because lock and door procedures vary.
Community feedback
Share a repair observation
Share a plain-text repair observation. Accepted observations are published automatically; this page may take a moment to update.